
Step-by-Step Guide on How to Use a Countersink Drill Bit
This post contains affiliate links. As an Amazon Associate, we earn from qualifying purchases.
To use a countersink drill bit, you match the bit’s included angle to your screw head, 82° for inch-series flat heads, 90° for metric, and cut the conical recess to the screw’s head diameter plus 0.005–0.010 inches. The head sits flush when the countersink depth equals the screw head’s height. Drill the pilot hole first, then the countersink, at a slow speed to prevent chatter and burning.
That extra five to ten thousandths of an inch is the difference between a screw that catches your finger and one that disappears. Get it right, and the fastener head vanishes into the surface. Get the angle wrong, and the screw either sits proud or bottoms out before the head clamps, leaving a gap that cracks the workpiece under load.
What follows: how to pick the right angle, the three types of bits that actually work, and the one drill speed that ruins the job before you even feel the heat.
Key Takeaways
- The screw head’s angle dictates the bit angle. Inch-series flat head screws (ASME B18.3) use an 82° countersink. Metric flat heads (DIN 7991) use a 90° countersink. Mixing them guarantees a bad fit.
- For flush seating, the countersink diameter must be the screw head’s maximum diameter plus 0.005–0.010 inches. The depth must match the head’s height.
- High drill speed causes chatter, a ragged, chewed-up hole edge. Run the bit slow, especially in softwood or metal.
- A combination drill-countersink does the pilot hole and countersink in one pass, but only for specific screw sizes. A separate fluted or cross-hole countersink gives you control for custom work.
- The cheapest fluted countersink is the best tool for deburring freshly drilled holes in metal. Keep one in your metalworking kit.
The 82° vs 90° Angle You Can’t Guess
You don’t choose the angle. The screw does.
ISO 4205:2016 and ASME B18.3 are not suggestions. They are the printed specs that decide whether your fastener sits flush or fails. The first tells you what a 90° countersink bit should measure; the second locks in the 82° angle for inch-series flat head screws.
An 82° included angle is the standard for inch-series flat head socket cap screws governed by ASME B18.3. A 90° included angle is the standard for metric flat head socket cap screws per DIN 7991 / ISO 10642. That 8-degree difference isn’t a rounding error.
Where this goes sideways: Putting a metric 90° screw into an 82° inch countersink. The screw head bottoms out in the cone before the perimeter makes contact. The clamping force concentrates on a tiny ring at the tip of the screw head, which can crack the surrounding material within a few tightening cycles.
The reverse, an 82° inch screw in a 90° metric hole, leaves the head protruding. It snags, looks unfinished, and defeats the purpose.
| Fastener Standard | Countersink Angle (Included) | Common Use |
|---|---|---|
| ASME B18.3 (Inch series) | 82° | US-made machinery, woodworking, legacy automotive |
| DIN 7991 / ISO 10642 (Metric) | 90° | European machinery, aerospace, modern automotive, electronics |
| ISO 4205:2016 | 90° (for tools) | Defines dimensions for 90° countersink bits with parallel shanks |
Your job is to read the fastener spec or measure a sample screw with a protractor. Don’t guess.
How to Countersink Step-by-Step
The process is straightforward, but the tolerances are tight. Skip a step, and the screw tells you immediately.
Before you start: Unplug your drill or remove the battery. A spinning countersink bit is unforgiving, it will grab and skate across your workpiece, leaving a gouge you can’t sand out. Secure the workpiece in a vise or with clamps. Wear safety glasses; the chips are sharp.
- Drill the pilot hole. Use a drill bit sized for the screw’s shank, not its threads. For a #8 wood screw, that’s a ⅛-inch bit. For an M4 machine screw, drill a 4.5 mm hole. This hole guides the screw and prevents the wood from splitting.
- Select the correct countersink bit. Match the angle (82° or 90°) to your screw. Then match the bit’s maximum cutting diameter to the screw head’s diameter. A bit that’s too small won’t cut a wide enough recess.
- Set the depth. If your bit has an adjustable stop collar, set it. For a flush fit, the depth should equal the height of the screw head. You can mark the bit with tape as a visual guide. Test on a scrap piece of the same material.
- Chuck the bit and set a slow speed. Countersinks cut with a shearing action, not a drilling action. High RPMs generate heat, melt plastic, burn wood, and cause the bit to chatter. For a standard cordless drill, start at the slowest clutch setting. For a drill press, 500–800 RPM is a good starting point.
- Align and plunge. Place the bit’s pilot tip into the pre-drilled hole. Hold the drill perfectly perpendicular to the surface. Apply steady, moderate pressure and start the drill. Let the flutes do the cutting, don’t force it.
- Clear chips and check. After a second or two, pull the bit out to clear wood or metal chips. This keeps the cut clean and prevents overheating. Test the screw fit. The head should sit flush or slightly below the surface without wobbling.
- Deburr (optional but recommended). A light second pass with the countersink can clean up any raised edges or burrs around the hole’s rim, especially in metal.
I won’t use a combination drill-countersink for final assembly. The pilot bit can wander in existing holes, and the depth is harder to control precisely. They’re fantastic for quick jigs and rough framing, but for furniture or metalwork, I keep the operations separate.
The Right Bit for the Job
Not all countersinks are created equal. The right one removes material cleanly and lasts.
Fluted countersinks are the classic choice. They have cutting edges machined into the cone, usually in an odd number like one or five to reduce vibration. They’re inexpensive and work for both wood and soft metals. The downside? The flutes can clog in gummy woods like pine.
Cross-hole countersinks have a hole drilled through the cone at an angle. The trailing edge of this hole acts as the cutting edge. They eject chips aggressively, which makes them excellent for deep countersinks in aluminum or plastic where heat buildup is a problem. They cost more, but they cut smoother.
Combination drill-countersinks are a pilot bit wrapped by a fluted countersink. You drill and countersink in one shot. The DEWALT DW2531 or the Irwin Tools 3118004 sets cover common screw sizes (#6, #8, #10). They’re fast. They’re also inflexible, each bit is matched to a specific screw size, and the pilot bit is often too aggressive for hardwoods, causing blow-out.
| Bit Type | Best For | Drawback |
|---|---|---|
| Fluted Countersink | General woodworking, occasional metal deburring | Can clog in softwoods; requires a pre-drilled pilot hole |
| Cross-Hole Countersink | Aluminum, plastic, deep holes | Higher cost; still requires a pilot hole |
| Combination Drill-Countersink | Speed, production work, framing | Limited to specific screw sizes; pilot can cause tear-out |
For metal, you need a bit made for it. A standard HSS fluted bit will work for a few holes in mild steel, but it’ll dull fast. Cobalt or carbide-tipped countersinks are the right choice. The Neiko 10193A 5-piece cobalt set handles most shop metals. For deburring, simply removing the sharp edge from a drilled hole, the cheapest fluted bit you own is perfect. Keep it with your metal drill bits.
Speed, Pressure, and the Chatter Problem
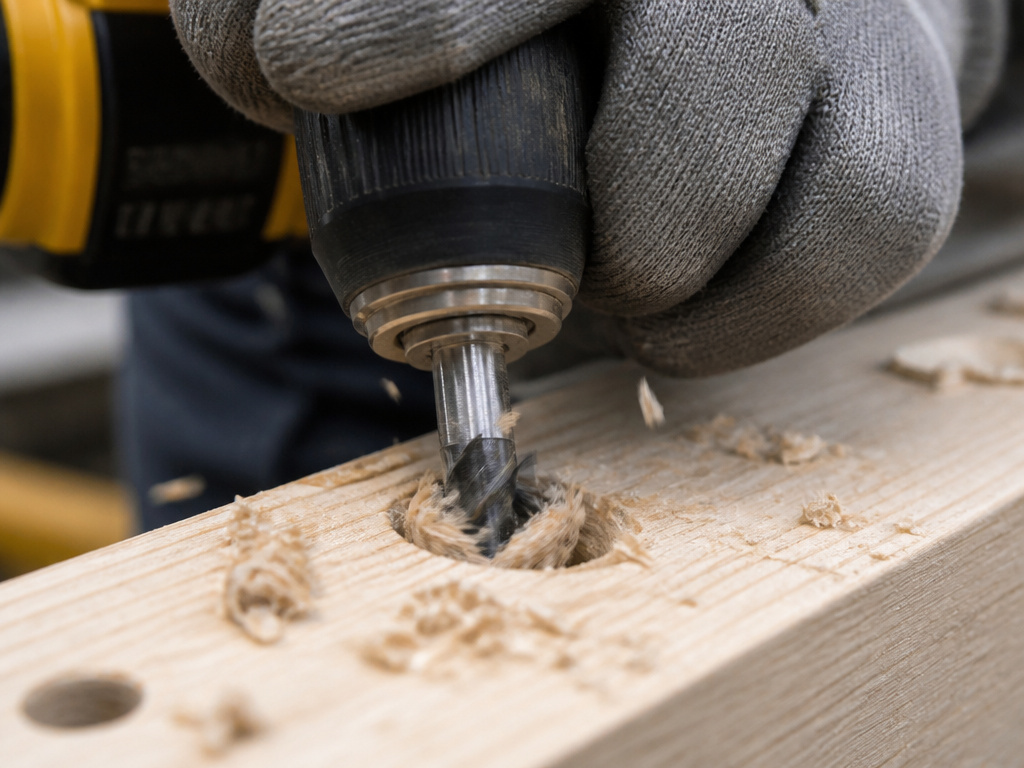 Chatter is the sound of the bit bouncing. You’ll hear a rhythmic brrrrr-brrrrr-brrrrr and feel the drill vibrate in your hand. The result is a torn, wavy surface inside the countersink that looks chewed up.
Common mistake: Running the drill too fast. In softwood, high speed melts the sap, which gums up the flutes. In metal, it work-hardens the surface, making it tougher to cut. The bit skips instead of shears.
The fix is counterintuitive: slow down and press harder. More downward pressure keeps the bit engaged in the cut. If you’re using a cordless drill, use the low-speed/high-torque setting. On a drill press, start at 500 RPM for a ½-inch bit in steel. For wood, you can go a bit faster, maybe 1200 RPM, but if you see burn marks or smell burning wood, you’re still too fast.
Softwoods like pine and cedar are the worst for chatter. The material gives way, then springs back, creating a harmonic bounce. A sharp bit and a firm, consistent feed rate are the only solutions.
Measuring for a Perfect Flush Fit
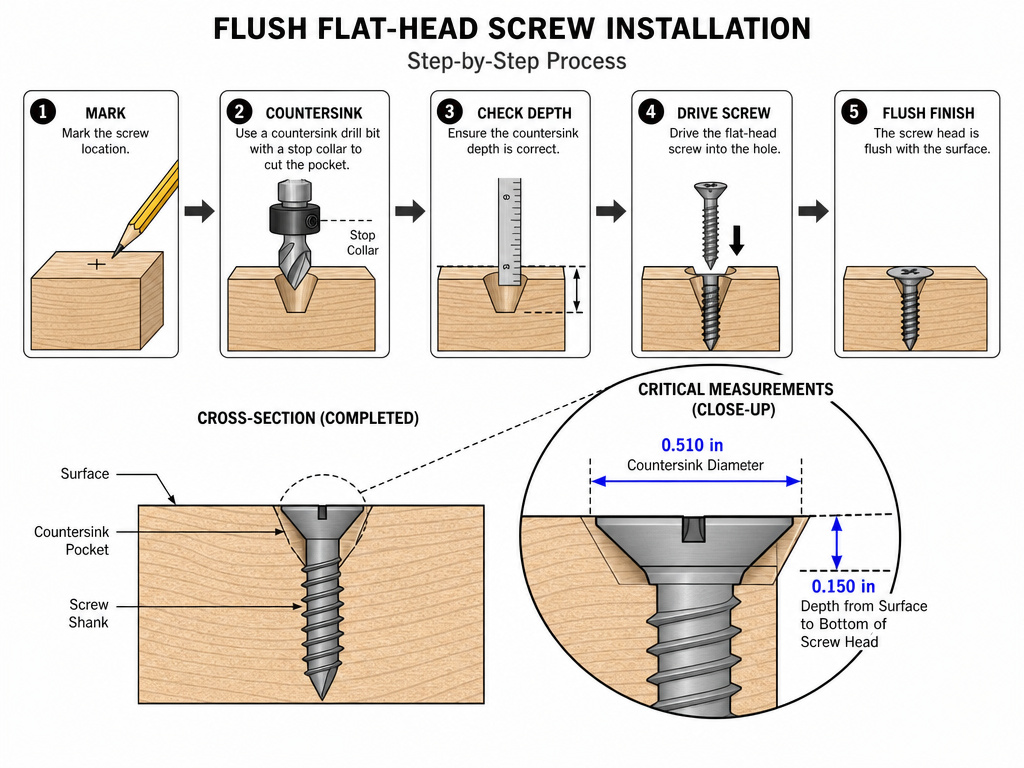 “Flush” means the screw head’s face is even with the workpiece surface. “Recessed” means it’s below. You control both with diameter and depth.
The rule for diameter is simple: the countersink’s wide opening must be slightly larger than the screw head’s widest point. Engineers specify the head’s maximum diameter plus 0.005–0.010 inches for a clean fit. In the shop, that means if your #10 flat head screw has a 0.500-inch head, your countersink should cut a hole about 0.505 to 0.510 inches across.
Depth is about the screw head’s height. A standard ½-inch flat head screw might have a head that’s 0.150 inches tall. Your countersink must be exactly that deep. Too shallow, and the head sticks up. Too deep, and you lose clamping force, the screw threads pull the material down into an empty space.
| Screw Size (Inch) | Pilot Hole Diameter | Countersink Diameter (82°) | Approx. Head Height |
|---|---|---|---|
| #6 | 5/27 in (~0.185 in) | 11/32 in (0.344 in) | 0.110 in |
| #8 | 11/64 in (0.172 in) | 13/32 in (0.406 in) | 0.135 in |
| #10 | 3/16 in (0.188 in) | 1/2 in (0.500 in) | 0.150 in |
The easiest way to set depth is with a stop collar on your countersink bit. Slide the collar down the shank, lock it with the set screw, and you’re set for repeat holes. No collar? Wrap a piece of masking tape around the shank at the correct height. When the tape hits the workpiece, you’re at depth.
When a Countersink Isn’t the Answer
A countersink makes a conical hole. A counterbore makes a cylindrical hole with a flat bottom, usually to sink a bolt head and nut or to install a wooden plug. If you need a flat surface for a washer or want to hide the fastener completely with a plug, you counterbore.
The drill bit sequence changes: drill the pilot hole, then use a Forstner bit or a dedicated counterbore bit to drill the wider, flat-bottomed recess, and finally drill the countersink inside the counterbore for the screw head’s angle. It’s a three-step process.
This is where a combination drill-countersink fails. It can’t counterbore. For a clean, hidden fastener like in a wooden bench, you need separate bits and a drill press for control.
Frequently Asked Questions
What’s the difference between a countersink and a counterbore?
Countersink cuts a conical recess for a flat-head screw. A counterbore drills a cylindrical pocket with a flat bottom, often for a bolt head and washer or to seat a wooden plug over the fastener. You sometimes countersink inside a counterbore.
Can I use a regular drill bit as a countersink?
No. A standard twist drill bit has a 118° or 135° point angle, not the 82° or 90° needed for a screw head. It will cut a hole, but the screw will not seat correctly, it will either rock or sit proud. You need a proper countersink bit.
Why does my countersink bit keep jumping out of the hole?
You’re likely trying to start the cut without a pilot hole. The bit’s center point needs that hole to guide it. Always drill the pilot hole first. If you have a pilot and it still jumps, your drill speed is too high, or you’re not holding the drill perpendicular to the work surface.
How do I sharpen a dull countersink bit?
For a fluted bit, use a small diamond file or an Arkansas stone. Match the file to the existing angle of each flute, and give it a few light strokes. Don’t try to reshape it. For a cross-hole or carbide bit, replacement is more cost-effective than professional sharpening for most DIYers.
Is there a universal countersink angle?
No. While 82° and 90° cover the vast majority of flat-head screws, other angles exist. 60° is common in sheet metal, 100° and 120° are used in aerospace for specific rivets. Always match the bit to the fastener called out on the print or in the hardware spec.
Before You Go
Match the angle first. An 82° bit for inch screws, a 90° bit for metric. That single choice determines whether the joint holds or the wood cracks. Drill the pilot hole, then the cone, and keep the speed low to avoid chatter. For metal, grab a cheap fluted bit and use it only for deburring, it’ll stay sharp for years. And when you need a bolt head to disappear completely, remember that a counterbore comes before the countersink bit, not instead of it.
