
The Correct Way to Drill Through Fiberglass Without Damage
This post contains affiliate links. As an Amazon Associate, we earn from qualifying purchases.
To drill through fiberglass, you need the right bit, the right speed, and the knowledge that the hole will finish 0.002″ to 0.004″ undersize. Use a sharp brad-point or carbide-tipped drill bit, run it at hardwood speeds (1,000–3,000 RPM for a 1/4″ bit), and always support the backside with a wood block to prevent breakout. Force dulls the tool and cracks the laminate.
The undersize tolerance is printed in the Strongwell Fabrication and Repair Manual because fiberglass reinforced polymer (FRP) doesn’t compress like wood or deform like metal; it abrades.The glass fibers spring back slightly after the bit passes, pinching the fastener. Get the speed or pressure wrong, and you’ll fray the edges, burn the resin, and dull a brand-new bit in a dozen holes.
What follows is the mechanics behind that clean hole: why FRP eats tools, how to match drill speed to thickness, and the two factory-approved methods for fixing a hole you drilled in the wrong spot.
Key Takeaways
- FRP is brutally abrasive. Standard high-speed steel (HSS) bits work but need sharpening after 20–30 holes; carbide-tipped bits last 5–10 times longer.
- Drill speed is critical. For a 1/4″ bit, target 1,000–3,000 RPM, the thicker the material, the slower you go. Excessive speed generates heat that softens the resin and causes breakout.
- Holes finish 0.002″–0.004″ undersize. This is a material property, not a mistake. For a 1/8″ rivet, you must drill with a No. 30 bit (0.1285″) instead of a 1/8″ (0.125″) bit.
- Always use a backup board. A scrap piece of plywood clamped behind the work piece prevents ugly breakout on the back side, especially for holes over 1/2″.
- You can repair a misplaced hole. The OEM manuals detail two methods: counterboring with an epoxy plug or tapping for a FIBREBOLT® insert. Neither restores 100% of the original strength.
Why Fiberglass Is Different: It Abrades, It Doesn’t Cut
Forget everything you know about drilling wood or metal. Fiberglass reinforced polymer is a composite, glass fibers locked in a plastic resin matrix. A drill bit doesn’t slice through it cleanly. It grinds and fractures the brittle fibers.
The glass is harder than the steel in most drill bits. Every rotation is a sanding operation. That’s why the Bedford Fabrication & Installation Manual states point blank: “FRP is extremely abrasive. Tools will wear rapidly, and frequent tool sharpening is common.”
The part nobody mentions: You’ll see the dulling happen. A fresh HSS bit will produce a fine, white powder. A dull bit makes longer, stringy shavings and requires more pressure. That extra pressure is what delaminates the layers and cracks the exit side.
This abrasiveness dictates your entire tool strategy. It’s the reason you choose a carbide-tipped drill bit over standard HSS for more than a few holes. Carbide’s hardness stands up to the glass. It’s also why a brad-point bit outperforms a standard twist bit, the center spur punches a clean starter hole, so the cutting edges shear the fibers instead of skating and grinding them.
The Right Gear: Bits, Speeds, and Backup
You can’t muscle through fiberglass. The right tool does the work for you.
Choosing the Drill Bit
Your bit choice decides the hole quality and your wallet’s pain. Here’s how they stack up.
| Bit Type | Best For | Lifespan (Holes in 1/4″ FRP) | Risk If You Choose Wrong |
|---|---|---|---|
| High-Speed Steel (HSS) | A one-off hole, tight budget | 20–30 | Dulls quickly, requires excessive force → cracks exit side. |
| Brad-Point (HSS) | Precision hole location, clean edges | 25–40 | Center spur can snap if forced on curved surfaces. |
| Carbide-Tipped | Production work, multiple holes | 150–300+ | Brittle tip can chip if dropped or used in a hand impact driver. |
| Diamond-Coated | Large-diameter holes (over 1″) | 500+ | Very expensive; overkill for standard fastener holes. |
For most DIY and pro jobs, a carbide-tipped bit is the default. It balances cost and longevity. If you’re drilling one hole for a cable pass-through, a sharp HSS brad-point is fine.
The search for the strongest drill bits often leads to carbide. But remember, hardness and toughness are different. A cobalt drill bit is tough and resists heat, making it great for metal, but it’s not as hard as carbide. For FRP’s abrasion, hardness wins.
Setting the Speed and Pressure
Speed generates heat. Heat softens the polyester or vinyl ester resin that holds the glass fibers together. A soft matrix means frayed edges and a mangled exit.
The DEFI Fiberglass Fabrication Manual specifies: “The drill speed should be equivalent to those used for drilling hardwood.”
What does that mean in RPM?
- 1/8″ bit: 2,500–3,000 RPM
- 1/4″ bit: 1,000–2,000 RPM
- 1/2″ bit: 500–800 RPM
- 1″ bit: 200–350 RPM
Start at the lower end of the range. Let the bit’s sharpness do the work. You should feel a steady, moderate resistance. If you’re leaning into the drill, the bit is dull. If the drill screams and you smell a faint chemical burn, you’re going too fast.
Before you start: Wear safety glasses and a NIOSH-rated dust mask. FRP dust is microscopic glass. You do not want it in your eyes or lungs. Long sleeves are also smart, the dust is irritating to skin.
The Non-Negotiable Backup Board
This is the single easiest way to guarantee a clean job. Clamp a scrap of plywood or MDF firmly behind your drilling spot. The backup board supports the fibers as the bit breaks through, preventing the laminate from splintering out.
The OEM manuals explicitly recommend this for large holes. It works for small ones, too. It’s the same principle used in drilling tile to prevent cracking the delicate glaze.
The 4-Step Process for Drilling a Clean Hole in Fiberglass
Follow this sequence. Missing a step costs you a clean hole.
- Mark and Punch. Use a sharp awl or a center punch to make a definitive dimple on your mark. The bit will not skate on the smooth, hard gel coat.
- Secure and Support. Clamp the workpiece. Clamp your backup board directly behind it. A wobbly panel guarantees a chipped exit.
- Drill with Consistent Feed. Start the drill at speed before touching the surface. Apply firm, steady pressure. Don’t peck. Let the flutes clear the dust. If drilling a deep hole, pull out halfway to clear chips.
- Deburr and Seal. The hole will have a slight raised edge. Knock this off with a deburring tool or a countersink bit. For exterior or wet applications, swipe the edge with a bit of epoxy or resin to seal the exposed fibers.
Where this goes sideways: skipping the center punch. The bit wanders, you overcorrect, and the hole ends up oval. That’s a mislocated hole, which leads to the next section.
The Critical Tolerance: Why Your Hole is 0.002″ Undersize
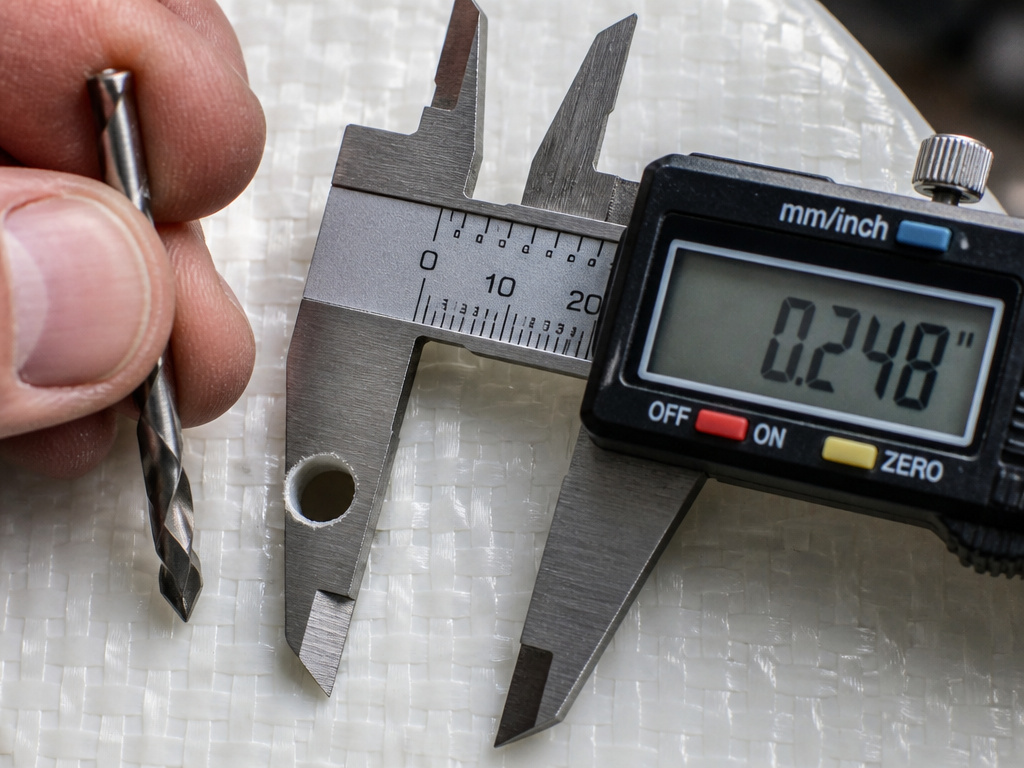
You drill a perfect 1/4″ hole. Your 1/4″ bolt doesn’t fit. This characteristic is inherent to the material.
Holes drilled in FRP are generally 0.002″ to 0.004″ undersize. This is due to the elastic rebound of the glass fibers after the drilling stresses are removed. – Strongwell, Bedford, and DEFI Fabrication Manuals
The fibers compress as the bit passes, then spring back slightly. This creates an interference fit that is actually beneficial for mechanical fastening, increasing grip. But you must account for it.
| Target Fastener Size | Drill Bit Size to Use | Actual Drill Diameter | Why It Works |
|---|---|---|---|
| 1/8″ Rivet (0.125″) | No. 30 Drill Bit | 0.1285″ | The hole drills at ~0.1285″ and springs back to ~0.123″, creating the proper grip for the 0.125″ rivet. |
| 1/4″ Bolt (0.250″) | ‘F’ Drill Bit (or 1/4″ with tolerance) | 0.257″ | A true 1/4″ bit may produce a hole too tight; the ‘F’ bit (0.257″) ensures clearance after rebound. |
This is a sourced-number fact that changes hardware selection. Ignoring it means forcing fasteners, which can split the FRP along the grain of the fibers.
Repairing a Mislocated Hole: The Two Factory Methods
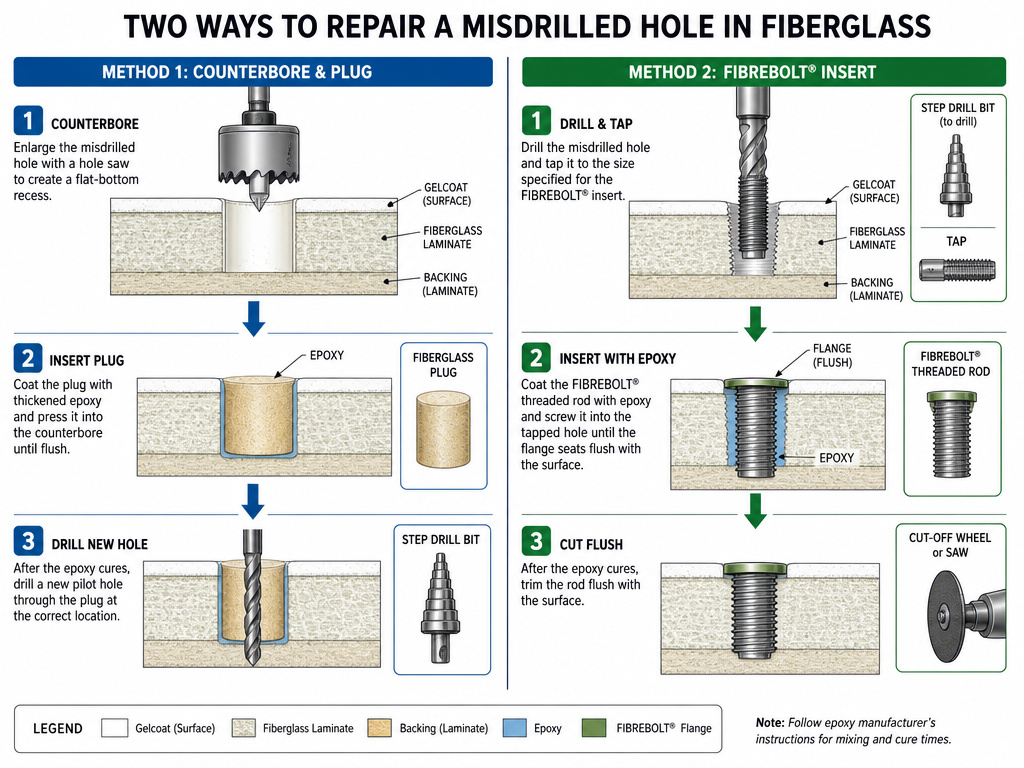
You drilled it wrong. It happens because of a layout error, a slipped clamp, or a design change. The manuals have a whole section on this. Don’t just drill a bigger hole beside it, that weakens the structure.
Method 1: The Counterbore and Plug Repair
This is a permanent, structural fix that works when the new, correct hole location would intersect the old, wrong hole.
- Counterbore. Using a step drill bit or a flattened bit roughly twice the diameter of the mistake, drill halfway through the material. Center this counterbore on the old hole.
- Cut a Plug. Use a hole saw to cut a plug from a scrap of EXTREN® plate or similar FRP. The plug’s thickness should be half the thickness of your material.
- Epoxy and Set. Sand the plug and the counterbored hole. Mix a structural epoxy (like a methacrylate adhesive), apply it, and set the plug. Let it cure fully.
- Drill the Correct Hole. Flip the piece over. Now, drill your new, correct-sized hole through the center of the cured plug.
Method 2: The FIBREBOLT® Insert
This is faster and ideal when the mislocated hole is isolated from other fasteners.
- Drill and Tap. Drill out the old hole to the nearest tap size. Tap it for the smallest FIBREBOLT® (fiberglass threaded rod) you have.
- Install the Insert. Coat the FIBREBOLT® threads and the hole with epoxy. Screw the insert in until flush.
- Cut and Finish. Cut off the excess rod, grind it flush, and reseal the area with resin.
Bottom line: Neither repair restores 100% of the original EXTREN® properties. But done correctly, either will restore sufficient strength for most non-critical applications. The counterbore method is stronger.
Drilling Large Holes and Curves
Need a 2″ hole for a pipe or a curved cutout? The principles shift.
For holes over 1/2″, a hole saw is the tool. Use one with a carbide grit edge, not a toothed saw meant for wood. Run it slow, under 500 RPM. The backup board is mandatory. For very large holes, drill a pilot hole first, then follow with the hole saw arbor.
Curved cuts are the domain of a jigsaw or a router. For a jigsaw, you need the right fiberglass jigsaw blade, a carbide-grit blade or a bi-metal blade with fine teeth (20+ TPI) set for a downward cut. A standard wood blade will shatter the laminate. The same logic applies if you’re using a reciprocating saw; you need specific fiberglass blades to avoid a ragged, unusable cut.
Frequently Asked Questions
Can I use a regular drill bit for fiberglass?
Yes, but not for long. A brand-new high-speed steel twist bit will drill a few holes. It will dull rapidly, and the increased pressure needed will likely cause breakout on the back side. For more than a handful of holes, step up to a carbide-tipped bit.
How do I prevent fiberglass from cracking when drilling?
Use sharp bits, correct slow speeds, and always clamp a backup board (like plywood) directly behind the drilling point. This supports the material as the bit breaks through, preventing the laminate from splintering.
What’s the best drill speed for fiberglass?
Match speeds for drilling hardwood. For a 1/4″ bit, that’s 1,000–2,000 RPM. The thicker the material, the slower you go. High speed creates heat, which softens the resin and leads to fraying and cracking.
Why is my drill bit getting dull so fast?
Fiberglass is an abrasive composite. The glass fibers are harder than the steel in standard drill bits. Each hole is essentially a grinding operation. This is why carbide-tipped bits, which are harder, last exponentially longer.
How do I fix a hole I drilled in the wrong spot?
You have two main options from the OEM manuals. The counterbore-and-plug method involves drilling a larger shallow hole, gluing in an FRP plug, and then drilling the new correct hole through it. The FIBREBOLT® method involves drilling and tapping the old hole, then threading in an epoxy-coated fiberglass insert.
The Bottom Line
Drilling fiberglass requires precision and patience. The material’s abrasiveness and spring-back tolerance dictate the rules: carbide or sharp brad-point bits, hardwood speeds, and unwavering support for the exit side.
The difference between a clean, serviceable hole and a cracked, frayed mess comes down to respecting those physics. Keep your bits sharp, your RPMs low, and a backup board clamped tight. When you’re matching a fastener, remember the 0.002″ rule and reach for that No. 30 drill bit instead of the 1/8″. That’s how you move from fighting the material to working with it.
