
How to Drill Out a Screw: A Step-by-Step Guide to Success
This post contains affiliate links. As an Amazon Associate, we earn from qualifying purchases.
To drill out a screw, you must remove its head with a drill bit slightly smaller than the head diameter, then extract the remaining shank with pliers or a screw extractor. The critical factor is the driver you use first, not the drill. A straight-handle screwdriver strips 75% of overtightened titanium screws on removal, while a T-handle or hex key wrench cuts that failure rate by more than half.
That 75% number comes from a materials science study on 3.5-mm titanium locking screws. It’s a specific, measurable failure point that shifts the job from a simple extraction to a likely repair. The drill is your last resort, not your first move.
What follows: the three scenarios that demand drilling, the exact drill settings for a Milwaukee extractor bit, the step-by-step head removal, and the one tool swap that prevents most stripping before you ever reach for the drill.
Key Takeaways
- A straight-handle screwdriver strips 75% of overtightened 3.5-mm titanium screws; switching to a T-handle or hex key wrench reduces stripping to 35-40%.
- For a screw extractor like the Milwaukee 49-57-9001, the drill must be in reverse and drill mode at high speed for pre-drilling, then switched to low speed for the actual extraction.
- Drilling off the screw head requires a bit one-third the diameter of the head; drilling too large a hole weakens the shank and can snap it.
- On thin panels, there may not be enough screw shank left to grip after drilling the head off, forcing you to use a screw extractor instead.
- Screw removal pliers have angled, serrated jaws that grip a protruding shank far better than standard slip-joint pliers.
The 75% Stripping Failure Rate (And How to Halve It)
Most people grab a drill when a screw won’t budge. That’s the wrong first step. The real problem usually happens during the last attempt at turning it with a driver.
A 2021 study in Scientific Reports tested the removal of overtightened 3.5-mm titanium locking screws. The results are not subtle. Using a standard straight-handle screwdriver, 15 out of 20 screws (75%) stripped their hexagonal sockets and became irremovable. The researchers then switched tools. Using a T-handle screwdriver dropped the stripping rate to 40%. A hex key wrench dropped it to 35%.
The part nobody mentions: The probability of stripping was reduced by 4.5 times with a T-handle and 5.57 times with a hex key wrench compared to a straight-handle driver. The larger handle provides better alignment, distributing force evenly across the socket walls instead of canting the tip and reaming out one side.
The mechanism is leverage and alignment. A straight handle is thin. Under high reverse torque, your hand can tilt the driver’s axis away from the screw’s axis. The tip contacts only part of the socket, concentrating stress until the softer metal (usually the screw) deforms. A T-handle or hex key gives you a perpendicular grip that keeps the tip seated squarely. This maximizes the contact area.
Before you drill, always try a better driver. For small, precision screws, a hex key wrench is often the best tool in the kit. For larger fastener heads, a T-handle screwdriver you can push straight into the screw while turning makes the difference between extraction and a drilling job.
When Drilling Is Your Only Way Out
You’ve tried the better driver. You’ve tapped in a square drive bit. The screw head is a smooth, rounded crater. Now you drill. There are three specific scenarios where drilling out the screw head is the correct next move.
The head is completely stripped. This is the classic case. The drive recess. Phillips, Torx, hex, is so worn that no bit can achieve bite. You might see rounded edges or a shiny, polished cavity.
The screw is seized or corroded in place. The threads are chemically welded by rust or galvanic corrosion. Applying torque only twists the head off, leaving the shank embedded. This is common in outdoor projects, automotive work, or old plumbing fixtures.
You need to remove a panel or bracket, not the screw itself. Sometimes, the goal is to free the thing the screw is holding. Drilling off the head is faster than trying to salvage a cheap, damaged fastener. You’ll replace it later.
Skip this if: The screw is in a thin, fragile material like vintage guitar wood or a plastic housing. Drilling torque can crack the surrounding material. For those, a manual extraction method or a dedicated small stripped screws approach is safer.
The method changes slightly based on your goal. Do you want to save the threads in the hole? Then you’ll use a screw extractor after drilling. Is the hole going to be repaired or the part discarded? Then drilling off the head is sufficient.
The Right Drill and Bit Setup
Not all drills and bits are equal for this job. Using the wrong rotation or an incorrect bit type turns a repair into a disaster.
Your drill must have a variable speed trigger and a reverse function. A basic single-speed drill will likely slip and damage the work surface. You need the control to start slowly. The reverse direction is critical for extractor bits and left-hand bits.
Bit selection follows a decision tree. Your choice dictates the entire process.
| Bit Type | How It Works | Best For | Risk If Skipped |
|---|---|---|---|
| Left-Hand Drill Bit | Cuts while spinning counterclockwise (reverse). Often “walks” the screw out. | Initial attempt on seized screws; pre-drilling for extractors. | Using a standard bit first can tighten the screw further. |
| Screw Extractor Bit | A tapered, reverse-fluted bit that bites into a pre-drilled hole and backs out the screw. | Screws with a salvageable shank and intact threads. | Pre-drilling with a bit that’s too large weakens the shank. |
| Standard HSS Bit | Cuts material in standard clockwise rotation. | Drilling off the screw head completely when saving the hole isn’t needed. | Can tighten the screw if it grabs; requires extreme care. |
For a speed-out bit or extractor set like the Milwaukee 49-57-9001, the manufacturer’s instructions are non-negotiable. The drill must be in reverse and drill mode at high speed for the initial pre-drilling (Step 2). After flipping the bit, you switch the drill to low speed for the extraction (Step 6). Running an extractor at high speed can glaze the metal or break the bit.
A left-hand drill bit is a brilliant first try. Because it cuts in reverse, the cutting action often applies enough counter-torque to unscrew the fastener before you even switch to an extractor. It also creates the perfect pilot hole for one.
Step-by-Step: Drilling Off the Screw Head
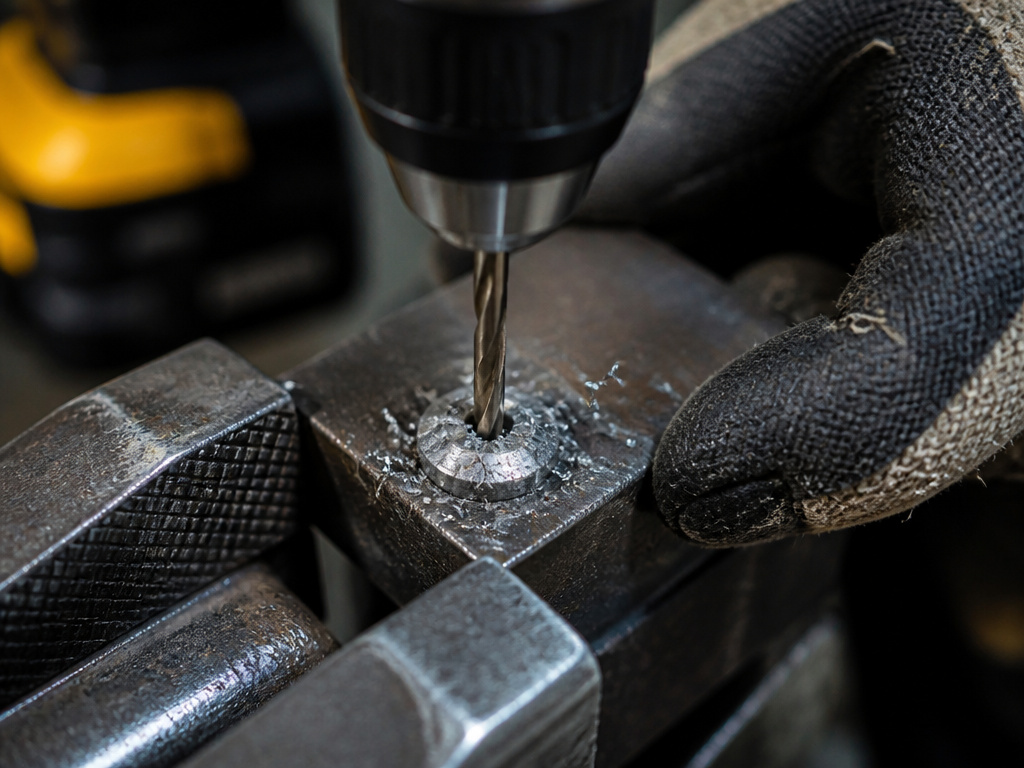
This is the “destroy the fastener to save the project” method. You will not save the screw. The goal is to remove the head so you can lift off the secured part.
Before you start: Wear safety glasses. Metal shavings are sharp and fly unpredictably. Put on gloves, the screw and bit will get hot. Secure the workpiece in a vise or clamp it down. A slipping drill ruins surfaces.
Step 1: Center punch the screw head. This is the most important step everyone rushes. Find the exact center of the stripped head and give it a solid tap with a center punch and hammer. This creates a small dimple that prevents the drill bit from “walking” across the hardened steel and gouging your workpiece.
Step 2: Select your drill bit. Choose a standard (right-hand) high-speed steel (HSS) bit with a diameter roughly one-third the size of the screw head. For a #8 screw, start with a 1/8-inch bit. The goal is to drill through the head, not the entire shank.
Step 3: Drill out the head. Set your drill to a medium speed. Place the bit tip in your center-punch dimple. Hold the drill perfectly perpendicular to the screw. Apply firm, steady pressure and begin drilling. Do not force it. Let the bit cut. * Drill until the head separates. You’ll feel a sudden drop in resistance as the bit passes through the head into the space below. The head may spin off or break away. * If the head is thick, you may need to step up bit sizes. Start with your small pilot bit, then increase to the final size. This maintains control and keeps the hole centered.
Step 4: Remove the component. With the head gone, the bracket, panel, or hinge should lift away freely, leaving the screw shank protruding from the hole.
Step 5: Extract the shank. Now you have a short post of threaded metal. This is where screw removal pliers excel. Their jaws are angled and deeply serrated to bite into the sides of the shank. Grip it as close to the base as possible and turn counterclockwise. If the shank is too short or flush, you’ll need to drill it out completely with progressively larger bits or use a broken screw extractor.
Using a Screw Extractor: The Manufacturer’s Sequence
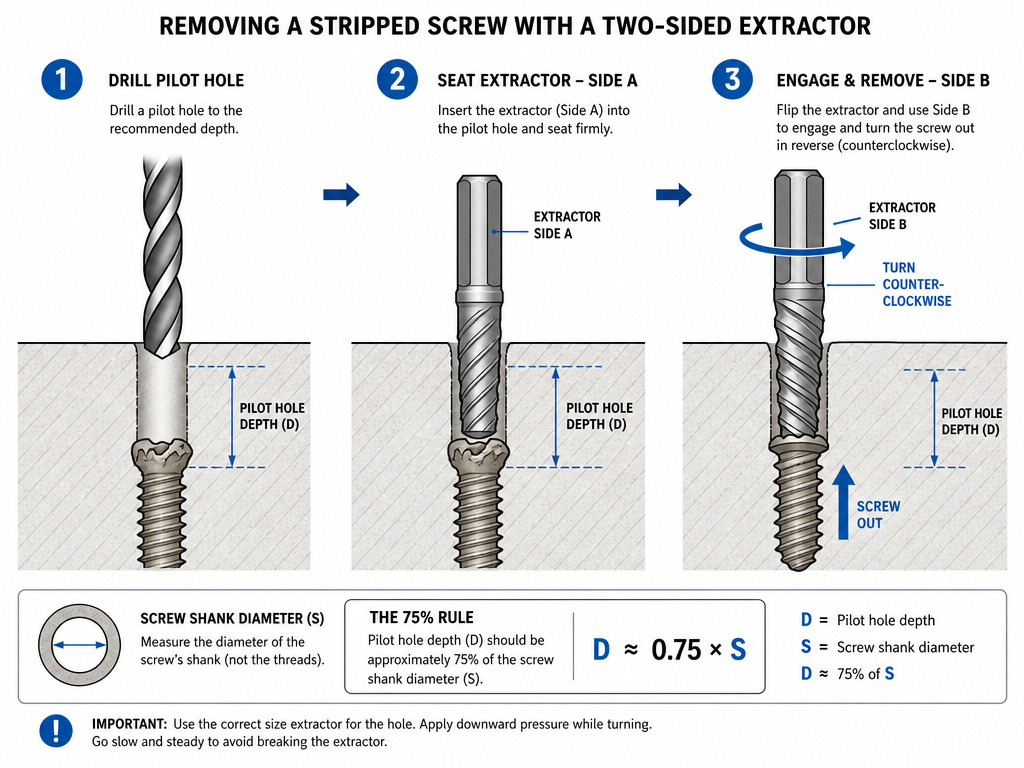
When you need to save the threaded hole, a screw extractor is the tool. The Milwaukee 49-57-9001 set is a common pro-grade example, and its manual provides the exact sequence that applies to most quality extractors.
Technical Snippet: For the Milwaukee 49-57-9001 extractor bits #1-3, an impact driver can be used in low speed for all steps. When using a standard drill/driver, it must be in reverse and drill mode at high speed for pre-drilling (Step 2). After flipping the bit, switch the drill to low speed for extraction (Step 6). If the screw sticks to the extractor, disconnect power, wear gloves, and gently tap it off.
- Pre-drill a pilot hole. Using a standard HSS bit sized for your extractor (the kit will specify), drill a straight, centered hole into the stripped screw head. Depth should be about 1/8 to 1/4 inch.
- Insert the extractor (Side A). Place the tapered, fluted end (Side A) of the extractor into your drill chuck. Ensure the drill is in reverse.
- Set drill to high speed (drill mode). This is not a typo. The high speed in reverse helps the sharp edges of Side A cut and seat into the pilot hole. Press firmly and run the drill briefly.
- Flip the bit to Side B. Remove the bit and insert the opposite end (Side B), the spiral-fluted extractor, into the chuck.
- Switch drill to low speed. Keep the drill in reverse. The extractor needs torque, not RPMs.
- Engage and extract. Push the extractor firmly into the pre-drilled hole. Squeeze the trigger slowly. The reverse-spiral flutes should bite and begin to back the screw out. Apply steady, straight pressure.
If the extractor spins without gripping, your pilot hole may be too large. The hole should be no more than 75% of the screw shank’s diameter. A larger hole removes too much material, leaving nothing for the extractor to bite against. If you hit this point, you’ve graduated to drilling out the entire screw.
Thin Panels and Other Edge Cases
Standard procedures break on edge cases. The most common is the thin panel.
The “drill off the head” method assumes there will be enough screw shank left above the surface to grip with pliers. On a thin piece of sheet metal or a plastic guitar pickguard, the shank may be flush or nearly so once the head is gone. Pliers have nothing to grab.
Solution: You must use a screw extractor from the start. The extractor bites into the head itself, not the shank. This makes the manual screw extractor a viable option here, as you can turn it with a wrench for more control in delicate materials.
Another edge case is the overly weakened shank. Drilling a pilot hole for an extractor that’s too large removes critical material. The remaining “shell” of the screw can collapse when torque is applied, snapping the head off and leaving a packed, threaded tube in the hole. At that point, you’re into drill out a broken screw territory, which involves drilling out the entire diameter of the screw and potentially re-tapping the hole.
Tool Recommendations: What Actually Works
You need tools that are designed for failure, not for ideal conditions. Here’s what to reach for.
For the initial driver attempt, skip the cheap multi-bit screwdriver. A dedicated T-handle driver set or a quality set of hex key wrenches (like Wera or Bondhus) provides the necessary alignment and grip. The Scientific Reports screw stripping study proved this is a 4, not a minor improvement.5x reduction in failure.
For extractors, a set with multiple sizes is mandatory. The Milwaukee 49-57-9001 is a known entity with clear instructions. For a more affordable yet reliable home kit, the Irwin Hanson Spiral Screw Extractor Set is a common sight in toolboxes. Both provide the necessary hardened steel and clear size progression.
You cannot drill accurately without a center punch. The Neiko 02638A Center Punch Set is a basic, effective option. For gripping the leftover shank, Vampliers (or their generic counterpart, screw removal pliers) are in a class of their own. Their tapered, toothy jaws bite where smooth-jawed pliers slip.
Finally, for the drill itself, a brushless cordless drill with an electronic clutch and variable speed is ideal. The clutch can prevent over-torquing, and the variable speed gives you the delicate control needed to start a left-hand bit or an extractor without jumping. Knowing how to reverse a drill is a fundamental skill here, the switch is usually located above the trigger.
Frequently Asked Questions
Can I use an impact driver to remove a stripped screw?
Sometimes, but with extreme caution. An impact driver delivers sudden rotational blows (impacts). On a slightly stuck screw, this can break it free. On a fully stripped head, the impacts will simply destroy the remaining drive recess. For using a screw extractor bit, the Milwaukee manual states their bits #1-3 can be used in an impact driver in low speed only. The high-torque impacts can snap a delicate extractor.
What if the extractor bit breaks off in the screw?
Stop. This is a worst-case scenario. The extractor is made of hardened, brittle tool steel. Drilling through it is nearly impossible. Your options shrink to careful grinding with a Dremel tool to create a flat surface for a new extractor, or using an EDM (electrical discharge machining) service, a professional metal shop job. This is why using low speed and steady pressure on the extractor is non-negotiable.
Is the rubber band trick real?
It can work for a partially worn screw, but not for a fully stripped one. Stretching a wide rubber band over the tip of your screwdriver and pressing it into the damaged head adds friction and can fill minor gaps. It’s a worthwhile 30-second attempt before you move to destructive methods. It will not work on a rounded-off hex socket or a Phillips head that’s become a smooth bowl.
How do I prevent screws from stripping in the future?
Use the right driver. Match the bit type and size exactly, a #2 Phillips is not a #3. Apply firm, straight-down pressure while turning to keep the bit fully seated. For critical applications, use a torque-limiting screwdriver or clutch on your drill to prevent overtightening. The study showed that at 4.5 Nm, 60% of titanium screws stripped during removal. Knowing when to stop turning is as important as knowing how to start.
Before You Go
Drilling out a screw is a repair of last resort. The data shows your biggest leverage point is the tool you use before the drill. A T-handle or hex key wrench changes a 75% failure rate into a 60% success rate.
If you must drill, the sequence is everything: center punch, pilot hole, correct bit, controlled speed. The Milwaukee extractor instructions, high speed to seat, low speed to extract, are there because the engineers know what breaks. For thin materials, assume you’ll need an extractor, not pliers.
The goal is to remove the fastener while leaving the hole intact for the next one. A set of best easy-out screw extractors and a pair of dedicated screw removal pliers turn a frustrating hour into a ten-minute fix.Keep them in the drawer next to your regular drill bits. You’ll know when you need them.
