
How to Drill Drainage Holes in Ceramic Pots Safely & Easily
This post contains affiliate links. As an Amazon Associate, we earn from qualifying purchases.
To drill drainage holes in ceramic pots, you need a diamond-tipped or carbide-tipped masonry bit, a variable-speed drill, and continuous water cooling. Mark your spot, start at a low speed (200-400 RPM) with light pressure, and let the bit do the work. For holes larger than 1/4 inch, use a stepped drilling technique, starting with a smaller pilot bit. The ceramic must stay cool to the touch throughout the process to avoid thermal shock and cracking.
That last point about temperature is the whole game. Thermal shock from friction heat is what turns a beautiful pot into a puzzle in under three seconds. The right bit and the right speed are just setup; the real skill is managing that heat with a constant stream of water.
What follows is the full breakdown: the two bits that actually work, the one cooling trick that prevents 80% of failures, and the professional method for placing multiple holes with perfect spacing. We’ll also cover the critical difference between drilling leather-hard clay before it’s fired and tackling a finished, glazed planter from the store.
Key Takeaways
- Use a diamond-tipped bit for glazed or hard ceramics; a carbide-tipped masonry bit is a budget option for soft, unglazed terracotta only.
- Continuous water cooling is non-negotiable. A spray bottle or a dam of plumber’s putty keeps the temperature down and prevents instant cracking.
- Drill at the lowest speed your drill allows (200-400 RPM) with just enough pressure to keep the bit engaged. Let the abrasive grit cut, don’t force it.
- For holes larger than 1/4 inch, step up in size. Start with a 1/8-inch pilot hole, then move to your final diameter to reduce stress on the ceramic.
- Soak unglazed terracotta pots overnight before drilling. The saturated clay drills easier and produces less dust.
The Right Drill Bit for the Job
Forget the twist bits in your general-purpose kit. Drilling ceramic is an abrasive process, not a cutting one. You need a bit that’s harder than the fired clay and glaze.
A diamond-tipped core bit or diamond grit hole saw is the professional’s choice, especially for glazed pots or hard stoneware. These bits have industrial diamond particles bonded to their edge or surface, which grind through the material. They create a clean, round hole with minimal chipping. The Bosch Diamond Grit Hole Saw set is a reliable option for this kind of work.
A diamond-tipped core bit removes a plug of material rather than grinding it all to dust. This creates less heat and vibration, which directly translates to a lower chance of cracking the pot.
A carbide-tipped masonry bit is a passable alternative for soft, unglazed terracotta. It’s cheaper, but it works through impact and requires more downward pressure, which increases the risk of cracks. It’s a gamble on a five-dollar pot, but a guaranteed loss on a fifty-dollar one.
Your drill matters as much as the bit. A variable-speed drill is essential. You need to start slow, crawling speed, to establish the hole without the bit skating across the slick glaze. A corded drill often provides more consistent torque for this sustained, low-speed work than a cordless model.
| Bit Type | Best For | Risk If Used Wrong |
|---|---|---|
| Diamond-Tipped Core Bit | Glazed ceramics, stoneware, porcelain, repeat projects | Low risk if cooled; high initial cost |
| Carbide-Tipped Masonry Bit | Unglazed terracotta only | High risk of cracking; rough hole edges |
| Standard Twist Drill Bit | Wood and metal only | Will not cut ceramic; will dull instantly |
Everything You Need Before You Start
Gathering the right gear prevents mid-job panic. Here’s the checklist:
- Safety Glasses: Ceramic dust and tiny chips are sharp. Wrap-around styles seal best.
- Dust Mask (N95): Ceramic dust contains crystalline silica, a lung irritant. Don’t skip this.
- Variable-Speed Drill: Corded or cordless, but it must have fine speed control.
- Diamond or Carbide Drill Bit: Sized for your desired hole (1/4-inch is a common start).
- Water Source: A spray bottle or a squeeze bottle. A small container of water works too.
- Masking Tape: A small square over the drill point stops the bit from skating.
- Marker or Grease Pencil: For marking your spot.
- Backing Surface: A scrap piece of wood or a thick pad of foam to support the pot.
- Patience: This is not a speed drill. Rushing equals breaking.
Before you start: Wear eye and lung protection. Secure the pot on a non-slip surface, never hold it in your hand. The drill can bind and spin the pottery with enough force to cause injury.
Step-by-Step: Drilling Without a Crack
This process is about control and cooling. Follow it in order.
- Prepare the Pot. If it’s a new, unglazed terracotta pot, submerge it in water for at least an hour, preferably overnight. This saturates the clay, making it easier to drill and reducing dust. Dry pots thoroughly before marking.
- Mark the Spot. Place the pot upside down on your backing surface. Use a ruler to find the center if you’re doing one hole. For multiple holes, measure and mark evenly. Place a small “X” of masking tape over each mark. This gives the drill bit initial purchase.
- Set Up Cooling. Fill your spray bottle. Alternatively, make a small dam around the drill site with plumber’s putty or modeling clay and fill it with water. This “dam method” is superior for deeper holes.
- Start the Pilot Hole. Fit your drill with the smallest bit you’re using (or your final bit if it’s 1/4-inch or smaller). Set the drill to its lowest speed setting. Position the bit on the mark, hold the drill straight, and gently squeeze the trigger. Apply a light, steady stream of water.
- Drill with No Pressure. Let the bit’s weight and abrasion do the work. Do not push. Maintain the water flow. You’ll see a slurry of mud and ceramic dust. If you see steam or the pot gets hot, stop immediately, add more water, and let it cool.
- Use Stepped Drilling for Large Holes. For a 3/8-inch or 1/2-inch hole, drill the pilot hole all the way through. Then, switch to the larger bit. Place it into the pilot hole, this guides it and prevents skating. Repeat the low-speed, high-cooling process.
- Finish from Both Sides (For Thick Pots). If the pot base is thicker than 1/4 inch, drill about halfway through from the outside. Then, flip the pot over and finish drilling from the inside out. This prevents “blowout” chipping on the exit side.
- Clean Up. Once the hole is through, release the trigger and keep the water flowing for a few seconds. Wipe away the slurry. You can lightly sand any rough edges on the inside of the hole with 120-grit sandpaper.
The most common mistake is leaning on the drill. Increased pressure doesn’t make it go faster; it generates heat and stresses the ceramic. If progress seems slow, your bit might be dull, or you might need more water. The Ceramic Arts Network how-to article emphasizes starting with a pilot hole and using steady, minimal force, which aligns perfectly with professional ceramic pot drilling practice.
Drilling Leather-Hard vs. Fired Clay
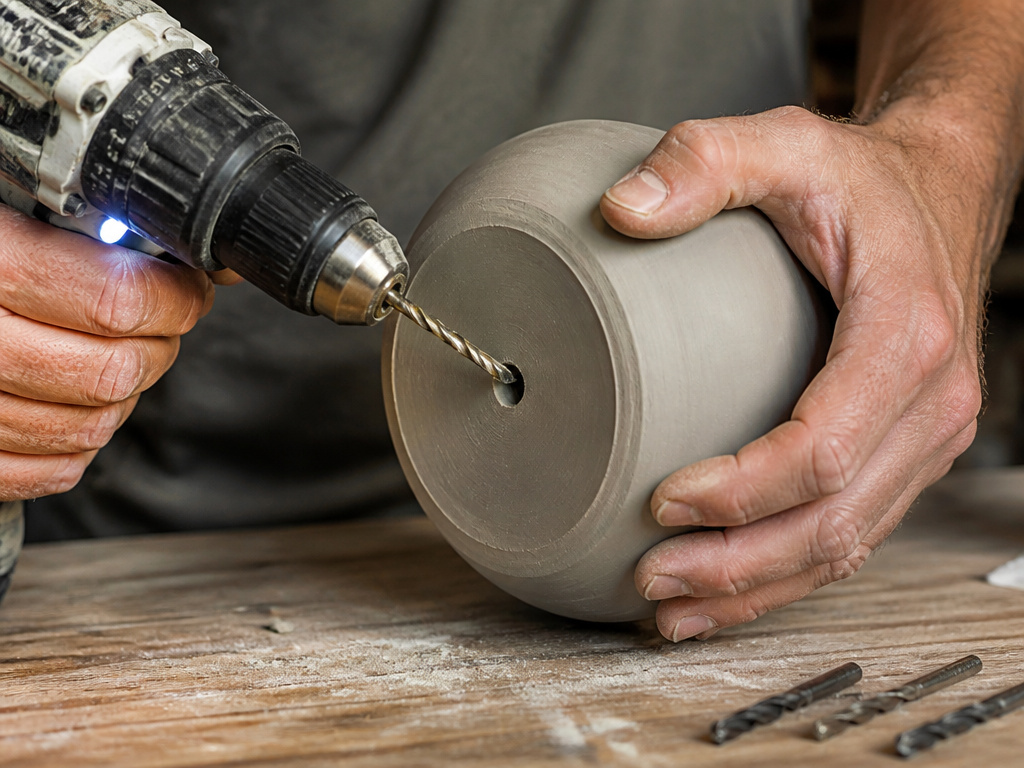 The stage of the ceramic changes everything. If you’re a potter modifying your own work before firing, you have a huge advantage.
Leather-Hard Clay is the ideal time to drill. The clay is firm but not brittle. As noted in Ceramics Monthly, you can use standard twist drill bits or spade bits for this. If the clay is on the softer side of leather-hard, you can go straight to your final bit size. If it’s stiffer, start with a small pilot hole. This is when you can use tools like MKM Decorating Disks to mark perfectly spaced holes for a berry bowl or colander.
Bone-Dry or Fired Ceramic is what you buy at the store. It’s hard and brittle. This is where diamond or carbide bits and religious cooling are mandatory. The techniques in this guide are designed for this state. The principles of drilling ceramic tile are nearly identical, which is why tile bits often work for pots.
How Many Holes and Where to Put Them
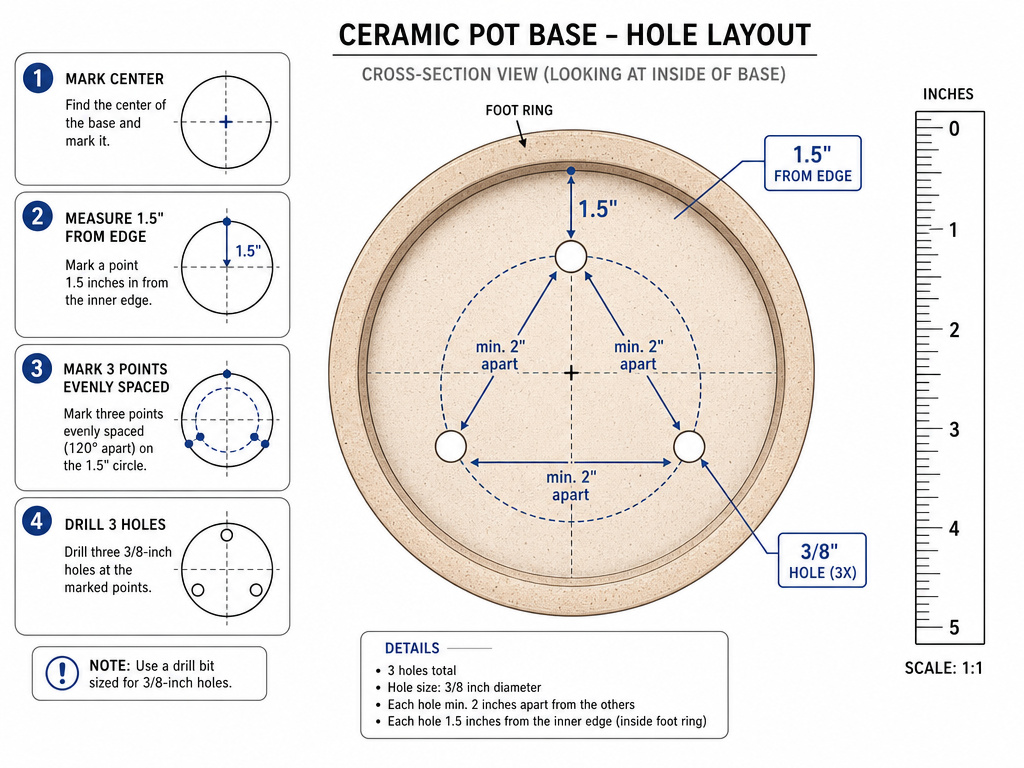 A single, tiny hole often clogs. Good drainage requires adequate total area and smart placement.
For a standard round pot, one 1/4-inch hole is sufficient for pots up to 6 inches in diameter. For an 8-12 inch pot, use two or three 3/8-inch holes. Space them evenly inside the foot ring or around the center. For anything larger, or for rectangular planters, space 1/2-inch holes every 6 to 8 inches along the base.
Where this goes sideways: Clustering holes too close together or too near the edge. This creates a weak point that can crack under stress. Keep holes at least 2 inches apart and 1.5 inches from the pot’s edge.
The goal is to match the drainage area to the soil volume. More holes are always better than fewer, as long as they’re properly spaced. If you’re converting a decorative pot, consider using it as a cachepot and creating a drainage hole in a plastic nursery pot that fits inside instead.
Troubleshooting: Why Did My Pot Crack?
If you hear a tink or see a hairline fracture, stop immediately. Diagnose the cause so it doesn’t happen again.
- Crack during drilling: Thermal shock. The bit and ceramic got too hot. You weren’t using enough water, or you were drilling too fast. Next time, double the water flow and halve the speed.
- Crack after drilling: Stress propagation. The pot may have had a hidden, pre-existing hairline crack, or the hole was drilled too close to the edge or another hole. Always inspect pots before you start.
- Bit skates and scratches glaze: No pilot purchase. You didn’t use masking tape or a center punch to dimple the spot. The tape trick is essential for drilling tile without damage.
- Chipping on the exit side: Blowout. You drilled all the way through from one side on thick material. For future thick pots, use the “drill halfway and flip” method.
For extremely delicate pieces like a plate or teacup you want to turn into a planter, the stakes are higher. The same rules apply, but with even lighter pressure. Our guides on how to drill a plate and how to drill a teacup dive into the extra precautions needed for thin, fine ceramics.
Frequently Asked Questions
Can I use a regular drill bit on ceramic?
No. A standard high-speed steel (HSS) twist bit is for metal and wood. It is softer than fired ceramic glaze. It will dull in seconds, generate immense heat, and likely crack the pot. You need an abrasive bit like diamond or carbide.
Do I really need to use water?
Yes. Dry drilling generates friction heat upwards of 300°F at the bit contact point. Ceramic expands with heat, and the uneven expansion between the hot spot and the cool rest of the pot causes thermal stress fractures. Water keeps the temperature close to ambient.
What if I don’t have a drill?
You have fewer options, but they exist. For unglazed terracotta, you can carefully use a nail and hammer to punch a series of small holes, though this is messy and risky. For any glazed pot, a drill is the only reliable tool. Methods for making holes without power tools are limited to soft materials.
Is a cordless drill okay, or do I need corded?
Cordless drill is perfectly fine if it has variable speed control. The advantage of a corded drill is consistent torque at very low RPMs, which some budget cordless drills struggle with. If your cordless drill can start and maintain a very slow speed, it will work.
Can I drill into a painted ceramic pot?
It depends. If the paint is a fired glaze, treat it as a glazed ceramic pot. If it’s a latex or acrylic craft paint applied after firing, you have a problem. The paint will gum up your drill bit and the heat from drilling can burn it. It’s better to strip the paint from the drilling area first.
The Bottom Line
Drilling a ceramic pot isn’t a test of strength; it’s a test of patience and heat management. The formula is simple: the right abrasive bit, a slow drill speed, and a constant flood of cooling water. Get those three things right, and you can turn any solid container into a proper home for a plant.
Skip the guesswork and the heartbreak of a cracked pot. Grab a diamond bit, keep that spray bottle handy, and let the tool do the work. Your plants, and your favorite pots, will thank you for it.
