
The Safe Way to Drill Holes in Tea Cups Without Breaking Them
This post contains affiliate links. As an Amazon Associate, we earn from qualifying purchases.
To drill a hole in a tea cup, you need a diamond-coated or carbide-tipped drill bit, a slow drill speed, and constant water cooling. Secure the cup on a soft, non-slip surface, mark your spot with tape, and apply light, steady pressure. The process takes patience, often more than three minutes per hole, and skipping the water or using high speed is a guaranteed crack.
That “more than three minutes” clause is where most home workshops fail. It’s not a suggestion; it’s a thermal limit. A drill motor heats up, your hand tires, and the temptation to push harder creeps in. That’s when the bit grabs, the cup torques, and you hear the telltale ping.
What follows is the difference between a successful lamp base and a pile of shards: the one drill type that lasts, the two adhesives that hold, and the simple centering trick a DIY blog dug up from a forum ten years ago.
Key Takeaways
- Diamond beats carbide for china. A diamond-coated bit grinds where a carbide tip can catch and chip the glaze.
- Water isn’t optional. Drilling “dry” builds heat in seconds, and porcelain cracks from thermal shock before you see smoke.
- Corded drills outlast cordless here. A project with multiple cups can burn out a cordless drill’s motor or battery on the third hole.
- Hole placement decides survival. Drilling near the rim or handle weakens the cup’s structure more than a hole in the center of the base.
- Epoxy beats superglue for assembly. Gorilla Glue Epoxy or E6000 fills the imperfect gap between the cup and the lamp rod; cyanoacrylate (superglue) fails under slight lateral pressure.
The One Tool That Actually Works (and Two That Don’t)
You need a bit that grinds, not cuts. Porcelain and bone china are glass-hard and brittle. A standard twist bit will skate, then grab, and almost always crack the piece.
A diamond-coated drill bit is the default choice. The diamond grit is bonded to a steel shaft, and it grinds a hole through abrasion. It works on glass, ceramic, and stone for the same reason. A carbide-tipped bit can also work, but the cutting edge is sharper and more prone to catching on the glaze. If you already own a carbide bit for tile, you can use it, just be prepared for a slightly higher risk of chipping on the exit side.
Common mistake: Using a masonry bit or a standard high-speed steel (HSS) bit. The flute design is wrong, the tip geometry is wrong, and the result is a cracked cup within the first thirty seconds of contact. These bits are for brick and soft metal, not vitrified ceramic.
The drill itself matters more than most guides admit. This is a slow, high-torque, multi-minute operation.
| Drill Type | Best For | Risk If Used |
|---|---|---|
| Corded Drill (e.g., DeWalt DWD220) | Projects with 3+ cups, longer drilling times | Overheating is rare; the main risk is user fatigue leading to slippage |
| Cordless Drill (e.g., Makita XFD131) | A single, small-diameter hole | Motor or battery overheats after ~3 minutes of continuous load, leading to inconsistent speed and increased breakage |
| Drill Press | Ultimate precision and control | Overkill for one-off projects, but eliminates hand-drilling wobble |
A cordless drill can do the job. But the thermal mass in its motor is smaller. After about three minutes of continuous pressure against a hard surface, the internal temperature climbs. You’ll feel the casing get warm, the power will dip, and that’s the point where breaking the cup becomes likely. For a teacup lamp needing multiple holes, a corded drill is the smarter call.
What You Need Before You Start
Gathering the right setup prevents mid-drill panic. Here’ s your list:
- Drill: Preferably corded, or a high-torque cordless model with a fresh battery.
- Drill Bit: Diamond-coated or carbide-tipped, sized for your project (e.g., 1/4″ for a standard lamp rod).
- Cooling Water: A shallow tub, container, or a spray bottle filled with water.
- Work Surface: A plastic tub or deep tray. An old rag or towel placed inside it.
- Safety Gear: Safety goggles (non-negotiable). A dust mask isn’t a bad idea.
- Marking & Stabilization: Painter’s tape or masking tape. A permanent marker.
- Optional but Helpful: A C-clamp or hands-free helper. A large washer (for centering holes on saucers).
Before you start: The drill bit and ceramic will generate fine, sharp dust. Wear goggles to protect your eyes from flying particles. The water will get cloudy and slippery, secure your workpiece so it doesn’t spin violently. A sudden slip can snap the cup or drive the bit into your hand.
Step-by-Step: Drilling Without the Crack
This process is about managing heat and pressure. Rushing any step turns a cup into a planter.
1. Mark and Secure the Cup
Clean and dry the cup first. Apply a small piece of masking tape over the spot you want to drill. The tape gives the drill bit initial traction and helps prevent the bit from skating across the glossy glaze. Mark your exact drill point on the tape with the marker.
Place an old rag or towel in the bottom of your plastic tub. This provides a non-slip, cushioned base. Set the cup on the rag. Fill the tub with enough water to submerge the drilling area completely. The water must cover the point of contact throughout the entire process.
2. Set Up Your Drill
Insert your diamond or carbide bit into the drill chuck and tighten it securely. Set your drill to its lowest speed setting. If it has a variable speed trigger, practice a gentle, halfway pull. Turn off any “hammer drill” or impact function, this is for rotary drilling only.
3. Drill with Patience
Position the drill bit perpendicular to the surface, right on your mark. Start the drill at its slow speed. Apply light, steady pressure, let the weight of the drill do most of the work. Imagine you’re trying not to wake someone up.
Where this goes sideways: Increasing the speed to “get through faster.” High RPMs generate friction heat faster than the water can dissipate it. The porcelain expands unevenly, and a hairline crack shoots out from the hole. You might not see it until you drain the tub.
Keep the drill bit and the cup submerged. The water will turn milky with fine ceramic dust. This is normal. If you’re using a spray bottle, mist the contact point continuously.
4. Break Through and Finish
You’ll feel a slight drop in resistance as the bit breaks through the other side. Ease up on the pressure immediately to avoid chipping the exit edge. Continue drilling slowly until the bit clears completely.
Lift the cup out of the water and carefully peel off the masking tape. Rinse the cup to remove any residual grit. Inspect the hole edges. Some minor, smooth chipping on the exit side is common and usually harmless for a lamp project.
The “Why” Behind the Slow Speed and Water
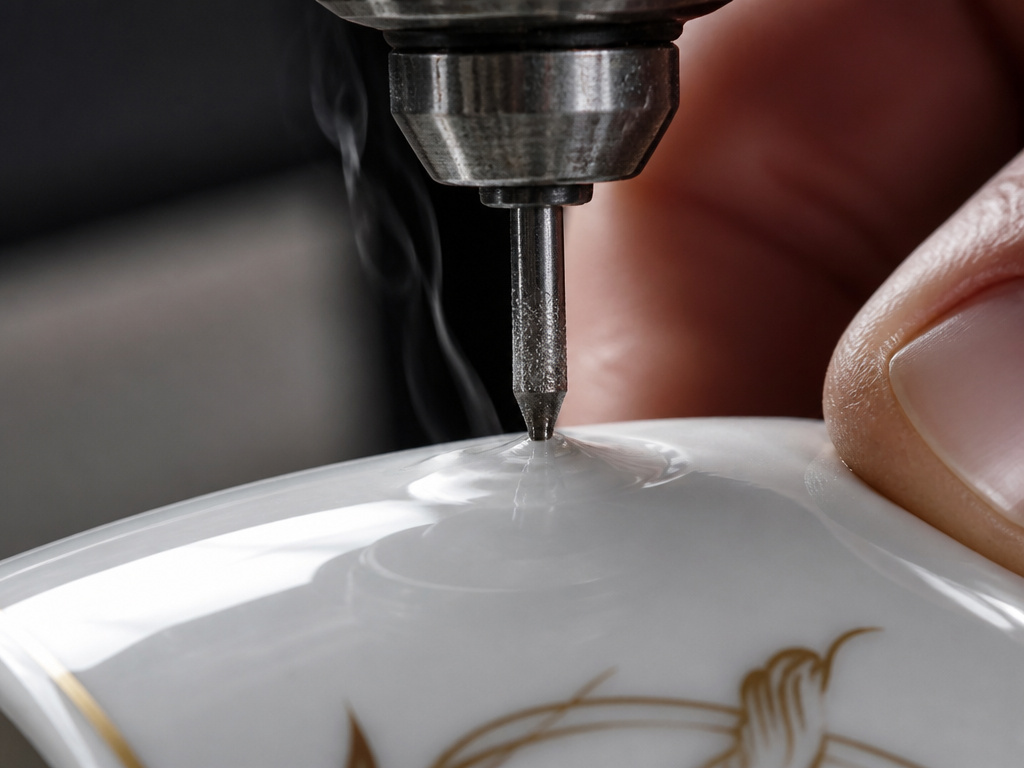 This isn’t just folklore. Porcelain is a vitrified ceramic, meaning it’s fired at extremely high temperatures until the clay particles fuse into a glass-like matrix. This makes it hard but also brittle.
When a high-speed drill bit hits it, local friction can create intense heat at the point of contact. Porcelain has low thermal shock resistance. A rapid temperature change, a hot spot on one side of the cup wall, causes uneven expansion. That stress has to go somewhere, so it relieves itself as a crack. The water acts as a heat sink, constantly pulling that energy away and keeping the material temperature stable.
The slow speed minimizes the friction generated in the first place. You’re grinding material away particle by particle, not shearing through it.
Hole Size, Placement, and Structural Integrity
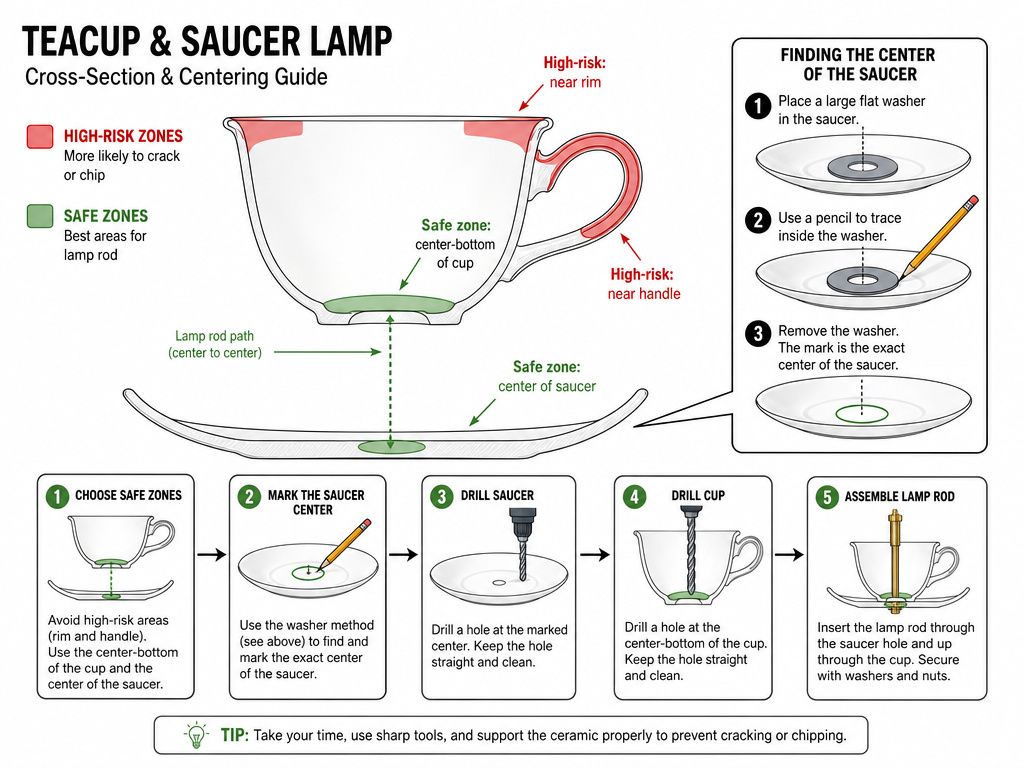 Not all holes are equal in risk. Your project’s design directly affects the cup’s survival odds.
A large hole or one drilled close to the cup’s rim weakens its structure more than a small hole in a non-critical area like the center of the saucer.
If you’re making a lamp, you’re likely drilling through the center of the saucer and the bottom of the cup. This is the strongest location. If your design calls for a hole in the side of the cup or near the delicate handle, the risk of breakage during drilling, or later from a slight bump, multiplies.
Centering a hole on a round saucer is its own challenge. One practical trick from a seasoned DIYer is to use a large washer. Place the washer on the saucer, adjust it until it looks centered, and mark through the center hole. It’s a low-tech solution that beats eyeballing it.
For a multi-cup lamp stack, your hole diameter is dictated by the lamp rod. A standard rod is 1/4 inch. Buy a 1/4 inch diamond drill bit. Don’t try to enlarge a smaller hole with the same bit, you’ll chip the edges. Drill the final size from the start.
After the Hole: Assembling Your Project
You’ve drilled successfully. Now you need to put the pieces together permanently. This is where the wrong adhesive turns hours of work into a wobbly mess.
For threading a metal lamp rod through stacked china, you need an adhesive that can fill gaps. The hole won’t be perfectly smooth, and the rod won’t fit it exactly.
Gorilla Glue Epoxy or E6000 are the right choices. They come in two parts you mix, and they cure into a tough, slightly flexible bond that fills voids. Clean the surfaces with isopropyl alcohol first, apply the epoxy around the rod where it meets the china, and hold it steady as it sets.
Cyanoacrylate (superglue) is the wrong choice. It’s thin and bonds only smooth, tight-fitting surfaces. On porous, imperfect ceramic, it forms a brittle bond that cracks under the slightest twist or temperature change. Your lamp will separate within months.
Drilling Alternatives and When to Walk Away
What if you don’t have a power drill? Or what if the cup is a priceless antique?
The no-drill methods are limited and risky for delicate china. You could try a manual hand drill with a diamond bit, but the inconsistent pressure often leads to cracks. There are also diamond-coated hole saws designed for tile, but they require even more stability and water flow, and they’re overkill for a single small hole.
Sometimes, the best tool is a different cup. If the piece has high sentimental or monetary value, the risk likely outweighs the reward. Consider a no-drill hanging mug rack or a display shelf instead. Drilling should be reserved for durable, replaceable, or already-damaged china you’re repurposing.
Frequently Asked Questions
Can I use a regular drill bit on a tea cup?
No. A regular high-speed steel (HSS) twist bit is designed for metal and wood. It will not penetrate the hard glaze, will overheat instantly, and will almost certainly cause the cup to crack from the sudden, uneven force. You must use a bit designed for hard, brittle materials: diamond-coated or carbide-tipped.
How long does it take to drill through a cup?
With the correct bit, speed, and cooling, expect to spend three to seven minutes per hole. Thicker, harder porcelain or larger diameter holes take longer. If you’re drilling multiple pieces for a lamp, the process can take half an hour or more. This is a patience project.
Why did my tea cup crack even though I used water?
The most common reasons are excessive drill speed, uneven pressure (like leaning the drill to one side), or the bit catching on the exit side. Another possibility is an invisible pre-existing flaw or crack in the cup that the drilling stress revealed. Always inspect pieces for hairline cracks before you start.
What’s the best way to keep the cup from spinning while drilling?
Submerging it in water in a tub provides some resistance. Placing the cup on a wet, folded rag inside the tub adds grip. For absolute security, you can gently clamp a piece of scrap wood against the cup (not directly on the ceramic) to hold it steady against the side of the tub. Avoid clamping force directly on the cup body.
Can I drill a hole in a bone china cup?
Yes, the same process applies. Bone china is actually stronger and more chip-resistant than standard porcelain due to the addition of bone ash, but it is still a vitrified ceramic. You must use the same slow, cool, careful technique. The risk of catastrophic cracking is slightly lower, but the risk of expensive ruin is higher.
Before You Go
Drilling a tea cup boils down to respecting the material. It’s not wood or drywall. You need the abrasive bite of a diamond bit, the heat management of constant water, and the patience to let the tool work at its own pace.
For a one-off planter, a robust cordless drill might suffice. For a multi-cup lamp that means something, plug in a corded drill. Spend the extra minute taping, centering, and setting up your water bath. That minute is what stands between a charming finished piece and a lesson learned the hard way.
Choose your target cup wisely, mix your epoxy thoroughly, and wear those goggles every single time. The difference between success and a dustpan isn’t luck, it’s following the rules the material already wrote.
