
How to Drill Into Tile Without Cracking It: Speed & Size Guide
This post contains affiliate links. As an Amazon Associate, we earn from qualifying purchases.
To drill into tile without breaking it, you need three things matched exactly: a diamond core bit, a drill speed between 250 and 300 RPM, and constant water lubrication. The hole must be drilled 1/8” larger than the fixture fitting to prevent stress transfer. Dry cutting or high speed cracks the tile within the first millimeter.
That 250–300 RPM window isn’t a suggestion. It’s printed in the installation manual for a major tile brand. Go faster and the friction heat exceeds the tile’s thermal shock resistance; the ceramic micro-cracks before the bit even breaks through.
What follows is the installer’s method, stripped of guesswork. You’ll get the bit types that work, the two ways to keep everything wet, and the one mistake that turns a $50 tile into dust before the anchor even goes in.
Key Takeaways
- Drill speed is not variable. Keep it between 250 and 300 RPM for ceramic and porcelain. Stone requires even slower speeds.
- You must lubricate. Use a diamond core bit with constant water flow or a spray bottle. Dry drilling guarantees a crack.
- Size the hole 1/8” larger than your pipe or fixture. A tight fit transfers stress directly to the tile edge.
- For large holes, always pre-drill a pilot with a small diamond bit. Trying to start a hole saw directly on the glaze is how it skates and scars the surface.
- Tile type changes the game. Porcelain is harder than standard ceramic and requires a fresh, sharp bit. A worn bit will glaze over and burn.
The Non-Negotiable Setup: Speed, Bit, and Lubrication
Skip any one of these three and the project fails at the drill point. This isn’t about being careful; it’s about matching physics.
The OEM manual for Lunada Bay Tile specifies a diamond core bit at low speed (250 to 300 rpm). This number exists because ceramic and porcelain have a low tolerance for heat shock. The diamond grit does the cutting through abrasion, not shearing. High RPMs generate heat faster than water can dissipate it, creating micro-fractures that spread to the surface.
Where this goes sideways: Using a standard masonry or twist drill bit. The carbide tip can grab the hard glaze and shatter the tile on contact, or simply grind itself dull without making progress. A diamond core bit is the only correct tool.
Your drill must have variable speed control. A cordless drill with a trigger is fine, but you must be disciplined. If your drill only has a high/low switch, use the low setting and pulse the trigger. Better yet, use a drill press with its speed dialed down.
For lubrication, you have two proven paths. The first is a helper with a spray bottle, misting the bit and tile every 10-15 seconds. The second is a dedicated 3/8” drill with a water swivel attachment, which feeds water directly through the bit. This is the method called out in multiple stone and porcelain installation sheets. The water cools the bit, suppresses dust, and flushes away debris so the diamonds cut cleanly.
| Tile Type | Bit Type | Target Speed | Critical Lubrication Note |
|---|---|---|---|
| Glazed Ceramic | Diamond Core Bit | 250–300 RPM | Water prevents glaze cracking; a spray bottle is minimum. |
| Porcelain | Diamond Core Bit (New/Sharp) | 250–300 RPM | Porcelain is denser; heat builds faster. A water swivel is best. |
| Natural Stone | Diamond Core Bit | 150–250 RPM | Softer stone (marble) can clog the bit; use more water flow. |
| Glass Tile | Diamond Core Bit (Spear-point) | 200–250 RPM | Must be backed with wood; use light pressure and constant water. |
Choosing the Right Bit and Drill for the Job
A category name is not a recommendation. You need the specific tool that matches the material’s hardness.
For almost all wall and floor tile, a diamond core bit is the only bit that works consistently. These are hollow cylinders with diamond grit sintered or electroplated to the end. The electroplated versions are cheaper and good for a handful of holes in ceramic. For porcelain or more than five holes, a sintered metal bond bit lasts three times longer. Brands like Bosch, DEWALT, and MK Diamond make reliable lines.
A diamond core bit cuts through the tile via abrasion. The water keeps the diamonds cool and washes away the powdered tile, preventing the bit from glazing over and losing its cutting ability.
For small holes (under 1/4″), a diamond spear-point or needle bit works. These are solid bits with a pointed tip, ideal for pilot holes or drilling into a ceramic pot for drainage. They require even more care to prevent walking.
Your drill matters. A standard 18V or 20V cordless drill has enough power. The key is speed control and a side handle. The twisting torque when the bit first bites can wrench the drill from your hands. A secondary handle gives you the leverage to keep it straight. For frequent tile work, a 3/8” drill with a water swivel attachment is the professional’s choice, as it feeds coolant directly through the drill and bit.
Step-by-Step: The Wet-Drilling Process
This sequence assumes you’re drilling into an already-installed tile. If the tile is loose, clamp it to a scrap wood backer board.
Step 1: Mark the Hole Precisely
Use painter’s tape over the drilling spot. Mark your center point on the tape with a permanent marker. The tape prevents the bit from skating on the glossy surface. For larger holes, use a template or a hole saw guide block.
Step 2: Set Up for Water
Place a sponge around the drilling area or have a spray bottle filled and ready. If using a water swivel, connect your water source and let it drip to prime the line.
Step 3: Start the Pilot Hole (Critical)
Tilt your drill at a slight angle and start at the lowest speed. Grind a small, shallow groove in the tile glaze to create a starting point for the bit. Once the groove is established, slowly bring the drill to vertical. This prevents the bit from skittering across the surface and scratching the tile.
Step 4: Drill with Steady, Light Pressure
Maintain your speed between 250-300 RPM. Let the weight of the drill do the work, do not push. The sound should be a consistent grinding hiss, not a high-pitched whine. Pause every 20-30 seconds to add water. If drilling through a wall, be prepared for a burst of water and dust when you break through the backside.
Step 5: Manage the Break-Through
As you feel the bit about to exit the back, reduce pressure significantly. The last millimeter of material is most prone to chipping out. For a clean exit, if possible, flip the work and drill from the opposite side after the pilot hole is through.
Common mistake: Drilling straight through from one side at full pressure. The back side will almost always chip or blow out a fragment, leaving a ragged hole edge that can compromise the seal.
Tile Type Changes Everything: Ceramic vs. Porcelain vs. Stone
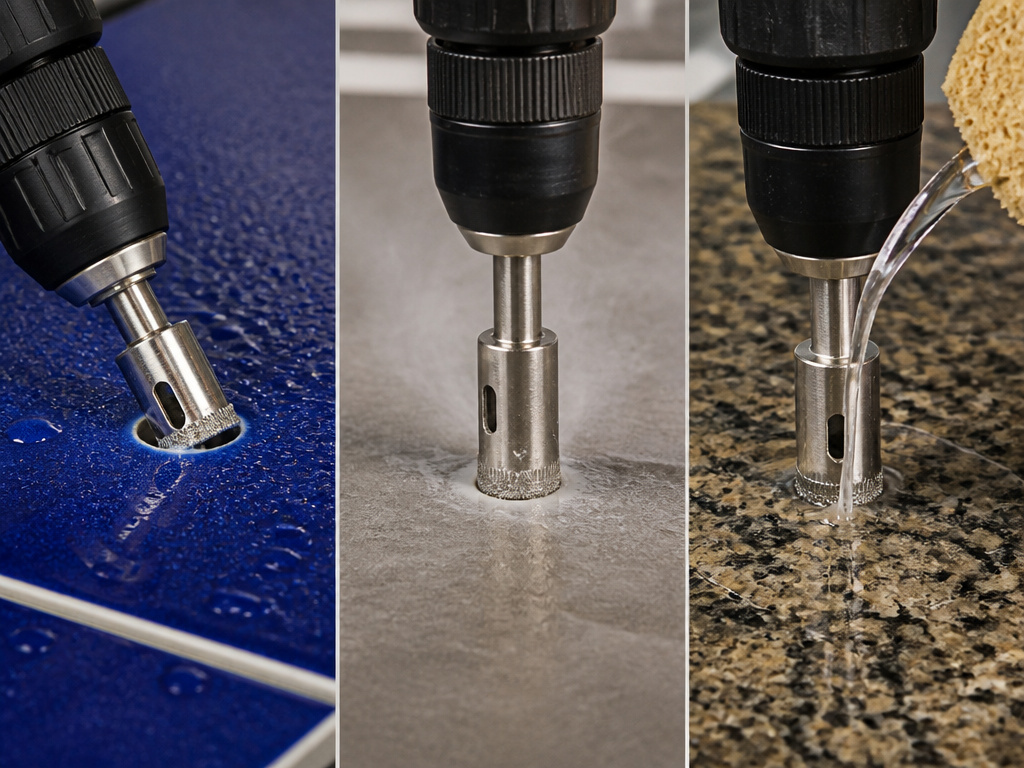 The “tile” category is too broad. The density and manufacturing process dictate your approach.
Ceramic Tile is softer, with a higher water absorption rate. It’s the most forgiving. A sharp diamond bit and steady water will get through it. You can often use a less expensive electroplated bit here. The main risk is cracking the glazed surface on the start, which is why the angled start technique is non-negotiable.
Porcelain Tile is fired at higher temperatures, making it incredibly dense and hard. It’s nearly as hard as mild steel. Drilling porcelain tile demands a fresh, high-quality sintered diamond bit. A worn bit will overheat, glaze over, and stop cutting while still generating destructive heat. Patience is the only tool here; a single hole can take two to three minutes.
Natural Stone like marble, granite, or slate is a different beast. It’s softer but abrasive and can clog drill bits. Use a continuous water flow. Softer stones like marble can also crack under point pressure, so a pilot hole is essential. The process shares principles with drilling into stone, where controlled speed and clearing debris are paramount.
| Problem | Likely Cause | Immediate Fix |
|---|---|---|
| Bit skates/scratches tile | Drilling on glossy glaze without a pilot groove | Apply painter’s tape and start angled groove. |
| No progress, bit smoking | Dull bit or too high speed | Stop immediately. Cool bit, check sharpness, reduce RPM. |
| Chipping on back side | Too much pressure on breakthrough | Reduce pressure at end, or drill from both sides. |
| Tile cracks radially from hole | Dry drilling or too-tight fixture fit | Use water; ensure hole is 1/8” larger than fixture. |
The Hole Size Rule Everyone Ignores
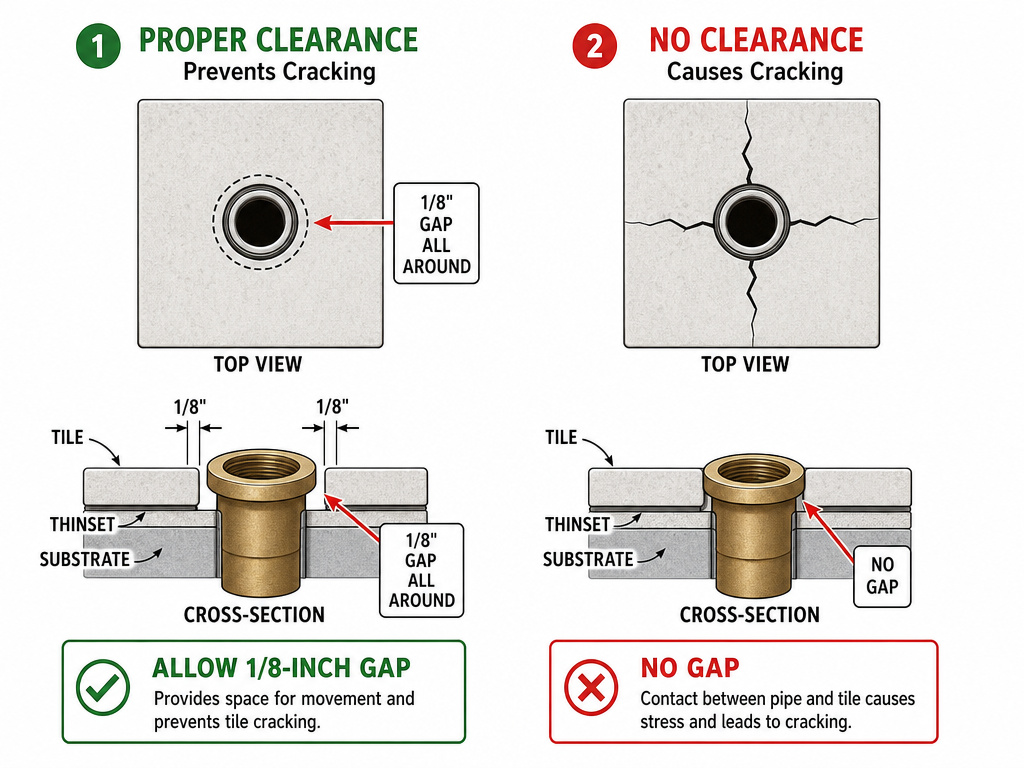 The hole isn’t done when the bit comes out. Its final size determines if the tile cracks next week.
Installation guidelines state openings should be 1/8” larger than fixture fittings to avoid stress transfer to the tile. This means if your pipe is 1/2” in diameter, you need a 5/8” hole. This clearance allows for minor substrate movement, thermal expansion, and the sealant bed without putting pressure on the brittle tile edge.
A tight hole transmits any stress directly to the tile. When the wall flexes or the pipe expands, the tile becomes the weakest point and cracks in a straight line from the hole. This is why store-bought shower kits with pre-cut holes often fail, they’re cut to the minimum size.
For sink faucets or shower valves with multiple holes, maintain this clearance for each hole. Use a best tile hole saws kit designed for this, which will give you clean, sized holes. After drilling, deburr the inside edge of the hole with a diamond hand pad to remove any microscopic chips that could weaken the edge.
Before You Start: The Safety & Prep Checklist
Tile drilling creates a fine, abrasive slurry and uses water near electricity. Mitigate the hazards before the bit spins.
Before you start: Wear safety glasses and a dust mask, silica dust is present. Use a GFCI-protected outlet for your drill. Secure the tile firmly; if it’s on the wall, be aware of what’s behind it (wires, pipes). Have a shop vacuum or wet/dry vac handy for the messy slurry.
Your substrate must be prepared. If you’re drilling into a wall for an anchor, ensure there’s solid backing (wood stud, concrete) behind the tile. Hollow areas behind the tile will cause blowout when the anchor is tightened. For a clean installation where the tile will be bonded, the standard is a minimum of 80% mortar coverage for dry areas and 95% for wet areas.
This often requires the double-buttering technique, applying adhesive to both the tile back and the substrate, to guarantee full contact. A mortar like ARDEX X 77 MICROTEC is fiber-reinforced for this kind of job. The substrate must be flat to within 1/8” in 10 feet for large-format tiles, per TCNA guidelines.
Frequently Asked Questions
Can I use a regular drill bit on tile?
No. Standard high-speed steel (HSS) or masonry bits are designed for different materials. They will either dull instantly, skate dangerously, or grab and crack the tile. A diamond-grit bit is the only appropriate tool for drilling tile.
Why does my tile keep cracking when I drill?
Two primary reasons: heat and stress. You’re either drilling too fast without water (heat crack), or the final hole is too small for the fixture, transferring stress to the tile edge. Go slower, use more water, and double-check your hole size.
Do I need to drill from both sides?
It’s the best practice for a clean exit, especially with porcelain or brittle stone. Drill partway through from the front, then flip the tile or access the back to finish the hole. This prevents the back side from chipping out.
What’s the difference between drilling ceramic and porcelain?
Porcelain is significantly denser and harder. It requires a sharper, more durable diamond bit and even more patience. A bit that will drill ten holes in ceramic might only handle two or three in porcelain before needing replacement. The core technique for drilling ceramic tiles is the same, but porcelain punishes any shortcut.
How do I drill a hole in already-installed tile without water everywhere?
Use a putty dam. Make a ring of plumber’s putty or modeling clay around the drilling site to form a small reservoir. Fill it with water. This keeps the bit lubricated and contains 90% of the slurry. Have a wet/dry vacuum nozzle held right next to the bit to suck up the overflow.
The Bottom Line
Drilling tile is a test of patience, not force. The winning formula is a diamond bit, slow speed, and constant water. Remember the 1/8” clearance rule, it’s what keeps the tile intact after you’re done. For the hardware, a Bosch diamond core bit and a drill with a side handle will cover 95% of home jobs. If you’re facing dense porcelain, buy a fresh bit and accept the slower pace. Rushing this job has only one result: the sound of cracking ceramic.
