How to Use a Track Saw – Essential Techniques & Pro Tips
This post contains affiliate links. As an Amazon Associate, we earn from qualifying purchases.
Using a track saw requires matching three things: the correct blade for your material, a precise track alignment on the cut line, and a blade depth set to protrude only about a quarter-inch past the workpiece. Get those right, and the tool delivers a perfectly straight, splinter-free cut in seconds.
Most people see the track and think the hard part is over. They slap the rail down, crank the blade deep, and push. The cut wanders, the edge shreds, and they blame the saw.
The truth is simpler. The track is just a guide. The real work happens in the sixty seconds of setup you probably skipped.
This guide walks through that setup, step by step. We’ll cover the straight cuts, the bevels, the plunge cuts, and the mistakes that turn a $600 tool into a noisy paperweight. You’ll learn how to pick a blade by listening to the cut, why foam board is your best friend, and when to ignore the manual’s depth chart.
Key Takeaways
- Set your blade depth to the thickness of your material plus the track, plus a quarter-inch. Any deeper creates excess dust, dulls the blade faster, and dramatically increases kickback risk on bind.
- Always use a sacrificial layer under your workpiece, 1.5-inch rigid foam insulation is the standard. Cutting into a concrete floor will chip the blade’s carbide teeth on the first pass.
- The splinter guard on the track is the cut line. Align its edge with your pencil mark; the blade cuts on the waste side of that edge. If you align the saw’s base plate instead, your cut will be off by the width of the splinter guard.
- For bevel cuts, measure to the long point of your angle. The saw’s bevel scale measures from the vertical, so a 45-degree setting cuts a 45. Your marked line needs to account for where that angled blade meets the wood.
- Connect a dust extractor, always. Track saws create a fine, concentrated stream of dust that coats the track’s anti-slip strip. After three cuts without extraction, the saw starts to slide and the cut drifts.
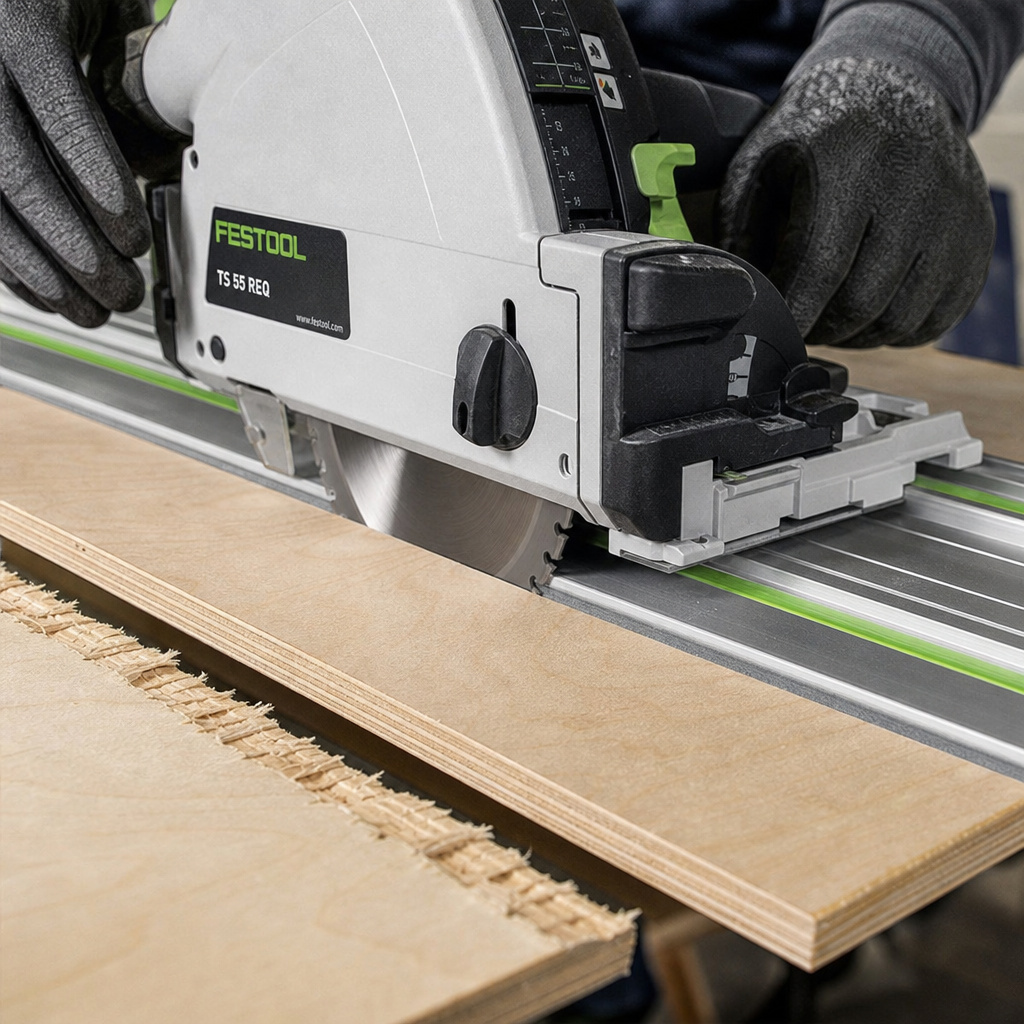
A track saw combines a plunge-cut circular saw with an aluminum guide rail featuring a factory-applied anti-splinter strip. The saw’s base mates with the rail’s edge via a rubber strip and groove system, eliminating lateral movement. Blade depth is set relative to the material and rail thickness, typically limiting protrusion to 5–6mm for safety and cut quality. Standard rails are 55mm wide, compatible across many brands using a universal T-slot or proprietary lip.
What do you need before you make the first cut?
You have the saw and the track. That’s not enough. The difference between a clean operation and a frustrating mess is in the supporting gear most tutorials treat as optional.
Your work surface is the first decision. A pair of sawhorses and a sheet of plywood is the classic move, and it’s wrong. The blade will cut into that plywood support on the first pass, pinching the kerf and causing the saw to bind.
The professional fix is a sheet of 1.5-inch thick extruded polystyrene foam board, the pink or blue insulation from a building supply store. It’s cheap, it’s flat, and the blade passes through it without resistance. You can cut on it all day. When it’s chewed up, you flip it over.
Clamps are not optional for cuts under four feet. The track’s rubber underside provides friction, but it’s not a weld. For a rip cut along an eight-foot sheet, you might get away with just the friction.
For a 14-inch crosscut, the lateral force of the saw will shift the track halfway through. Get a set of low-profile track clamps that fit into the T-slot on the rail. If your track doesn’t have a slot, use sturdy F-style clamps over the top, but place them well behind the saw’s path.
Finally, the blade. The one that came in the box is a compromise. It’s usually a 40-tooth ATB (Alternate Top Bevel) blade, decent for plywood and softwood.
For melamine or veneered plywood, you need an 80-tooth triple-chip grind (TCG) blade. The higher tooth count and flat-top grind shear the laminate instead of chipping it. For hardwood, a sharp 40-tooth ATB is fine, but listen. If the motor bogs and the cut smells like a campfire, the blade is either dull or wrong.
| Tool/Accessory | Non-Negotiable Purpose | What Happens If You Skip It |
|---|---|---|
| Sacrificial Foam Board | Supports workpiece fully; allows blade clearance | Blade binds in cut, kicks back, or chips on floor |
| Track Clamps (2 minimum) | Prevents track creep during cut | Cut drifts off line, especially on short crosscuts |
| Dust Extractor with Hose | Keeps track groove clean; maintains visibility | Saw loses grip on dusty track; cut wanders; airborne particles |
| Material-Specific Blade | Ensures clean cut, prevents tear-out, protects motor | Chipped veneer, burned wood, overloaded saw motor |
What are the basic steps for making a straight cut with a track saw?
The sequence matters. Change the order, and you’ll be re-marking, re-clamping, and re-cutting.
Step 1: Mark once, align the splinter guard. Draw your cut line with a sharp pencil and a straightedge. Now, place the track so the edge of the splinter guard sits directly on that line. This is the most common mistake. People align the saw’s shoe or the edge of the aluminum rail. The blade cuts exactly along the inside edge of that rubber splinter guard. If your line is for the finished piece, the guard goes on the line, and the waste falls to the outside. Double-check this alignment at both ends of the track.
Step 2: Clamp the track securely. For cuts longer than 24 inches, use at least two clamps. If your track has a T-slot, use the dedicated track clamps. If not, place F-clamps over the top, ensuring they are positioned so the saw’s body will clear them as it passes. Tighten them firmly. Give the track a solid shove with your hand, it shouldn’t move. This is your last chance to catch a slip.
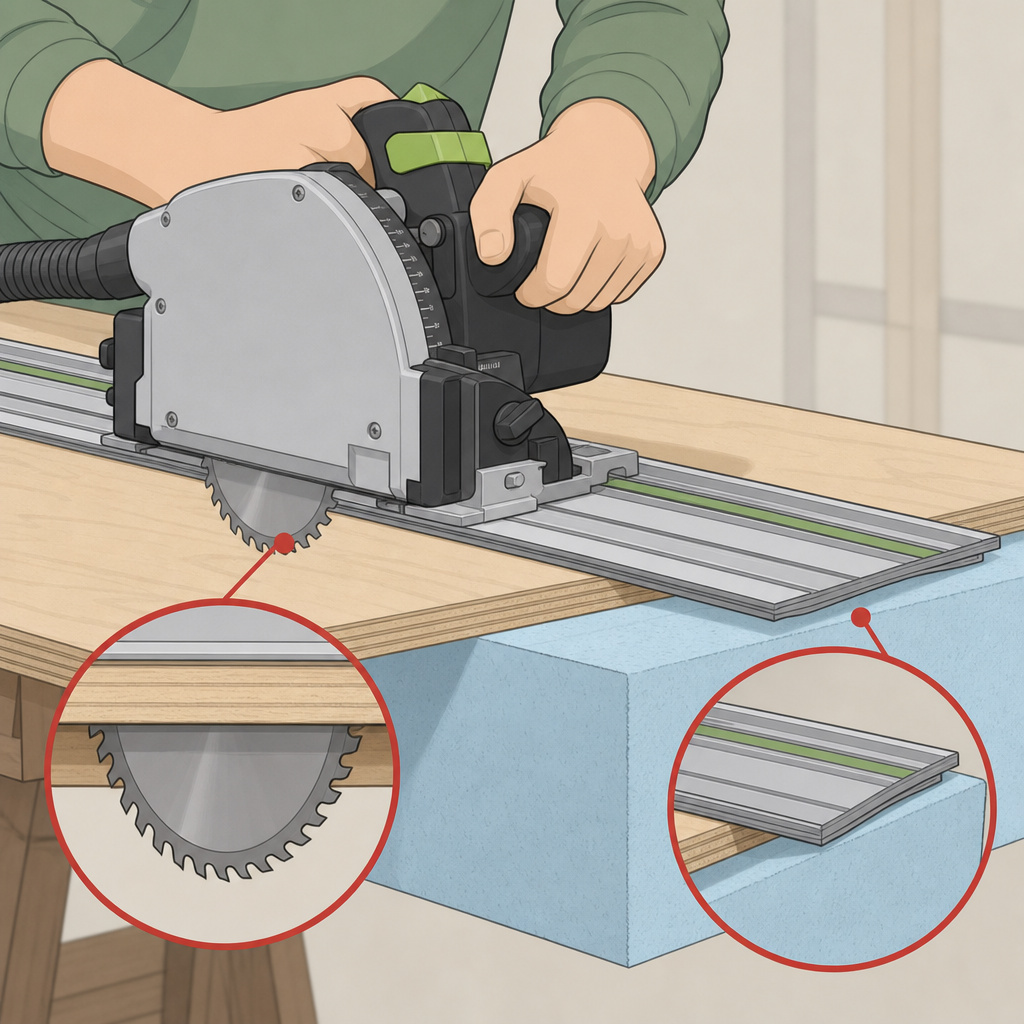
Step 3: Set the blade depth precisely. This isn’t a circular saw. You don’t crank it deep. Place the saw on the track at the start of your cut. Plunge the blade down until it just touches your sacrificial surface. Now, look at the depth scale. You want the blade to extend only about 1/4 inch (6mm) past the bottom of your workpiece. So, if you’re cutting 3/4-inch plywood on a 1.5-inch foam board, your total depth is the plywood (0.75″) + the foam (1.5″) + the clearance (0.25″) = 2.5 inches. Set it there. A deeper blade throws more dust, strains the motor, and increases the lever arm for kickback.
Step 4: Connect dust extraction and make the pass. Hook up your vacuum hose. Position the saw at the start, with the blade clear of the material. Pull the trigger, wait for the motor to spin up to full speed, you’ll hear the pitch stabilize, then smoothly and firmly plunge the blade straight down into the material. Once fully plunged, push the saw forward along the track with steady pressure. Don’t rush. Don’t slow to a crawl. Let the blade teeth do the cutting. At the end of the cut, keep the saw plunged, let the blade stop spinning, then retract it and lift it off.
Forget these steps, and you join the club. I once tried to “save time” by not clamping the track for a quick 18-inch cut on a cabinet panel. The track slid two degrees halfway through. The panel was ruined, and the straight cutting guide I had to build to salvage the project took three times longer than clamping would have.
Before you start: The blade is exposed at the rear when plunged. Never reach behind or underneath the workpiece during or immediately after a cut, the carbide teeth are still sharp after spinning. The riving knife must be installed and aligned; it prevents kickback by keeping the kerf open. If you smell burning plastic or see smoke, stop immediately. You are forcing the cut, the blade is dull, or the track has shifted.
How do you make a bevel or plunge cut?
Bevels and plunge cuts are where the track saw pays for itself. They’re also where you can ruin a project in two seconds.
For a bevel cut, the process changes at the marking stage. The saw’s bevel gauge measures the angle from vertical. If you set it to 45 degrees, the blade tilts 45 degrees. But your cut line is on the top surface of the wood. The blade enters at the top on your line, but exits at the bottom further in. You must measure and mark to the long point of the angle.
1. Draw your desired cut line on the workpiece.
2. Set the saw’s bevel angle using the adjustment lever.
3. Place the saw on the track, plunged to your set depth, and hold it at the start of your line. Look at where the blade teeth contact the wood at the bottom of the workpiece. This is your actual cut line. Adjust the track position so the blade’s bottom contact point is on your waste side.
4. Clamp and cut as usual. The saw will want to walk sideways slightly due to the angled force. Use a firmer guiding hand.
Plunge cuts (for starting a cut in the middle of a panel) require a specific blade type, a plunge-cut blade with a negative hook angle. These have teeth designed to enter the material vertically without grabbing.
1. Set your depth exactly to the material thickness plus your standard quarter-inch.
2. Align the plunge mark on the saw’s shoe (usually a notch at the front) with your starting point.
3. With the saw on the track, start the motor and let it reach full speed.
4. Slowly and evenly press the plunge lever down. The blade will enter the material. Do not push forward until the base plate is fully seated on the workpiece.
5. Once plunged, proceed with the cut.
The first time I tried a bevel cut on a walnut slab, I used the top-surface line. The resulting angle cutting techniques were perfect, but the cut was a full 3/8-inch off where it needed to be because I didn’t account for the blade’s exit point. The slab became a very expensive lesson in geometry.
Which blade should you use, and when does it matter?
The stock blade works. It doesn’t work well. Blade selection is the single biggest lever for cut quality, and it’s not about tooth count alone. It’s about tooth geometry and the material’s glue.
For plywood, MDF, and melamine, you need a high tooth count blade with a Triple-Chip Grind (TCG) or an Alternate Top Bevel (ATB) with a high angle. The Festool 48-tooth Pantheon blade or the DeWalt 60-tooth Ultra Finish are examples. The TCG teeth shear through the brittle glue layers in plywood and the plastic coating on melamine without chipping. Using a standard framing blade here will fray the edge like a broom.
For solid hardwood and softwood, a sharp 40-tooth ATB blade is ideal. More teeth can cause burning in dense hardwoods like maple or oak because each tooth takes too small a bite and rubs. Fewer teeth (like a 24-tooth) will cut faster but leave a rougher surface.
Listen to the sound. A clean, sharp blade makes a steady ripping sound. A dull or wrong blade produces a labored, lower-pitched hum, and you’ll see burn marks.
For aluminum and non-ferrous metals, you cannot use a standard wood blade. You need a blade specifically labeled for aluminum, usually a negative-hook-angle TCG blade with around 80 teeth for a 6.5-inch diameter. Even then, you must go slow, use cutting wax, and never force it. The chips will be hot.
| Material | Recommended Blade Type | Tooth Count (6.5″) | Critical Spec | Visual Result If Wrong |
|---|---|---|---|---|
| Veneered Plywood / Melamine | Triple-Chip Grind (TCG) | 60–80 | Negative or zero hook angle | Chipped, torn veneer; fuzzy edges |
| Solid Hardwood (Oak, Maple) | Alternate Top Bevel (ATB) | 40–48 | Sharp, clean teeth | Burn marks along cut; rough, torn grain |
| Softwood (Pine, Cedar) | ATB or Combination | 24–40 | Any sharp blade | Acceptable, but may be fuzzy |
| Aluminum (Sheet/Extrusion) | Non-Ferrous Metal TCG | 80+ | Negative hook angle (< -5°) | Grabbing, dangerous kickback; melted aluminum on blade |
What are the most common track saw mistakes?
They’re predictable. I’ve made every one.
Mistake 1: Setting the blade too deep. It feels right to get full clearance. But a blade protruding an inch past the material acts like a lever. If the kerf closes even slightly, from material stress or an imperfect support, the back of the blade contacts the wood and violently throws the saw back toward you. The correct depth reduces this lever arm drastically. It also creates less dust and prolongs blade life.
Mistake 2: Not supporting the track ends. When cutting a full sheet, the track often overhangs the foam board. If an overhanging end is unsupported, your weight on the saw can flex the track downward. This flex translates into a cut that starts straight but dips or rises in the middle. Support the track ends with scrap wood or a second sawhorse.
Mistake 3: Forcing the feed rate. Pushing too fast causes tear-out on the bottom edge because the teeth are grabbing too much material. Going too slow lets the blade rub and burn, especially in hardwoods. The right speed is a firm, consistent push where the motor sound is loaded but not straining. You’ll feel it.
Mistake 4: Ignoring the riving knife. This is the thin piece of metal behind the blade. Its only job is to keep the kerf from closing on the blade. If you remove it for a plunge cut (sometimes necessary), you must be hyper-aware. For 99% of cuts, it stays on. A pinching kerf without a riving knife will stop the blade dead and kick the saw sideways.
Mistake 5: Assuming track compatibility. DeWalt tracks work with Makita saws? Sometimes, but not always. The rubber anti-slip strips and the groove dimensions vary. A “universal” track might accept the saw, but if the fit isn’t snug, you lose precision. The safest path is to use the track from your saw’s manufacturer. If you mix, test the fit on scrap first. A wobbly saw on a track is worse than a freehand circular saw.
I learned the riving knife lesson on a humid August day cutting treated pine. The wood was wet, the kerf swelled shut behind the blade, and without the knife, the saw kicked back so hard it pulled the cord from my hand. The blade was fine. My confidence took six months to regrow.
How do you maintain your track saw for longevity?
Maintenance is a five-minute ritual after each use. Skip it, and the precision tool becomes a sloppy one.
First, clean the track. Wipe the aluminum rail with a dry cloth to remove dust. The rubber anti-slip strip on the bottom is the critical surface.
Use isopropyl alcohol on a rag to dissolve any sap or built-up grime. If that strip gets glossy, the saw loses grip. Next, clean the saw’s base plate and the matching groove that rides on the track. A bit of wax on the aluminum contact points (not the rubber) makes for smoother sliding.
Second, check the blade. Look for pitch buildup, that black, sticky resin from cutting pine or other sappy woods. Soak the blade in a dedicated blade cleaner or simple household degreaser.
A clean blade cuts cooler and sharper. Inspect the carbide teeth for chips. A single chipped tooth will leave a score line on every cut you make.
Third, store it right. Don’t leave the track leaning against a wall. It can bow over time.
Lay it flat or hang it on a wall bracket. Store the saw with the blade retracted. If it’s a cordless model, remove the battery. For corded, coil the cord loosely.
Finally, the dust port. That rubber fitting gets clogged. Disconnect it and clear any packed dust. A blocked port forces dust into the motor housing, and that’s a death sentence for the bearings. Do this every few months if you use the saw regularly.
Your track saw isn’t a disposable tool. A Festool TS 55 or a DeWalt DWS520 is an investment. Ten minutes of care keeps it cutting like the day you bought it, and that’s cheaper than a replacement.
Frequently Asked Questions
Can a track saw replace a table saw?
For breaking down sheet goods and making long, straight cuts, a track saw is often superior to a table saw operation. For repeatable rip cuts of narrow stock, dadoes, and joinery, a table saw is still the right tool. They complement each other; one doesn’t fully replace the other.
Why is my track saw burning the wood?
You’re either feeding too slowly, using a dull blade, or cutting with a blade that has too many teeth for the material. In hardwood, a 40-tooth blade is the max. If you’re using an 80-tooth blade on oak, it will burn. Increase your feed rate slightly or switch to a blade with fewer teeth.
How do I connect two tracks for a longer cut?
Most brands have a connector bar. You butt the two tracks together, slide the connector into the T-slots on the underside, and tighten the screws. The critical step is to check for a seamless transition by sighting down the joined rail. A misaligned joint will cause a slight bump, and the saw will jump, leaving a notch in your cut.
Can I use my track saw to cut doors or countertops?
Absolutely. It’s one of the best tools for the job. Use a fine-tooth blade (60+ teeth), ensure the door is fully supported on foam, and clamp the track securely. The plunge action lets you start the cut safely in the middle of the door’s edge without an entry hole.
The cut is straight but has tear-out on the bottom. What’s wrong?
You need a zero-clearance effect. Place a strip of blue painter’s tape along your cut line on the bottom of the workpiece before aligning the track. The tape supports the wood fibers as the blade exits. Also, verify your blade is sharp and designed for cross-grain cuts (an ATB blade, not a rip blade).
The Bottom Line
A track saw rewards patience in setup and punishes haste. The magic isn’t in the motor, it’s in the sixty seconds you spend aligning the splinter guard, clamping the track, and setting the depth. Get those right, and the cut happens by itself. Choose your blade by the sound of the cut and the smell of the wood, not the tooth count on the package. Remember that the track is a precision instrument; keep it clean, store it flat, and it will guide you true for years. This tool turns the intimidating task of breaking down a full sheet of plywood into a simple, repeatable process. Use it well, and you’ll wonder how you ever worked without it.