The Right Way to Cut Angles with a Circular Saw in 7 Steps
This post contains affiliate links. As an Amazon Associate, we earn from qualifying purchases.
Cutting an angle with a circular saw means tilting the base plate for a bevel cut or angling the saw’s path along the workpiece for a miter cut. You set the bevel angle using the saw’s adjustment lever, mark the cut line with a square, clamp the material, and guide the saw along the line with the blade at the correct depth.
Most people get this wrong by skipping two things. They don’t clamp the workpiece, letting it shift mid-cut and ruining the angle. And they set the blade depth too deep, which increases friction, kickback risk, and leaves a ragged edge on the backside of the cut.
This guide walks through the three types of angle cuts, the exact seven-step process to make them cleanly, and the common mistakes that turn a simple 45-degree cut into a trip to the lumber yard for more wood.
Key Takeaways
- A bevel cut angles through the material’s thickness; a miter cut angles across its width. Know which one your project needs before you adjust the saw.
- Always clamp your workpiece. A shifting board guarantees a ruined angle and is the leading cause of kickback on angled cuts.
- Set the blade depth so the teeth protrude only 1/4 inch past the bottom of the material. A deeper setting binds in the kerf and tears out the underside.
- Use a speed square as a physical guide for the saw’s base plate. It’s more reliable than trying to follow a pencil line freehand, especially for bevels.
- Make a test cut on scrap wood first. Saw angle markings drift over time, and a 45-degree setting might actually be 43 degrees on your tool.
The Three Types of Angle Cuts (And When to Use Each)
Not all angles are the same. Using the wrong type for your joint is like using a screwdriver to drive a nail – it might work, but it’ll be ugly and weak. The cut type changes how you set up the saw and how the pieces fit together.
A bevel cut slopes across the thickness of the board. You make it by tilting the circular saw’s base plate. Think of the angled edges on a picture frame’s back where it meets the wall, or the sloping sides of a wooden planter box. The blade stays vertical relative to the cut line, but it’s tilted relative to the board’s face.
A bevel cut is made by tilting the circular saw’s base plate, changing the angle of the cut relative to the face of the workpiece. Common angles are 45 degrees for joining two pieces into a 90-degree corner, or 22.5 degrees for an octagonal shape. The saw’s shoe must remain flat on the material surface throughout the cut.
A miter cut angles across the width of the board, with the saw’s base plate remaining flat. The classic example is a picture frame corner, where two 45-degree miter cuts meet to form a 90-degree joint. You don’t tilt the saw for a basic miter; you instead guide the saw along an angled line you’ve drawn across the board’s face.
Then there’s the compound cut, which combines both a bevel and a miter. You tilt the saw and cut along an angled line. This is for complex joinery like crown molding or furniture legs where the joint meets on two planes.
It’s the most advanced of the three and demands the most setup precision. If you’re just building a basic planter box, you don’t need it. If you’re installing trim on a sloped ceiling, you do.
| Cut Type | Saw Adjustment | Best For | Visual Cue |
|---|---|---|---|
| Bevel | Tilt base plate | Planter boxes, tapered edges, some trim work | Angled edge on the board’s thickness |
| Miter | Guide saw along angled line (base flat) | Picture frames, simple box corners, trim | Angled cut across the board’s width |
| Compound | Tilt base plate AND guide along angled line | Crown molding, furniture, complex trim | Angled on both the face and edge of the board |
The Non-Negotiables: Safety and Setup
You can’t cut a straight line on a wobbly bench, and you can’t cut a safe angle without the right prep. This isn’t just about good results. It’s about keeping your fingers.
Before you start: The blade is exposed on the underside during a bevel cut, increasing the chance of contacting a hidden nail, the work surface, or your leg. Always know what’s beneath the workpiece. Also, the cutoff piece on an angled cut is more prone to pinching the blade due to the altered kerf shape. Support it so it can fall away freely.
First, personal gear. Safety glasses are mandatory – a spinning blade throws splinters sideways, especially on an angled pass. Hearing protection too.
A circular saw hits 100 dB, and that’s not a volume you want for more than a minute. A dust mask isn’t just for comfort. Inhaling MDF or pressure-treated pine dust is a health issue, not an annoyance.
Now, tool check. Is the blade sharp? A dull Diablo 60-tooth finish blade will burn the wood on a bevel cut before it cleanly shears it. The burn marks are a symptom, but the cause is the blade struggling, which leads to you forcing the saw.
Forcing a saw is how kickback starts. Is the base plate tight? Grab the saw and try to wiggle the shoe. If there’s play, the bevel lock isn’t fully engaged or the mechanism is worn. An unlocked bevel will drift during the cut, turning your 45 into a 50.
Workpiece stability isn’t a suggestion. It’s the rule. Two clamps minimum. One near the start of the cut, one near the end. The board must not move, rock, or vibrate.
If you’re cutting a long 2×10, support it every 18 inches. That floppy, unsupported end will sag as you cut, bind the blade, and launch the saw back toward your torso. I’ve seen it happen with a piece of pine trim. The sound is unforgettable – a sharp BANG and the saw jerking up and back. Support the cutoff side so it can drop, not pinch.
The 7-Step Process for a Perfect Angled Cut
Follow this sequence. Swapping steps or skipping one costs you accuracy, and on a angled cut, accuracy is everything. A 1/8-inch gap in a picture frame miter is glaring.
Step 1: Mark with precision, not a guess. Use a sharp pencil or, better, a marking knife for a fine line. A fat, blunt pencil line is 1/16th of an inch wide – that’s your margin of error before you even start the saw. Hold your speed square firmly against the board edge and draw your line. For a bevel, you’re marking where the cut starts and ends on the face. For a miter, you’re drawing the angled line you’ll follow.
Step 2: Set the bevel angle (for bevel or compound cuts). Find the bevel adjustment lever, usually at the front of the shoe. Loosen it. Most saws have positive stops at 0, 45, and sometimes 22.5 degrees. Don’t trust the scale blindly. Push the shoe to the detent, then check it with a digital angle finder or a speed square held against the blade (with the saw unplugged). Tighten the lever until it’s firm. If it feels mushy, it’s not tight enough. A loose bevel will shift under pressure.
Step 3: Set the blade depth. This is the step everyone rushes. Loosen the depth adjustment lever, pivot the shoe until the blade teeth extend just past the bottom of your workpiece. The rule is 1/4 inch. Why? A deeper blade exposes more teeth, creating more friction and heat. It also acts like a larger lever in the kerf, magnifying any twist in your cut. A shallow blade won’t cut through, forcing you to stop and readjust mid-stroke. One-quarter inch. No more.
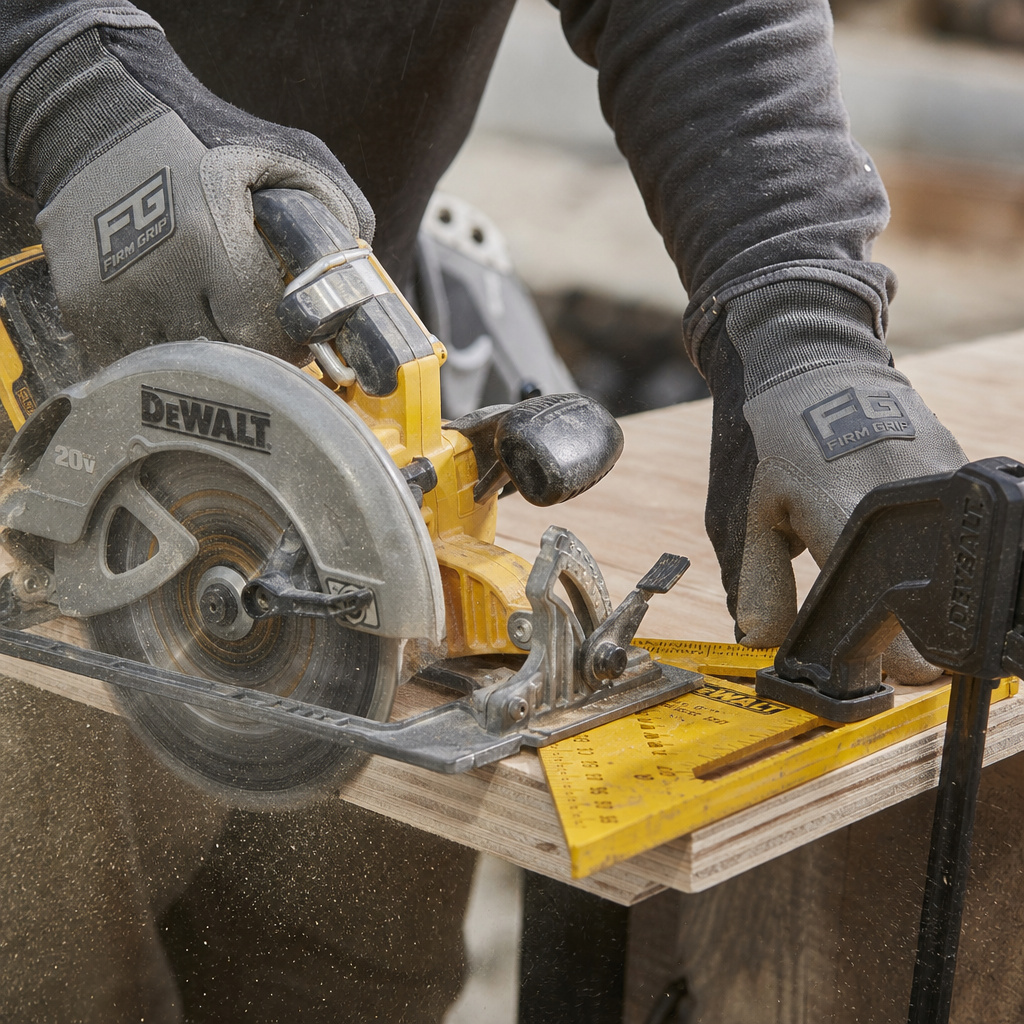
Step 4: Position and clamp the guide. For a bevel cut along the length of a board, clamp a straight edge or your speed square to the workpiece as a guide for the saw’s shoe. Align the guide so the blade will cut on your marked line, accounting for the distance between the blade and the edge of the shoe. This is your offset. Measure it once for your saw and write it on the tool with a paint pen. For a miter cut, you can often use the speed square itself as a guide, hooking it over the board edge.
Step 5: Start the saw, align, and cut. Position the saw at the start of the cut with the blade clear of the wood. Start the trigger, let the motor reach full speed – that high-pitched whine levels out. Then, with both hands, ease the blade into the material. Don’t jab it. Keep the shoe flat against the workpiece and firmly against your guide. Push with steady, even pressure. Let the blade do the cutting. If you smell burning or the motor bogs, you’re pushing too hard or the blade is dull. Stop.
Step 6: Manage the cutoff piece. As you near the end of the cut, the unsupported piece will want to sag and bind. For a long cut, have a helper support it. For a short cut, make sure it can fall freely to the ground without pulling your workpiece with it. Your last few inches of push should be smooth, not forced. Let the saw complete the cut fully before releasing the trigger.
Step 7: Inspect and finish. Unplug the saw. Check your cut angle with the square. If it’s off, note whether the error is consistent. A consistent error means your saw’s bevel scale is off – you’ll need to calibrate it. A wavy or inconsistent error means you drifted off the guide during the cut. Sand the edge lightly to remove any burrs or saw marks. A clean cut needs less than 30 seconds with 120-grit sandpaper.
Your Toolbox: Blades, Squares, and Jigs
The saw is only part of the equation. The right accessory turns a frustrating job into a repeatable process.
The blade is the most important accessory. For clean angle cuts in plywood or finished lumber, you need a high-tooth-count blade. A Diablo 60-tooth 7-1/4 inch finish blade leaves an edge that often needs no sanding. For framing lumber where speed matters more than finish, a 24-tooth general-purpose blade like the Bosch T4B is fine. Never use a framing blade for plywood – it will tear out chunks along your beautiful angled line.
A speed square isn’t just for marking. It’s a saw guide. For a bevel cut along a board’s length, clamp the square’s thick flange to the workpiece.
The saw’s shoe rides against the square’s edge, guaranteeing a straight cut. For a 45-degree miter across a board, hook the square’s 45-degree lip over the edge, and it gives you a perfect guide to run the saw against. It’s more accurate than your hands will ever be.
Sometimes you need to make the same angled cut many times. That’s when you build a simple jig. Take a piece of 1/2 inch plywood about 12 inches wide and 24 inches long. Cut a straight edge on one long side.
Then, using your circular saw set to the desired bevel angle, cut a strip off the other long side. What remains is a platform with a perfectly angled edge. Clamp your workpiece to the platform, and run your saw (with its base plate set to 0 degrees) along that angled edge. The jig does the angling, not the saw. This is how you get perfect, repeatable bevels for a whole set of planter box sides.
| Problem | Likely Cause | Immediate Fix | Long-Term Solution |
|---|---|---|---|
| Burn marks on cut | Dull blade or feeding too slow | Increase feed speed slightly, ensure blade is sharp | Replace blade; use correct TPI for material |
| Tear-out on underside | Blade too deep, wrong blade type, no support | Reduce blade depth to 1/4″ past material | Use a high-tooth-count blade; apply masking tape over cut line |
| Cut angle is not square | Saw bevel scale out of calibration | Use guide/jig to compensate | Calibrate saw with a digital angle finder against a known square |
| Saw binds/kicks back | Cutoff piece pinching blade, forcing saw | Stop cut, support cutoff piece, restart | Always support workpiece on both sides of cut; don’t force feed |
| Wavy cut line | Freehanding without a guide, loose bevel lock | Use a speed square or straight edge as guide | Tighten bevel lock; practice guiding with two hands on saw |
Calibration and Maintenance: Trust but Verify
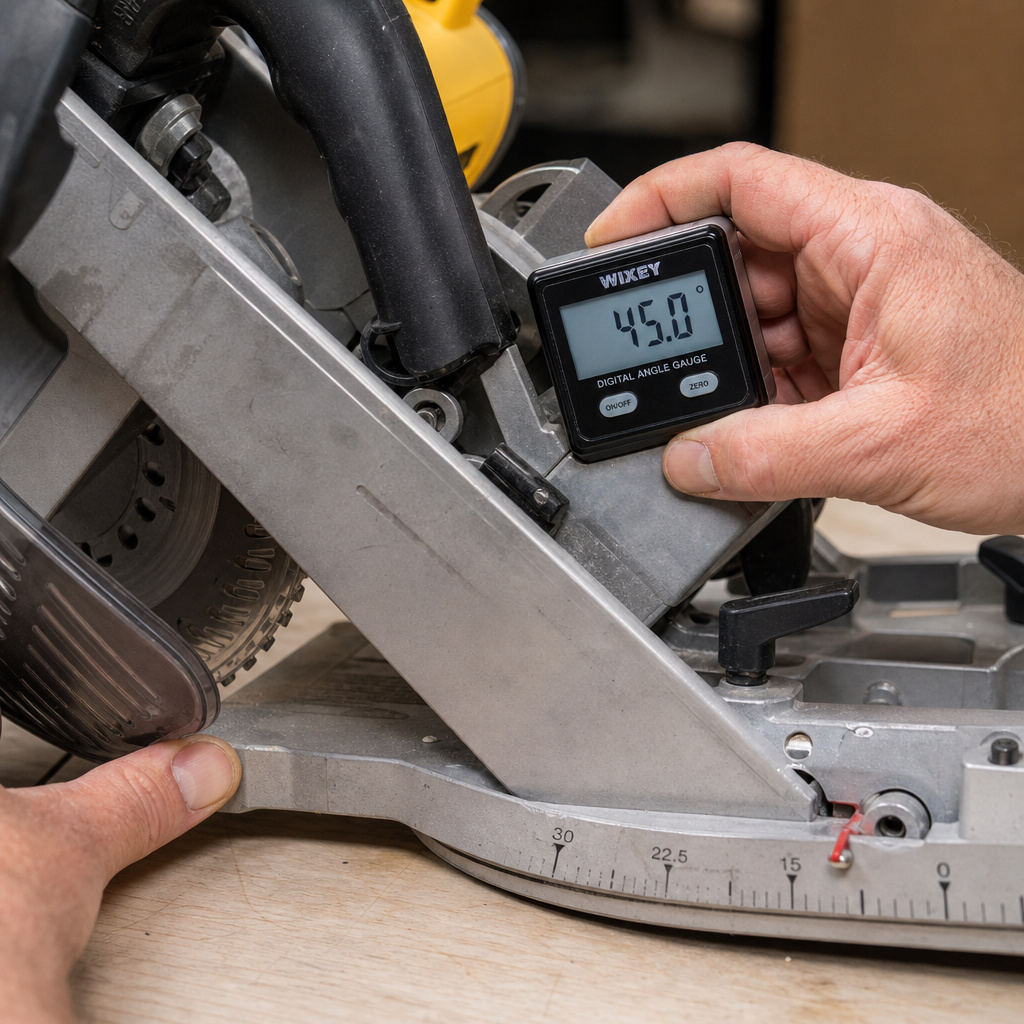
Your saw’s angle scale lies. Not on purpose, but through drops, vibration, and wear. A scale that reads 45 degrees might be cutting 43. Over a four-foot planter box side, that error multiplies into a 3/8-inch gap at the corner. You blame your technique, but it’s the tool.
Calibrate at least once a year. You need a reliable reference. A digital angle finder is best. Unplug the saw. Set the bevel to 0 degrees, lock it, and place the angle finder on the base plate. Zero the tool.
Now tilt the saw to 45 degrees and lock it. Place the angle finder on the blade plate (not the teeth). It should read 45.0. If it reads 43.5, you’ve found your problem. Some saws have calibration screws near the pivot. Others require you to adjust the position of the scale pointer. Consult your manual.
I built a set of Adirondack chairs where every joint was a compound angle. The first chair looked like a toddler’s drawing. I checked my cuts with a bevel gauge – my saw’s 15-degree setting was actually 17 degrees. Two degrees doesn’t sound like much. It meant every joint was loose, and the chair racked sideways if you leaned on it. I spent three hours recalibrating the saw, recut the parts from new wood, and the second chair was rock solid. Now I check the calibration before any project with more than two angled cuts.
General maintenance keeps it accurate. After each use, blow out the sawdust from the bevel mechanism with compressed air. A chunk of pine pitch in the gears will throw off the setting.
Every few months, put a drop of light oil (3-in-1 oil is fine) on the bevel pivot point. Wipe the base plate clean. A layer of sawdust and resin under the shoe changes its effective thickness, minutely altering your cut over a long guide.
Frequently Asked Questions
What’s the difference between a bevel cut and a miter cut?
bevel cut angles through the thickness of the board (you tilt the saw). A miter cut angles across the width of the board (you guide the saw along an angled line with the base flat). A compound cut does both at once.
Why does my saw burn the wood on angled cuts?
Burning is almost always from a dull blade or feeding the saw too slowly. The blade rubs instead of cuts, generating heat. On a bevel cut, more blade surface is in contact with the wood, so a dull blade burns faster. Check your blade for dull or gummed-up teeth, and try moving the saw at a steady, consistent pace.
How do I cut a 60-degree angle with a circular saw?
Most circular saws only bevel to 45 or 50 degrees. To cut a 60-degree angle, you need to cut a 30-degree bevel (because 90 – 60 = 30). Set your saw to a 30-degree bevel. The resulting edge will have a 60-degree angle relative to the board’s face.
Can I cut crown molding with a circular saw?
You can, but it’s advanced. Crown molding requires a compound cut – both a bevel and a miter. You’ll need to build a jig to hold the molding at the correct spring angle, then set your saw for the specific bevel and miter settings. For more than a few cuts, a miter saw is a much faster and safer tool for this job.
How do I prevent tear-out on plywood when cutting angles?
Use a blade with at least 60 teeth. Apply painter’s tape along the cut line on both sides of the plywood. Score the cut line lightly with a utility knife before sawing. And ensure the blade depth is set to only 1/4 inch past the material. The tape holds the veneer fibers, the scoring severs them cleanly, and the shallow depth reduces upward tear-out from the exiting teeth.
The Bottom Line
Cutting clean angles with a circular saw comes down to preparation and physics. Clamp everything. Set the blade depth to one-quarter inch. Use a sharp, high-tooth-count blade for finished work. And never trust the angle scale on your saw – verify it with a square or angle finder, and calibrate it yearly.
The tool can do the job if you give it what it needs: a stable workpiece, a clear guide, and a sharp blade. Forget one, and the cut will remind you. Get all three right, and the sound of the saw through the wood changes from a struggle to a smooth zip. That’s the sound of a cut done right.
