
What Is a Brad Point Drill Bit? Uses & Benefits Explained
This post contains affiliate links. As an Amazon Associate, we earn from qualifying purchases.
A brad point drill bit is a woodworking bit with a sharp, nail-like center spur for precise positioning and two outer spurs that shear wood fibers for a clean, splinter-free hole. Its design prevents the bit from “walking” across the workpiece, making it the go-to choice for dowel joints, cabinetry, and any project where hole location and edge quality are non-negotiable.
That center spur is the whole game. It’s what separates it from a standard twist drill bit and what makes it useless for metal. The spur bites in first, locking the bit on your mark before the cutting edges even touch the wood. But that same feature is also its limitation, drill into end grain or plywood with a cross-grain layer, and the spurs can tear rather than slice.
What follows: a breakdown of the three parts that matter, the one wood type where brad points fail, and the real data on whether a $60 set lasts ten times longer than a $6 one.
Key Takeaways
- The sharp center spur prevents “walking,” giving you dead-accurate hole placement every time.
- Brad points create clean holes in face and edge grain but can tear out end grain and the back layer of plywood.
- In a 2006 torture test drilling over 1,000 holes, the cheapest bits dulled quickly, but mid-range high-speed steel bits held up nearly as well as premium carbide-tipped ones.
- Never use a brad point bit on metal, tile, or masonry, the center spur will snap.
- For the best balance of cost and performance, skip the bargain-bin sets and get a mid-range set of HSS drill bits from a known brand.
The 3-Part Anatomy That Makes It Work
A brad point bit’s sharp center pin bites into the wood first, acting as a pivot. The two outer spurs then score the circumference of the hole before the flutes lift the chips away. This three-step action, pivot, score, clear, is why the hole is clean and exactly where you want it.
Look at the business end. You’re not just seeing a pointy tip; you’re looking at a specialized wood-cutting system. The center spur is a hardened, sharp pin. Its only job is to penetrate and hold. It doesn’t cut. Once it’s anchored, the two outer spurs, those little wings on the sides, rotate and slice through the wood fibers like a tiny cookie cutter, defining the hole’s exact diameter. Finally, the flutes, the spiraled grooves, carry the sawdust up and out of the hole.
Forget this sequence, and you’ll burn out the bit. If you try to force-feed the drill, you overload the center spur. It can’t pivot, so the outer spurs drag, generating heat and friction that softens the cutting edge. The telltale sign is a black, burned ring around your entry point and a bit that’s too hot to touch within thirty seconds.
The Center Spur: Your Anchor
This is the bit’s GPS. On a flat surface, it finds your punch mark and stays there. When you’re drilling on a slight angle or a curved surface, it’s the only thing keeping the bit from skating off into the workpiece. The spur on a quality bit, like those from Bosch Professional or Amana Tool, is ground to a needle point and hardened separately from the body.
The Outer Spurs: Your Clean Edge
These are the real cutters. They’re angled slightly outward, which is why a brad point bit often drills a hole a thousandth of an inch larger than its stated size, a perfect fit for a standard dowel. Dull spurs don’t slice; they crush and tear. That’s when you get fuzzy, splintered holes even in pine.
The Flutes: Your Chip Clearance
The flutes on a brad point are typically shallower and wider than on a metal-cutting twist drill bit. That’s by design. Wood chips are bulky and fibrous; they need a big channel to escape. A clogged flute means friction, heat, and a bit that’s effectively just rubbing itself smooth against the wood.
Brad Point vs. Split Point: The Center-Pin Confusion
This is where most DIYers grab the wrong bit. A split point drill bit also has a self-centering tip, but it’s designed for metal. The tip is ground with a shallow, web-thinning split that reduces “walking” on curved metal surfaces. It has no outer spurs.
The brad point’s center spur is a physical pin. The split point’s center is just a ground geometry. That geometry works on metal because the bit’s primary cutting action happens at the tip’s outer corners. In wood, without spurs to score the circumference, a split point bit will still wander, and the hole walls will be rough.
The rule is simple: brad point for wood, split point for metal. Trying to use a brad point on steel is a sure way to snap that delicate center spur right off.
When a Brad Point Bit Is the Only Right Choice
You need a brad point when the location of the hole is as important as the hole itself. Dowel joints are the classic example. A dowel hole that’s off by 1/16th of an inch is a joint that doesn’t close. The brad point’s anchor-and-cut action is the only thing that gets it right consistently without a drill press.
Where this goes sideways: Using a brad point on plywood’s back face. The outer spurs slice cleanly through the top veneer, but when they hit the cross-grain layer underneath, they can catch and tear out a chunk instead of cutting it. The fix is to back up the workpiece with a scrap board.
Other uses of brad point bits include hinge screw holes, shelf pin holes, and any through-hole where you care about the exit side’s appearance. The spurs cut a clean circumference before the bit’s body tears through, minimizing blowout.
For flat-bottomed holes for inlays or concealed hinges, you’d switch to a Forstner bit. For quickly hogging out a large-diameter hole (over 1 inch), you’d use a spade bit. The brad point sits in the middle: precision holes from 1/8 inch up to about 3/4 inch.
The One Place a Brad Point Fails (And What to Use Instead)
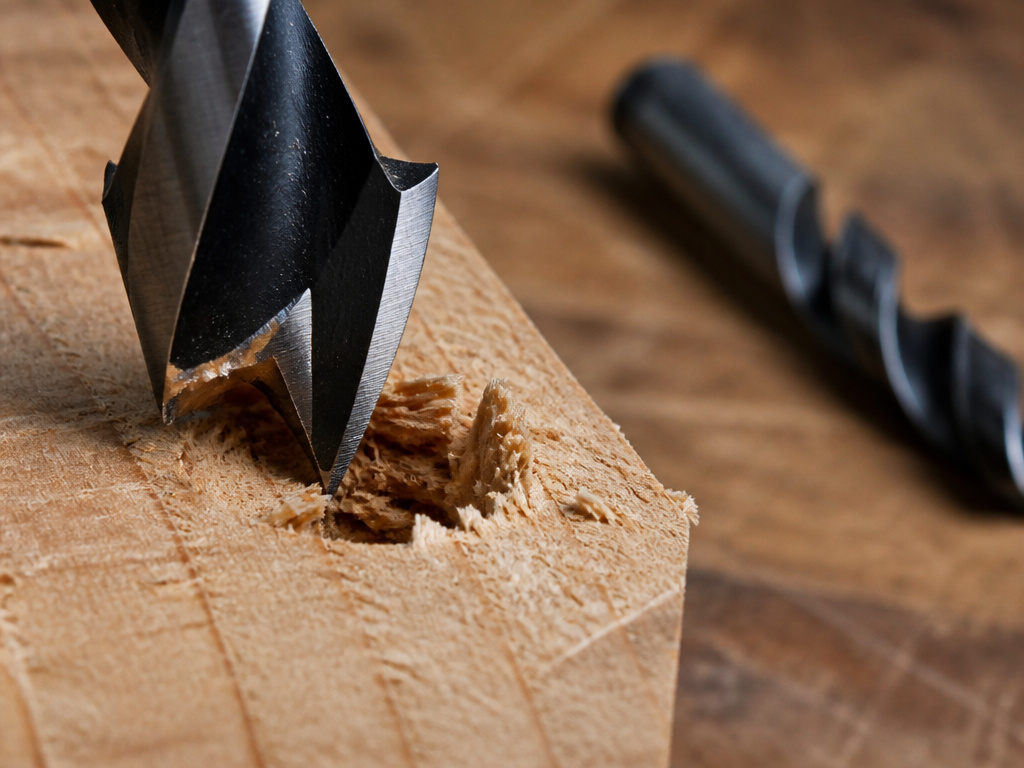
Brad points create a much cleaner hole in most cases, except in end grain. That’s the direct finding from a FineWoodworking test. The outer spurs are designed to slice long wood fibers running parallel to the bit. In end grain, those fibers are facing straight up at the bit. The spurs can’t get a clean shear, so they tend to rip and tear, leaving a ragged hole.
For end grain, a standard twist drill bit often does a cleaner job. Its cutting edges are at the tip, so it shears the end fibers more cleanly as it plunges. For the absolute cleanest end-grain holes, a dedicated end mill or a brad point bit in a drill press with extremely slow feed pressure is the pro move.
Sizing, Speed, and the One Thing That Breaks Them
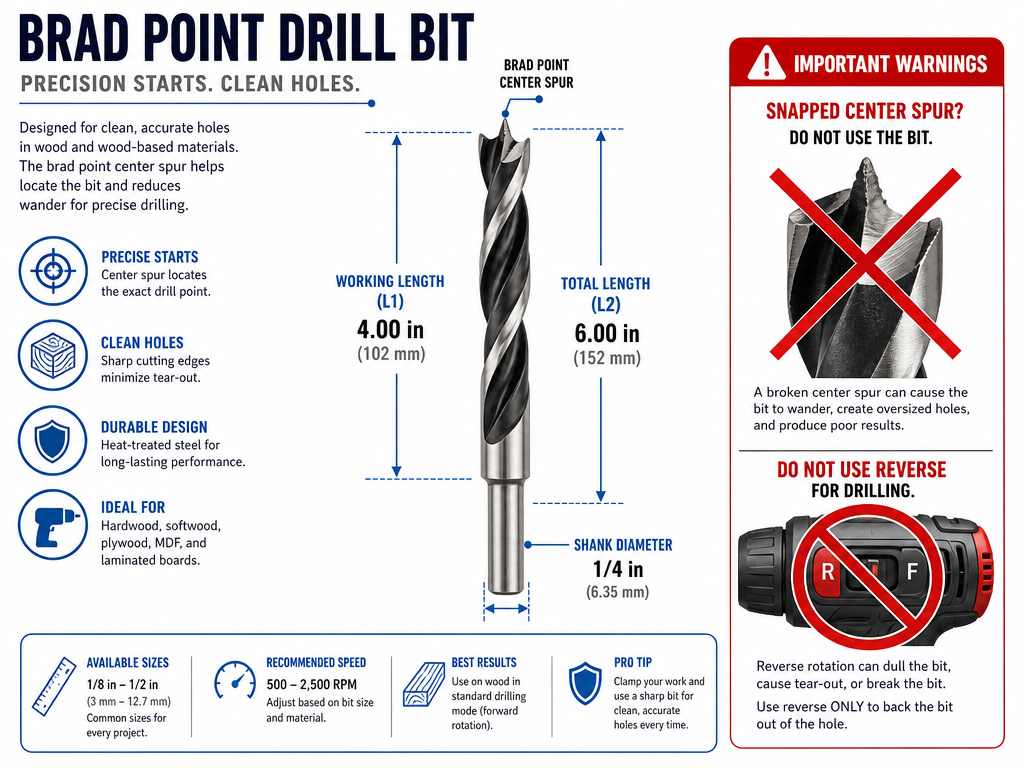
Brad point bits are sold in sets that typically range from 1/8 inch to 1/2 inch, with larger individual bits available. Sizing isn’t just about diameter.
| Spec | What It Means | Why It Matters |
|---|---|---|
| Working Length (L1) | The length of the fluted, cutting portion. | Determines maximum drilling depth before you need an extension. A Bosch B14601 has a 1 5/8″ working length. |
| Total Length (L2) | The bit’s full length from tip to shank end. | Dictates whether the bit will fit in your drill’s chuck with a drill guide attached. |
| Shank Diameter | The non-cutting end that goes into the chuck. | Must match your chuck’s capacity (typically 3/8″ or 1/2″). The metric Bosch 2 608 577 706 has a 3mm shank. |
Speed is critical. Too fast, and you burn the wood and the bit. Too slow, and the flutes can’t clear chips, causing friction and a rough cut. For a 3/8-inch bit in hard maple, 1,550 RPM on a drill press is a good target. In a handheld drill, you rarely have that control, so the rule is to start slow and let the bit cut, don’t push.
Common mistake: Running the drill in reverse to “back out” a bit. This blunts the outer spurs almost immediately. The spurs are angled to cut in one direction only. Reverse rotation turns them into dull, scraping wedges.
The thing that breaks them isn’t hard use, it’s lateral force. That slender center spur is hardened, but it’s not flexible. If the bit drifts or you change angle mid-drill, the side pressure can snap the spur clean off. Once that happens, the bit is useless for precision work.
Do You Need the $60 Set, or Is the $6 One Fine?
I learned long ago that when it comes to drilling wood, reach for a brad-point bit rather than a standard twist bit. The low-angled, blunt point of a twist bit can skate across the wood and leave a curled scar in its path, and makes it difficult to locate a hole accurately.
But does price equal performance? FineWoodworking put eight brands through a brutal test in 2006, drilling over 1,000 holes with each 3/8-inch bit in materials like hard maple and particleboard. The results were telling.
The cheapest sets (think $6 big-box store specials) dulled significantly after the first few hundred holes. The outer spurs rounded over, and hole quality degraded. The mid-range high-speed steel (HSS) bits, however, held up remarkably well. Brands like Lee Valley‘s HSS set performed nearly identically to the most expensive carbide-tipped option from Forest City for the vast majority of DIY and professional work.
The takeaway isn’t that price doesn’t matter. It’s that the curve of diminishing returns hits hard. A $25-$40 set of HSS brad point drill bits from a reputable manufacturer will last for years of shop use. The $6 set will frustrate you on your third project. The $60 carbide set is for a production shop drilling hundreds of holes a day.
Brad Point vs. Other Common Wood Bits
Knowing when to switch bits is half the skill. Here’s how the brad point stacks up against its common shop mates.
| Bit Type | Best For | Where It Beats a Brad Point | Where It Loses |
|---|---|---|---|
| Twist Drill Bit | Metal, plastic, general-purpose drilling. | Availability, cost, versatility. | Walks on wood, creates rough, oversized holes. |
| Spade Bit | Quickly boring large holes (1/2″ and up) in framing lumber. | Speed and cost for large diameters. | Terrible precision, massive tear-out on exit. |
| Forstner Bit | Flat-bottomed, clean-sided holes for hinges, inlays, or overlapping holes. | Cleanest possible side and bottom finish. | Slow, expensive, requires a drill press for best results. |
| Hole Saw | Cutting large diameter holes (for pipes, cables) through sheet material. | Cutting a full disc out of thin material. | Creates a rough, often burned core; needs a pilot bit. |
Your drill index should have a mix. Use the brad point for your joinery and finish work, and keep a spade bit and a Forstner bit for their specific, heavy-duty roles.
Frequently Asked Questions
Can you use a brad point bit on metal?
No. The hardened center spur is brittle and will snap when it hits metal. The outer spurs are also not designed for the chip formation of metal. You’ll ruin the bit and likely damage your workpiece. Use a split point bit or a standard twist drill bit designed for metal.
What’s the difference between a brad point and a dowel bit?
They are often the same thing. “Dowel bit” is a common name for a brad point bit because its precision is essential for dowel joinery. Some dowel bits may have a slightly shorter flute to provide more rigidity, but the functional design, center spur and outer spurs, is identical.
Why is my brad point bit burning the wood?
You’re feeding it too fast or running it too slow. Burning happens from friction, which comes from two places: the flutes are clogged and not clearing chips, or you’re forcing the bit instead of letting the spurs cut. Clear the flutes regularly and ease up on the pressure. If burning persists, increase your drill speed.
Can you sharpen a brad point bit?
Yes, but it’s a specialist’s job. Resharpening the center spur and the two outer spurs to the exact same geometry requires a fine-grit diamond file and a steady hand. For most people, the cost of professional sharpening approaches the price of a new mid-range bit. It’s often more economical to replace worn HSS bits and only consider sharpening high-end carbide-tipped ones.
What drill speed should I use for a brad point bit?
Larger bits need slower speeds. A good rule of thumb: for bits up to 1/4″, you can run at full speed on a variable-speed drill. For 1/4″ to 1/2″, use a medium speed. For bits over 1/2″, use the slowest speed setting. Let the sound be your guide, a high-pitched whine means it’s too fast; a labored groan means it’s too slow or you’re pushing too hard.
Before You Go
For clean, accurate holes in wood, a brad point bit is the default choice. Its center spur stops the walk, and its outer spurs give you a finish that often needs no sanding. Just remember its limits: keep it away from metal and go slow on end grain.
Skip the absolute cheapest sets, they dull fast and make your work harder. A mid-range HSS set from a brand like Bosch or DeWalt will cover 95% of what a home shop throws at it. Save the premium carbide for when you’re running a production line. And always back up plywood with a scrap board. That one trick saves more headaches than any tool purchase.
