
How to Extract a Screw Without a Drill Using an Extractor
This post contains affiliate links. As an Amazon Associate, we earn from qualifying purchases.
You can use a screw extractor without a drill only if you have a Sock-It-Out style extractor, which is hammered directly into the stripped fastener head. For all other standard spiral-fluted extractors, you must first drill a pilot hole, which you can do manually with a hand drill, a nail and hammer, or a rotary tool if you lack a power drill.
The Sock-It-Out tool works because it’s a tapered, hardened steel wedge. You drive it in with a hammer until it bites, then turn it out with a wrench. That’s the exception. Every other extractor on the market, the spiral kind, the straight-flute kind, the ones stamped with a drill size, requires a hole first. The hole centers the tool and gives its threads something to bite. Skipping that step snaps the extractor tip.
What follows is the walkthrough for the no-drill exception, the manual ways to make that mandatory pilot hole if you don’t have a drill, and the torque warning that keeps a $20 tool from becoming a $200 problem.
Key Takeaways
- Only Sock-It-Out extractors are designed to be used without first drilling a hole. All other types require a centered pilot hole.
- You must wear ANSI/OSHA-compliant safety glasses. A shattered extractor or metal shard travels at eye level.
- The correct drill bit size for a standard extractor is stamped on its shank. Drilling the wrong size hole guarantees failure.
- Apply penetrating oil and let it soak for at least five minutes on frozen fasteners. Dry metal binds and snaps tools.
- Never apply more torque to the extractor than you would to a normal screw of the same size, per the ICS Cutting Tools manual. More force breaks the tool.
The One Type of Screw Extractor That Doesn’t Need a Drill
Forget what you’ve heard about universal methods. Most screw extractors absolutely require a drilled pilot hole. The US Army Technical Manual (TM 9-243), the ICS Cutting Tools guide, and the HAZET manual for their stud extractor all list drilling as the first step. The extractor’s spiral flutes need a centered cavity to bite into. Without it, the hardened steel has nowhere to go, and you’ll just mash the fastener head or snap the extractor.
The part nobody mentions: A standard spiral extractor hammered into an undrilled screw acts like a cold chisel on an anvil. It deforms the screw head, work-hardens the metal, and makes the eventual drilled hole nearly impossible to center.
But there is one designed exception: the Sock-It-Out extractor. Its manufacturer’s instructions state plainly: “Sock It Out screw extractors do not require drilling into the stripped fastener.” Instead of spiral flutes, it uses a tapered, splined design. You hammer it directly into the stripped socket, a hex, Torx, or Phillips head, until the splines wedge themselves against the socket walls. That friction lock is what you turn.
| Extractor Type | Requires Pilot Hole? | How It Grips | Best For |
|---|---|---|---|
| Sock-It-Out / Impact Extractor | No | Hammer-driven wedge into socket walls | Stripped hex, Torx, or Phillips heads |
| Spiral Fluted (Left-Hand) | Yes | Threads bite into walls of drilled hole | Broken screws, bolts, and studs |
| Straight Fluted / EZ-Out | Yes | Flutes cut into hole walls | Softer metals where spirals might gall |
If you don’t own a Sock-It-Out, you’re in the majority. The rest of this guide is for the standard extractor in your kit, and how to get that mandatory hole without a power drill.
How to Use a Sock-It-Out Extractor: Step-by-Step
This isn’t subtle. You hit it until it sticks, then you crank it. 1. Safety First. Put on ANSI/OSHA-compliant safety glasses. This isn’t a suggestion. You are hitting hardened steel with a hammer; fragments can fly. 2. Clean the Socket. Blow out any debris from the stripped head. A bit of brake cleaner on a rag works. 3. Select the Size. Sock-It-Out extractors are sized by the fastener, not the Allen key. A 10mm bolt head needs the 10mm extractor. 4. Hammer It Home. Hold the extractor square in the socket. Hit it firmly with a ball-peen hammer until it stops moving. You’ll feel it wedge. Don’t tap, strike. 5. Turn It Out. Grip the extractor’s square base with a wrench, a six-point socket is best, and turn counter-clockwise. The fastener should come out with steady pressure.
Where this goes sideways: Using the wrong size. If the extractor is too small, it won’t wedge. If it’s too big, you’ll split the socket walls and expand the fastener, locking it tighter. The splines must contact the socket’s full depth.
What You Actually Need to Make the Hole
If you’re using a standard extractor, you need a hole. If you don’t have a power drill, you need one of these three methods. Your choice depends on the screw’s size and how stuck it is.
A Hand Drill (Eggbeater Drill)
This is the best manual option. A 3/8″ capacity hand drill with a sharp bit can make a clean, centered pilot hole in most screws. The key is downward pressure and slow, consistent cranking. Let the bit’s flutes do the work. If the bit wanders, you’re off-center, and the extractor will fail.
A Nail and Hammer
For small screws (#6 or smaller) in soft wood, you can sometimes start a hole by centering a sharp nail and tapping it with a hammer. This creates a dimple for a drill bit to follow. It rarely works in metal or hardened screws.
A Rotary Tool with a Carbide Bit
A Dremel or similar rotary tool with a 1/16″ or 1/8″ carbide engraving bit can grind a starter hole. This is slow, produces heat, and requires a steady hand. But for a single, stubborn screw in an awkward spot, it’s a viable last resort.
The goal is a clean, centered hole deep enough for the extractor’s tip to seat fully, usually about a quarter of the screw’s length. A wandering hole is worse than no hole.
Manual Hole-Making: The Backup Plan When You Have No Drill
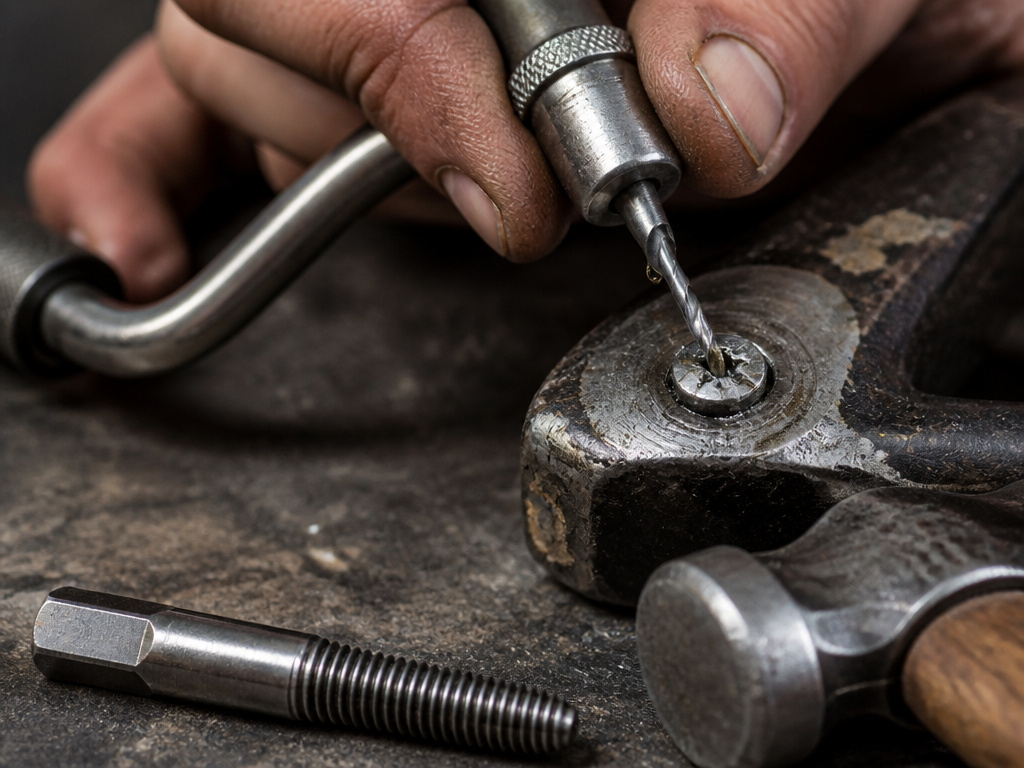
You have a spiral extractor, a broken screw, and no power. Here’s how to make that pilot hole by hand. The sequence matters more than force.
Step 1: Find Your Center
Use a center punch or a sharp nail. Place the tip exactly where you want the hole and give it a firm tap with a hammer. This dimple keeps your drill bit from “walking” across the hard metal surface.
Step 2: Select the Right Bit
Look at your extractor. The correct drill size is stamped on its shank (e.g., “5/32”). If it’s not, the extractor packaging or manual will have a chart. This is not a suggestion. Drilling with a bit that’s even 1/32″ too large leaves nothing for the extractor threads to grip.
Step 3: Drill the Pilot Hole
Secure your hand drill. Apply firm, steady downward pressure and turn the crank at a consistent, moderate pace. For metal, add a drop of cutting oil or even motor oil to the bit tip. It reduces friction and keeps the bit cool. Drill straight down until the hole depth is roughly equal to the extractor’s threaded section.
Before you start: Wear eye protection. The drill bit can snap, especially the smaller sizes used for screw extractors. A broken bit fragment travels fast enough to embed in skin. Secure the workpiece in a vise or clamp it down, if it spins, you’ll snap the bit or injure your hand.
Step 4: Clear the Chips
Blow out the metal shavings from the hole. A puff of air or a blast from a can of compressed air works. Left inside, these chips can pack under the extractor and prevent it from seating fully.
The Universal Extraction Process (When You Have a Hole)
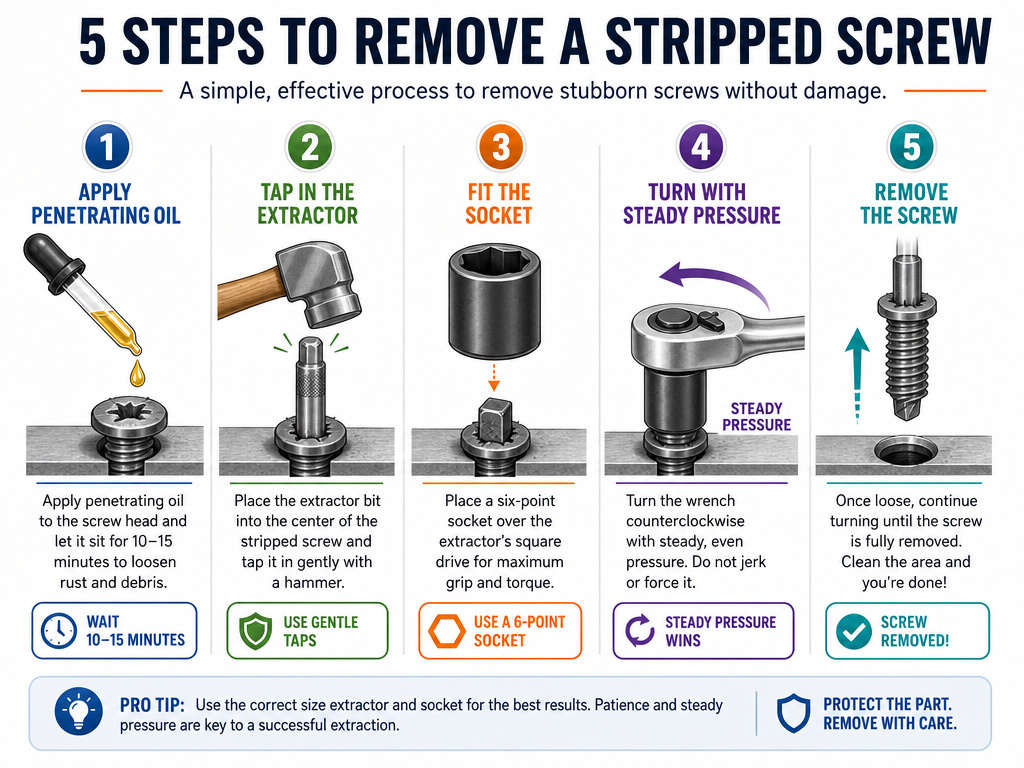
Once the hole is drilled, the procedure is the same for 95% of extractors. The difference between success and a snapped tool is in the details most guides skip.
- Soak It. If the screw is rusted or seized, apply a penetrating oil like Liquid Wrench or PB Blaster to the threads. Let it soak for at least five minutes, longer is better. This isn’t just lubrication; it creeps into the microscopic gaps between threads and breaks the corrosion bond.
- Tap the Extractor In. Place the extractor’s tapered end into the hole. Tap it gently with a hammer until it’s fully seated. You should not see any of the extractor’s threads above the workpiece. For left-hand spiral extractors, this light tap also helps start the counter-clockwise rotation.
- The Right Wrench. Use a tap wrench or a six-point socket on the extractor’s square drive. Adjustable wrenches and pliers can slip, rounding the corners and leaving you with no grip. A six-point socket contacts more surface area and is far less likely to slip.
- Steady Pressure, Not Jerks. Turn the extractor counter-clockwise with steady, increasing pressure. Do not jerk or hammer on the wrench. If it doesn’t budge, stop.
Common mistake: Cranking harder when the extractor stops. The ICS Cutting Tools manual warns: “Do not apply more torque than you would apply to a screw that size with a wrench, or you may break the extractor.” If it’s stuck, the screw is frozen, the hole is off-center, or the extractor is bottomed out. More force breaks the tool in the hole, creating a much bigger problem.
- Back It Out. Once the screw breaks free, continue turning the extractor until the screw is completely out. Sometimes the extractor will bring the screw with it; other times the screw will back out on its own threads.
Why Most DIYers Break Their First Extractor
It’s not bad luck. It’s usually one of three physical mistakes, and each has a tell.
The Hole is Too Big
This is the most common error. If the drill bit is larger than the extractor’s specified size, the extractor’s threads only contact the hole at the very top. When you apply torque, those thin threads act as a lever and snap. You’re left with a piece of hardened steel embedded in your workpiece. * The Fix: Match the drill bit to the size stamped on the extractor. No guessing.
The Hole is Off-Center
If your pilot hole isn’t drilled straight down the center of the screw, the extractor will bite into one side of the screw wall. The force is uneven, and the extractor cams out, stripping the hole or breaking. * The Fix: Use a center punch. Every time. For critical repairs, a drill press or a guide block is worth the setup.
The Screw is Still Frozen
Penetrating oil needs time to work. If you skip the soak on a rusted bolt, the extractor is trying to turn the entire screw against welded threads. The extractor, being harder but more brittle, loses. * The Fix: Apply heat. Use a propane torch to heat the surrounding metal (not the screw itself). The metal expands, breaks the rust bond, and contracts as it cools, often loosening the screw. Then apply penetrating oil while it’s still warm.
Sock-It-Out vs. Spiral: Which One Should You Keep in Your Kit?
This isn’t a matter of opinion. It’s a matter of what you’re likely to face. Your first extractor should solve your most common problem.
Choose the Sock-It-Out extractor set if: you mostly deal with stripped heads on accessible fasteners. Allen bolts on machinery, Phillips heads on engine covers, Torx screws on outdoor equipment. It’s faster and requires less precision. You can’t use it on a broken screw with no head.
Choose a standard left-hand spiral extractor set if: you encounter broken bolts, sheared studs, or screws broken flush or below the surface. This is the classic broken screw removal scenario. The left-hand drill bit often removes the screw during the drilling phase, making the extractor a backup.
For a complete home shop, having both is ideal. The Sock-It-Out handles the quick, dirty stripped-head jobs. The spiral set is your last resort for truly broken fasteners. Trying to use a spiral extractor on a stripped hex head is a guaranteed hour of frustration.
Frequently Asked Questions
Can you use a screw extractor on a broken bolt?
Yes, but only with a spiral or straight-fluted extractor, and only after drilling a precise pilot hole down the center of the broken bolt. A Sock-It-Out extractor requires a head to grip, so it’s useless on a bolt broken flush.
What can I use instead of a screw extractor?
If the screw head is stripped but protruding, locking pliers (Vise-Grips) clamped onto the sides are the first thing to try. For a broken screw, a left-hand drill bit is often more effective than an extractor, as it frequently backs the screw out during drilling. For small screws, you can sometimes use a speed-out bit, which is a specialized drill bit designed to grip stripped heads.
Why did my screw extractor break?
The three most likely reasons are: you applied more torque than the tool is rated for (see the ICS manual warning), you drilled the pilot hole too large so the extractor didn’t have enough material to grip, or the extractor was made of cheap, non-hardened steel. A quality extractor from a brand like Proto, Snap-on, or even a reputable import like Vampliers will be made of hardened steel and stamped with its required drill size.
Do you turn a screw extractor left or right?
You turn a screw extractor counter-clockwise (lefty-loosey). Most spiral extractors also have left-handed threads, so the act of screwing them in also applies counter-clockwise force to the broken fastener. This dual-action is why a left-hand drill bit is such a good partner, it drills and applies loosening force simultaneously.
Can I use an extractor without a pilot hole?
Only if you are using a Sock-It-Out style impact extractor. All other types, including the most common spiral “easy-outs”, require a drilled pilot hole to function. Attempting to hammer a spiral extractor into an undrilled screw will damage both the screw and the tool.
Before You Go
Keep a Sock-It-Out set in your truck or garage for stripped heads. Keep a left-hand drill bit set and a matching spiral extractor set in your main toolbox for broken bolts. The drill bit size stamped on the extractor is a requirement, not a suggestion. And no matter which method you use, the torque limit is real, if it doesn’t turn with steady pressure, the problem isn’t your strength. It’s a frozen thread, a misaligned hole, or a bottomed-out tool. Apply heat, re-center, or drill deeper. Forcing it turns a $15 repair into a $150 machining job.
