
Making a Lathe with Your Drill: Techniques and Size Limits
This post contains affiliate links. As an Amazon Associate, we earn from qualifying purchases.
You can make a lathe with a drill by using a commercial drill press attachment like the Woodstock D4088, which holds workpieces up to 6 inches in diameter, or by building a DIY sled-and-bearing rig for a handheld drill. The core challenge isn’t spinning the wood, it’s creating a stable, aligned tool rest and managing the drill’s fixed, often too-fast RPM for unbalanced blanks.
That alignment is the whole game. A lathe cuts because the chisel meets the wood at a precise, supported point. A wobbly rest or a misaligned tailstock turns a smooth cut into a catch, and a catch on a makeshift setup throws the workpiece. Hard.
What follows: the specs of the ready-made kits, the three critical parts of any DIY version, the speed problem nobody mentions until a blank vibrates apart, and the safety gear that isn’t optional. By the end, you’ll know whether to buy the $100 attachment or spend a weekend in the shop building something sturdier.
Key Takeaways
- Commercial attachments like the Woodstock D4088 cap your workpiece at 6 inches in diameter and demand a drill press with a 3/8″ chuck.
- The tool rest is non-negotiable. Freehand turning on a spinning drill is a guaranteed route to the emergency room.
- Most drill presses don’t go below 500 RPM, which is too fast for roughing out an unbalanced block of wood. It will vibrate, chatter, and can split.
- Your drive method changes with size: a screw center for wood under 3/4″, a spur center up to 3″, and a 2-inch Forstner bit for anything from 3″ to 6″.
- You need a face shield, a respirator, and hearing protection. Goggles alone won’t stop a knot from breaking loose at your face.
The Two Paths: Buy a Kit or Build a Sled
You have a clear fork in the road. One side leads to a store-bought attachment designed for a drill press. The other is a garage-built fixture that turns your handheld drill into a lathe. The choice isn’t about skill; it’s about your drill, your space, and the size of the things you want to turn.
The commercial path is straightforward. You buy a kit like the Woodstock D4088 Drill Press Lathe Attachment. It’s a steel assembly with a 12-inch tool rest, a live center for the tailstock, and different drive centers. You bolt it to your drill press table, chuck the drive center, and you’re theoretically in business. Its manual lists hard limits: a maximum workpiece diameter of 6 inches, and a maximum length of 24 inches if you reverse the assembly. The drive centers have a 3/8-inch shank, so your drill press chuck must accommodate that.
The Woodstock D4088 attachment is a steel assembly with a 12″ tool rest, a live center tailstock, and a maximum rated workpiece capacity of 6″ in diameter. It requires a drill press with T-slot or slotted holes in the table for mounting.
The DIY path is for the tinkerer with a handheld drill and a workbench. You’re not modifying the drill; you’re building a carriage for it. The goal is a rigid frame that holds the drill perfectly parallel to a tool rest, with a tailstock that can be locked in place. This usually involves linear bearings or pipe, a sturdy base plate, and a lot of attention to squareness. The power and RPM come from your cordless drill or corded drill, which introduces its own speed-control challenges.
| Path | Best For | Primary Limitation | Tool Required |
|---|---|---|---|
| Commercial Attachment | Quick setup, small spindles, drill press owners | 6″ diameter cap, requires drill press | Drill Press |
| DIY Sled Build | Larger diameters, custom lengths, handheld drill users | Stability and alignment are hard to achieve | Handheld Drill, Linear Bearings/Shafting |
Your drill’s chuck size matters here. A 3/8 drill often lacks the torque for sustained turning, while a 1/2 drill can handle it but may be too bulky for a sleek DIY frame. This isn’t a casual choice.
What Are the Limits of a Drill Press Lathe?
The specs sheet gives you numbers. The reality of the shop floor gives you splinters and stalled motors. The advertised 6-inch diameter limit isn’t arbitrary; it’s the point where the leverage of the workpiece overcomes the rigidity of the attachment and the torque of your drill press motor.
The first hard limit is speed. A drill press is geared for drilling, not for turning wood. Its lowest speed is often 500 RPM or higher. According to the Woodstock D4088 manual, the recommended roughing speed is 750 RPM. For a perfectly round, balanced spindle, that’s fine. For a rough, square blank you’re starting with, that’s dangerously fast. The imbalance creates violent vibration that stresses every bolt in your setup and can crack the wood before you make the first cut.
The second limit is drive method. The same manual specifies how to mount workpieces: – Diameter of 3/4 inch or less: Thread the workpiece onto the screw center. – Diameter between 3/4 inch and 3 inches: Tap the spur center into the wood end. – Diameter between 3 inches and 6 inches: Tap a 2-inch Forstner bit into the wood to act as the drive center.
This progression is critical. Try to drive a 4-inch bowl blank with a small spur center, and the torque will simply chew up the wood and stall. The larger contact area of the Forstner bit spreads the force.
Common mistake: Assuming any drill press speed is safe for turning. An unbalanced blank at 750 RPM doesn’t just vibrate, it can jump the tool rest or snap the drive center clean out, turning the workpiece into a projectile.
The third limit is your drill press itself. The drill press operation for this task is a sustained, side-loaded spin. Most drill presses are not built for continuous lateral pressure on the quill. The bearings will heat up, and the motor will strain. For a 15-minute spindle, it’s okay. For an afternoon of turning, you’re asking for a burned-out motor.
The Non-Negotiable Safety Gear
This isn’t the section you skip. Turning wood on any lathe, especially an improvised one, throws dust, chunks, and occasionally whole pieces. The manual for the Woodstock attachment states the requirements in bold: “Always wear a face shield, safety glasses, and a respirator.”
A face shield is not negotiable. Safety glasses protect your eyes from dust, but a face shield stops a 3-inch piece of oak from breaking your nose. A respirator is equally mandatory. Wood dust isn’t just messy; it’s a known carcinogen and allergen. You need a particulate filter, not a dust mask.
Hearing protection often gets overlooked. A drill press motor whining at 750 RPM for an hour, combined with the screech of a tool catching, is enough to cause permanent hearing damage. Use earmuffs.
Finally, manage your clothing and workspace. No loose sleeves, no gloves, no jewelry. Tie back long hair. Clear the floor around you of trip hazards. Your basic drill operation instincts aren’t enough here; this is a machine shop level of caution.
Building Your Own: The Three Critical Components
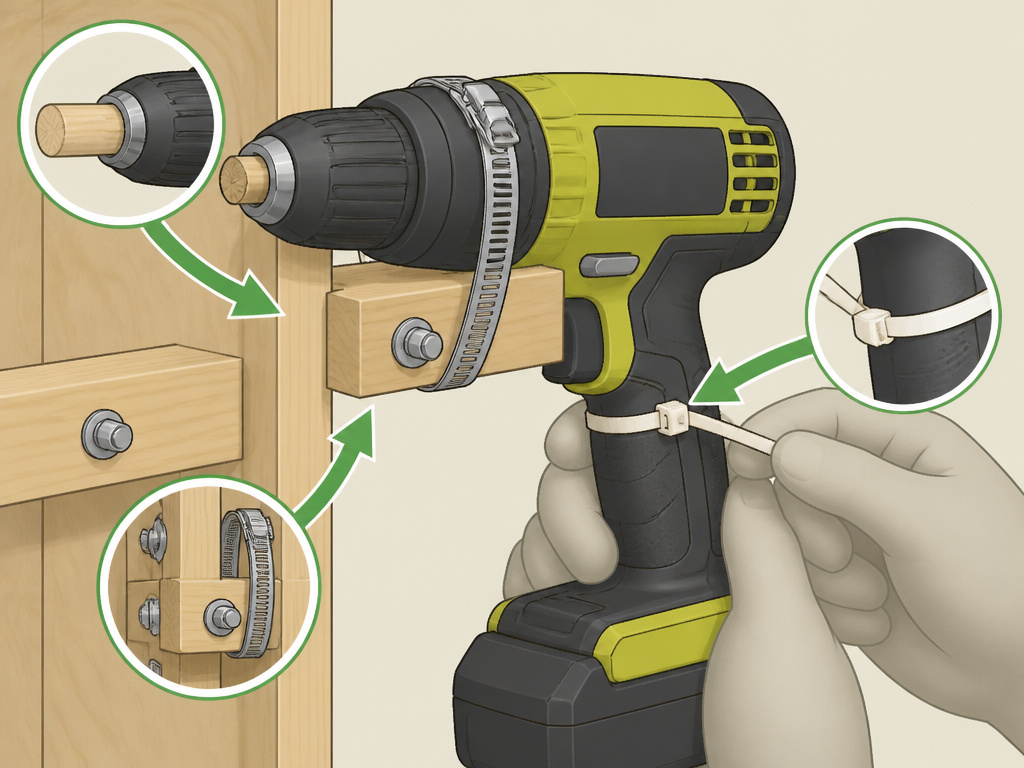 If you’re going the DIY route, your build succeeds or fails on three parts: the drive assembly, the tool rest, and the tailstock. Get one wrong, and the whole thing is a wobbly, dangerous mess.
1. The Drive Assembly
This is how you connect your drill to the wood. The simplest method is to use a drill chuck mounted directly to a stub axle, which is then held in your fixture. You need a way to lock the drill’s trigger in the on position, which often means a zip-tie or a dedicated switch mod. Remember, a cordless drill has a battery that will drain, and a corded drill has a cord that can get tangled. The chuck must be ultra-tight; a slipping chuck ruins your workpiece and can damage the drill’s internal drill mechanism.
2. The Tool Rest
This is the most important part of the build. It must be: – Rigid (no flex under pressure) – Adjustable (in height and distance from the workpiece) – Secure (locked down with no play)
Many builds use a piece of angle iron or a heavy steel bar. It must be bolted to the base in at least two places. The height should be set so the cutting edge of your chisel meets the workpiece at or slightly above center. A tool rest that vibrates guarantees a bad cut.
3. The Tailstock
This provides the opposing pressure to keep the workpiece from flying off the drive center. A simple tailstock can be a block of wood with a mounted bearing or a pointed bolt (a dead center). It must be perfectly aligned with the drive center’s axis. Even a 1/2 drill‘s chuck will wobble if the tailstock is off by a few millimeters. Use a dial indicator or a careful measurement with calipers to align it.
| Component | DIY Solution | What Breaks If It’s Wrong |
|---|---|---|
| Drive Assembly | Drill chuck on mounted axle | Workpiece slips, drill motor burns out |
| Tool Rest | Bolted angle iron or steel bar | Chisel catches, workpiece kicks back |
| Tailstock | Bearing block or bolt dead center | Workpiece wobbles, ends don’t turn true |
The alignment between these three points, drive, rest, tail, is what separates a functional lathe from a scary spinny thing. Spend 80% of your build time here.
The Speed Problem and Workable Solutions
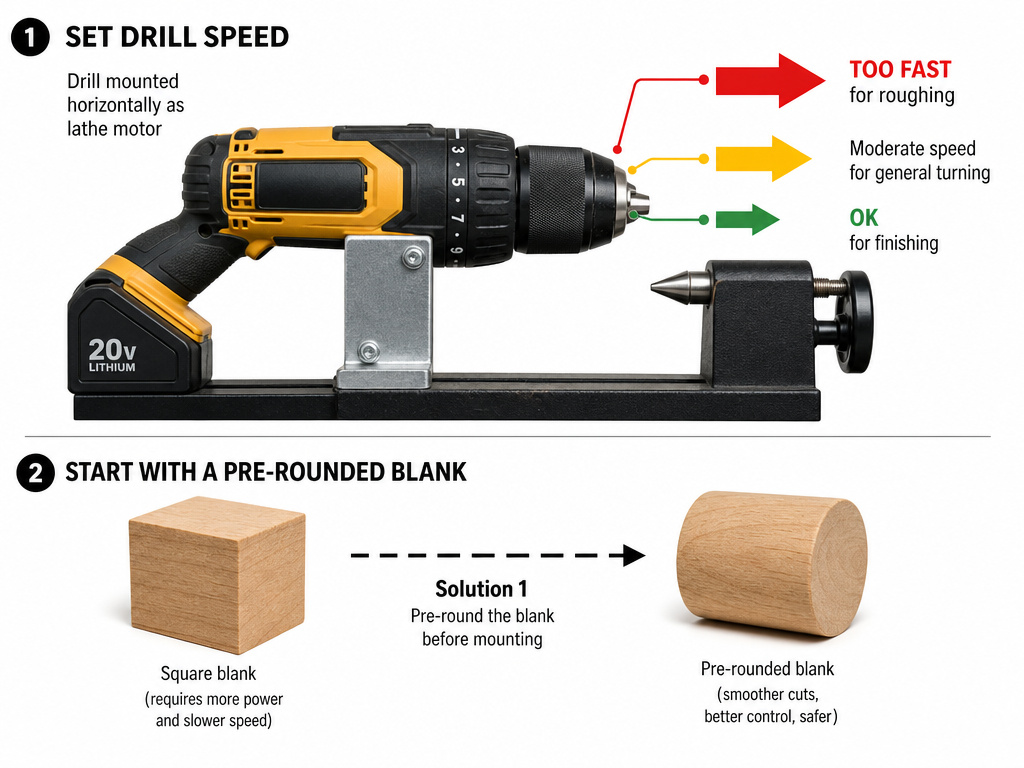 Your drill’s RPM is fixed, or within a narrow range. As discussed, 500+ RPM is too fast for starting a rough blank. So what do you do?
First, understand that speed needs change with the cut. Roughing a square blank down to round requires slow speed for control and safety. Finishing cuts and sanding can use higher speeds for a smoother surface. Since most drills and drill presses can’t go slow enough, you have to get creative.
Solution 1: Start with Pre-rounded Blanks
If you can, use a bandsaw or a handsaw to cut your blank as close to round as possible before it goes on the lathe. This reduces the imbalance and makes higher speeds less dangerous. It’s a workaround, but an effective one.
Solution 2: Use a Speed Controller (for AC motors)
If you have a corded drill with an AC motor, an inline router speed controller can sometimes reduce the RPM. This doesn’t work for most cordless drill models or for brushless motors. Test carefully, as reducing voltage can also reduce torque and cause the motor to stall under load.
Solution 3: Embrace the Limitations
Accept that your DIY lathe is for small, light work. Stick to turning pens, small handles, or dowels where the lower speed isn’t as critical. This is the most honest approach. It matches the reality of the Woodstock D4088 and similar kits, they’re for “small pickets, legs, spindles, handles, dowels, and pins,” as their manual says. Not for large bowls or table legs.
The Nardini lathe operation manual from the Tinkermill workshop makes a relevant point about drilling metal: “135 Degree drills wander less.” The principle applies here too: work with the tool’s design, not against it. A drill wants to spin fast in a straight line. A lathe needs variable speed and side stability. Your build is a compromise between the two.
Step-by-Step: Mounting a Commercial Attachment
Let’s walk through setting up a kit like the Woodstock D4088. This isn’t just assembly; it’s a procedure to avoid first-time failures.
Step 1: Clear and Mount the Drill Press Table
Unplug your drill press. Clear everything off the table. You’ll be using the T-slots or the through-holes to bolt down the attachment’s base. Ensure the bolts are tight and the base doesn’t rock. A rocking base translates directly into chatter on the workpiece.
Step 2: Install the Drive Center and Tailstock
Insert the appropriate drive center (screw, spur, or Forstner bit) into the drill press chuck and tighten it securely. Bring the quill down and slide the tailstock’s live center into position on the base. Lock the tailstock in place. Now, raise the quill and slide the workpiece between the centers. Tap it onto the drive center, then slide the tailstock forward to secure it. Lock the tailstock again. The workpiece should spin freely by hand without wobbling.
Step 3: Position the Tool Rest
This is the step everyone rushes. Loosen the tool rest assembly and position it so the rest is about 1/8 to 1/2 inch from the workpiece. The top of the rest should be at or slightly below the centerline of the workpiece. Tighten every locking knob and bolt on the tool rest. Re-check the gap after tightening, it often shifts.
Step 4: Test Run and Final Check
Put on all your safety gear. Turn on the drill press at its lowest speed. Watch the workpiece. Does it spin true, or is there a visible wobble? If it wobbles, stop immediately. The workpiece is not seated correctly on the centers, or it’s not round. Do not proceed. A wobbly workpiece will shake the whole machine and almost certainly cause a catch.
Where this goes sideways: Skipping the hand-spin test. If the workpiece wobbles when you spin it by hand, it will vibrate destructively at 750 RPM. The fix happens with the machine off, not by hoping it will “true up” under power.
Frequently Asked Questions
Can I use my handheld drill as a lathe?
Yes, but not by holding it. You must build or buy a rigid fixture that holds the drill perfectly still and aligned with a tool rest and tailstock. Hand-holding a drill against spinning wood is a severe entanglement hazard and will not produce usable results.
What is the biggest piece I can turn?
With a commercial drill press attachment, the hard limit is typically 6 inches in diameter and about 24 inches in length. For a DIY build, the limit is the rigidity of your frame and the torque of your drill. Exceeding these limits risks breaking the workpiece or the tool.
Do I need special lathe tools?
Yes. You cannot use regular wood chisels. You need properly ground lathe tools that are designed to be supported on a tool rest. Using the wrong tool increases the chance of a dangerous catch. Start with a basic spindle roughing gouge and a skew chisel.
Why does my workpiece keep vibrating?
The most likely cause is an unbalanced blank spinning too fast. The fix is to lower the speed (if possible) or to pre-round the blank on a bandsaw to reduce the imbalance. The second cause is a loose component, check that the drive center is tight in the chuck, the tailstock is locked, and the tool rest is secure.
Is a drill press lathe good for beginners?
It’s a double-edged sword. It’s a low-cost way to try turning, but it enforces strict limits and lacks the safety features of a real lathe (like a safety-rated spindle lock). If you’re serious, consider a used benchtop lathe. If you just want to try turning a few small items and have a drill press, a commercial attachment is a valid start.
Before You Go
Making a lathe from a drill is a study in limitations. The ready-made attachments are convenient but cap you at 6-inch diameters and demand high, fixed speeds. The DIY route rewards precise metalworking and offers more flexibility, but getting the tool rest and alignment right is a project in itself.
Your first project should be small, a dowel or a simple handle. That teaches you the feel of the tool on the rest and the sound of a good cut versus a catch. The moment you understand why the tool rest gap must be under half an inch, you’ve graduated from theory to practice.
If you only want to turn the occasional small spindle, buy the Woodstock D4088 or similar kit. If the build itself is the project and you have the tools and patience for precision alignment, go the DIY sled route. But whichever path you take, wear the face shield. Every time.
