
Ceramic Pot Drainage: How to Drill a Perfect Drain Hole
This post contains affiliate links. As an Amazon Associate, we earn from qualifying purchases.
To drill a drain hole in a ceramic pot, you need three things: the correct drill bit (diamond-tipped for glazed, carbide-tipped masonry for unglazed terracotta), a steady supply of water for cooling, and a method to prevent the bit from skating on the glaze. Drill from the outside in, start slow, and let the bit’s abrasion do the work, never force it. The Rehbinder effect, submerging the pot, reduces cracking risk in thick or glazed ceramics by lowering surface stress.
That last point about water is a documented physical phenomenon that changes the material’s behavior under the drill, going beyond simple cooling. Most guides tell you to keep the bit wet.Few explain why a fully submerged pot is almost crack-proof, or why a standard wood bit will skate and shatter the glaze on contact.
What follows is the mechanics behind each step, the tool specs that actually work, and the two procedures, one for unfired leather-hard clay, one for finished glazed pots. By the end, you’ll know which bit to reach for and the one mistake that turns a $50 planter into rubble.
Key Takeaways
- The Rehbinder effect means submerging a ceramic pot in water reduces its surface stress, making drilling far less likely to cause cracks, this is non-negotiable for thick or glazed pieces.
- Bit choice is absolute: Use a diamond-tipped hole saw or carbide-tipped bit for glazed ceramics; a carbide-tipped masonry bit can work for soft, unglazed terracotta but carries higher risk.
- Drill a pilot hole when working on leather-hard clay to guide the larger bit and prevent wandering, which is the main cause of tears in unfired work.
- Safety gear is mandatory, not optional, silica dust from ceramic is a lung irritant, requiring an N95 mask, plus goggles for flying shards.
- If your pot is already fired and glazed, you must use a diamond or carbide bit and accept a slower process; a standard twist drill will not penetrate and will likely crack the piece.
The Rehbinder Effect: Why Water Isn’t Optional
Most instructions say to add water to keep the bit cool. That’s only half the story. The full mechanism is the Rehbinder effect, first documented in 1928. It describes how certain liquids reduce surface stress in hard, brittle materials like ceramics and stoneware.
When a ceramic pot is fully submerged, water molecules interfere with the microscopic bonds at the material’s surface. This makes the ceramic slightly less brittle at the exact point where the drill bit is applying pressure. The result is a lower chance of a fracture propagating from the drill site across the entire pot.
The Rehbinder effect isn’t a theory. It’s a documented materials-science principle where full submersion in water lowers the surface stress of brittle ceramics, making them less prone to crack under the localized pressure of a drill bit.
This is why the most reliable method for a valuable or thick glazed pot is to do the entire job underwater. Fill a tub, sink the pot, ensure no air bubbles are trapped underneath, and drill while it’s submerged. The water cools the bit and modifies the ceramic’s physical response. For everyday terracotta, a steady drip from a spray bottle works. For a family heirloom planter, submersion is the only method I’d trust.
The practical takeaway is that water acts as a process modifier, not merely a coolant. Skipping it means you’re relying entirely on the bit’s hardness and your own patience, which is a gamble with glazed ware.
Drill Bit Selection: This Is Where Projects Fail
Using the wrong bit is the single fastest way to ruin a pot. Ceramic is harder than wood and most metals, but it’s also brittle. You need a bit that grinds or crushes the material, not one that tries to cut it.
| Bit Type | Best For | Will It Work on Glazed Ceramic? |
|---|---|---|
| Diamond-tipped hole saw | Glazed ceramics, precise large holes | Yes – the diamond grit grinds through glaze. |
| Carbide-tipped masonry bit | Unglazed terracotta, softer clay bodies | No – it will skate and likely crack the glaze. |
| Carbide-tipped drill bit | Fired ceramic, glazed surfaces (small holes) | Yes – but requires extreme care and water. |
| Standard HSS twist bit | Wood, metal, plastic | Absolutely not. It will dull instantly and skate. |
Diamond-tipped hole saw bits are the gold standard for glazed pots and for holes larger than 1/4 inch. They have a hollow core and a rim coated in diamond grit. They grind away a perfect circle of material. The DEWALT Diamond Grit Hole Saw set is a reliable option for this job.
Carbide-tipped masonry bits have a spear-shaped tip made of tungsten carbide. They work by a combination of crushing and abrasion. They can handle unglazed terracotta, but they are impact-oriented. On a rigid pot, the hammering action can propagate cracks. If you must use one, ensure your drill is NOT in hammer mode.
Carbide-tipped drill bits (often sold as tile or glass bits) have a sharp, spear-like carbide tip. They are designed to penetrate hard, slick surfaces without skating. They’re suitable for smaller drainage holes in fired ceramic. The Bosch HM1010 Carbide Drill Bit set is a proven choice for this.
The rule is simple: if the surface is shiny, you need diamond or a dedicated carbide-tipped tile bit. If it’s rough terracotta, a masonry bit might survive. Using a standard bit is like trying to cut a steak with a plastic spoon.
The Complete Tool & Safety Setup
You cannot wing this with a drill and a bit. The dust and debris demand respect.
- A cordless drill with variable speed is ideal. You need slow, controllable RPMs. A corded drill often starts too fast. A double-insulated battery-powered drill (look for the double-square symbol on the housing) is safest for any method involving water.
- Safety Glasses or Goggles. Ceramic shards are sharp and can fly.
- N95 Respirator or Dust Mask. Ceramic dust contains crystalline silica, a lung irritant. Do not skip this.
- Masking Tape. This gives the drill bit initial traction and prevents skating.
- Water Source. Spray bottle, sponge, or a tub for submersion.
- Backing Material. A scrap piece of wood or a dedicated drilling pad to support the pot and prevent blow-out on the exit side.
- Work Gloves. Lightweight gloves improve grip on a wet, slippery pot.
Where this goes sideways: Skipping the mask because “it’s just a little dust.” Silica particles are small enough to lodge deep in lung tissue. One hole might be fine; a Saturday of potting projects without protection is how long-term respiratory issues start.
Gear up before you even mark the pot. The process is messy and wet, and you won’t want to stop midway to find your goggles.
Step-by-Step: Drilling a Fired or Glazed Pot
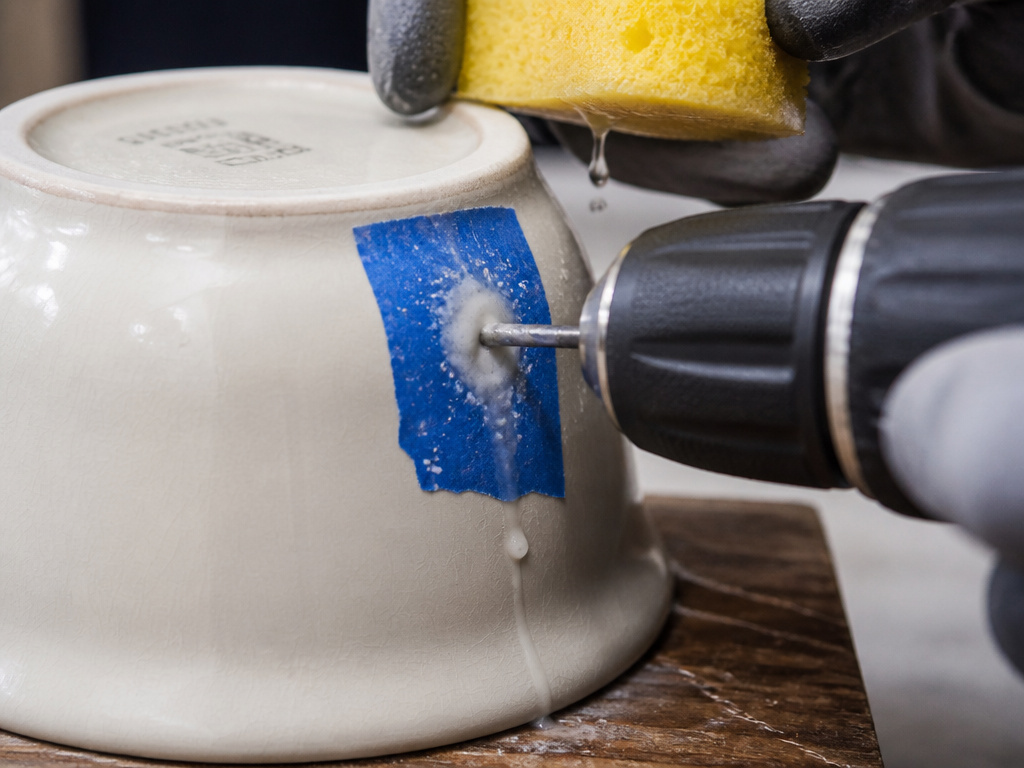 This is the procedure for a finished pot you bought at a store, it’s already been kiln-fired and likely glazed.
- Clean and Mark. Wash the pot to remove any dirt. Dry it. Place a piece of masking tape over the spot where you want the hole. Mark the center on the tape with a permanent marker. The tape provides grip for the bit.
- Secure the Pot. Place the pot upside down on a stable, flat surface. Put a piece of scrap wood or a rubber pad underneath to prevent slipping. If possible, clamp the pot gently. If not, use your non-drill hand to hold it firmly against the backing.
- Start the Pilot Dimple. Fit your diamond or carbide bit into the drill. Set the drill to its slowest speed. Position the bit perpendicular to the pot’s surface. With no water yet, run the drill briefly at low speed to create a shallow, scratched dimple in the glaze. This gives the bit a starting point.
- Begin Drilling with Water. Start a steady drip or spray of water onto the drilling point. Begin drilling again at a slow, steady speed. Let the weight of the drill provide pressure, do not push.
- Maintain Steady Pace. Keep the drill speed medium-slow and consistent. Add water continuously to keep the area wet and to flush out the white, milky ceramic slurry. If drilling a thick pot, you may need to stop, blow out the accumulated paste, and re-wet.
- Exit Slowly. As you feel the bit about to break through, reduce pressure and speed even further. Let it exit gently to avoid chipping the underside. Drill all the way through.
- Clean Up. Remove the tape. Rinse the pot. You can smooth any rough edges on the hole with a round file or a bit of sandpaper used under running water.
The entire process for a single hole can take two to five minutes. Rushing it creates heat, and heat plus brittle ceramic equals a crack. Patience is the tool the hardware store doesn’t sell.
Drilling Leather-Hard Clay: The Potter’s Advantage
 If you’re making your own pot or have access to it before it’s fired, your job is much easier and safer. The best time to drill is during the leather-hard stage, the clay is firm but still contains moisture and is easier to cut.
Working on a bone-dry pot might crack it, and working on a wet pot would just be messy. Leather-hard is the sweet spot.
The process differs because you can use standard HSS drill bits and you should drill a pilot hole. According to the Ceramic Arts Network drainage guide, here’s the method:
- Mark the hole locations on the leather-hard piece using a needle tool.
- Start with a small pilot bit (e.g., 1/16″) and drill straight through at each mark. This guides the larger bit.
- Switch to your final size bit. The pilot hole keeps it centered. Drill through at medium speed. No water is needed at this stage.
- Account for shrinkage. Remember, the clay will shrink during drying and firing, and a thin layer of glaze will reduce the hole size further. Drill the hole slightly larger than your desired final size.
This method produces clean, precise holes without the risk of skating or the hassle of water management. It’s the professional approach for a reason.
How to Drill a Hole in a Ceramic Pot Without a Drill
Sometimes you don’t have a power drill. There is a manual method, but it’s only for the truly desperate or for very soft, unglazed terracotta.
You’ll need a hammer and a nail (or a dedicated carbide-tipped nail punch). The Rehbinder effect is still your friend. Submerge the pot in water. Place the nail’s point on your marked spot. Tap the nail gently but firmly with the hammer, rotating it slightly between taps. You are slowly punching and crushing the ceramic. It is slow, imprecise, and exhausting for anything thicker than a standard flower pot. For a single hole in a cheap terracotta pot, it can work. For glazed ceramic, forget it.
Troubleshooting: Why Did My Pot Crack?
Even with care, things go wrong. Here’s a diagnostic table.
| Symptom | Likely Cause | How to Fix Next Time |
|---|---|---|
| Star-shaped crack radiating from hole | Drill speed too high, no water, or bit blunt. | Use more water, slower speed, sharpen or replace bit. |
| Pot split completely in half | Uneven pressure, pot was internally flawed, or thermal shock. | Submerge entire pot, use even pressure, inspect for cracks first. |
| Glaze chipped around hole edge | Bit skated on glaze at start. | Use masking tape and start with a pilot dimple at slow speed. |
| Hole is ragged and uneven | Bit wandered, or drill was not perpendicular. | Use a pilot hole, or start with a smaller bit first. |
| Bit won’t start, just spins | Using standard HSS bit on glazed surface. | Switch to diamond-tipped or carbide-tipped tile bit. |
If a crack appears, stop immediately. The structural integrity is compromised. You can sometimes seal a hairline crack on a decorative pot with a waterproof epoxy, but it will never be as strong.
Frequently Asked Questions
Can I use a regular drill bit on ceramic?
No. A standard high-speed steel (HSS) bit designed for wood or metal will not penetrate the hard surface of a glazed ceramic pot. It will dull instantly, skate across the surface, and likely scratch or crack the glaze. You must use a bit designed for masonry, tile, or glass, specifically diamond-tipped or carbide-tipped.
How many drainage holes should I drill?
For a small pot (under 6 inches in diameter), one central hole is usually sufficient. For larger pots, add multiple holes. A good rule is to add one extra hole for every additional 4-6 inches of pot diameter. Space them evenly around the center of the pot base to ensure even drainage.
Is it safer to drill ceramic or glass?
They present similar challenges, both are hard and brittle. However, drilling glass often requires even lighter pressure and more consistent cooling. The fundamental principles are the same: use the correct bit (diamond or spear-point carbide), keep it wet, and apply minimal pressure. Glass may be more prone to spider-web cracking if you rush the exit.
What if I need a very large hole?
For holes larger than an inch, a diamond-tipped hole saw is the only reliable tool. The process is the same, but it requires even more patience and water. You cannot use a standard bi-metal hole saw; it will be destroyed. For a project requiring a large opening, refer to our guide on the best tile hole saw for specific model recommendations.
Can I drill a hole in a porcelain plate?
Yes, but porcelain is even denser and harder than standard ceramic. You must use a diamond-tipped bit and employ the submersion method. The process for drilling delicate porcelain is nearly identical to drilling glazed ceramic, but requires an even lighter touch and acceptance of a longer drilling time.
Before You Go
Drilling a ceramic pot involves abrasion, cooling, and physics rather than raw strength. The right bit, a diamond hole saw for glaze or a carbide masonry bit for terracotta, does the hard work.Your job is to keep it wet, keep it slow, and keep it straight.
For a standard store-bought glazed pot, the submersion method using the Rehbinder effect is your safest bet. For a homemade leather-hard piece, drill a pilot hole first. And always, always wear the mask. That silica dust is no joke.
If you’re also working on a tiled surface, the principles you’ve learned here directly apply to how to drill into tile without cracking it. The material family is the same; the confidence you gain from one project transfers to the next.
