
Master Drilling a Door Knob Hole With These Essential Tips
This post contains affiliate links. As an Amazon Associate, we earn from qualifying purchases.
Drilling a door knob hole requires matching three manufacturer specs: a 2-1/8” (54 mm) hole through the door face, a 1” (25 mm) hole into the door edge for the latch, and the correct backset (2-3/8” or 2-3/4”) measured from the door edge to the center of the large hole. Use a hole saw for the face bore and a spade or auger bit for the edge bore, drilling from both sides on wood doors to prevent splintering.
That’s the short answer. The long answer is where doors get ruined. A backset off by half an inch means the knob won’t engage the strike plate. A latch hole drilled too shallow binds the mechanism. And every major brand. Kwikset, Baldwin, Hager, has a slightly different rule for beveled doors.
What follows is the translation of four different OEM manuals into one procedure. We’ll cover the three non-negotiable measurements, the exact tool sequence, and the two mistakes that cost you a new door slab.
Key Takeaways
- The backset (2-3/8″ or 2-3/4″) is the first measurement to lock down; getting it wrong means the latch won’t reach the strike plate.
- Drill the 2-1/8″ face bore from both sides of a wood door, start one side, break through, then finish from the opposite side to prevent ugly tear-out.
- The 1″ edge bore needs to be deep enough for the latch mechanism (often 2″ to 3-7/8″ deep, depending on backset); a shallow hole causes the knob to bind.
- Manufacturer templates for beveled doors conflict: Kwikset says use the exterior side, Baldwin says low side, Hager says high side. Pick one brand’s hardware and follow its guide exactly.
- A hole saw is the only correct tool for the 2-1/8″ face hole; a spade bit will shred the door’s face and likely split the wood.
The Three Measurements You Must Get Right
Forget “about two inches.” Door hardware runs on exact numbers. Miss one, and the knob either won’t install or will fail within weeks.
The standard door knob hole configuration consists of a 2-1/8” (54 mm) diameter hole through the face of the door, a 1” (25 mm) diameter hole into the edge of the door for the latch assembly, and a specified backset distance of either 2-3/8” (60 mm) or 2-3/4” (70 mm) from the door edge to the center of the face hole.
First: the backset. This is the horizontal distance from the edge of the door to the center of the large knob hole. It’s not a suggestion. A 2-3/8″ backset latch will not work in a door drilled for a 2-3/4″ backset, the bolt will be too short to engage the strike plate in the frame. You must know which backset your hardware uses before you mark anything. Most residential knobs use 2-3/8″; some commercial or exterior sets use 2-3/4″. Check the package.
Second: the face bore. This is the 2-1/8″ hole you see from the side of the door. The size is universal across Kwikset, Baldwin, Schlage, and most others because the knob’s internal collar is standardized. A 2-1/8″ hole saw is the required tool. Attempting this with a spade bit guarantees a ragged, out-of-round hole that the knob rose won’t cover.
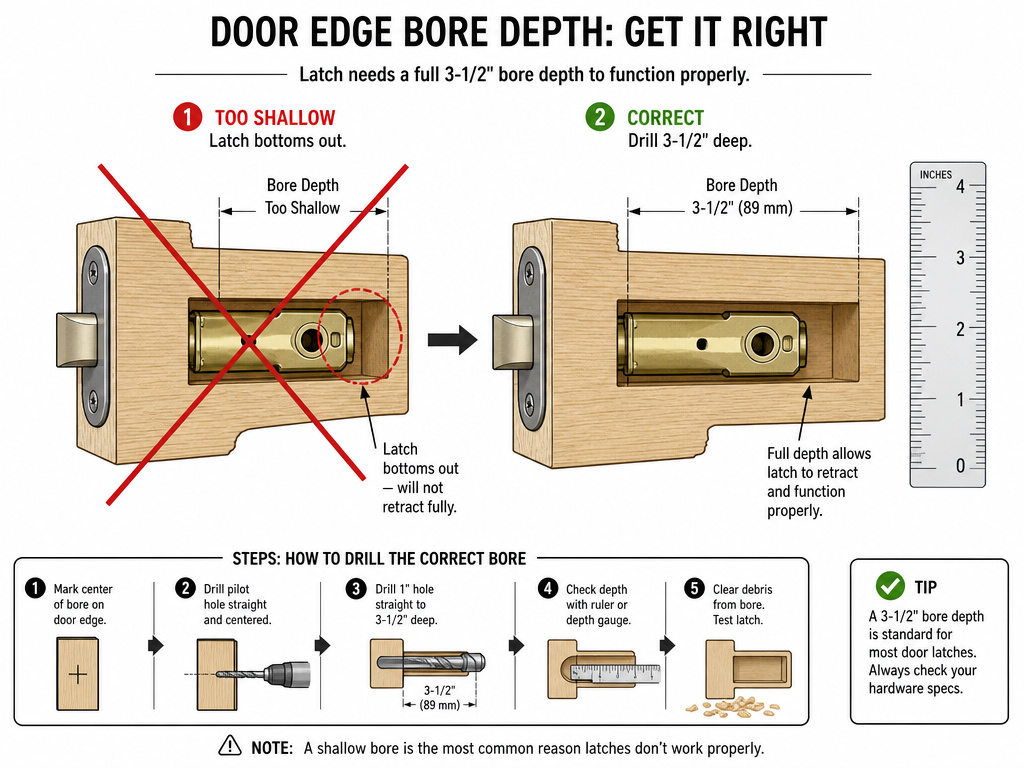
Third: the edge bore. This 1″ hole houses the latch. Its depth is critical and varies by backset. For a 2-3/8″ backset, Baldwin specifies drilling 3-1/2″ deep. For a 2-3/4″ backset, drill 3-7/8″ deep. If you only drill 1″ deep, the latch mechanism won’t seat and the knob will spin without retracting the bolt.
| Measurement | Specification | Tool Required | Consequence if Wrong |
|---|---|---|---|
| Face Bore Diameter | 2-1/8” (54 mm) | 2-1/8” Hole Saw | Knob collar won’t fit; rose won’t cover the hole. |
| Edge Bore Diameter | 1” (25 mm) | 1” Spade or Auger Bit | Latch won’t insert; requires filling and re-drilling. |
| Backset | 2-3/8” or 2-3/4” | Tape Measure | Latch won’t align with strike plate; door won’t latch. |
| Edge Bore Depth | 3-1/2” to 3-7/8” | Depth Stop on Drill | Latch binds; knob operation is stiff or fails. |
Get these four numbers right, and the physical installation is straightforward. Get one wrong, and you’re shopping for wood filler or a new door.
Tools and Prep: Beyond the Hole Saw
You need more than a drill. A clean install requires controlling depth, preventing tear-out, and mortising the latch plate flush with the door edge.
The non-negotiable tool list:
- Corded or cordless drill with side handle. A hole saw can grab and twist hard; two-handed control is safety, not luxury.
- 2-1/8” hole saw with a sharp, carbide-tipped blade. A dull saw burns the wood and requires excessive force.
- 1” spade bit or auger bit with a depth stop. An auger bit pulls itself in cleanly and is worth the upgrade for more than one door.
- Drill guide or a steady hand. For the edge bore, you must drill perfectly perpendicular to the door edge. A simple drill guide is cheaper than a misdrilled door.
- Sharp chisel and a hammer. You’ll need to mortise the recess for the latch’s faceplate.
- Tape measure, pencil, and a combination square. For marking the backset and centerlines accurately.
- Safety glasses and hearing protection. Hole saws are loud and throw coarse chips.
Where this goes sideways: Using a twist drill bit for the 1” edge hole. A standard twist bit will wander off-center the moment it touches the end grain of the door edge, throwing your latch alignment off by a quarter inch. The knob will install, but the latch will bind every time you turn it.
Skip the all-in-one “door knob installation kit” from the big box store. The included hole saw is usually low-grade and burns out on the second door. Buy a dedicated, quality hole saw from a brand like Milwaukee, Diablo, or Bosch. The hole saw arbor must securely lock the saw onto your drill’s chuck.
Step-by-Step: From Marking to Mounting
Follow this sequence. The order matters because later steps depend on earlier holes being perfectly placed.
Step 1: Mark the Centerline and Backset
Measure up from the finished floor. The standard height for a door knob centerline is 38 inches. Mark this spot on the door edge with a pencil. Use a combination square to extend this centerline across the face of the door.
Now, measure the backset from the door edge along this centerline. If your hardware uses a 2-3/8” backset, mark that point on the door face. This mark is the center point for your 2-1/8” hole saw.
Check the door for bevels. Most exterior doors are beveled (the edge is cut at a slight angle) so they close tighter against the weatherstripping. This is where the manuals disagree. If your door is beveled, you must use the template from your specific hardware brand. – Kwikset: Place the template on the exterior side of the door. – Baldwin: Place the folded template on the low side of the bevel. – Hager: Apply the template to the high side of the bevel.
Pick one brand and follow its rule. Mixing guidance guarantees a misaligned latch.
Step 2: Drill the 2-1/8” Face Bore
Secure the door. Clamp it between sawhorses or have a helper hold it firmly. Attach your 2-1/8” hole saw to the drill. Locate the pilot bit exactly on your center point.
Start the drill at a medium speed. Apply firm, steady pressure. The moment you see the pilot bit breakthrough on the opposite side of the door, stop.
Pull the hole saw out. Move to the other side of the door, locate the small pilot hole, and finish the cut from that side. This two-side technique prevents the hole saw’s teeth from tearing out a fist-sized chunk of veneer as they exit. It’s the difference between a professional job and a visible repair.
Step 3: Drill the 1” Edge Bore
Find the center of the door edge at your 38-inch mark. This is where you drill the latch hole. Your drill must be perfectly perpendicular to the door edge. A drill guide is the best $20 you’ll spend on this project.
Attach your 1” auger bit and set a depth stop for 3-1/2” (for 2-3/8” backset) or 3-7/8” (for 2-3/4” backset). Drill slowly, letting the auger’s screw point pull the bit in. Clear chips frequently.
The hole must be clean and deep enough for the entire latch mechanism. Blow out the dust with compressed air or a shop vacuum.
Step 4: Mortise the Latch Plate
Insert the latch into the edge hole. Trace around its faceplate with a sharp utility knife. Remove the latch.
Use your chisel and hammer to carefully cut along the traced lines, then remove the wood inside to a depth of about 1/8”–5/32”. The goal is for the metal plate to sit perfectly flush with the door edge. A proud plate prevents the door from closing fully.
Step 5: Dry-Fit and Install
Insert the latch back into the hole and secure it with the provided screws. Do not overtighten, snug is enough. The latch bolt should move in and out smoothly.
Slide the exterior knob assembly onto the latch spindle from outside. Hold it flush against the door. From the inside, thread the mounting screws through the interior rose and into the exterior assembly. Tighten them alternately and evenly.
Finally, snap or screw the interior knob onto the spindle. Test the knob. It should turn freely and retract the latch bolt smoothly.
Bevels, Double Doors, and Other Edge Cases

Standard doors are easy. It’s the exceptions that cost you time.
Beveled doors, as covered, require you to pick a hardware brand and follow its template rule religiously. The conflicting advice exists because each company’s latch and rose design has a slightly different spatial relationship. Using a Kwikset knob? Use the Kwikset template placement, even if you own a Baldwin manual.
Double doors need symmetry. Kwikset’s guide explicitly warns: “If there is another hole in the door, or if you are drilling double doors, make sure to keep the backset consistent.” Measure both doors from the same reference point, the floor and the meeting stile, and use the same backset measurement for both. An inconsistency of even 1/4” will be visually obvious and may affect latching.
Passage locks on entry doors have a hidden rule. Kwikset states: “If installing a passage lock on an entry door, make sure the knob with the screw holes is on the interior side of the door.” A passage lock has no locking mechanism, so either knob can technically go anywhere. But the one designed to receive the mounting screws has a reinforced interior; putting it on the exterior creates a security weak point.
Metal doors change the tooling. You cannot use a standard bi-metal hole saw on steel. You need a carbide-tipped hole saw designed for metal, cutting oil, and a slower drill speed. The edge bore in a metal door is often punched at the factory. If you must drill it, use a step drill bit or a cobalt twist bit designed for drilling into metal. It’s a different skill set.
What Most People Get Wrong (And How to Fix It)
Mistakes happen. Here’s how to diagnose and repair the common ones.
The latch binds when you turn the knob. The edge bore is almost certainly too shallow. The latch mechanism is bottoming out inside the door. Remove the latch and measure the depth of the hole. If it’s less than 3 inches, use your 1” bit to deepen it to the required 3-1/2” or 3-7/8”. Clear all debris before reinstalling.
The knob feels loose or wobbles. The mounting screws connecting the interior and exterior assemblies are not tight enough. Remove the interior knob (often by depressing a small catch with an Allen key) and tighten the two long machine screws. Do not overtighten, as this can distort the plastic housing inside the knob.
The door won’t latch smoothly. The latch bolt isn’t aligning with the strike plate in the frame. This is usually a backset error. If the latch is too short, you drilled for a 2-3/4” backset but have a 2-3/8” latch. You’ll need to plug the edge bore with a dowel and re-drill it closer to the door edge. If the latch is too long, you have the opposite problem, plug the face bore and re-drill it further from the edge. It’s a frustrating fix, which is why measuring twice matters.
Splintering on the door face. You drilled the 2-1/8” hole completely from one side. The only fix is wood filler, sanding, and touch-up paint. Next time, remember the rule: drill until the pilot bit breaks through, then finish from the other side.
Frequently Asked Questions
What size hole saw do I need for a door knob?
You need a 2-1/8 inch (54 mm) hole saw. This is the universal standard for the bore that accepts the knob collar and rose. Do not use a spade bit.
How deep should the latch hole be?
The 1 inch edge bore for the latch should be 3-1/2 inches deep for a 2-3/8 inch backset, or 3-7/8 inches deep for a 2-3/4 inch backset. This depth accommodates the full latch mechanism.
Can I use a regular drill bit for the door knob hole?
No. A standard twist drill bit cannot cut a 2-1/8 inch diameter hole. You must use a hole saw. For the 1 inch edge bore, a spade bit or auger bit is correct; a small twist bit will wander off-center in the end grain.
What if my door is already drilled for the wrong backset?
If the backset is incorrect, the latch won’t align with the strike plate. You must plug the existing holes. For the edge bore, glue a 1 inch wooden dowel into the hole, let it dry, and re-drill in the correct location. For the face bore, use a larger dowel or a specialized door hole plug kit, then re-drill the 2-1/8 inch hole at the correct backset.
The Bottom Line
Drilling a door knob hole is a measuring job disguised as a drilling job. Success hinges on three numbers: 2-1/8″, 1″, and either 2-3/8″ or 2-3/4″. Get them right with a sharp hole saw, a perpendicular drill, and the patience to work from both sides of the door.
The hardware brand’s template is your final authority, especially on beveled doors. Ignore it and you’ll learn the hard way that a misaligned latch is a persistent headache. For most interior doors, a Kwikset or Schlage residential set with a 2-3/8” backset is the default. Drill cleanly, mortise carefully, and the knob will work for decades.
