
How to Use a Ryobi Drill | The 4 Settings That Matter Most
This post contains affiliate links. As an Amazon Associate, we earn from qualifying purchases.
To use a Ryobi drill, first insert a charged battery and install a bit by inserting it at least 15mm into the chuck and rotating the collar clockwise. Set the direction switch forward for drilling, the speed selector to Position 1 (0-440 rpm) for control or Position 2 (0-1,700 rpm) for speed, and the torque ring to the drill icon. Squeeze the trigger to start, applying steady pressure.
That 15mm spec is the line between a bit that wobbles and one that stays put. It’s printed in the official support guide, and skipping it is the single fastest way to strip a screw head or snap a small bit. The drill works perfectly when those four settings are matched to the job.
What follows is a walkthrough of each control, why it works that way, and the exact mistakes that burn out motors or break chucks. You’ll also see how a Ryobi drill stacks up against a DeWalt or Milwaukee for the same tasks.
Key Takeaways
- The torque clutch is not a power dial. It’s a mechanical disconnect that saves screw heads and wrists by slipping at a preset force.
- Speed Position 1 (0-440 rpm) delivers higher torque through a gear reduction. Use it for driving screws or drilling holes larger than a pencil.
- Always insert the drill bit at least 15mm into the chuck jaws. Gripping the shank, not the cutting flutes, prevents the bit from spinning loose.
- The drill mode icon on the torque ring bypasses the clutch entirely, giving you full motor power for boring holes.
- Let the tool do the work. Forcing a stalled bit overheats the motor and can cause a violent kickback.
How to Install and Remove a Drill Bit
Ryobi’s keyless chuck is the standard for home drills. You don’t need a key. The mechanism uses a threaded collar that, when turned, moves three metal jaws in or out. Get this wrong and the bit slips, drills off-center, or gets stuck.
Before you start: Disconnect the battery. If the bit was just used, wait a minute. The metal jaws conduct heat straight from a hot bit to your hand.
Open the chuck by holding the drill body with one hand and rotating the black collar counter-clockwise. The jaws will separate. Insert your bit—drill bit, screwdriver bit, whatever—straight into the center. The shank (the smooth, cylindrical part) must go in at least 15mm. Do not let the chuck jaws grip the cutting flutes of a drill bit or the twisted body of a screwdriver bit.
Common mistake: Gripping the bit’s cutting threads. The hardened steel jaws can’t get a secure hold on the grooves, so the bit spins inside the chuck under load. You’ll smell burnt metal before you see the smoke.
Now, tighten. Hold the drill body and rotate the collar clockwise. Do it firmly by hand until the bit is snug. For a final cinch, you can grip the collar and give it one more firm twist. Do not use pliers or excessive force. Over-tightening stresses the chuck’s internal threads and can crack the plastic collar on some models.
To remove a bit, reverse the process: battery off, hold the body, turn the collar counter-clockwise. If it’s stuck, ensure the drill is in forward direction and give the trigger a quick, light tap while holding the collar loose. The jolt often breaks the grip.
The 4 Settings That Matter Most
A Ryobi drill has four primary controls: the direction switch, the speed selector, the torque ring, and the trigger. Treating them as independent is how you strip screws. They work as a system.
Forward rotation (arrow pointing toward the chuck) is for drilling and driving screws in. Reverse (arrow pointing toward the battery) is for removing screws or backing out a stuck drill bit. The motor must be completely stopped before you flip this switch. Changing direction while the chuck is spinning grinds the internal electrical contacts.
1. The Speed Selector (Gear Shift)
This is a two-position slider on top of the drill, near the base of the handle. It doesn’t control electronic speed; it physically changes gears inside the transmission.
| Position | Labelled Speed | Best For | Why It Works |
|---|---|---|---|
| 1 (Low) | 0–440 rpm | Driving screws, drilling with large bits (>6mm), high-torque tasks. | The gear reduction trades rotational speed for twisting force. You get more power to turn stubborn screws or big paddle bits without stalling. |
| 2 (High) | 0–1,700 rpm | Fast drilling of small holes (<6mm) in wood, metal, or plastic. | A direct gear connection spins the chuck faster with less torque. It’s for rapid material removal where resistance is low. |
Start in Position 1. It gives you more control and power for 90% of tasks. The only time you need Position 2 is when you’re drilling a series of small pilot holes and want to finish faster.
2. The Torque Ring & Clutch
This numbered collar behind the chuck is the most misunderstood part of a cordless drill. It is not a power dial. It is a mechanical clutch.
The clutch is a set of stacked metal plates inside the drill. When the torque at the chuck reaches the level you’ve set (say, #5), these plates slip against each other instead of transferring more force. You’ll hear a rapid click-click-click and the chuck will stop turning, even though the motor is still running.
- Settings 1–24: Use these for driving screws. Start low (#4-6) for small trim screws. Increase the number for larger screws. If the clutch clicks before the screw is seated, move to a higher number.
- Drill Icon: This setting moves the clutch plates completely out of engagement. It locks the motor directly to the chuck, delivering full torque. Use this only for drilling holes. Never use it for driving screws, or you will overdrive them instantly.
The clutch is why a drill for screws is so useful. It prevents stripping the screw head and protects your wrist from sudden twisting if the bit slips.
3. The Direction Switch
Located above the trigger, this simple left/right switch is non-negotiable. Forward for in, reverse for out. The critical rule: the drill must be stopped completely before you flip it. Switching under power arcs the motor’s commutator, creating carbon buildup that eventually kills the motor.
4. The Variable Speed Trigger
This is your fine control. The harder you squeeze, the faster it goes. Start every operation with a gentle squeeze to engage the bit, then increase pressure. For driving screws, start slow to set the screw, then add speed. Letting the trigger snap back from full speed puts unnecessary stress on the motor brake.
Step-by-Step: Drilling a Clean Hole
This sequence assumes you have a bit installed and the battery is charged.
- Select the bit. Match it to your material: a brad-point or twist bit for wood, a high-speed steel (HSS) bit for metal, a masonry bit for concrete. A dull bit forces the drill, creates heat, and makes a ragged hole.
- Set the drill mode. Rotate the torque ring to the drill icon. This gives you full, unclutched power.
- Set the speed. For holes up to 6mm (1/4″), use Position 2 for speed. For anything larger, use Position 1 for its higher torque.
- Set the direction. Switch to forward.
- Mark and secure your workpiece. Use a center punch on metal to keep the bit from wandering.
- Start the hole. Hold the drill perpendicular to the surface. Squeeze the trigger gently to start a small pilot indentation.
- Apply steady pressure. Let the bit’s cutting edges do the work. If drilling metal, use a drop of cutting oil to keep the bit cool. If the drill labors or the bit stops turning, stop immediately.
- Withdraw the bit. Once through, keep the drill spinning and pull it straight back to clear the hole of debris.
If the drill bit stalls, release the trigger instantly. A stalled bit under power creates tremendous torque that can twist the drill from your hands or damage the gearbox. This is kickback. The fix is a sharper bit, slower speed, or less pressure.
Step-by-Step: Driving a Screw Without Stripping It
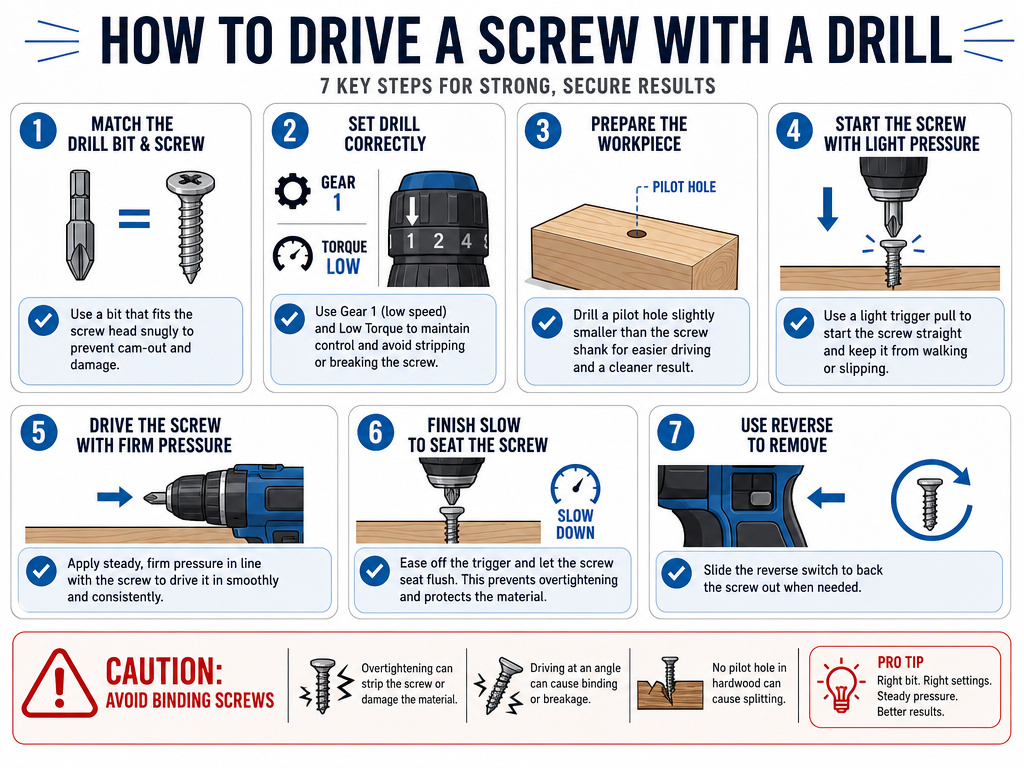
Using a drill as a screwdriver is its most common job. The clutch is your best friend here.
- Select the correct bit. A #2 Phillips bit for most deck or drywall screws. The bit must fit the screw head perfectly. A worn or mismatched bit will cam out and ruin the head.
- Set the clutch. Start on a mid-range setting, like #8. You can always increase it.
- Set the speed. Position 1. Always.
- Set the direction. Forward.
- Start the screw. Hold the screw on the bit, start it in the pilot hole (you did drill a pilot hole, right?), and squeeze the trigger gently until the screw engages.
- Drive to depth. Apply moderate forward pressure and increase trigger speed. The moment you hear the rapid click-click-click of the clutch, stop. The screw is set.
- Check the depth. If the screw isn’t flush, increase the clutch setting by two numbers and give it one more short burst.
This process is nearly identical on a DeWalt drill or a Milwaukee drill. The clutch behavior and trigger sensitivity might feel slightly different, but the principle is universal.
Ryobi vs. The Competition: Where It Fits

A Ryobi ONE+ drill is a solid home and DIY tool. It won’t withstand the daily abuse a professional Milwaukee drill or DeWalt drill is built for, but it doesn’t need to. For the price, it delivers capable performance.
The chuck is decent but can develop slight wobble after years of heavy use. The plastic gear housing is tougher than it looks, but dropping it onto concrete from a ladder is a gamble. Where Ryobi shines is in its ecosystem—one battery platform that runs dozens of tools, from drills to leaf blowers.
For driving many long screws or drilling large holes, you’ll eventually want more power. That’s when you graduate to an impact driver vs drill decision. The impact driver’s hammering action handles high-torque jobs easily, but it’s terrible for delicate drilling. They complement each other.
Essential Safety & Maintenance
Safety isn’t a list of obvious warnings. It’s about recognizing the specific moments things go wrong.
- Eye protection is mandatory. A broken drill bit or metal shaving travels fast enough to embed itself.
- Secure your workpiece. Clamp it down. A spinning drill can grab and spin a loose board right into you.
- No gloves near the chuck. Loose fabric can get caught and pull your hand in.
- Mind the cord. If using an older corded model, keep the cord behind you and clear of the bit’s path.
- Store batteries half-charged. Storing them fully charged or fully dead for months degrades the cells faster.
After heavy use, blow dust out of the air vents with compressed air. Wipe the chuck jaws clean of grit. A drop of light oil on the chuck threads once a year keeps it turning smoothly.
Frequently Asked Questions
What do the numbers on my Ryobi drill mean?
The numbers (1-24) on the torque ring are clutch settings. They control how much twisting force the drill will apply before it disengages and starts clicking. A higher number means more torque. Use these settings for driving screws to prevent over-tightening.
Why does my Ryobi drill keep stopping?
It’s almost certainly the clutch. If you’re driving a screw and the chuck stops with a clicking sound, the clutch has reached its set torque limit. Turn the torque ring to a higher number. If you’re trying to drill a hole and the drill stops, make sure the torque ring is set to the drill icon, not a numbered setting.
Can I use my Ryobi drill as a screwdriver?
Yes, that’s one of its main functions. Use a screwdriver bit, set the clutch to a low-to-medium number, and use the slow speed setting (Position 1). The clutch will prevent you from stripping the screw head. For more detail, see our guide on using a drill as a screwdriver.
What’s the difference between the 1 and 2 speed settings?
Position 1 is a lower gear (0-440 rpm) that provides more twisting power (torque) for tough jobs like driving large screws or drilling big holes. Position 2 is a higher gear (0-1,700 rpm) for faster drilling of small holes where less power is needed.
How do I change the direction on my Ryobi drill?
Locate the direction switch above the trigger. Slide it to the right (so the arrow points toward the chuck) for forward (driving/drilling). Slide it to the left (arrow points toward the battery) for reverse (removing screws). Always ensure the drill has completely stopped spinning before changing direction.
The Bottom Line
A Ryobi drill is a capable, straightforward tool. Its success hinges on matching four things: the bit, the speed, the clutch, and the direction. Respect the 15mm insertion rule, let the clutch protect your work, and start every job in the slow, powerful first gear. It won’t drill as fast as a pro-grade model, but for building a deck, assembling furniture, or hanging shelves, it’s more than enough. When you need brute force for lag bolts, that’s the day you reach for an impact driver vs drill. Until then, this drill will handle it.
