Hedge Trimmer Guide for Beginners (7 Steps + Safety First)
This post contains affiliate links. As an Amazon Associate, we earn from qualifying purchases.
Using a hedge trimmer requires matching three things: the right safety gear, a solid cutting plan based on hedge type, and a specific side-to-top trimming sequence that keeps the base wider than the top for plant health. A formal privet hedge needs a string guide for a flat top; an informal flowering hedge gets a lighter trim after it blooms.
Most beginners grab the tool and start hacking at the middle of the hedge. That destroys the shape in the first ten seconds. You end up with a wobbly top, a narrow base that blocks light, and a pile of regret. The trimmer feels awkward because you’re fighting gravity and the plant’s natural growth pattern instead of working with it.
This guide walks through the setup, the cut, and the cleanup. We’ll cover how to not annoy your neighbors, why a dull blade is more dangerous than a sharp one, and what to do when you find a bird’s nest. Let’s get the hedge straight.
Key Takeaways
- Check for nests first. It’s illegal to disturb active bird nests under the Wildlife & Countryside Act 1981. The main nesting season runs March to August, but always do a visual sweep.
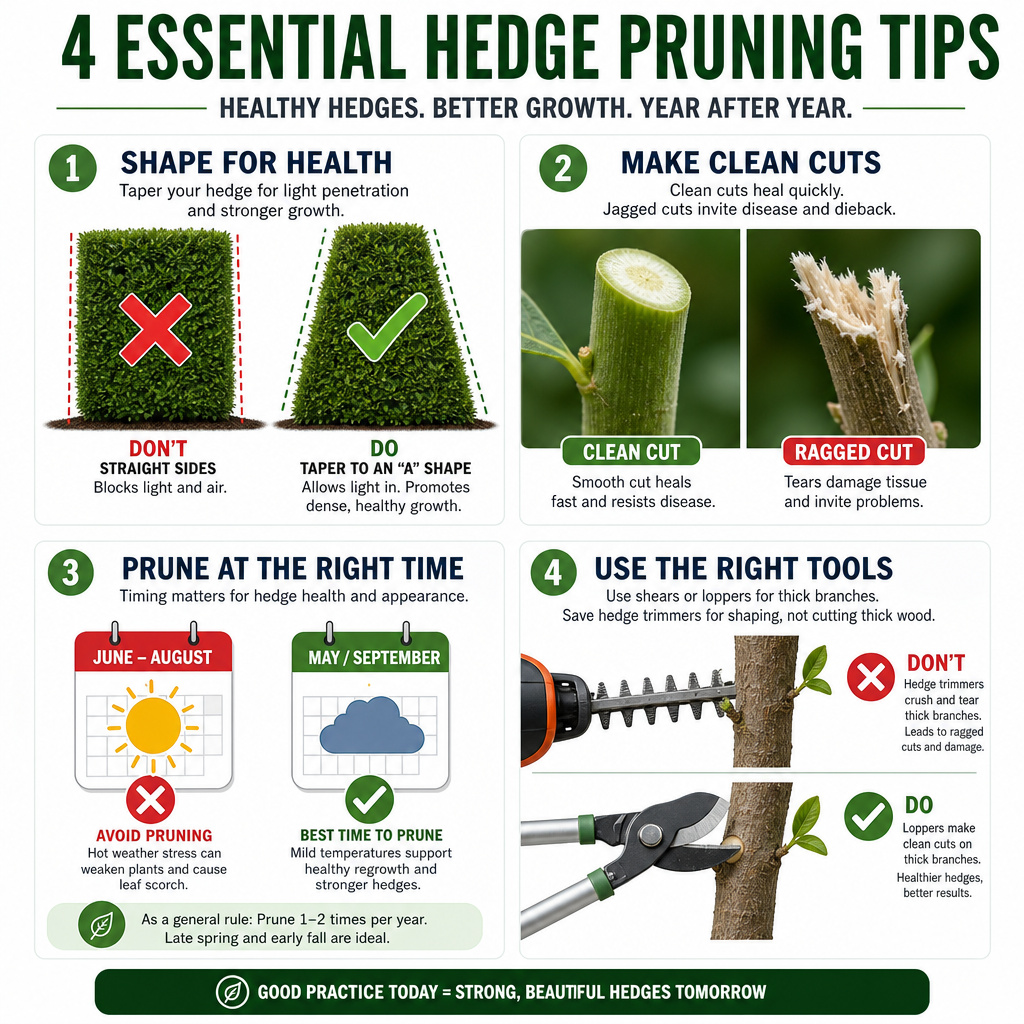
- Shape is everything. Trim so the hedge is wider at the bottom than the top. A tapered shape lets sunlight reach lower branches, preventing bare, leggy patches.
- Dull blades tear. A sharp blade makes a clean cut that heals fast. A dull blade mashes and shreds stem ends, inviting disease and stressing the plant.
- Time your cuts. For most formal hedges, trim twice a year: a light shaping in late spring and the main cut in late summer. Never cut more than one-third of the total height at once.
- Battery care matters. For cordless trimmers, never run the battery to 0%. Charge it before it drops below 20% and store it with at least a 50% charge in a cool, dry place.
Before You Start: The Non-Negotiable Safety List
Before you start: Wear cut-resistant gloves, the thin nylon kind sold for kitchen use won’t stop a blade. Wear safety goggles that seal around your eyes; flying wood chips bounce. If you’re using a corded electric trimmer, plug it into a Residual Current Device (RCD). An RCD will cut power in a fraction of a second if you slice through the cord, which happens more often than you’d think.
The safety talk isn’t just about you. It’s about the guy next door who doesn’t want to be woken up at 7 AM on a Saturday. Noise is a real issue. A petrol trimmer like a STIHL HS 56 C-E hits about 96 decibels.
That’s legally okay for daytime, but community rules are stricter. On a weekday, 8 AM is a fair start. On a weekend, push that to 9:30 or 10 AM. Your relationship with the neighbors is worth the extra hour of sleep.
Your clothing matters. Long sleeves, long pants, and sturdy boots. No loose shirt tails or dangling drawstrings that can get caught in the blade housing. Ear protection is smart for petrol models, but even a loud electric trimmer can cause ringing after an hour.
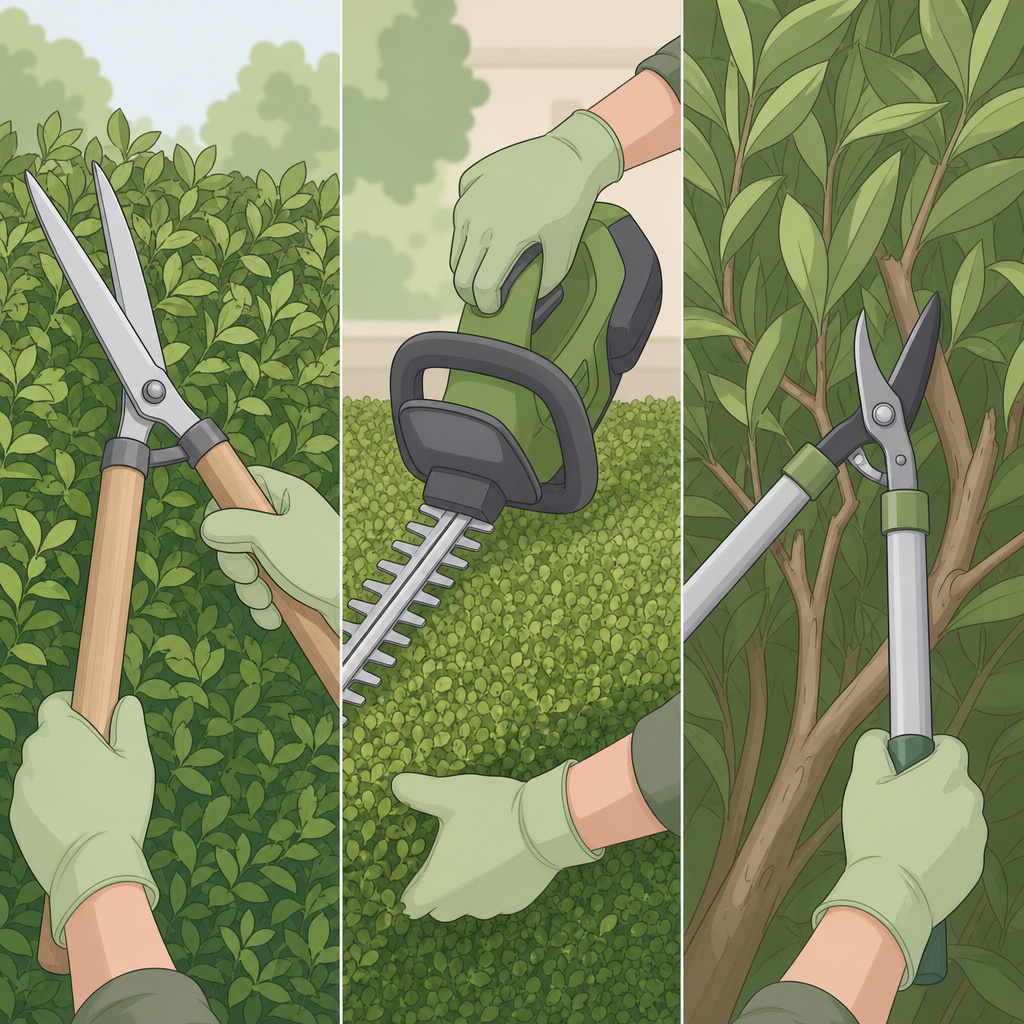
What Type of Hedge Trimmer Do You Actually Need?
The tool choice decides your entire experience. There are three main types, and each has a specific job.
Corded Electric Trimmers are the budget workhorse. They’re light, relatively quiet, and have unlimited runtime. The downside is the cord. You need a heavy-duty outdoor extension cord and constant awareness of where it’s lying. If you have a small, easily accessible hedge near an outlet, this works. For anything larger, the cord becomes a tripping hazard and a major limitation.
Cordless/Battery Trimmers are the sweet spot for most homeowners. A model like the Ryobi ONE+ 18V Hedge Trimmer offers real freedom. You trade some raw power for not dragging a cord or dealing with fuel. Runtime is the constraint. A 4.0Ah battery might give you 45 minutes of continuous cutting on a medium-density hedge. That’s often enough. Always have a second battery charging.
Petrol Trimmers are for big jobs, thick growth, or remote areas without power. They’re the most powerful and the loudest. They require fuel mixing, pull-starting, and regular engine maintenance. You don’t need one for a suburban privet hedge.
The blade length matters too. A 24-inch blade is standard and manageable. A 30-inch blade covers more ground per pass but is heavier and harder to control for a beginner. Start with 24 inches.
| Trimmer Type | Best For | Biggest Limitation |
|---|---|---|
| Corded Electric | Small hedges near an outlet, low noise needed | Cord management, limited range |
| Cordless/Battery | Most suburban hedges, medium size, ease of use | Battery runtime, periodic recharging |
| Petrol | Large properties, very thick growth, no power | Noise, maintenance, fuel, weight |
If you’re still deciding, our guide on hedge trimmer features breaks down blade types, tooth spacing, and weight.
How to Trim a Hedge Step-by-Step
This is the core sequence. Rushing it makes a mess. Skipping the setup guarantees a crooked hedge.
Step 1: The Wildlife and Worksite Check
Walk the length of the hedge and look deep inside. You’re searching for woven nests, not just birds. If you see an active nest with eggs or chicks, stop. Postpone the job for at least six weeks. It’s the law, and it’s the right thing to do. Next, clear the base. Pull away any vines, toys, or garden hose. Lay down a tarpaulin or an old sheet. This catches 80% of the clippings and makes cleanup a five-minute job instead of a forty-minute rake-and-bag session.
Step 2: Set Your Cutting Guide
For a flat, level top, you need a physical guide. Eyeballing it never works. Hammer a wooden stake into the ground at each end of the hedge. Tie a mason’s line between them, pulling it taut. Position the line about 1cm (half an inch) below your desired finished height. This gives the trimmer blades clearance so they cut the hedge, not the string.
Step 3: Trim the Sides – Bottom to Top
Now pick up the trimmer. Stand with your feet shoulder-width apart for stability. Hold the trimmer so the blades are vertical. Start at the very bottom of the hedge on one side. Make your first cut here. Why? Because if you start at the top, the falling clippings will cover the lower section you still need to cut, forcing you to recut or leave it messy.
Begin each cutting pass at the bottom of the hedge and sweep the trimmer upward in a smooth, controlled arc. Keep the blades parallel to the hedge surface, and angle them very slightly inward to create the essential taper, wider at the bottom, narrower at the top.
Use the whole length of the blade. Don’t just poke the tips into the foliage. Think of it like mowing a vertical lawn. Overlap each upward pass by a few inches to avoid leaving uncut strips. Work your way along one entire side before moving to the other.
Step 4: Trim the Top – Use the String
Move to the top. Hold the trimmer with the blades horizontal. Position yourself so you can make long, walking passes along the length of the hedge. Let the string guide the blade height. Use smooth, continuous motions. Don’t chop. Let the teeth do the work. If you hit a particularly thick branch, don’t force it. Back out and either use loppers or make several lighter passes.
Step 5: The Step-Back and Refine
This is the part everyone skips. Put the trimmer down. Walk ten feet back and look at the hedge. Sight down its length. You’ll see dips and bulges you missed up close. Pick up the trimmer and make only the corrective cuts needed to smooth those out. Less is more here. You can always take more off; you can’t put it back.
Step 6: Cleanup and Aftercare
Pull away the tarpaulin and dispose of the clippings. Then, take a rake and gently pull any remaining clippings off the top of the hedge. This lets light hit the freshly cut stems, encouraging bushy regrowth. If your soil is poor or sandy, sprinkle a general-purpose granular fertilizer around the base of the hedge and water it in. This is like giving it a recovery drink after a workout.
What’s the Best Technique for Different Hedge Types?
 **
**
Not all hedges are the same. Your technique changes based on the plant.
Formal Hedges (Privet, Box, Yew)
These are the sculpted ones. They need crisp lines and frequent trimming, two to three times per growing season. Always use a string guide. Yew is an exception among conifers; it will regrow from old wood if you cut back too far. Privet and box are forgiving.
Informal Flowering Hedges (Forsythia, Lilac)
You’re not after a perfect cube. You’re shaping a natural-looking screen that flowers. The rule is simple: trim after flowering. If you cut in early spring, you’re cutting off all the flower buds. Wait until the blooms fade, then shape it lightly. This preserves next year’s show.
Conifer Hedges (Leylandii, Thuja)
Here lies the point of no return. Most conifers will not regrow from brown, woody stems. You must only cut into the green, needled growth. If you cut back to the brown trunk, that section is dead forever, leaving a permanent bald patch. Go slow. Never cut more than an inch or two into the green.
Large-Leaved Evergreens (Laurel, Rhododendron)
Don’t use a hedge trimmer here. The blades will slice through the middle of leaves, leaving ugly brown half-leaves hanging. Use secateurs or loppers to cut branches back to a bud or a side shoot. It’s slower, but the hedge looks healthy, not butchered.
Common Beginner Mistakes (And How to Avoid Them)
I’ve made the first two on this list. You probably will too. Knowing them cuts the learning curve.
Mistake 1: The “Wider at the Top” Shape. It happens when you trim the sides straight up and down. The top grows outward, shades the bottom, and the lower third of the hedge turns into a skeleton of bare sticks within two seasons. The fix is the taper. Consciously angle your cuts inward by about 5 degrees as you go up.
Mistake 2: Using a Dull Blade. A sharp blade snips cleanly. A dull blade rips and tears plant tissue. You’ll see frayed, white ends on the cut stems. The trimmer will also vibrate more, bog down easier, and consume more battery or fuel. It’s harder on you and the plant. Learn the steps for sharpening hedge trimmer blades.
Mistake 3: Cutting at the Wrong Time. Trimming in the peak heat of a summer afternoon stresses the plant. Trimming a spring-flowering hedge in March ruins the blooms. The sweet spot is a cool, cloudy morning in late spring or late summer for the main cut.
Mistake 4: Forcing the Trimmer Through Thick Branches. Hedge trimmer teeth are designed for shoots up to about 1cm (3/8 inch) thick. If you hear the motor straining and smell hot plastic, you’re forcing it. That branch needs loppers. Forcing it can snap a tooth, twist the blade, or burn out the motor.
| Symptom | Likely Cause | Fix |
|---|---|---|
| Hedge has bare patches at the bottom | Hedge is wider at the top | Re-shape with a taper; be patient—it may take a full season to fill in. |
| Cut stem ends look shredded, not clean | Dull blades | Sharpen blades immediately. |
| Trimmer bogs down or stops in dense growth | Trying to cut branches too thick | Pre-cut thick branches (>1cm) with loppers before trimming. |
| Uneven, wavy top line | Cutting freehand without a guide | Use a string line for the next trim. |
Maintenance and Care: Keeping Your Trimmer Ready
The job isn’t over when you unplug the battery. The next five minutes determine if your trimmer lasts three years or ten.
1. Clean the Blades. Every. Single. Time.
Sap and plant residue harden on the blades like concrete. While the trimmer is unplugged or the battery is removed, put on your gloves. Use a stiff brush (an old paintbrush works) and some soapy water to scrub the blades. Get between the teeth. Rinse and dry thoroughly. A quick spray of a light lubricant like WD-40 Specialist Dry Lube displaces moisture and prevents rust. This is a non-negotiable habit. For a deeper clean, follow the full process for cleaning your hedge trimmer.
2. Check the Blade Sharpness.
Run your gloved thumb lightly along the flat side of a tooth. If it feels rounded or slick, it’s dull. If it catches slightly, it’s still sharp. Dull blades don’t just cut poorly; they make the tool work harder, overheating the motor or engine. Sharpen them after every 3-4 hours of use.
3. Battery and Cord Care.
For cordless tools, never store a fully drained battery. Charge it to at least 50% before putting it away. Store batteries in a cool, dry place, not in a hot shed or garage. For corded trimmers, always coil the extension cord loosely. Kinks and tight bends break the internal wires over time.
4. End-of-Season Storage.
Give the tool a full clean and lubrication. For petrol models, run the engine dry or add fuel stabilizer. The principles for proper tool storage apply across all outdoor power equipment.
Frequently Asked Questions
What safety gear is absolutely necessary?
Safety goggles and cut-resistant gloves are the bare minimum. Add ear protection for petrol trimmers, long sleeves, pants, and sturdy boots. For corded electric trimmers, an RCD plug is essential.
Can I use a hedge trimmer to cut tree branches?
No. A hedge trimmer is for soft, green growth and small-diameter shoots. Attempting to cut tree branches risks severe damage to the tool, broken teeth, bent blades, or a burnt-out motor, and can cause dangerous kickback. For branches, use loppers or a pruning saw.
How often should I sharpen the blades?
Sharpen the blades after every 3-4 hours of actual cutting time. A clear sign it’s time is when the cut stems look mashed instead of cleanly sliced, or the tool requires more force to push through the hedge.
Is it okay to trim a wet hedge?
No. Trimming wet foliage is harder on the tool, leads to a ragged cut, and can promote the spread of fungal diseases between plants. It also makes the clippings clump together, creating a mess. Wait for the hedge to dry.
My hedge has large brown patches. Can I fix it?
It depends on the plant. For privet, yew, or boxwood, you can cut back into the brown wood and it may slowly resprout. For most conifers (like Leylandii), brown wood is dead forever. The only fix is to cut the entire hedge back to where there is green growth and live with a smaller hedge, or replace it.
The Bottom Line
Using a hedge trimmer isn’t about brute force. It’s about a plan. Check for wildlife, set a guide, and always cut the sides from the bottom up with a slight taper. Keep the blades sharp and clean them after every use. Respect the type of hedge you’re cutting, flowering ones after they bloom, conifers only in the green.
The difference between a hack job and a professional-looking trim is about thirty minutes of setup and patience. That’s it. Your back will thank you, your hedge will thrive, and you’ll only have to do it twice a year. Now go put those clippings in the compost.