How to Store a Weed Trimmer the Right Way (3 Steps You’re Missing)
This post contains affiliate links. As an Amazon Associate, we earn from qualifying purchases.
Store a weed trimmer correctly by completing three prep steps: clean it thoroughly, manage the fuel or battery, and protect the cutting head. Then, place it in a dry, temperature-stable location, ideally hung vertically on a wall. This sequence prevents rust, fuel system damage, and battery failure, guaranteeing a ready-to-start tool next season.
Most people grab the trimmer, run it until the tank is empty or the battery dies, and chuck it in a corner of the garage. They figure it’s fine until spring. That approach costs you a carburetor rebuild, a dead battery, or a spool jammed with petrified grass.
This guide walks through the exact prep for gas, battery, and electric trimmers. You’ll get specific product recommendations for fuel stabilizer and lubricant, a foolproof battery storage voltage, and a simple wall-mount solution that clears floor space. We’ll also cover what to do when you pull it out and it still won’t start.
Key Takeaways
- Fuel is the #1 killer: Untreated gas turns to varnish in 60–90 days, clogging the carburetor. Either drain the tank completely or add a stabilizer like Sta-Bil 360 Performance before the last run.
- Batteries have a memory: Storing a lithium-ion battery at full charge or zero charge permanently reduces its capacity. Aim for a 40–60% charge (2–3 indicator lights) and keep it in a cool, dry place.
- Cleanliness is non-negotiable: Grass clippings hold moisture against metal. That moisture causes surface rust on the shaft and blade within two weeks, leading to common trimmer repairs you could avoid.
- Hang it, don’t lay it: Vertical wall storage saves space and prevents critters from nesting in the guard. For 99% of two-stroke trimmers, hanging won’t cause leaks, if it does, you have a failing fuel line.
- Environment matters more than you think: A stable temperature (50–80°F) is better than a perfect but fluctuating one. Daily swings cause condensation inside the engine, which is worse than a constant chill.
The Three Non-Negotiable Prep Steps
Skip one of these and you’re gambling with your tool’s next season. The order matters. Do the cleaning first, because you can’t inspect a dirty tool.
Proper storage begins with a cold, dry engine. Cleaning removes abrasive debris and corrosive moisture, while fuel stabilization prevents polymerization, the chemical process where gasoline oxidizes into a sticky gum that blocks carburetor jets and fuel lines. A final lubrication of metal surfaces displaces residual moisture and prevents oxidation during dormancy.
First, run the trimmer for a minute to warm the engine. This loosens any grass packed underneath the guard. Now shut it off and let it cool completely. Trying to clean a hot engine melts plastic and can warp the carburetor diaphragm.
Step 1: The Deep Clean.
Scrape off the big chunks with a plastic putty knife. Then hit it with a compressor or a cordless blower. You need to dislodge the fine, damp stuff stuck to the shaft and inside the cooling fins. If you don’t have air, a stiff-bristle brush and a damp rag work.
– Why this matters: Grass juice is acidic. Left on aluminum engine housings, it etches the surface. On steel drive shafts, it holds moisture directly against the metal. I’ve pulled trimmers out of storage with pitted shafts that needed replacement because the owner “just hosed it off.” Hosing drives water into the bearings. Don’t do that.
Step 2: Fuel or Battery Triage.
This is the fork in the road. Your choice here dictates the next six months.
| Trimmer Type | Immediate Action | Long-Term Storage Action | Risk If Skipped |
|---|---|---|---|
| Gas 2-Stroke | Add fuel stabilizer to fresh 50:1 mix in gas can. | Run engine 5 mins to circulate treated fuel, then either drain carb bowl or leave tank full. | Untreated fuel turns to varnish, clogging carburetor jets. Repair cost: $80–$150. |
| Gas 4-Stroke | Same as above, but check oil level. | Change oil if due, then run stabilizer through system. | Old oil contains combustion acids that corrode engine internals. |
| Battery (Li-ion) | Use trimmer until battery has 2–3 indicator lights (40–60%). | Remove battery, store separately in cool, dry place. | Full charge degrades cell chemistry; zero charge can trigger protection circuit, bricking the pack. |
| Corded Electric | Unplug. | Coil cord loosely, avoid tight bends. | Cord insulation cracks at sharp bend points, creating a shock hazard. |
For gas models, the debate is drain versus stabilize. I stabilize. A full tank with treated fuel leaves no air space for condensation to form. If you drain, you must also drain the carburetor float bowl, a step most forget. That tiny reservoir of fuel still evaporates and leaves gum.
I used to be a “drain it” guy. Then I stored a Stihl FS 56 RC-E with what I thought was an empty carb. Four months later, the pilot jet was completely plugged with a brown, crystalline gum. The repair took an afternoon. Now I run Sta-Bil 360 Performance through the system every fall. Not a single clog in eight years.
Step 3: Cutting Head and Spark Plug.
Remove the spool and any leftover line. Nylon line absorbs moisture from trapped grass and becomes brittle. For blade heads, spray the metal with a light corrosion inhibitor. A quick shot of WD-40 Specialist Long-Term Corrosion Inhibitor on the blade and drive shaft spline works.
Pull the spark plug. Squirt a teaspoon of engine oil into the cylinder, then pull the starter cord slowly a few times to coat the cylinder walls. Reinstall the plug finger-tight. This prevents rust on the cylinder walls during humidity swings, the main cause of hard starting after storage.
Where and How to Hang Your Trimmer
The floor is for tires and paint cans. Your trimmer needs air flow and security. Wall mounting is the answer, but you have to match the method to the tool’s weight and your wall type.
Can hanging cause leaks? Almost never. That YouTube mechanic is right. If your two-stroke trimmer leaks fuel when hung vertically, the problem isn’t gravity, it’s a cracked fuel line or a faulty carburetor needle valve. Fix it. The only exception is some low-end four-stroke models where the crankcase oil can seep past the rings. If your trimmer smokes excessively on startup after hanging, store it horizontally.
The Simple Wall Solution.
You need a 1×6 pine board, some 3-inch wood screws, and a set of tool holders. The kind meant for rakes and shovels work perfectly. They’re usually steel with a rubber coating.
- Find the studs in your garage or shed wall. Mark them.
- Screw the pine board directly into the studs. Pre-drill to avoid splitting.
- Space the tool holders along the board, leaving enough room for the trimmer head and handle.
- Slide the trimmer’s shaft into the holders. The cutting head should point upward.
This took me 45 minutes and about $25 in materials. It cleared a four-foot square of floor space previously occupied by three trimmers leaning against each other. They’re now accessible and the floor is easy to sweep.
For heavier commercial trimmers, use a dedicated wall bracket like the Rubbermaed FastTrack system. It’s more expensive but holds up to 75 pounds per bracket.
Battery-Specific Storage: Lithium-Ion Rules
This is where people murder expensive battery packs. The rule is simple, but counterintuitive: never store them full or empty.
Lithium-ion chemistry degrades fastest at the voltage extremes. Storing at 100% charge puts constant stress on the cathode. Storing at 0% can trip the pack’s internal protection circuit, which may refuse to take a charge again.
The Ideal Storage Charge
For a Ryobi 40V, EGO Power+, or similar pack, run it down until the indicator shows 2 or 3 lights out of 4. That’s roughly 40–60% state of charge. If your pack has a digital gauge, aim for the mid-point.
Store the battery inside your house if your garage regularly freezes or hits 90°F. Extreme cold permanently reduces capacity, and heat accelerates the chemical aging process. A closet shelf is perfect.
Remove the battery from the trimmer. This prevents a tiny parasitic draw from the tool’s electronics from slowly draining the pack to zero over several months. Wipe the terminals clean with a dry cloth to prevent corrosion. Do not store batteries loose in a metal toolbox, the terminals could short against other tools. Use the original plastic case or a battery storage bag.
Seasonal vs. Short-Term Storage
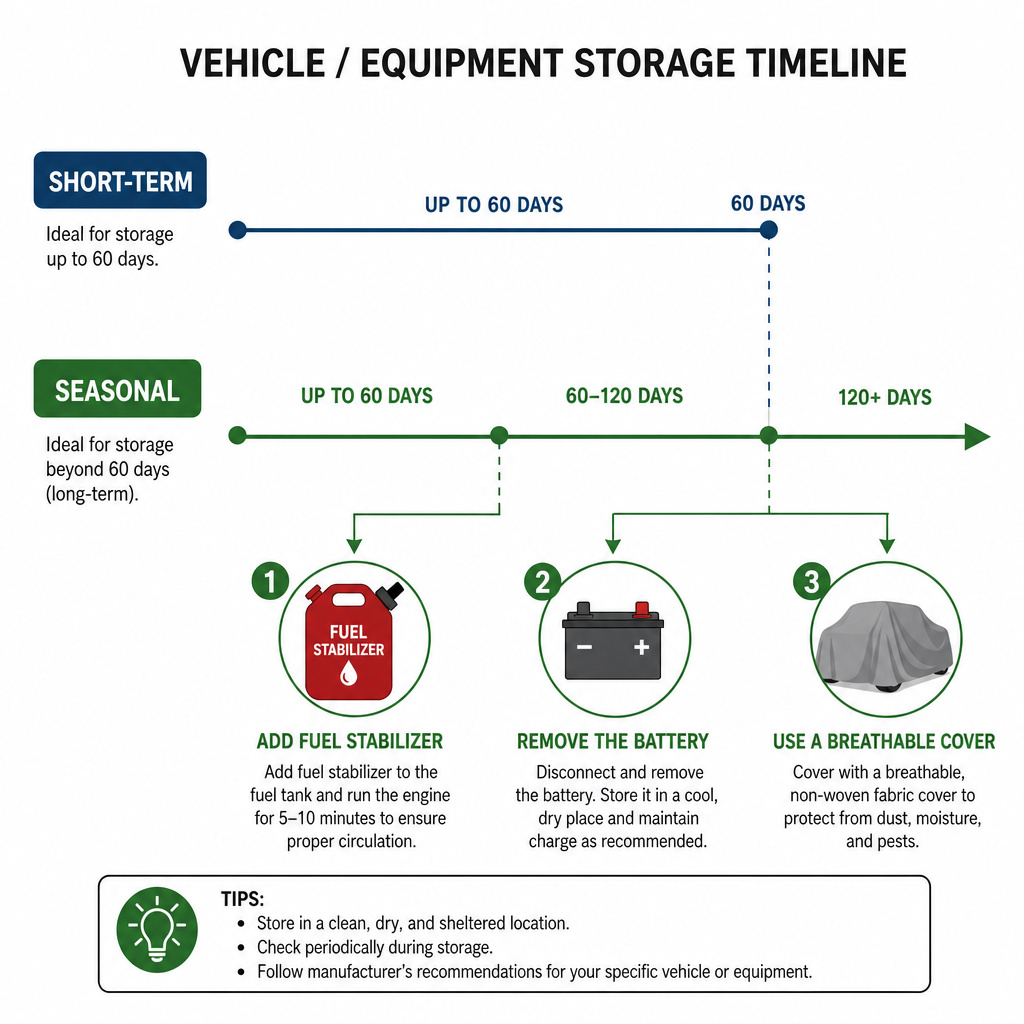
You don’t need the full winterization ritual for a two-week break. But knowing the difference saves time and prevents over-maintenance.
Short-Term (2 weeks to 2 months):
- Clean the trimmer head and underside of the guard.
- For gas, just run the tank dry or add stabilizer if you know it’ll be longer than 30 days.
- For battery, you can leave it on the tool if the garage is climate-controlled.
- Hanging is still preferred.
Long-Term / Seasonal (3+ months, winter):
- Follow all three prep steps rigorously.
- Stabilize the fuel or drain the tank and the carburetor bowl.
- Remove the battery for independent storage.
- Consider a breathable fabric cover (not plastic) to keep dust off if stored in an open shed.
The timeline pivot is 60 days. That’s when untreated gasoline begins its irreversible slide into gum. That’s also when a fully charged lithium-ion battery left in a hot garage will lose a noticeable percentage of its maximum capacity.
What to Do When You Retrieve It
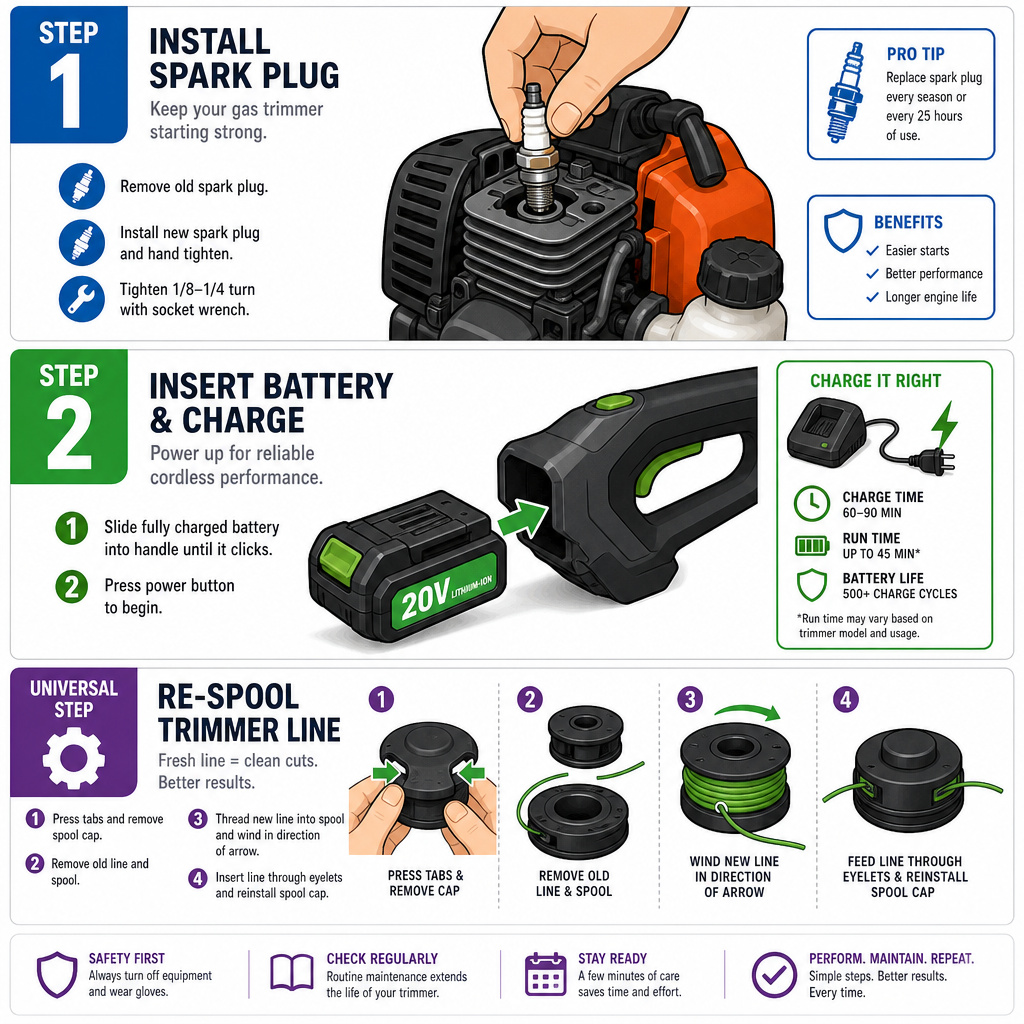
Storage isn’t over until the trimmer starts on the first pull. Assume it won’t. Here’s the revival sequence.
Gas Models:
- Install a fresh spark plug. That oil you added will foul the old one.
- If you stabilized the fuel, you’re good to go. If you drained it, add fresh, pre-mixed fuel.
- Prime the carburetor (if equipped), set the choke, and pull. It might smoke a bit from the cylinder oil, that’s normal.
- If it doesn’t start, your first check is the fuel line. Did it dry out and crack? Next, the carburetor. Stabilized fuel rarely causes issues, but a clogged pilot jet is still possible if the fuel was old when treated.
Battery Models:
- Insert the battery. If the tool has no lights or response, the battery is likely in protection mode.
- Place it on the charger. A quality charger like the EGO Rapid Charger or Ryobi Super Charger can sometimes revive a deeply discharged pack. It might take an hour before it shows any sign of life.
- If it charges, run the trimmer for a full cycle to recalibrate the battery management system.
Universal First Step:
Inspect the cutting head. Re-spool fresh line. Trying to start with old, brittle line just leads to immediate frustration and a need for restringing a trimmer. Check that the guard is securely fastened. A loose guard is a safety hazard you might have missed during storage.
Frequently Asked Questions
Should I drain the gas from my trimmer before storing it?
You have two valid choices: drain the tank and carburetor bowl completely, or fill the tank with fresh fuel mixed with a stabilizer like Sta-Bil 360 Performance. Stale fuel left untreated for more than 60 days will start to gum up the carburetor jets. The stabilizer prevents this chemical breakdown for up to 24 months. I prefer the stabilizer method because it eliminates air space for condensation.
What is the best way to store a battery-powered weed trimmer?
Remove the battery pack. For lithium-ion batteries (like those from Ryobi or EGO), charge or discharge it to a 40-60% state of charge, about 2 or 3 lights on a 4-light indicator. Store the battery in a cool, dry place away from metal objects. Never store it fully charged or completely dead. Reattach it to the tool every 3-4 months to check the charge, topping it back to the middle range if needed.
Can I hang my gas trimmer on the wall?
Yes, and it’s the best way to save space. For common two-stroke trimmers, you can hang them vertically, horizontally, or even upside down, they won’t leak fuel if the carburetor and fuel lines are intact. The only exception is some cheap four-stroke models where oil can seep into the cylinder; check your manual. If it smokes on startup after hanging, lay it flat next time.
How do I prepare the cutting head for storage?
Remove any remaining trimmer line from the spool. Grass and moisture trapped against the nylon line will make it brittle. For models with a replaceable blade, spray the metal with a light lubricant like WD-40 Specialist Corrosion Inhibitor to prevent surface rust. This is a key step often skipped during routine proper trimmer cleaning.
What temperature is safe for storing a weed trimmer?
Aim for a stable environment between 50°F and 80°F (10°C to 27°C). Avoid unheated sheds that drop below freezing, as this can damage plastic components and battery cells. More important than a specific number is avoiding wild swings, a 40-degree daily temperature swing causes condensation inside the engine and on metal parts, which leads to rust.
The Bottom Line
Storing a weed trimmer isn’t about finding a corner. It’s a deliberate shutdown procedure. Clean it, treat the fuel or battery, and protect the metal. Then get it off the floor.
The payoff isn’t just a tool that starts. It’s avoiding the sunk cost of a new carburetor, a $100 battery pack, or a Saturday lost to weed trimmer troubleshooting. An hour of focused work this season buys you five minutes of easy pulling next season. That’s a trade worth making every time.