How to Use a Circular Saw: A Beginner’s Safety & Cuts Guide
This post contains affiliate links. As an Amazon Associate, we earn from qualifying purchases.
Using a circular saw requires matching three things: the correct blade for your material, a precise cutting depth, and a secure, guided workpiece. The blade should extend only about a quarter-inch past the wood, the work must be clamped down, and you must let the saw’s motor do the cutting without forcing it.
Most people get this wrong because they treat the saw like a brute-force tool. They set the blade too deep, skip the clamps, and shove it through the wood. That’s how you get kickback, crooked cuts, and a trip to the emergency room. The saw is designed to do the work. Your job is to guide it safely.
This guide walks through the parts you need to know, how to set up for your first cut, and the techniques for crosscuts, rip cuts, and bevels. We’ll also cover the mistakes that dull blades and bind motors, and how to avoid them from the start.
Key Takeaways
- Set the blade depth so only 1/8 to 1/4 inch of the teeth protrude below your workpiece. More blade exposed dramatically increases kickback risk and friction.
- Always clamp your material. Two-handed control of the saw is non-negotiable for safety and straight cuts. Let the cutoff piece fall freely.
- Let the saw reach full RPM before touching the wood, and never force the cut. A binding sound means you’re pushing too hard or the blade is dull.
- Use a sharp blade designed for your task. A 24-tooth framing blade tears plywood, while a 60-tooth finish blade cuts slowly through 2x4s.
- For straight cuts without a guide, align the notch on the front of the shoe with your pencil line, not the blade itself. The blade cuts to the side of the notch.
Parts of a Circular Saw You Need to Know
The first time I picked up a circular saw, I nearly sheared the cord because I didn’t know where the cord went. I was so focused on the blade I ignored the tool itself. You need to know what each part does before you pull the trigger.
The shoe, or base plate, is the flat metal foot that rides on your workpiece. Its front has a notch that aligns with the blade’s cutting path. The depth adjustment lever, usually on the back, loosens to raise or lower the shoe, controlling how deep the blade cuts. The bevel adjustment lever, typically on the front, lets you tilt the entire saw for angled cuts.
Never confuse the two. The lower blade guard is a spring-loaded cover that retracts automatically as you cut. It must snap back when you lift the saw. If it sticks, clean out the sawdust in the hinge before your next cut.
The shoe of a 7 1/4-inch circular saw is typically cast aluminum or magnesium, with a notch milled into the front edge that corresponds to the blade’s right-side kerf. The depth adjustment scale is marked in inches and millimeters, while the bevel scale ranges from 0 to 45 or 50 degrees, with positive stops at common angles.
The handle configuration matters. Most saws have a rear main handle with the trigger and a top auxiliary handle. Your dominant hand goes on the rear, finger on the trigger.
Your other hand grips the top handle, applying downward pressure and guiding direction. This grip gives you control to resist kickback. The blade guard lever is only for specialized cuts like plunge cuts. Under no circumstances should you tie it back.
Before You Start: The Non-Negotiable Safety Rules
Before you start: The blade spins at over 5,000 RPM and can throw wood chips fast enough to embed in skin. Hearing damage is cumulative and permanent. Kickback can pull the saw from your hands in a fraction of a second.
Wear wrap-around safety glasses, not just regular glasses. Use foam earplugs or over-ear muffs. Secure loose sleeves, jackets, and hair.
No gloves. They can get caught and pull your hand into the blade. This is the same level of precaution you should take with any spinning power tool, similar to the safety mindset for a string trimmer guide.
Unplug the saw or remove the battery for all adjustments. This includes changing the blade, adjusting depth, or clearing a jam. I learned this after a close call with a corded Makita 5007MGA. I had just finished a cut, went to raise the blade guard to clear some chips, and my thumb brushed the trigger.
The saw jumped off the bench. The blade was still spinning down. That half-second of complacency could have cost me a finger. Now the plug gets pulled every single time.
Your work area must be clean, dry, and well-lit. Have a clear path for the cord behind you. If you’re right-handed, run the cord over your left shoulder. This keeps it out of the cut line and away from your feet. The number of pros I’ve seen trip over their own cord is embarrassing.
| Safety Gear | Why It’s Mandatory | What Happens If You Skip It |
|---|---|---|
| Safety Glasses | Stops high-speed wood/metal debris | Wood chips can embed in the cornea; permanent vision damage is possible. |
| Hearing Protection | Dampens 100+ dB noise from motor and cutting | Tinnitus and high-frequency hearing loss develop within a few years of regular use. |
| Dust Mask (N95) | Filters fine sawdust, especially from MDF or pressure-treated wood | Inhaled dust causes long-term respiratory issues; some woods are toxic. |
| Secure Clothing | Prevents loose fabric from catching on the blade or spinning parts | A caught sleeve can pull your arm into the blade path before you can react. |
Setting Up for Your First Cut
A proper setup prevents almost every common problem. It takes three minutes and saves hours of frustration.
First, choose and install the correct blade. For general construction lumber like 2x4s, a 24-tooth carbide-tipped blade (like a Diablo 7 1/4″ 24T) is the workhorse. It clears material quickly. For plywood or finished cuts, you need 40 teeth or more.
A Freud LU83R010 80-tooth blade leaves an edge that needs almost no sanding. The tooth count controls the feed rate and finish. More teeth mean a smoother cut but require a slower, steadier push. Installing the blade backwards is almost impossible on modern saws, the arbor hole is offset. But always check that the teeth at the front of the saw point upward, toward the direction of rotation.
I once tried to rip a sheet of oak plywood with a 24-tooth framing blade because it was already on the saw. The cut was so rough it splintered the entire edge, ruining a $120 sheet. The blade was sharp, but the wrong tool for the job. A 60-tooth blade would have sliced through cleanly in one pass.
Next, adjust the cutting depth. Unplug the saw. Loosen the depth lever and place the shoe flat on the edge of your workpiece. Lower the blade until the teeth just protrude below the wood, about the height of a pencil’s diameter.
Tighten the lever firmly. This is the single most ignored step. Too much blade exposes more cutting surface to the wood, which increases friction, heat, and the chance the blade will catch and kick back. It also dulls the blade faster because more teeth are engaged in wasteful cutting.
Finally, check the bevel setting. Make sure it’s locked at 0 degrees for a square cut. A loose bevel lock will let the saw drift during the cut, creating a tapered edge. Give the shoe a wiggle. There should be no play.
How to Make a Basic Crosscut
A crosscut goes across the grain of the wood, like cutting a 2×4 to length. This is the most common cut and the foundation for everything else.
Clamp your board securely to sawhorses. The section you’re keeping should be fully supported. The cutoff side should overhang so it can fall away cleanly without pinching the blade. Mark your cut line with a pencil and a Speed Square.
Use a knife score for ultra-fine work, but a dark pencil line is sufficient. Align the saw by placing the front notch of the shoe directly on the line. The blade itself cuts to the right of this notch (for a standard sidewinder saw). You must account for this offset, known as the blade’s kerf. Practice on scrap wood to see where your specific saw cuts relative to the notch.
Stand with your feet shoulder-width apart, slightly behind the saw’s path. Start the saw and let it reach full speed, you’ll hear the motor pitch level out. Gently push the front of the shoe into the wood. The lower guard will retract automatically.
Focus on keeping the shoe flat on the workpiece and the notch tracking your line. Don’t look at the blade. Look at the guide. Let the saw feed itself. If you push, the motor will bog down and the cut will wander.
As you finish, the cutoff piece will begin to sag. Support it lightly with your free hand to prevent a violent tear-out on the last inch. Better yet, have a second sawhorse or a helper ready to catch it. Once the cut is complete, release the trigger and wait for the blade to stop completely before setting the saw down.
Mastering Rip Cuts and Bevel Cuts
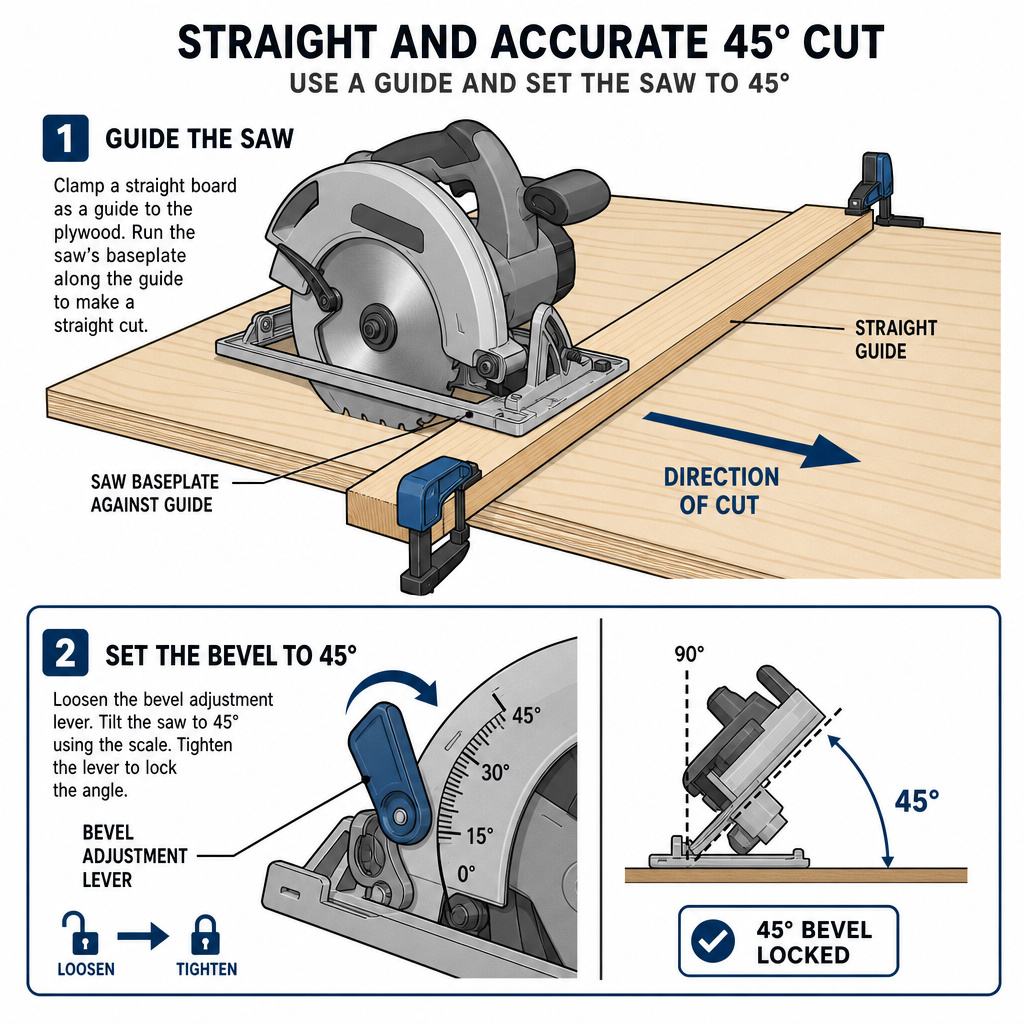
Once crosscuts feel comfortable, you’ll need to rip (cut with the grain) and bevel (cut on an angle). The principles are the same, but the setup changes.
For a rip cut on a wide sheet like plywood, you need a long guide. A factory edge of another sheet clamped down works. A dedicated track guide like the Kreg Accu-Cut is better. A homemade guide is simple: screw a straight 1×4 to a sheet of plywood, then run the saw’s shoe along the 1×4.
The guide must be on the side of the saw where the motor housing won’t hit it. For sidewinder saws, the motor is on the right, so the guide goes on the left. This is opposite of the logic for some stationary tools, which is why many beginners mess it up. The saw’s base should ride against the guide, not over it.
Bevel cuts require adjusting the bevel lock. Loosen the lever, tilt the saw to your desired angle (common ones are 45 degrees for miters), and re-tighten. The blade guard may bind on the wood at the start of a deep bevel cut.
You might need to manually retract it slightly to begin, but release it immediately once the cut is underway. The saw will want to drift sideways because of the angled blade. Use a fence or guide for any bevel cut longer than a few inches. Freehand bevels are a recipe for inconsistent angles.
| Cut Type | Best Blade | Key Technique | Common Mistake |
|---|---|---|---|
| Crosscut (2×4, framing) | 24-tooth ATB (Alternate Top Bevel) | Let the saw feed, support the cutoff. | Pushing too fast, causing blade bind and kickback. |
| Rip Cut (Plywood) | 40+ tooth ATB or TCG (Triple Chip Grind) | Use a straightedge guide clamped to the workpiece. | Letting the saw drift away from the guide, creating a curved cut. |
| Bevel Cut (Trim, Angles) | 60+ tooth Fine Finish | Check angle with a square before cutting; use a guide. | Not accounting for the blade’s tilt when aligning the shoe notch. |
| Plunge Cut (Starting in middle of material) | Any sharp blade, lower depth set minimally | Tip the saw forward on the front of the shoe, start blade, lower slowly. | Dropping the saw straight down, which can cause severe kickback. |
Troubleshooting: When Things Go Wrong
Even with perfect setup, you’ll hit problems. Knowing how to react keeps you safe and saves the workpiece.
If the saw binds and the motor stalls, you are forcing the cut or the wood is pinching the blade. Immediately release the trigger. Do not try to pull the saw back while the blade is spinning, that can damage the teeth. Wait for it to stop.
Then, drive a wooden wedge into the cut behind the saw to open the kerf and relieve pressure. Back the saw out gently. Check that your depth isn’t set too high and that the cutoff piece is free to fall away. This is a core principle of safe operation, just like ensuring proper clearance when learning hedge trimmer operation.
A crooked cut usually means you weren’t following your guide or you were forcing the saw. Your body position matters. Your shoulders should be square to the cut line, not twisted. If you’re consistently veering left, you’re likely putting downward pressure on the left side of the shoe. Focus on even pressure.
Excessive burning or smoking means the blade is dirty, dull, or you’re feeding too slowly. A blade caked with pitch (especially from pine or pressure-treated wood) creates massive friction. Clean it with a dedicated blade cleaner or a soak in simple green. A dull blade needs sharpening or replacement. Trying to push through just heats the wood and the blade, ruining the steel’s temper.
Kickback is the violent, sudden rearward motion of the saw. It happens when the back of the blade, which is moving upward, pinches or catches in the wood. The saw can jump toward your body.
When you feel it start, a sudden change in sound and resistance, grip the handles firmly, release the trigger, and hold the saw in place. Do not let go. Let the blade stop. Analyze what caused it: likely a misaligned cut, a knot, or a pinched kerf.
Essential Accessories and Upgrades
The right accessories transform a circular saw from a crude cutter to a precision tool. You don’t need them all at once, but they solve specific frustrations.
A sharp, quality blade is the first upgrade. Throw away the stock blade that came with the saw. Invest in a Freud, Diablo, or Forrest blade suited to your most common task.
The difference in cut quality and effort is staggering. A guide system is next. A simple Speed Square is perfect for short crosscuts and 90/45-degree angles. For long rip cuts, a DIY track made from a straight board is fine, but a commercial track guide guarantees absolute straightness.
A set of sturdy sawhorses and heavy-duty clamps (like Bessey or Irwin) are not accessories, they are necessities. Trying to balance a sheet of plywood on a wobbly table is asking for trouble. Finally, consider a dust collection bag or hooking up a shop vacuum. Sawdust clouds obscure your cut line and are a health hazard. Managing the mess is part of the job, much like dealing with debris after edger operation.
I used a dull blade on a pressure-treated decking project for two weekends because I was too lazy to change it. By the end, I was leaning my whole body weight into every cut, my arms were exhausted, and the saw motor was hot enough to smell. Swapping in a fresh Diablo blade felt like getting a new saw. The cuts were effortless. The lesson wasn’t just about sharpness, it was about respecting the tool’s design limits.
Maintenance: Keeping Your Saw Running
Neglect turns a reliable tool into a dangerous paperweight. Maintenance is simple but critical.
After every use, blow out the vents with compressed air. Sawdust clogs the motor cooling vents, causing overheating. Wipe the shoe clean with a dry rag.
A dirty shoe won’t slide smoothly, affecting cut accuracy. Periodically, check the blade guard’s movement. Spray a little dry lubricant (like PTFE spray) on the hinge pivot if it’s sticky.
For corded saws, inspect the power cord for cuts or frays, especially near the plug and the tool housing. For cordless models, keep the battery contacts clean. Brush off any sawdust. If you have a worm-drive saw, check the gear oil level according to the manual, usually once a season with heavy use.
The most important maintenance is blade care. A sharp blade is a safe blade. Learn to recognize the signs of dullness: increased effort, burning smell, ragged cut edges, and the saw wandering off the line. You can sharpen blades yourself with a kit, but for carbide-tipped blades, I send them to a professional sharpening service. It costs about a third of a new blade and they come back like new.
Frequently Asked Questions
What is the most dangerous part of using a circular saw?
Kickback is the most immediate danger. It happens instantly and can pull the saw into your body or out of your hands. It’s caused by blade pinching, cutting with a dull blade, or incorrect blade depth. Maintaining control with a proper two-handed grip and not forcing the cut are your best defenses.
Can I use a circular saw to cut metal?
Yes, but you must use the correct blade. A ferrous metal-cutting blade with specially hardened teeth and a negative hook angle is required. You must also go very slowly, use a lubricant like cutting oil for steel, and secure the metal firmly. Wear a full face shield and heavy gloves, as it will throw hot, sharp metal chips.
Why does my circular saw keep stopping in the middle of a cut?
This is usually a sign of overheating or overloading. You are feeding too fast for the material or using a dull blade, causing the motor to overheat and the thermal overload protector to trip. Unplug the saw, let it cool for 15-20 minutes, and check the blade. Also, ensure you’re using an extension cord of adequate gauge for a corded saw; an undersized cord starves the motor of power.
How do I make a perfectly straight long cut without a track saw?
Build or buy a straightedge guide. The simplest is an 8-foot length of 1×4 or aluminum straightedge clamped to your workpiece, using the saw’s shoe as a bearing surface. For repeatable accuracy, make a dedicated guide from a strip of plywood with a factory edge. Screw a cleat to it that rides against the edge of your workpiece, ensuring the cut line is always parallel.
Is a cordless circular saw powerful enough for framing?
Modern 18V or 20V MAX cordless saws with brushless motors are absolutely capable of day-long framing work, provided you have enough high-capacity batteries (5.0Ah or larger). They lack the sustained power of a 15-amp corded saw for heavy ripping, but for crosscutting 2x lumber and sheet goods, they are excellent. The freedom from a cord is a significant safety and convenience benefit.
The Bottom Line
Using a circular saw confidently comes down to preparation and respect. Prepare by choosing the right blade, setting the depth correctly, and clamping everything down. Respect the tool by letting it cut at its own pace, maintaining a firm grip, and never reaching past the blade. Start with simple crosscuts on scrap wood. Get the feel of the sound, the vibration, the feed rate. When that feels boring, you’re ready. The saw is a gateway tool that unlocks countless projects, but it demands your full attention every single time you pick it up. Give it that, and it will serve you well for decades.
