How to Use a Lawn Edger: Techniques for Professional Edges
This post contains affiliate links. As an Amazon Associate, we earn from qualifying purchases.
Using an edger correctly means matching three things: the right tool type for your lawn, a consistent 2-inch cutting depth, and a steady walking pace. A power edger with a steel blade or a string trimmer in the vertical position will slice a clean boundary; a manual half-moon edger requires a straight-down rocking motion. The goal is a defined edge that stops grass encroachment, not a deep trench that damages roots.
Most people grab the tool and start hacking at the grass line. The result is a wobbly, shallow cut that disappears after one mow. They focus on the blade or the line, not on the line they’re creating.
This guide walks through the exact techniques for power and manual edgers, the critical safety steps everyone misses, and how to maintain that sharp edge so your lawn looks professionally cut all season.
Key Takeaways
- Always mow your lawn first. Edging over long grass hides the true boundary and leaves a ragged, uneven finish.
- For a standard edge, cut only 2 inches deep. Cutting 4-6 inches creates a maintenance-heavy trench and can sever shallow tree roots.
- Wear safety glasses and sturdy gloves every time. A spinning steel blade or trimmer line can throw a piece of gravel back at your face at over 100 mph.
- Walk on the hard surface (sidewalk, driveway) when using a string trimmer as an edger. This is the only way to get a consistently straight line.
- Clean the edge and your tools immediately after use. Dried-on mud and grass sap will bake onto metal blades and plastic housings, making the next job harder.
What Does an Edger Actually Do?
An edger creates a physical and visual separation between your lawn and another surface, like a sidewalk, driveway, or garden bed. It’s not about trimming grass length—that’s your mower’s job. It’s about defining a border.
A lawn edger cuts a vertical or angled slice through the soil and grass roots at the lawn’s perimeter. This severs the horizontal runners that cause grass to creep into flower beds and over walkways, establishing a clean “wall” that defines the landscape.
Think of it like trimming the edges of a picture frame. The mower handles the main canvas, but the edger gives it that finished, intentional look. Without it, even a freshly mowed lawn can look unkempt. The functional benefit is just as important: a crisp edge is easier to maintain. You can mow right up to it without scalping, and weed growth across the boundary is more obvious and simpler to address.
I learned the hard way that skipping this step costs more time later. I spent a summer just using my string trimmer to whack down grass overhanging a new paver patio. By fall, the grass had woven its roots under the pavers. Fixing it meant pulling up stones, digging out rhizomes, and releveling sand. A one-time edging job when I installed the patio would have saved a weekend of backbreaking work.
How to Choose Your Edging Tool
You have three main paths, and the best one depends on your lawn size, your budget, and how much effort you want to expend. This isn’t about buying the most expensive tool; it’s about matching the tool to the task you’ll actually do.
| Tool Type | Best For | Effort Required | Key Limitation |
|---|---|---|---|
| String Trimmer (as edger) | Small to medium lawns, existing edges, DIYers who already own one. | Low (if battery/corded) | Less precise than a blade. Line wears quickly on hard soil. |
| Dedicated Power Edger | Large lawns, long straight edges, commercial use or serious homeowners. | Low to Moderate | Higher cost. Storage space needed. Overkill for tiny lawns. |
| Manual Edger (Half-moon) | Small lawns, intricate curves, garden bed definition, quiet operation. | High (Physical) | Very slow for large areas. Tough on compacted or dry soil. |
String Trimmers: Most modern electric and battery trimmers, like the EGO Power+ or Ryobi 18V models, can pivot their head to a vertical position for edging. It’s a versatile two-in-one solution. The catch is that nylon line (like 0.095-inch diameter) wears down fast when scraping against concrete and digging into soil. You’ll go through more line, and the cut won’t be as clean as a steel blade’s. It’s perfect for touch-ups between deeper edge cuts.
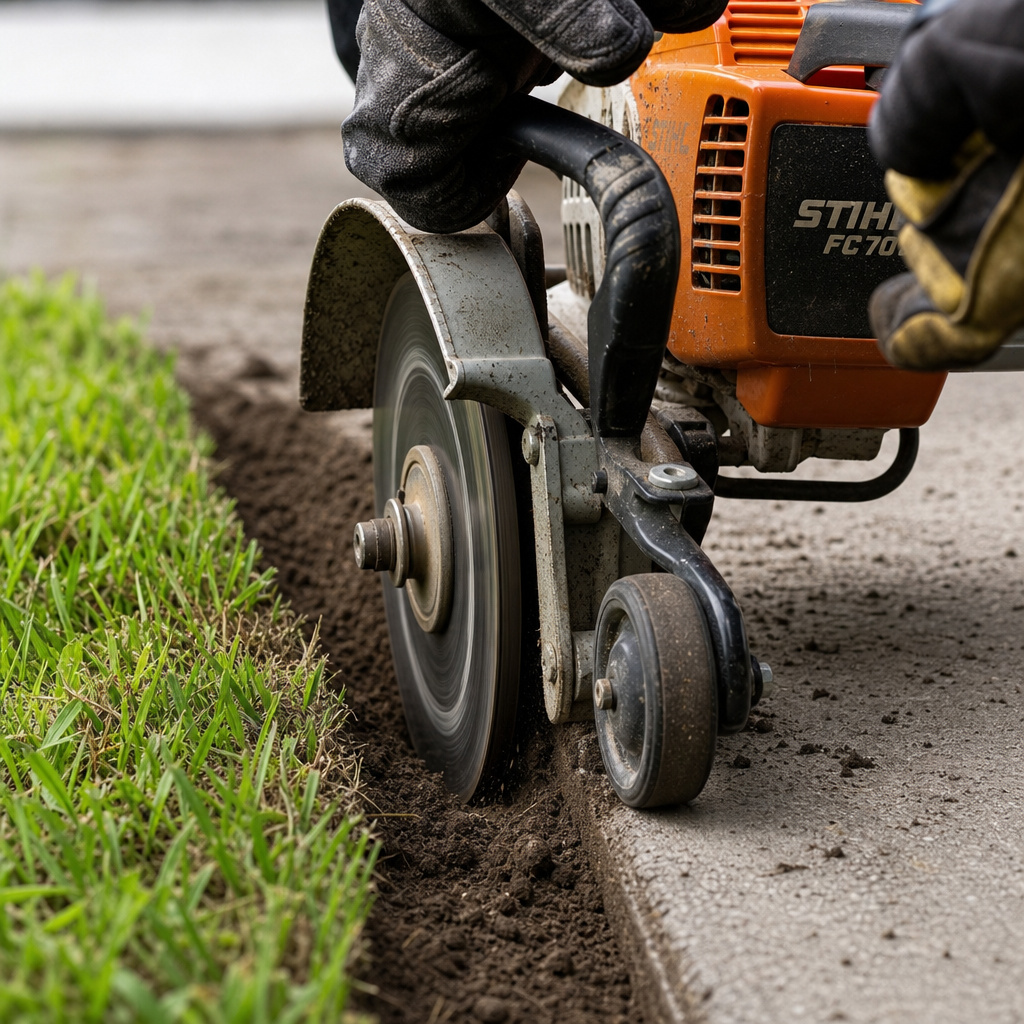
Dedicated Power Edgers: These are the specialists. They have a steel blade (often replaceable) and a guide wheel. Models like gas-powered Stihl edgers or wheeled electric versions are built for one job: cutting a perfect edge. They’re faster, give a cleaner cut, and are easier on your back over long distances. The blade doesn’t wear down mid-job like trimmer line.
Manual Edgers: The half-moon edger is a simple, timeless tool. You use your body weight to drive the curved steel blade into the ground. It offers surgical precision for curving around garden beds or trees where a power tool is clumsy. The trade-off is pure physical labor. On hard clay or after a dry week, the first few feet will make your calves burn.
Safety First: Non-Negotiable Gear
Before you start: A spinning edger blade or trimmer line can turn a small rock into a projectile. Wear ANSI-rated safety glasses—not sunglasses. Sturdy work gloves protect your hands from blisters and from the sharp edge of cut sod. If using a gas-powered tool, wear ear protection; sustained exposure to 90+ decibels causes permanent hearing damage.
This isn’t a suggestion. I was edging a neighbor’s lawn years ago with an old gas trimmer. I had on gloves but skipped the glasses because it was “just a quick job.” A piece of oyster shell mulch, hidden in the grass, caught the line and shot back.
It hit the bridge of my nose hard enough to draw blood and leave a bruise for a week. An inch higher and it would have been my eye. Glasses go on before the battery gets clicked in. Every single time.
Also, know what’s underground. If you’re cutting a new edge or going deeper than a couple of inches, call 811 (or your local utility locating service) first. Severing a buried irrigation line or low-voltage landscape lighting wire is an expensive, frustrating mistake that’s completely avoidable.
How to Use a Power Edger (Step-by-Step)
The process is straightforward, but rushing it creates a mess. The goal is a smooth, controlled cut, not a frantic race against the battery.
Step 1: Mow and Mark.
Mow your lawn first. This seems backward to some, but it’s essential. Long grass will flop over and obscure the actual edge of your soil, leading you to cut an uneven, wandering line. For a brand-new edge or a redesign, use a garden hose to lay out the curve you want. A hose is flexible and easy to adjust. Don’t use spray paint—a gust of wind can drift the paint onto your lawn or driveway.
Step 2: Set the Depth.
Most wheeled power edgers have a depth adjustment lever. Set it for a 2-inch cut to start. This is deep enough to sever grass roots and create a clear definition without digging a trench or risking deeper utilities. You can always make a second, slightly deeper pass if needed, but you can’t un-dig a hole.
Step 3: Start the Tool and Engage the Blade.
For a gas model like a Stihl, start it on a flat, clear surface following the manufacturer’s cold-start procedure. For battery tools, insert a fresh battery. Start the motor and let the blade reach full speed before it touches the ground. Dropping a slow-spinning blade into the soil will bog down the motor and stall it.
Step 4: Walk and Guide.
Place the guide wheel on the hard surface (sidewalk). Gently lower the spinning blade until it contacts the soil at the grass line. Let the wheel guide you. Walk at a steady, deliberate pace—not too fast, not too slow. The tool should do the work; you’re just steering. If the motor labors, you’re either walking too slow (digging too deep) or hitting overly compacted soil.
Step 5: Handle Corners and Curves.
For a 90-degree corner, cut past the corner, then lift the blade, reposition, and cut the adjacent side. Don’t try to pivot the spinning blade on the point—it will tear up the lawn. For gentle curves, just slow your walking pace slightly and follow the hose guide. The wheeled design handles mild curves well.
What happens if you rush? A fast, jerky walking pace creates a scalloped, wavy edge that looks terrible. The blade bounces and skips instead of slicing cleanly. You’ll see the unevenness every time you mow.
How to Use a String Trimmer as an Edger

This is the most common method because most people own a trimmer. The technique is different from trimming, and getting it wrong is why so many “edged” lawns look ragged.
- Pivot the Head. Unlock and rotate the trimmer head 180 degrees so the string spins in a vertical plane. The debris shield should now be facing you, protecting your legs.
- Assume the Stance. Stand on the driveway or sidewalk. Hold the trimmer with both hands, arms mostly straight, and engage your core. The tip of the guard should be just above the ground.
- Find the Sweet Spot. Start the tool and slowly lower the spinning line until it just kisses the soil at the precise grass line. You’ll hear the pitch change and see dirt fly. This is the contact point.
- Walk Backwards. Take slow, sideways steps along the edge, maintaining that light contact. Walking on the hard surface is the only way to keep the line straight. If you stand on the grass, your footing is uneven and the line will wobble.
I prefer a dedicated blade for long edges, but for a quick touch-up, flipping the trimmer is fast. Just remember the line is melting as it cuts. After about 30 feet of concrete contact, stop and bump-feed out fresh line. A worn-down string just polishes the dirt instead of cutting it.
The mechanics matter here. Nylon trimmer line cuts through abrasion, not slicing. It literally wears itself and the grass away. That’s why it needs to be fresh and why it struggles in rocky soil. A steel blade on a dedicated edger shears cleanly through the material, which is why it stays sharp longer and gives a crisper result.
How to Use a Manual Edger (The Right Way)
The half-moon edger is a test of technique, not strength. Using brute force will exhaust you and give poor results. The right motion is a fluid rock-and-pull.
| Step | Action | Why It Works | If You Do It Wrong |
|---|---|---|---|
| 1. Position | Place blade vertically on soil line, footrests stable. | Ensures a perpendicular cut for a true vertical edge. | Angled blade creates a sloped, weak edge that crumbles. |
| 2. Drive | Step down firmly with one foot, using body weight, not leg muscle. | Leverage and mass do the work; your leg is just the piston. | You’ll tire in minutes and the cut will be shallow. |
| 3. Rock | Rock the handle slightly side-to-side to widen the cut and free the blade. | Loosens the soil’s grip on the steel, making extraction easier. | The blade sticks in the ground, forcing a jerky, uneven pull. |
| 4. Pull & Advance | Pull handle toward you to lift blade, move forward 6 inches, repeat. | Creates a continuous cut with minimal soil disturbance. | Creates a series of disconnected holes instead of a smooth line. |
Work on slightly damp soil, never when it’s bone dry or soggy wet. The ideal time is a day after a rain or after you’ve watered the lawn. Dry clay will resist the blade like concrete; wet soil will gum up and stick to the tool.
After a long edge, your lower back and shoulders will feel it. That’s normal. What’s not normal is sharp pain in your wrists or knees. If that happens, you’re twisting your body or using your arms to drive the tool instead of your core. Reset your stance.
How to Maintain Your Edge (And Your Tool)
An edge isn’t a one-and-done job. Grass wants to grow back. A little ongoing maintenance keeps it looking sharp with minimal effort.
- Recut every 4-6 weeks during the growing season. This is far easier than letting it fill in and starting over.
- Clean the trough. After edging, use a flat shovel or a specialized edging shovel to scoop out loose soil and grass clippings from the cut. This exposes the clean edge and slows regrowth.
- Apply a pre-emergent. In early spring, a light application of granular pre-emergent herbicide in the edged trench can prevent weed seeds from germinating there all season.
Tool maintenance is just as critical. After each use:
1. Scrape it clean. Use a putty knife or stiff brush to remove all mud and grass from the blade and housing. Dried debris throws off balance and promotes rust.
2. Wipe it down. A rag with a light coat of WD-40 or a dedicated tool cleaner on metal parts prevents corrosion.
3. Sharpen the blade. A few passes with a mill bastard file along the existing bevel of your manual or power edger blade once a season keeps it cutting easily. A dull blade tears and pulls grass instead of slicing it.
4. Store it properly. Hang it up or store it in a dry place. Leaving a manual edger leaning against a wet garage wall guarantees a rusty blade by next month.
If you neglect this, the next time you go to use the tool, you’ll be fighting caked-on dirt and a dull edge. That adds 15 minutes of frustration to the job before you even start.
Keeping it clean takes two minutes and saves you the headache. For a powered model, checking the air filter and spark plug (gas) or battery terminals (electric) periodically is part of the same discipline. A well-maintained edger blade replacement is a rare event if you clean and sharpen regularly.
Troubleshooting Common Edging Problems
Sometimes, despite your best efforts, things don’t go smoothly. Here’s how to diagnose and fix the usual suspects.
Problem: The edge is wavy and uneven.
- Likely Cause: Inconsistent walking speed or not using a guide (wheel or hard surface).
- Fix: Slow down. Focus on a smooth, steady pace. For a string trimmer, consciously keep both feet on the pavement. For the next cut, use the existing edge as your guide to straighten it out.
Problem: The power edger bogs down and stalls.
- Likely Cause: Cutting too deep, walking too slow, or hitting incredibly dense, dry soil.
- Fix: Raise the depth gauge by half an inch. Try moistening the soil area with a hose 30 minutes before edging. If it’s a string trimmer, you’ve run out of line—bump feed more out.
Problem: Grass grows back into the edge within weeks.
- Likely Cause: The original cut was too shallow (less than 1.5 inches) or you didn’t clean out the trough.
- Fix: Recut the edge at a full 2-inch depth and thoroughly remove all debris from the channel. The exposed vertical soil wall is harder for grass runners to cross.
Problem: The cut edge crumbles and looks ragged.
- Likely Cause: Edging when the soil is too dry. It fractures instead of cutting.
- Fix: Water the perimeter area the evening before you plan to edge. The soil should be moist, not muddy.
Frequently Asked Questions
What’s the difference between edging and trimming?
Trimming cuts grass length in places your mower can’t reach, like around trees or fences. Edging creates a distinct vertical boundary between the lawn and another surface. You can edge with some trimmers, but they are different functions with different goals.
How often should I edge my lawn?
Edge every time you mow for a pristine look, or every other mow for a maintained look. During peak spring growth, you might need to edge more frequently. In the heat of summer when growth slows, you can stretch the interval.
Can I edge when the ground is wet?
You can, but you shouldn’t. Wet soil is heavy, clumps, sticks to your tools, and can compact unevenly, ruining the smooth line of your edge. It also makes a huge mess. Wait for the soil to be damp, not saturated.
Is it bad to edge around trees?
Yes. Avoid creating a deep edge right up against a tree trunk. You will sever critical surface roots that the tree uses for water and nutrient uptake, which can stress or even kill the tree over time. Maintain a grass-free ring with mulch instead.
What safety gear is absolutely necessary?
Safety glasses and sturdy gloves are the bare minimum. For gas-powered edgers, add hearing protection. Long pants and closed-toe shoes are also strongly recommended to protect from thrown debris.
The Bottom Line
A clean edge transforms a mowed lawn into a landscaped yard. The process isn’t complicated, but it demands the right technique for your chosen tool—whether that’s a dedicated power edger, a converted string trimmer, or a manual half-moon. Remember the core rules: mow first, cut to a 2-inch depth, wear your safety gear, and walk steadily.
Clean up the trough and your tools after each session to make the next job easy. Consistency beats intensity here; a quick touch-up every few weeks keeps that crisp line with minimal effort, while letting it go means starting from scratch. Now go define that border.