How to Use a String Trimmer: A 15-Year Veteran’s Guide
This post contains affiliate links. As an Amazon Associate, we earn from qualifying purchases.
Using a string trimmer correctly requires matching three things to your task: the tool’s orientation (flat for trimming, vertical for edging), the swing path of the cutting head, and the spin direction of the line to control debris. Get these right, and you’ll get a clean, professional-looking edge without scalping your lawn or destroying the trimmer line in five minutes.
Most people treat a string trimmer like a miniature, violent lawn mower. They hold it flat and wave it around, hoping for the best. That works for about two passes before you’ve either gouged a trench in your turf, wrapped a thousand strands of line around a fence post, or sent a cloud of gravel into your neighbor’s car.
This guide walks through the physical actions that separate a hack job from a clean finish. We’ll cover the stance, the swing, the line types that actually last, and what to do when the trimmer fights back.
Key Takeaways
- Always tilt the trimmer head so the string spins vertically for edging and horizontally for general trimming, the wrong angle causes immediate damage.
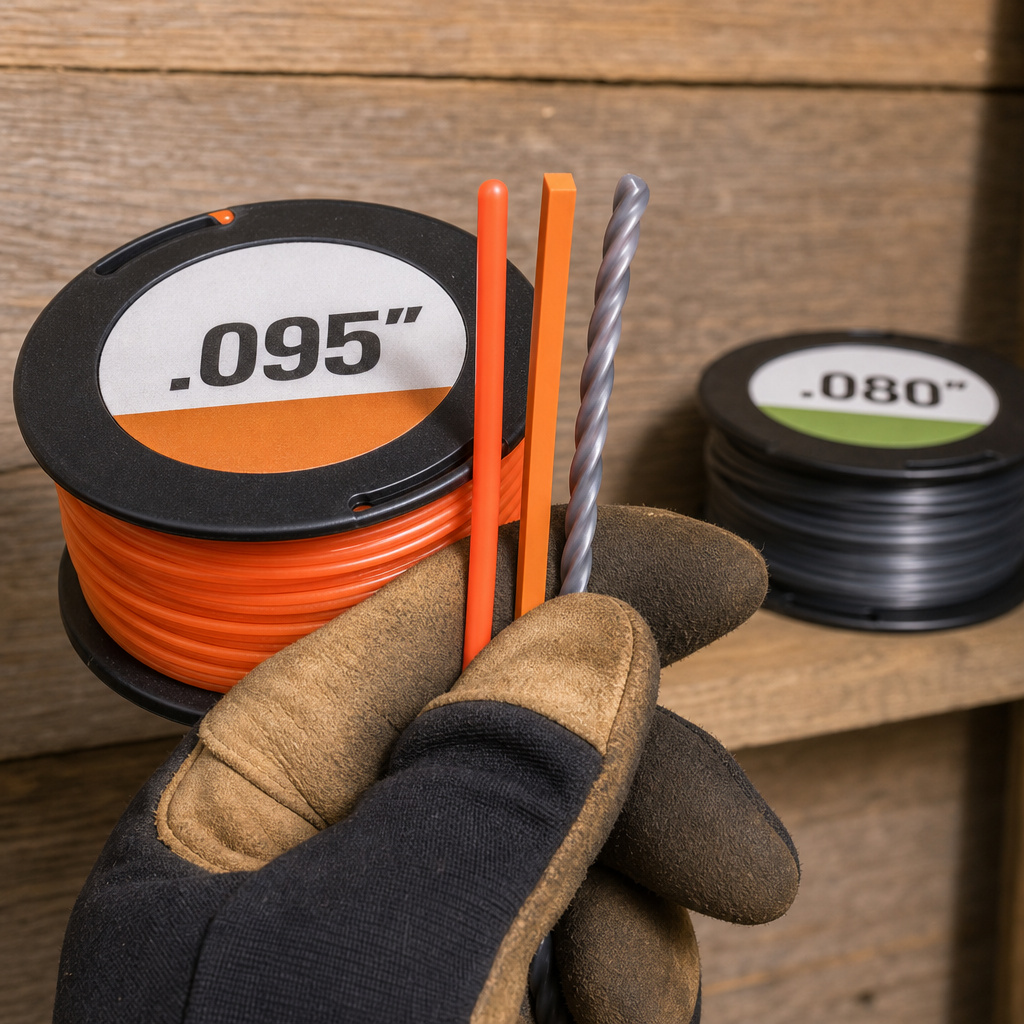
- Match your trimmer line diameter and shape to the job: .095-inch square line for weeds, .080-inch round line for fine grass, and never use a line thicker than your trimmer’s head is rated for.
- Let the tool’s RPM do the cutting; forcing the head into dense material burns out electric motors and stalls gas engines, usually within the same work session.
- Walk backwards when trimming along a fence or wall to keep the debris shield between you and the flying material, walking forward sprays it directly at your shins.
- A five-minute cool-down and wipe-down after each use prevents grass sap from cementing onto the head and air intakes, which is the main cause of early motor failure on battery models.
Before You Start: The Non-Negotiable Safety Setup
Before you start: A spinning .095-inch nylon line travels at over 200 mph. It will fling stones, shred irrigation lines, and cut skin to the bone without slowing down. Wear ANSI Z87.1-rated safety glasses, long pants, sturdy boots, and hearing protection for gas models. Clear the area of pets, kids, and any loose debris like sticks or rocks.
I learned the boot lesson the hard way. I was trimming in sneakers, thinking I’d be careful. A short piece of line snapped off, ricocheted off a hidden paver, and sliced through my canvas shoe and sock like a hot wire. It was a shallow cut, but it bled enough to ruin the shoe and my afternoon. I now wear leather work boots every single time, no exceptions.
Your trimmer’s debris shield isn’t a suggestion. It’s a critical deflector. If it’s cracked or missing, replace it before you pull the trigger. A missing shield on a Stihl FS 56 RC-E model, for instance, lets long grass wrap directly around the driveshaft, which can overheat the clutch in under ten minutes of runtime.
How do you edge a lawn with a string trimmer?
Edging is about creating a sharp, vertical boundary, not scalping the grass. The mistake is holding the trimmer at a slight angle. This bevels the edge and leaves ragged turf.
You need a 90-degree pivot. For a straight-shaft trimmer, rotate your entire grip so the head tilts onto its side, making the spinning line perfectly vertical. On a curved-shaft model, you’ll often find an edging guide or a secondary handle that locks the head in the correct orientation. Engage the edging lock if your model has one.
Stand with the edge line between you and the trimmer. Hold the head about half an inch above the ground, letting the very tip of the line do the work. Now walk sideways, maintaining a steady pace. The line should kiss the soil, not dig into it. If you hear the motor bog or see dirt flying, you’re too low.
For a crisp edge, position the string trimmer so the cutting line spins in a vertical plane, parallel to the sidewalk or driveway edge. The operator walks steadily alongside the edge, maintaining a consistent 1/2-inch height to sever grass blades at the soil line without gouging the turf or disturbing the soil bed.
A clean edge takes two passes. The first pass establishes the vertical wall. The second, slightly higher pass cleans up any stray blades. Trying to do it in one deep pass always tears the grass and leaves a frayed look.
If you’re learning the motion, our guide on string trimmer operation breaks down the mechanics of head rotation and line speed, which helps understand why the vertical orientation is so effective.
What’s the best technique for tall grass or weeds?
Swinging wildly at the base of tall growth is a guaranteed way to stall your trimmer and tangle the line. The stems wrap around the head before they’re cut.
The professional method is a “scything” motion. Start at the top of the weed patch. Hold the trimmer head flat and level, about two-thirds up the height of the grass. Make a slow, controlled U-shaped swing, left to right or right to left, cutting off the top third of the material. Let the clippings fall.
Now take a step forward, lower the head slightly, and repeat the U-swing, cutting the next third. Work your way down to the base in layers, like mowing a steep slope. This prevents tangling and keeps the motor from bogging down because it’s only cutting a manageable amount with each pass.
For really thick, woody weeds, you need the right line. A .095-inch square line has sharper corners that slice through fibrous stems. A round .080-inch line will just bend and fray. If you find yourself constantly battling thick growth, the process for threading a trimmer with heavy-duty line is a weekend skill that pays off all season.
| Weed Type | Recommended Line | Technique | Risk of Wrong Approach |
|---|---|---|---|
| Fine lawn grass | .065″ or .080″ round | Level, sweeping passes | Scalping lawn; line wears too fast |
| Dandelions, broadleaf | .080″ square or twisted | Scything motion top-down | Stem wraps around head, stalls motor |
| Woody stalks (vines) | .095″ square | Scything, slow RPM | Line snaps repeatedly; motor overheats |
| Grass in pavement cracks | .080″ round | “Screeding” (tip of line only) | Line grinds on concrete, vanishes in minutes |
Trimmer Line: Choosing the Right Type and Size
The string is your cutting tool. Using the wrong one is like trying to cut a steak with a butter knife.
First, diameter is critical. Your trimmer’s head has a maximum rating stamped on it, 0.080″, 0.095″, etc. Going thicker strains the motor.
Going thinner causes the line to whip and break prematurely. I keep a spool of .080″ and a spool of .095″ in my shed. The .080″ is for weekly lawn touch-ups. The .095″ comes out for the spring clean-up and the autumn weed patrol.
Shape changes the cutting action.
– Round Line: The most common. It’s durable and good for general grass trimming. It tends to wear evenly into a point.
– Square Line: The corners act like little blades. It cuts more aggressively through thick weeds and grasses but wears down and breaks faster than round line when used on abrasive surfaces like rocks or concrete.
– Twisted Line: Often marketed as “max performance.” It’s a compromise, offering slightly better cutting than round line with a bit more durability than square. It can be trickier to wind onto some spools without creating tension points.
I used round line for everything for years. Then I spent a weekend clearing a overgrown fence line with a Ryobi 40V Expand-It. The round .080″ line vanished every fifteen minutes.
I switched to .095″ square line from the same brand. The difference wasn’t subtle. It powered through the growth, and I used half the length of line. The trade-off was a louder, more aggressive zip sound, and I had to be more careful near the fence posts.
Operating Controls and Basic Movement
 **
**
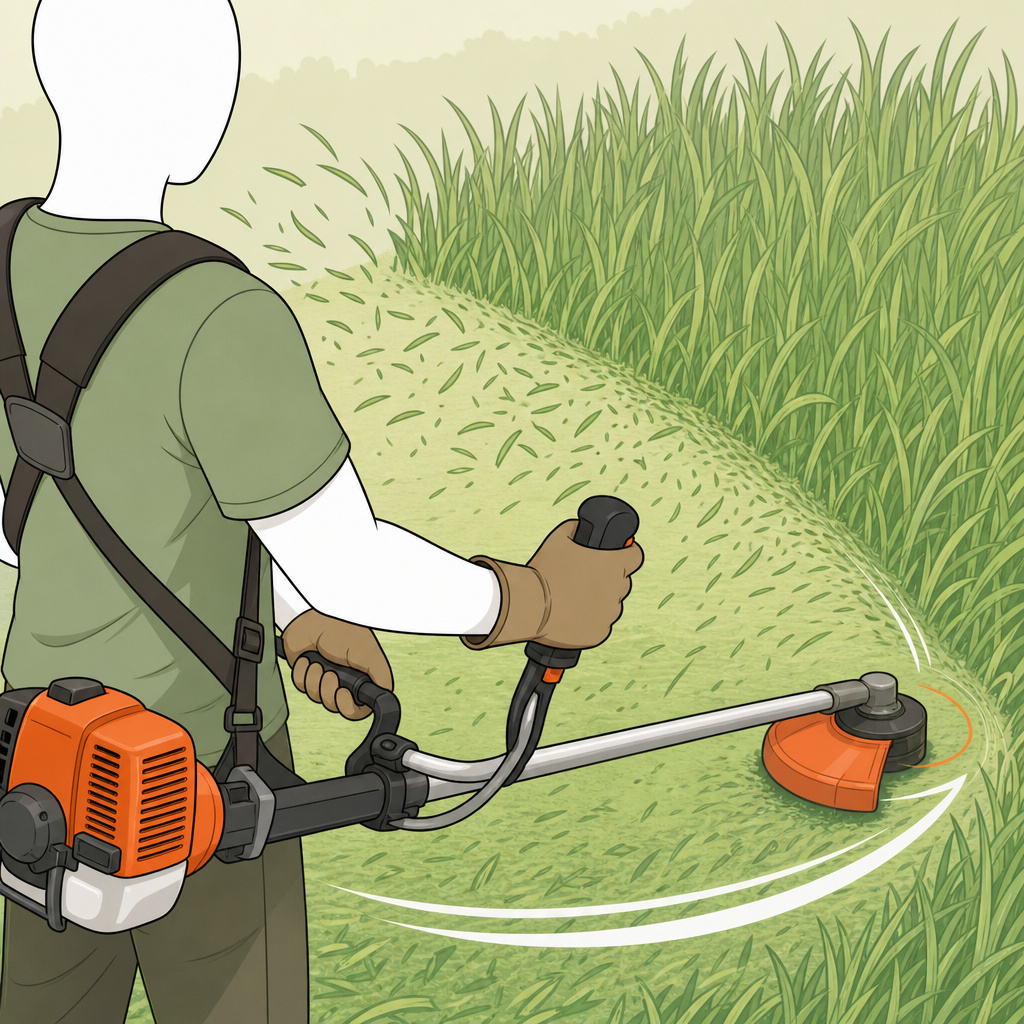
You don’t steer a trimmer with your arms. You pivot from your waist and let your legs do the walking. Grip the handles firmly but don’t choke them. Your posture should be upright, not hunched over.
- Starting Position: Stand with feet shoulder-width apart, the trimmer head off to your dominant side. Engage the trigger and let the motor reach full operating speed. You hear the pitch stabilize.
- The Swing: For a broad area, keep your arms relatively fixed. Rotate your torso from the waist, sweeping the head in a smooth, level arc about 4-6 feet wide. The cutting swath is only the outer 3-4 inches of the line’s circle. Don’t try to cover more by jamming the head into the grass.
- Advancing: Once you complete an arc, step forward with your lead foot about half the length of the cut grass. Repeat the swing, slightly overlapping the previous pass. This is the rhythm: swing, step, swing, step.
- Around Obstacles: For trees, poles, or garden beds, slow the swing to a crawl. Hold the head parallel to the obstacle and circle it, maintaining a safe distance. Never “attack” the base. For delicate plants, consider a hand tool instead. The same careful approach you’d use with a hedge trimmer operation applies here, slow, deliberate movements yield clean results.
If the motor bogs down, you’re either trying to cut too much, the line is too long, or the grass is wet. Stop, tap the head to advance fresh line, and take a shallower bite.
Power Source Specifics: Gas, Battery, and Corded
Your technique adapts slightly based on what’s spinning the head.
Gas-Powered Trimmers (2-Cycycle): These have the most torque and run until the fuel is gone. The key is managing the power band. You can often feather the throttle. Use full throttle for heavy cutting, but you can ease off to about 75% for light trimming to save fuel and reduce noise. Always use the correct fuel mix (e.g., 50:1). Old gas is the number one reason a gas trimmer won’t start next season.
Battery-Powered Trimmers (Cordless): Tools like the EGO Power+ ST1511T deliver consistent power until the battery dies. There’s no power band, it’s all or nothing. The limitation is runtime and potential for motor overheating under continuous heavy load. Let the tool work. If you force it, the thermal protection will shut it down. Keep a spare, charged battery on hand for larger yards.
Electric Corded Trimmers: You have unlimited runtime but a finite work radius. The technique here is all about planning your path to manage the cord. Always keep the cord behind you, over your shoulder, to avoid cutting it. Work in a systematic pattern away from the outlet to prevent the cord from dragging through your freshly cut area.
| Power Source | Best For | Key Technique Adaptation | Common Pitfall |
|---|---|---|---|
| Gas 2-Cycle | Large yards, tough weeds | Feather throttle; use full power for dense material | Using stale fuel; failing to clear cooling fins |
| Battery | Small/medium yards | Steady pace; avoid continuous heavy load to prevent overheating | Running out of charge mid-job; forcing the motor |
| Corded Electric | Small yards near outlet | Strategic path planning; always keep cord behind you | Cutting the power cord; limited mobility |
Maintenance and Troubleshooting for Reliable Operation
A trimmer that’s cleaned lives longer. After each use, especially if the grass was wet or sappy, wipe down the head, shield, and shaft with a damp cloth. For gas models, let the engine idle for 30 seconds before shutting it off to clear the carburetor.
Every few uses, inspect the line. If it’s worn down to less than 4 inches total length (2 inches per side), it’s time to advance more or replace it. A short line makes the motor work harder and cuts inefficiently. When it’s time for a full spool replacement, a methodical process like the one for Stihl trimmer stringing ensures a tangle-free load.
Problem: Line keeps breaking.
- Cause: Usually hitting an abrasive surface (rock, concrete, brick) or using old, brittle line.
- Fix: Use a more durable line shape (square for weeds, not for edging concrete) and keep the line at the proper length. Soaking line in water overnight before use is an old trick that can add flexibility, but it’s a temporary help for cheap line, not a solution.
Problem: Trimmer bogs down or won’t reach high RPM.
- Cause: Air filter clogged (gas), line too long/thick, head tangled with grass, or battery unable to deliver peak current.
- Fix: For gas, clean or replace the air filter. For all, stop, disconnect power, and clear any debris wrapped around the head or driveshaft. Check line length.
Problem: Line won’t advance on a bump-feed head.
- Cause: The spool is empty, tangled, or the bump mechanism is jammed with grass.
- Fix: Disassemble the head, clean it, and re-spool the line neatly, following the directional arrows. Never cross-wind the line.
This level of head maintenance is just as important as keeping your other cutting tools sharp. Dull or poorly maintained blades on any tool lead to poor results and strain, whether it’s a string trimmer head or hedge trimmer blades that need sharpening.
Frequently Asked Questions
What should you not do with a string trimmer?
Never use it to cut woody branches, vines thicker than a pencil, or plastic landscape edging. Don’t “weed whack” the bark of trees or shrubs, it destroys the cambium layer and can kill the plant. Never operate it without the debris shield and proper personal protective equipment.
Can you cut a whole lawn with a string trimmer?
Technically yes, but you shouldn’t. It’s incredibly time-consuming, hard on the tool, and nearly impossible to get an even cut. A string trimmer is for edges, tight spots, and areas your mower can’t reach. For anything larger than a small patch, use a lawn mower.
How long should the trimmer line be?
For a dual-line bump-feed head, you want about 6-8 inches of total line length (so 3-4 inches protruding from each side of the head). This provides enough cutting swath without overloading the motor. Longer lines break more easily and cause bogging.
Why does my trimmer line keep getting tangled inside the head?
This is almost always caused by improper winding on the spool. The line must be wound tightly, evenly, and in the exact direction indicated by the arrows inside the spool. If the lines cross or are wound loosely, they’ll snag and knot when you try to advance them.
The Bottom Line
A string trimmer is a finesse tool, not a brute-force instrument. Success hinges on matching the head’s angle to the task, choosing a line that can handle the material, and moving with a rhythm that lets the tool’s speed do the work. Remember the three-part match: orientation, swing path, and spin direction. Keep the head clean, the line fresh, and your boots on. That’s the difference between a ragged, torn-up edge and a crisp, professional finish that makes your whole yard look sharp.