
The Right Way to Turn On an Air Compressor | Step-by-Step
This post contains affiliate links. As an Amazon Associate, we earn from qualifying purchases.
To turn on an electric air compressor, plug it into a grounded outlet, move its power switch to the “AUTO” or “ON” position, and let it build tank pressure. The pressure switch will automatically stop the motor at the “cut-out” pressure (e.g., 175 PSI) and restart it at the “cut-in” pressure (e.g., 135 PSI). Never start a compressor with a closed tank drain valve or with the outlet valve open.
That’s the basic sequence. The gap between a routine start and a damaged motor is three specific checks most weekend users skip. The compressor doesn’t care if you’re in a hurry.
What follows is the full pre-start ritual: seven visual and tactile checks that take ninety seconds. We’ll break down what the switch labels mean, why starting against pressure kills pumps, and the one adjustment you should never touch.
Key Takeaways
- Always verify the tank drain valve is open before the first start of the day to prevent moisture-lock and pressure spikes.
- The “AUTO” switch position enables the pressure switch’s automatic start/stop function; “ON” or “I” bypasses it for continuous run.
- Starting a compressor against existing tank pressure (above 10 PSI) stresses the pump and motor, leading to premature failure.
- In high-humidity environments, you must drain condensate from the tank daily to prevent internal corrosion.
- If the motor hums but won’t start, immediately switch to OFF and check for a tripped thermal overload reset button on the motor housing.
The 7-Step Pre-Start Checklist (Before You Flip the Switch)
Most compressor damage happens in the first ten seconds of operation. This checklist is your buffer. It’s drawn from the warning sections of OEM manuals for models like the Husky 30-gallon and the ACGP series.
- Confirm the tank is depressurized. Look at the tank pressure gauge. It should read zero. If it shows any pressure, slowly open the tank drain valve (located at the bottom) to vent it completely. Starting a pump against pressure forces it to work against a load it wasn’t designed for.
- Open the tank drain valve. This is the step every third user misses. Leave the brass petcock or lever valve at the tank bottom open for the initial startup. This allows any residual moisture or condensation to be blown out as the tank pressurizes. Close it only after the motor cycles off for the first time.
- Check the oil level (if oil-lubricated). Find the sight glass or dipstick on the pump. The oil level must be between the marks. A Husky 30-gallon manual specifies checking this weekly. Low oil kills a pump in under an hour of runtime.
- Inspect the air intake filter. A clogged filter starves the pump of air, causing it to run hot and lose efficiency. Brush off debris. If it’s oily or torn, replace it before proceeding.
- Verify power and cord condition. Plug into a dedicated 15- or 20-amp grounded outlet. No extension cords unless they’re 12-gauge or thicker for runs under 25 feet. Frayed cords are an immediate stop.
- Close the outlet regulator valve. Turn the regulator knob on the outlet side fully counterclockwise. This ensures the compressor isn’t trying to fill both the tank and an open hose simultaneously on startup.
- Wear eye and hearing protection. ANSI Z87.1 safety glasses are not a suggestion. The first burst of air from the drain valve can eject debris. Hearing protection (ANSI S12.6 rated) is required for sustained use.
Where this goes sideways: Skipping the tank drain step. If the valve is closed and the tank has residual water, that liquid gets churned into a fine mist that coats the tank’s interior, accelerating rust. A rusted tank is a condemned tank, it cannot be safely repaired.
What the Switch Positions Actually Mean
The switch on your compressor isn’t just an on/off toggle. Its labeling controls the relationship between the motor and the pressure switch, a separate component that acts as the brain of the system.
| Switch Position | What It Does | When to Use It |
|---|---|---|
| OFF (O) | Cuts all power to the motor and pressure switch. The compressor is dead. | Before plugging in, before any maintenance, when storing the unit. |
| AUTO (I / ON) | Powers the pressure switch, allowing it to start/stop the motor automatically. | Normal operation. The compressor will run until tank hits “cut-out” pressure, stop, and restart at “cut-in.” |
| ON (Continuous) | Bypasses the pressure switch, sending continuous power to the motor. | Rarely. For initial setup or diagnostic purging. The motor will run until manually switched off—risk of overheating. |
The pressure switch is the black box typically mounted on the side of the tank with copper tubing running to it. It has two preset triggers: the cut-in pressure (when to start) and the cut-out pressure (when to stop). For a common 30-gallon model like the Husky C304H, these are factory-set to 135 PSI (cut-in) and 175 PSI (cut-out).
The pressure switch will automatically start and stop the compressor when the air receiver drops below or reaches factory set cut-in and cut-out pressures respectively.
This 50-word technical snippet, sourced from a Pilot Air compressor manual, describes the core automatic function. Do not attempt to adjust these settings without a gauge and a service manual.
Never use the ON (continuous) position for routine work. You will bypass the automatic shutoff. The motor will run until the thermal overload trips or the pump fails from heat.
The Step-by-Step Startup for Electric Models
Follow this sequence after completing the pre-start checklist. The goal is a smooth, uneventful pressurization.
Step 1: Plug in the compressor. Ensure the switch is in the OFF position first. Listen for any unusual arcing or buzzing from the outlet, if you hear it, unplug immediately and check your circuit.
Step 2: Move the switch to AUTO. Turn or flip the switch to “AUTO” or “I”. You should hear the pressure switch click and the motor will immediately start. A healthy start is a steady electric hum building into a mechanical chugging. If the motor just hums loudly without turning over, switch to OFF instantly. The pump is seized or the voltage is too low.
Step 3: Let the tank fill. Watch the tank pressure gauge needle climb. The motor will run louder as pressure builds. This is normal. It will automatically shut off with a distinct click when the cut-out pressure is reached. The Husky 30-gallon manual notes a fill-up time of about 6.5 minutes from empty to 175 PSI.
Step 4: Close the tank drain valve. Once the motor stops, go to the tank drain. You’ll hear moisture and air hissing out. Close the valve firmly. This retains dry, compressed air in the tank for your tools.
Step 5: Set your outlet pressure. Now, adjust the regulator knob clockwise to your desired outlet pressure (e.g., 90 PSI for a nailer). Watch the separate outlet pressure gauge. Never set this higher than your tool’s maximum rating.
Step 6: Attach your hose and tool. With the outlet pressure set, you can quickly connect your hose and tool. The system is ready.
Common mistake: Opening the regulator or attaching a tool before the tank is full. This causes the motor to start and stop repeatedly in short cycles, called “short cycling.” It overheats the motor and wears out the pressure switch contacts within a few months.
Powering Up Portable & Battery-Powered Compressors
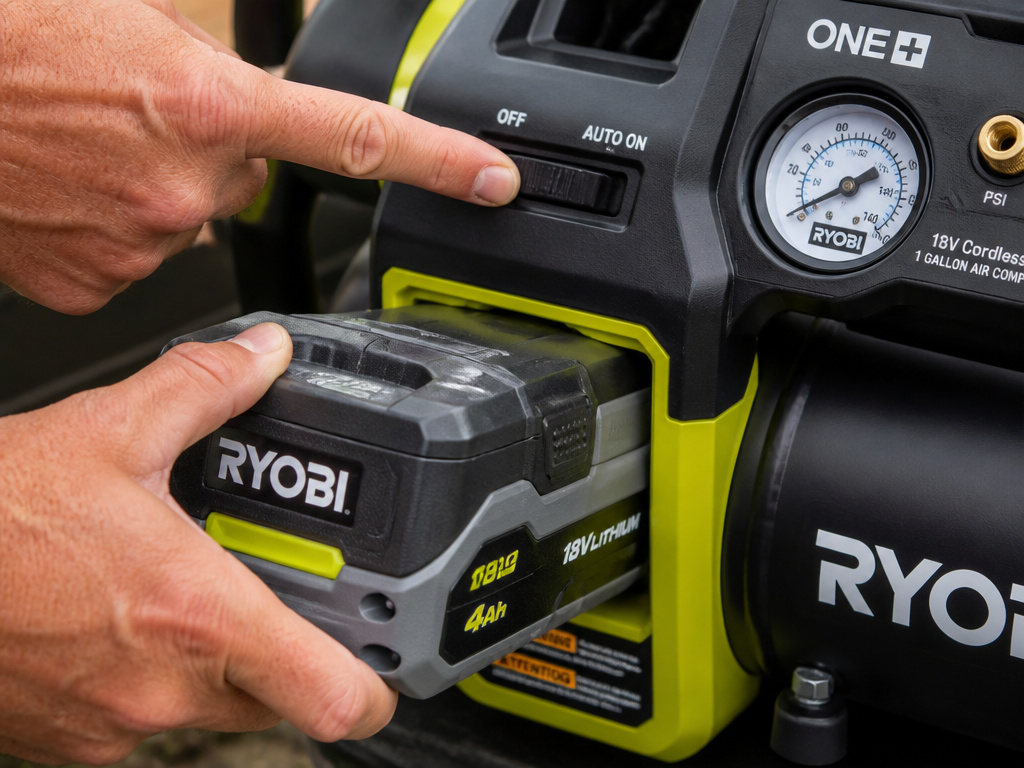
Smaller, portable units like the Ryobi 18V DC Compressor simplify the process but introduce their own rules. The core principle remains: the switch controls the automatic function.
For a battery-powered model: 1. Insert a fully charged battery pack. A weak battery will cause the motor to strain or not start. 2. Locate the switch, often a slider marked “OFF” and “AUTO ON.” 3. Slide to “AUTO ON.” The compressor will start and run until the tank reaches its max pressure (120 PSI for the Ryobi), then stop. It restarts automatically when pressure drops.
The key difference is duty cycle. These small compressors are not designed for continuous use. The Ryobi manual specifies an air delivery of 0.5 SCFM at 90 PSI. It will refill the 1-gallon tank quickly, but running a framing nailer will exhaust it in seconds. Match the tool to the compressor’s capability.
For ultra-quiet or “oil-free” portable compressors, the startup is identical, but the sound will be different, a higher-pitched whir instead of a deep chug. Let them fill completely on the first cycle before using air. Their thermal protection is less forgiving.
When Your Compressor Won’t Start: Troubleshooting
A non-starting compressor is usually telling you one of three things. Diagnose in this order.
Problem: Motor hums but doesn’t turn.
- Likely Cause: The pump is seized from sitting, or the start capacitor is dead.
- Immediate Fix: Switch OFF and unplug. Try turning the pump flywheel by hand (with gloves). If it doesn’t budge, the pump is locked. If it turns, the electrical system has failed, check the capacitor or thermal overload.
Problem: No sound, no power.
- Likely Cause: Tripped circuit breaker, bad outlet, or a failed pressure switch.
- Immediate Fix: Check your home’s breaker panel. Test the outlet with another device. If power is present, the pressure switch contacts may be corroded, a job for a technician.
Problem: Starts then immediately trips overload.
- Likely Cause: Insufficient voltage (long extension cord) or a failing motor winding.
- Immediate Fix: Eliminate the extension cord. Plug directly into a wall outlet. If it still trips, the motor is failing under load.
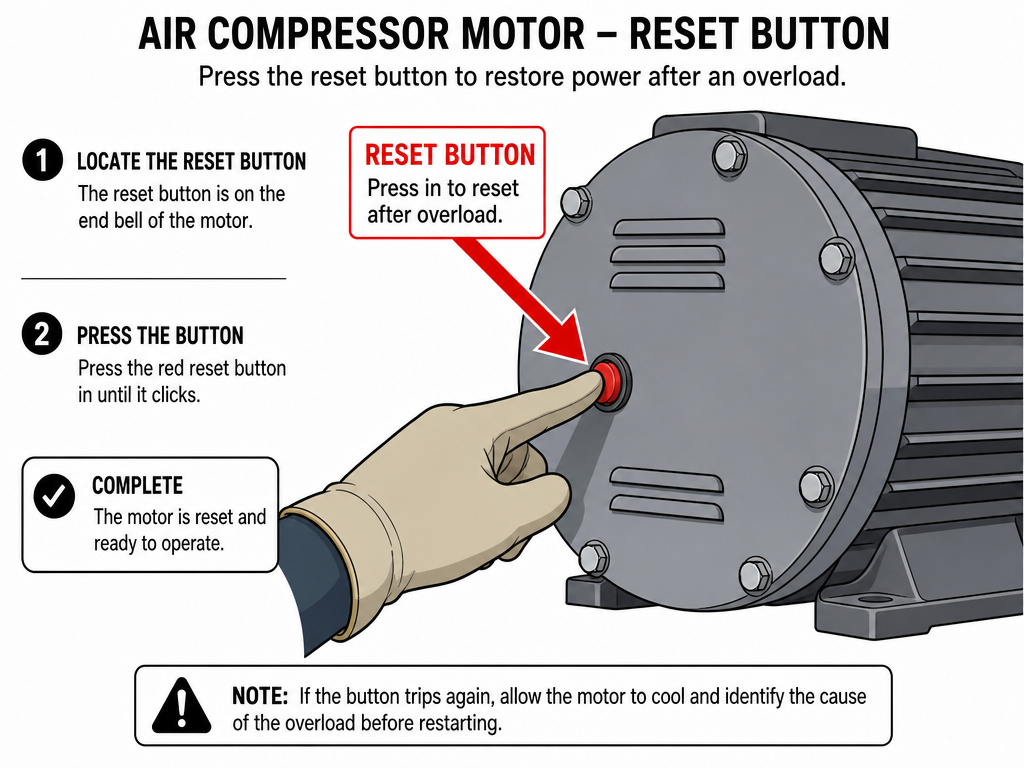
The part nobody mentions: The thermal overload reset button. Many motors have a small, red rubber button on the end bell. If the motor overheats, this button pops out. You must switch the compressor OFF, let it cool for 30 minutes, then press this button in before it will start again. Find it before you need it.
Critical Safety Notes and Manufacturer Warnings
The manuals are blunt for a reason. These are the highlighted warnings from the sourced OEM documents.
- Eye Protection is Mandatory. The Ryobi operator’s manual states eye protection “should ALWAYS be worn” and must comply with ANSI Z87.1. Flying debris from the drain valve is the most common injury.
- Release Pressure Before Servicing. The universal rule: “isolate power and release all pressure from receiver” before any maintenance. Never assume a tank is empty because the motor is off.
- Never Adjust the Pressure Switch Unnecessarily. The cut-in and cut-out are calibrated at the factory. Altering them can create a situation where the tank pressure exceeds the safety valve rating. That’s a bomb.
- Drain Condensate in High Humidity. The ACGP user manual advises draining the tank daily under high humidity. Water accelerates tank rust and can emulsify with oil in the pump, destroying lubrication.
- Ensure Proper Ventilation. A compressor needs 18 inches of clear space around it for cooling. The Pilot Air manual warns that poor ventilation leads directly to motor overload trips.
Your first job is to get the compressor running. Your second job is to keep it, and you, intact for the next decade. The startup ritual is where that contract begins.
Frequently Asked Questions
Why does my compressor start for a second then stop?
This is short cycling. The most common cause is an open tank drain valve or a significant air leak downstream of the pump (like a loose hose fitting). The pressure switch sees the tank isn’t building pressure and shuts off to protect the motor. Check for leaks with soapy water and ensure the drain valve is closed after the initial purge.
What’s the difference between “AUTO” and “ON” on the switch?
“AUTO” lets the pressure switch control the motor, turning it on and off automatically to maintain tank pressure. “ON” (or sometimes “I”) sends continuous power to the motor, bypassing the pressure switch entirely. Use “ON” only for specific diagnostics or purging; never for normal tool operation.
Can I use an extension cord with my air compressor?
You can, but it’s risky. Small compressors (under 10 amps) might tolerate a heavy-duty 12-gauge cord under 50 feet. Larger compressors (like a 2 HP, 15-amp model) should be plugged directly into a dedicated outlet. A long or thin extension cord causes voltage drop, making the motor work harder, overheat, and fail prematurely.
How often should I drain the water from my tank?
The rule is: after every use. In practice, drain it whenever you see the tank pressure gauge drop below 20 PSI. For high-humidity environments, the ACGP compressor manual specifies weekly or even daily draining. Water left inside is the primary cause of tank corrosion and failure.
My compressor is very loud. Is that normal?
All piston compressors are loud, but there are levels. A rhythmic thump-thump-thump is normal. A metallic screech, grinding, or violent knocking is not. For normal operational noise, consider an air compressor silencer or muffler kit for the intake, and always wear hearing protection rated for sustained noise exposure.
What should I check if the tank isn’t reaching full pressure?
First, listen for air leaks, hissing sounds at fittings, the drain valve, or the safety valve. Second, a worn piston ring or valve plate in the pump can reduce compression. Third, check that the pressure switch is actually cutting out at the correct high limit. A faulty switch will let the motor run but never signal it to stop.
Before You Go
Turning on an air compressor is simple until you skip a step. Then it’s expensive.
Remember the sequence: depressurize, drain open, check oil, power up on AUTO, let it fill, close the drain, then set your outlet pressure. The pressure switch is the automatic manager, let it do its job. Your job is to give it a clean, dry tank and enough power to work with.
For most home garage work, a solid home garage compressor in the 20- to 30-gallon range handles 90% of tasks. Keep its oil fresh and its tank dry, and it will last through years of weekend projects. The sound of it kicking on automatically should be a sign of readiness, not a warning.
