
Guide to Drilling Pot Metal Without Melting or Damaging It
This post contains affiliate links. As an Amazon Associate, we earn from qualifying purchases.
To drill pot metal, you must control heat above all else. Use a sharp high-speed steel (HSS) or cobalt drill bit, start with a center punch and pilot hole, and run your drill at its slowest speed—under 600 RPM for anything thicker than sheet metal. Apply firm, steady pressure and flood the area with cutting oil or WD-40 to keep the temperature below the metal’s 380–410°C melting point. Drilling dry or too fast turns the workpiece into a bubbled, warped mess.
Pot metal isn’t just soft. Its inconsistent zinc alloy composition and critically low heat tolerance make it behave unpredictably under a drill bit. A standard technique for drilling steel will ruin it in seconds.
What follows is the method that works when generic advice fails: the right bit selection, the non-negotiable slow speed, and the cooling routine that keeps the metal solid. This also covers how to spot aged, corroded pot metal that’s likely to crumble, and what to do when a hole goes wrong.
Key Takeaways
- Pot metal melts between 380°C and 410°C (716–770°F). Drill speed is your primary heat control.
- Always use a center punch and a pilot hole. A wandering bit creates friction and instant heat.
- Flood the work with cutting fluid or WD-40. Drilling dry is the fastest route to a melted hole.
- For thin pot metal, a step drill bit is the safest choice. It cuts cleanly with minimal grabbing.
- Aged, corroded pot metal is brittle and may crack or flake under drill pressure. Test on a hidden edge first.
The Core Challenge: Why Pot Metal Melts So Easily
Pot metal, often called monkey metal or white metal, is a cheap zinc-based alloy. It was used for decades in car emblems, costume jewelry, and vintage appliance parts. The problem isn’t drilling through it—it’s drilling through it without destroying it.
Pot metal has a melting point between 380°C and 410°C (716°F to 770°F). A standard drill bit turning at high speed in dry metal can generate enough friction heat to hit that threshold in under thirty seconds.
The alloy’s composition is wildly inconsistent. One vintage knob might be mostly zinc with a little aluminum; the next could have traces of lead or tin. This means its reaction to heat isn’t uniform. One spot might drill cleanly, while an impurity pocket three millimeters away bubbles and discolors.
Age makes it worse. Decades of exposure to air and humidity cause corrosion that presents as flaking, pitting, or a chalky white powder. This corroded layer is even more brittle and heat-sensitive. Drilling into it often just breaks it apart.
The Right Tools for the Job (And What to Skip)
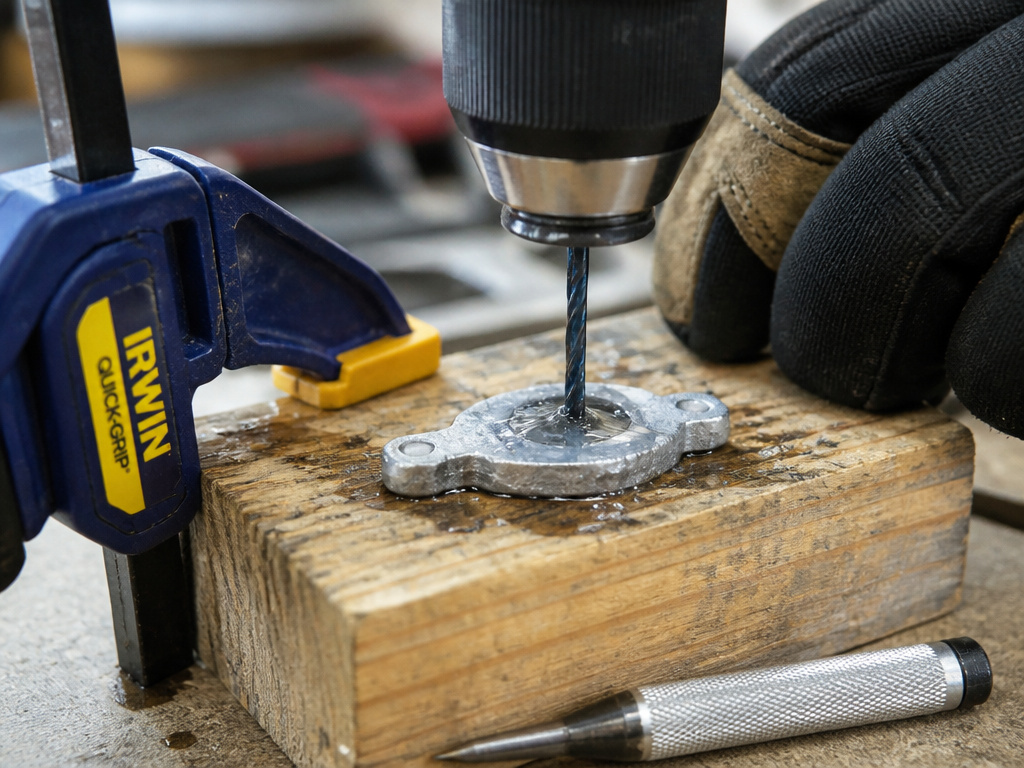
You don’t need a industrial drill press, but you do need the right bits and lubricant. A cordless drill with variable speed is perfect.
Drill Bits: The Short List
- High-Speed Steel (HSS): The minimum viable bit. It’s cheap and sharp, but it dulls faster against zinc alloys. Keep it moving and cool.
- Cobalt Steel Bits: The better choice. The cobalt blend holds an edge longer and dissipates heat slightly better. For a one-time job, HSS works; for several holes, spring for cobalt.
- Step Drill Bits: The winner for thin-gauge pot metal, like from a vintage radio case. A step drill bit shears the metal cleanly with less grabbing and lower point pressure, which means less heat.
Skip titanium-coated bits for this. The coating is for hardness, not heat dissipation, and pot metal is soft. Also, never use a wood spade bit or a masonry bit. They’re the wrong geometry and will destroy the workpiece.
The Non-Negotiables
- Center Punch: A spring-loaded automatic punch is ideal. You must create a dimple for the drill bit to sit in.
- Cutting Fluid or Lubricant: Tap Magic, standard cutting oil, or even WD-40 in a pinch. The goal is to keep the bit and metal cool.
- Clamps: Secure the piece to a scrap wood block. If the bit grabs, the whole piece can spin violently.
Step-by-Step: Drilling Without Damage
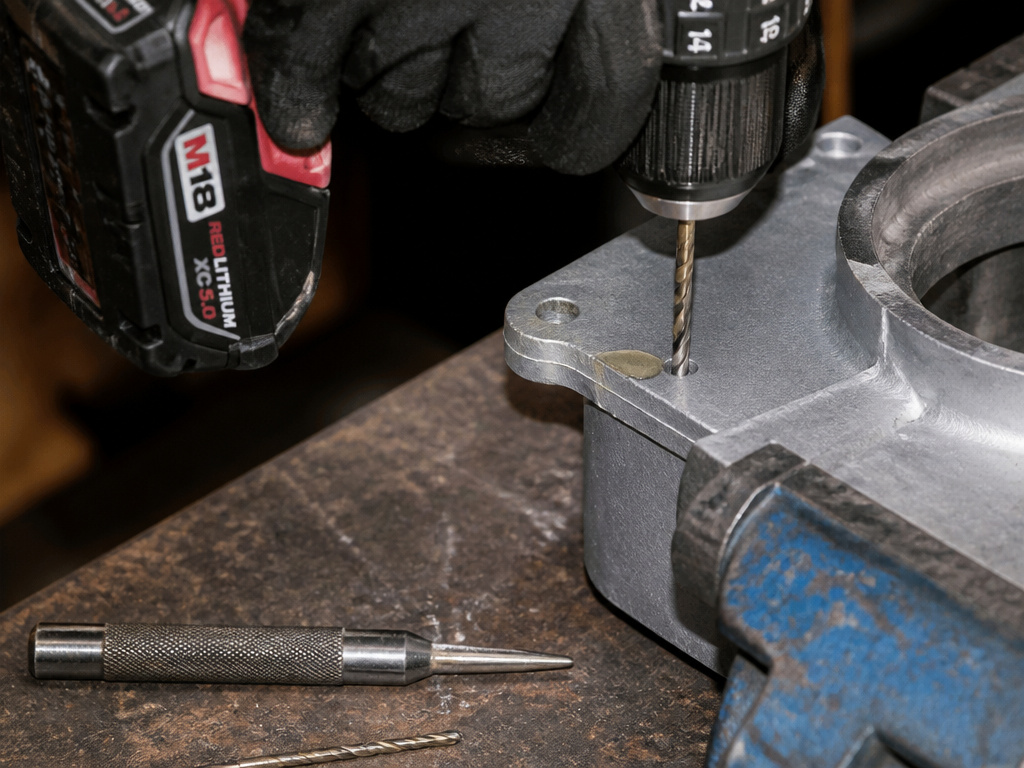
This sequence assumes you’ve identified your pot metal piece, cleaned off any corrosion with a wire brush, and securely clamped it to a backing board.
1. Mark and Center Punch
Mark your hole location with a fine-point marker. Place the center punch exactly on the mark and strike it firmly. The dent must be deep enough that the tip of your pilot bit cannot wander.
2. Drill the Pilot Hole
Start with a small bit, 1/16″ (1.5mm) or 2mm. This is not optional. It reduces the load on your final-sized bit and prevents walking. – Set your drill to its slowest speed setting. – Dip the bit in cutting fluid. – Place the bit in the center punch dent, hold the drill perfectly perpendicular, and pull the trigger. – Apply firm, steady pressure. Let the bit cut; don’t push so hard you stall the motor. – Withdraw the bit every 10–15 seconds to clear chips and add more fluid.
3. Open to Final Size
Switch to your final-sized HSS or cobalt bit. The same rules apply: slow speed, constant lubricant, frequent clearing.
Where this goes sideways: Increasing speed to “get it done faster.” The moment you see a blue tinge or smoke, the metal is overheating. Stop immediately, let it cool completely, add more oil, and resume at half the previous speed.
4. Deburr the Hole
Pot metal will form a sharp, ragged burr on the exit side. Don’t break it off with your fingers. Use a countersink bit or a small round file to gently smooth the edge. A deburring tool works if you have one.
Speed and Heat: The Numbers That Matter
Forget “slow and steady.” You need a specific target. Heat generation is a function of speed (RPM) and pressure.
| Material Thickness | Target RPM (Approx.) | Why This Speed |
|---|---|---|
| Thin Sheet (≤ 1mm) | 1,200 – 1,500 RPM | Higher speed shears the metal quickly before heat builds. Requires a sharp step bit. |
| Medium (1–3mm) | 600 – 800 RPM | Balances cutting efficiency with heat dissipation. The sweet spot for most repairs. |
| Thick Casting (>3mm) | 300 – 600 RPM | Maximum heat control. Drilling is slow, but it’s the only way to avoid core heat buildup. |
These speeds are far lower than those for drilling aluminum, which can handle 1,500+ RPM, and dramatically lower than for drilling hardened steel, where pressure is the main challenge.
If your drill doesn’t have an RPM readout, use the lowest speed setting on a variable-speed trigger. The drill should sound labored but not stalled. The cutting chips should be small, silver curls, not discolored blue or black dust.
Pot Metal vs. Other Metals: A Drilling Comparison
The technique for pot metal is an outlier. Getting it wrong has immediate, visible consequences.
| Metal Type | Primary Risk | Key Technique Difference | Bit Preference |
|---|---|---|---|
| Pot Metal | Melting, warping | Extreme speed control; flood cooling mandatory. | HSS/Cobalt, Step Bit |
| Aluminum | Bit grabbing, clogging | High speed, pecking motion to clear chips. | Sharp HSS, dedicated aluminum bit |
| Stainless Steel | Work hardening | Low speed, high pressure, never let bit rub. | Cobalt or drill bits for stainless steel |
| Cast Iron | Brittle fracture, dust | Moderate speed, no coolant needed (graphite self-lubricates). | HSS, carbide-tipped for scale. |
This table shows why knowledge from drilling cast iron doesn’t transfer. Cast iron likes to be dry; pot metal will fuse to your bit without coolant.
When Drilling Goes Wrong: Salvage and Alternatives
You’ll see the failure before you hear it. The metal around the hole turns a dull blue or grey. It might bubble or warp. If this happens:
- Stop drilling immediately.
- Let the piece cool to room temperature. Don’t quench it in water—that can cause cracking.
- Assess the damage. Slight discoloration is cosmetic. Warping or a melted edge likely means the part is trash.
- For a slightly enlarged or ragged hole, you can sometimes clean it up with a round file or a reamer. Go slow.
If the piece is too fragile to drill, consider an alternative: – Adhesive Bonding: For non-structural repairs, a two-part epoxy can often mount a fastener without a hole. – Cold Metal Stitching: A professional, no-heat mechanical repair that involves drilling small holes on either side of a crack and inserting metal pins. Not a DIY-friendly process.
Frequently Asked Questions
Can I use a regular drill bit on pot metal?
You can use a standard HSS bit, but it must be new or freshly sharpened. A dull bit creates more friction heat than a sharp one. For best results, choose a cobalt bit or a step bit designed for drilling metal.
Why does my pot metal crack when I drill it?
Age and corrosion. Old pot metal becomes brittle. The pressure from the drill bit, not the heat, can cause it to fracture. Always inspect for flaking or pitting. Drill a test hole in a hidden area or on a scrap piece first.
What’s the best lubricant for drilling pot metal?
Dedicated cutting fluid or oil is best. It has higher heat capacity and lubricity. In a pinch, WD-40 or even 3-in-1 household oil works better than nothing. Never drill dry.
How do I know if something is made of pot metal?
It’s often found on decorative, vintage items (pre-1980s). It’s lightweight, doesn’t rust (but corrodes white), isn’t magnetic, and has a slightly grainy, cast texture. If you scratch an inconspicuous area, the shaving is dull silver, not bright like aluminum.
Is a drill press better than a hand drill for this?
Drill press offers superior speed control and perpendicular alignment, which reduces binding. If you have one, use it. But a handheld cordless drill with a steady hand and the low-speed discipline outlined here works perfectly well.
The Bottom Line
Drilling pot metal isn’t a test of strength; it’s a test of patience. The enemy is heat, and you control it with slow RPMs and constant coolant. Remember the three anchors: a sharp cobalt or HSS bit, a solid center punch start, and the courage to run your drill slower than you think is necessary.
For one hole in a thin vintage piece, a sharp HSS bit and WD-40 will get you through. For a restoration project with multiple holes, invest in a cobalt set and proper cutting oil. The difference is a clean, usable part versus a melted lump of zinc alloy.
