How to Change Chop Saw Blade Safely (Step-by-Step Guide)
This post contains affiliate links. As an Amazon Associate, we earn from qualifying purchases.
To safely change a chop saw blade, you must match three elements: the correct blade for your material, the proper tools (typically an 8mm hex wrench), and a strict safety sequence. This process starts by unplugging the saw and concludes with a critical no-load test run to verify correct installation.
Most people rush the last step, the test run. They install the blade, make a cut, and only notice the wobble or strange noise after the workpiece is ruined. That’s backwards. The test run is the proof. Skip it, and you gamble with a blade that could be seated crooked, have a hidden crack, or spin in the wrong direction.
This guide walks through the exact swap process, covers how to pick a blade that won’t fail on your material, and includes the warnings you’d hear from a shop foreman. We’ll also tackle the questions Reddit handymen actually debate, like when to change a blade versus sharpen it, and what to do with the old one.
Key Takeaways
- Always unplug the saw first. The spindle lock can fail under force, and a live motor can spin the blade as you’re loosening the nut.
- Match the blade to the material. An abrasive wheel for metal, a carbide-tipped blade for clean wood cuts, a diamond blade for tile. Using the wrong type sparks, chips, or burns the workpiece.
- The test run is mandatory. Run the saw for 30 seconds without a load after installation. Any wobble, grinding, or vibration means stop and re-check the seating.
- Over-tightening the arbor nut damages the threads. Snug is enough. Overtorquing can strip the arbor threads or crack the blade’s center hole, making future removal a fight.
- Clean the arbor flanges every swap. Built-up sawdust or rust creates a tiny gap, which lets the blade sit off-axis. That causes wobble within ten cuts.
Before You Start: The Three Non-Options
Before you start: The blade guard stays engaged by spring tension. If you force it open without the proper release, the spring can snap and the guard won’t return, leaving the blade exposed for the next user. The arbor nut is often reverse-threaded on some older industrial models, turning it the wrong way tightens it further. And a recently used blade holds heat at the teeth for five minutes after shutdown. Grab it bare-handed and you get a burn that blisters.
Safety goggles are obvious. Cut-resistant gloves matter because even a “cool” blade can have sharp burrs on the teeth. The work area needs to be clear of scraps, a loose board under the saw can kick into your leg when you test the blade.
The one tool you must have is the wrench. Most modern chop saws use an 8mm hex key, sometimes stored in a slot on the saw body. If yours is missing, a socket wrench with an 8mm socket works. Do not substitute an adjustable wrench. The hex flats are shallow, and an adjustable wrench slips off under torque, rounding the nut corners.
When to Change the Blade (Not Sharpen It)
You change a chop saw blade when the cut quality degrades, not when a calendar date passes. The signs are physical.
Slow cutting is the first hint. The saw motor sounds normal but the blade advances through the material at half speed. For wood, you’ll see burn marks along the cut edge, black streaks where the dull teeth rub instead of slice. For metal, the abrasive wheel produces more spark showers than cut progress, and the wheel edge looks glazed, like a smooth rim.
Increased force is the second sign. You push harder on the saw handle to keep the cut moving. That extra pressure transfers to the saw’s pivot points, wearing the hinge bearings prematurely.
Uneven cuts are the final call. Both sides of a wood cut should look identical. If one side is smooth and the other has splinters hanging off, the blade teeth are unevenly worn or gummed up. Cleaning can sometimes restore a carbide blade, but an abrasive wheel is done.
I ran a DeWalt DW872 metal-cutting saw with an abrasive wheel for three months on aluminum framing. The wheel slowly glazed, and I didn’t notice until the cuts started tapering, the left side was clean, the right side had ragged burrs. I forced a few more cuts, and the wheel disintegrated mid-cut, throwing fragments into the guard. Now I swap abrasive wheels every 60–70 hours of runtime, no matter how they look.
Sharpening is only an option for carbide-tipped blades. You can have them professionally sharpened two or three times before the carbide teeth lose too much mass. Abrasive wheels and diamond blades are consumables; they wear down and must be replaced. Trying to sharpen them removes the abrasive coating or diamond grit, leaving a useless core.
Choosing the Right Blade
The blade type determines cut quality, speed, and safety. Using a wood blade on metal creates dangerous spark showers and instantly dulls the teeth. Using a metal blade on wood burns the wood and loads the teeth with gum.
| Blade Type | Best For | Wear Pattern | Risk If Misused |
|---|---|---|---|
| Abrasive Cutting Wheel | Metal (steel, aluminum) | Gradually wears down, diameter shrinks | Sparks ignite wood dust, wheel can fracture |
| Carbide-Tipped Blade | Wood, plastics, PVC | Teeth chip or gum up, edge stays sharp | Binding in metal, teeth snap off |
| Diamond Blade | Tile, stone, masonry | Diamond grit wears off, core remains | Chipping tile, overheating in wood |
| High-Speed Steel (HSS) | Soft metals, thin wood | Teeth deform under heat | Blunts quickly on hard materials |
Blade diameter matters. Chop saws typically use 12-inch or 14-inch blades. The size is stamped on the saw’s guard or in the manual. A larger blade offers a deeper cut capacity but requires a saw with enough arbor clearance. Never force a 14-inch blade onto a saw designed for 12-inch, the guard won’t close and the blade hits the housing.
Thickness affects stability. Thin blades (0.055-inch) vibrate more on tough materials and can warp under heat. Thicker blades (0.083-inch) resist wobble but cost more. For general wood cutting, a standard 0.065-inch carbide-tipped blade balances cost and performance.
The arbor hole must match your saw. Most chop saws have a 5/8-inch arbor. Some industrial models use 1-inch. Check the old blade’s center hole before buying a replacement.
The Step-by-Step Swap Process
Follow this sequence exactly. Deviations introduce risk.
Step 1: Unplug the saw. Pull the power cord from the outlet or remove the battery. This is non-negotiable. I’ve seen a spindle lock fail because a worn lock pin didn’t engage fully. The blade spun when the wrench pressure hit the nut, and the wrench flew into the user’s forearm. Unplugging removes that possibility.
Step 2: Clear the area. Move any workpiece away. Brush sawdust and debris from the blade guard area. Debris can fall into the arbor seat and tilt the new blade.
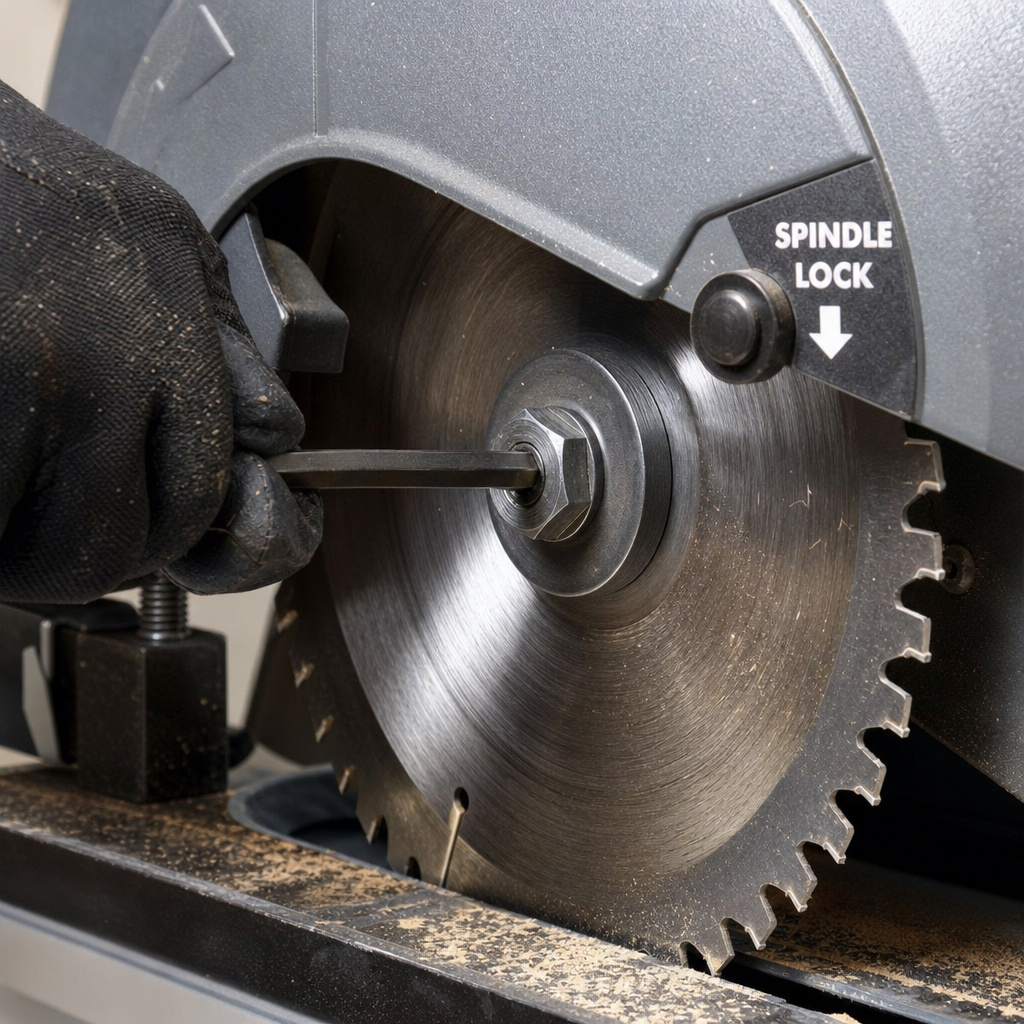
Step 3: Engage the spindle lock. Locate the lock button or lever on the saw’s side. Press it until you hear a click or feel it engage. On some DeWalt models, you pull a lever near the blade guard. The lock holds the blade stationary so the arbor nut can be loosened.
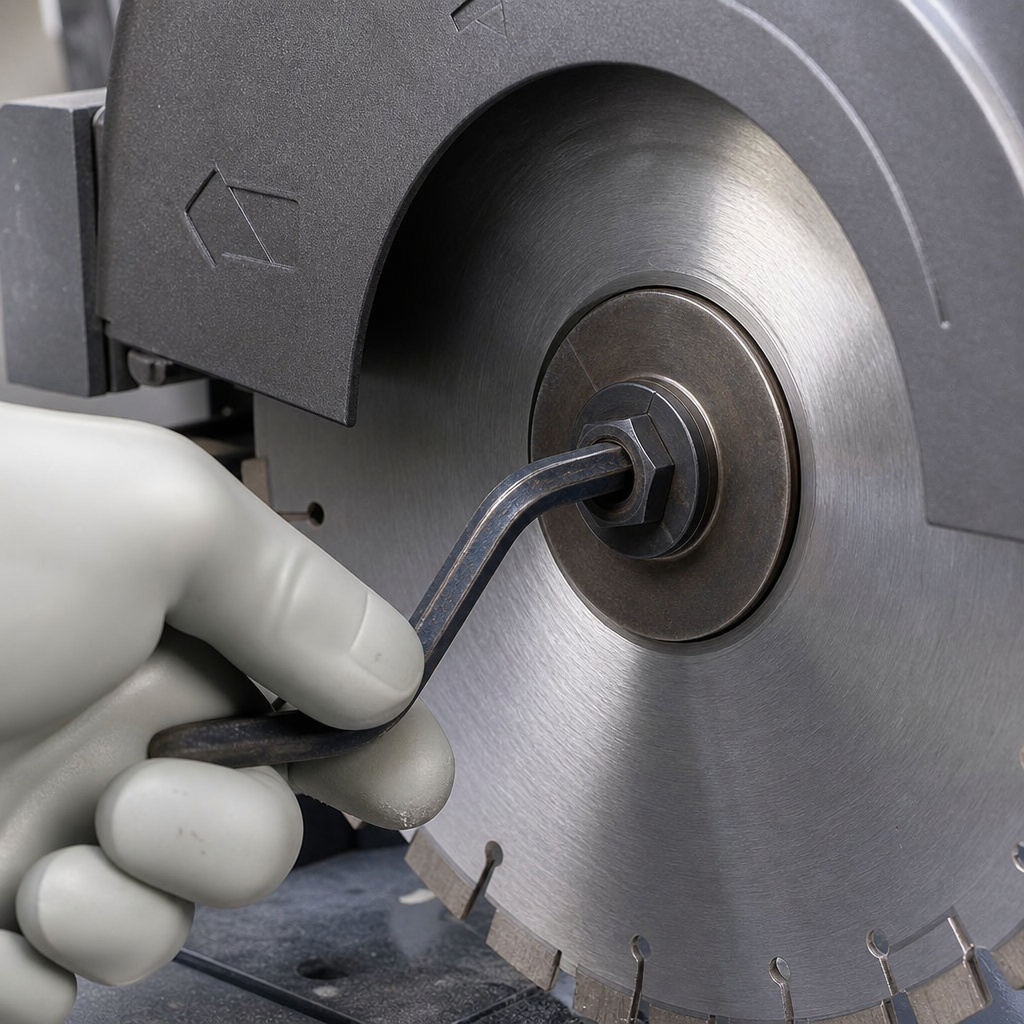
Step 4: Loosen the arbor nut. Fit the 8mm hex wrench onto the nut. Turn counterclockwise. The nut is often tight from vibration and heat. Apply steady pressure. If it refuses, do not hammer the wrench, that can crack the nut or damage the arbor threads. Instead, tap the wrench handle with a rubber mallet to shock the thread loose.
Step 5: Remove the old blade. Slide the blade off the arbor. Note the direction the teeth faced. Set the old blade aside on a flat surface, not on the ground where it can be stepped on.
Step 6: Clean the arbor and flanges. Use a brush or rag to wipe the arbor shaft and the two flange surfaces (the washer-like disks that sandwich the blade). Rust or packed sawdust here creates a minuscule gap. That gap lets the blade sit off-center, causing wobble immediately.
Step 7: Install the new blade. Place the new blade onto the arbor, aligning the center hole. Ensure the teeth face the correct direction, match the rotation arrow stamped on the saw’s guard or the blade itself. Installing it backward makes the cut aggressive and noisy, and the saw throws debris upward instead of downward.
Step 8: Tighten the arbor nut. Hand-tighten the nut first. Then use the wrench to secure it firmly. Snug is sufficient. Over-tightening strains the arbor threads and can crack the blade’s center hole. A cracked hole leads to blade fracture within hours.
Step 9: Release the spindle lock. Disengage the lock button or lever.
Step 10: Test before cutting. Reconnect power. Hold the saw down firmly on a bench or the floor. Run it for 30 seconds without a load. Listen for any grinding, whining, or irregular vibration. Watch the blade for wobble. If anything seems off, stop and re-check the installation.
If your chop saw wobbles after a blade change, the cause is usually one of three things: debris on the arbor flange, a mismatched arbor hole size (even a 0.005-inch difference matters), or an over-tightened nut that has distorted the blade’s seating. Clean the flanges again, verify the hole size, and loosen the nut slightly. Retest.
Why Does the Arbor Nut Need to Be Snug, Not Torqued?
The arbor nut’s job is to clamp the blade between two flanges, not to act as a vise. Over-tightening compresses the flanges past their designed spring point. That can warp the flanges slightly, creating an uneven seating surface.
The blade then runs off-axis. Also, excessive torque can gall the threads, metal friction that makes future removal require a breaker bar. Snug pressure keeps the blade secure without introducing these failures. If you’re curious about similar precision in other tools, our guide on installing a cutting head covers the same principle of fit without force.
How Tight Should the Arbor Nut Be?
Manufacturers rarely provide specific torque values for chop saw arbor nuts. The rule of thumb is firm hand-tight plus a quarter-turn with the wrench. You should not need both hands on the wrench.
If you must quantify it, think of 15–20 foot-pounds of torque. That’s the range for most 5/8-inch arbor nuts. A quarter-turn with a standard 8mm hex wrench after hand-tightening delivers about that.
Over-tightening has a clear consequence. The nut threads stretch, the flange warps, and the blade’s center hole can crack under the pressure. A cracked hole doesn’t show immediately. The blade runs fine for a few cuts, then fractures radially from the hole outward. The fracture throws blade fragments into the guard.
Under-tightening risks the nut loosening from vibration. The blade then slips on the arbor, changing the cut angle mid-stroke. That ruins the workpiece and can jam the saw.
Check the nut after the first few cuts. If it’s still snug, you’re good. If it loosened, tighten it slightly more and re-test.
What About Quick-Release Systems?
Some modern chop saws, particularly DeWalt’s DW872X and certain Makita models, feature a quick-release lever. The lever replaces the hex wrench. You pull the lever to unlock the arbor nut, then the blade slides off.
The quick-release is convenient but has a failure mode. The lever mechanism wears over time. If you don’t maintain it, cleaning the latch and checking the spring, the lever can fail to fully lock. The blade then spins loose under load.
When using a quick-release system, after installing the new blade and engaging the lever, still perform the no-load test. Listen for any clicking sound from the lever area. Clicking indicates the lock isn’t fully seated.
If the lever fails, you can usually revert to the hex wrench method. The nut underneath is standard. This fallback is why keeping the wrench handy is wise even on quick-release saws.
Post-Installation Checks and Troubleshooting
After the blade is installed and tested, make your first cut on a scrap piece of the same material you’ll be working with. Observe the cut quality and the saw’s behavior.
If the cut is slow or burning: The blade might be too fine for the material, or it’s installed backward. Check the tooth direction. For wood, a blade with too few teeth per inch (TPI) can also burn. Switch to a blade with higher TPI.
If the saw vibrates excessively: Stop. Re-check the arbor flanges for debris. Also inspect the new blade for a manufacturing defect, a slight bend or uneven tooth set. Rare, but possible.
If the blade makes a grinding noise: The blade guard might be contacting the blade. Ensure the guard retracts fully. Also check that the blade is the correct diameter; an oversized blade hits the guard housing.
If the arbor nut loosens after a few cuts: Tighten it slightly more. Vibration can settle a new nut. If it continues to loosen, inspect the nut threads and arbor threads for wear. Worn threads won’t hold tension.
These checks are part of the blade maintenance mindset, every tool change requires verification.
Disposing of the Old Blade
Old chop saw blades are not household trash. They are sharp, often metal-heavy, and can injure waste handlers.
Abrasive wheels and diamond blades contain composites that may be recyclable at specialized facilities. Check with local construction recycling centers.
Carbide-tipped blades can be recycled as scrap metal. The carbide teeth are valuable to metal recyclers. Some woodworking shops collect old carbide blades and sell them in bulk to recyclers.
If no recycling option exists, wrap the old blade in several layers of cardboard or bubble wrap before placing it in the trash. This protects handlers from cuts.
Never leave an old blade uncovered in a workshop corner. It becomes a trip hazard and a cutting risk.
Frequently Asked Questions
How often should I change my chop saw blade?
There’s no fixed timeline. Change it when the cut quality drops, slow cutting, burning, splintering, or excessive sparking. For abrasive wheels on metal, consider swapping every 60–70 hours of runtime. For carbide blades on wood, they can last years if cleaned regularly and not used on metal.
Can I sharpen a chop saw blade myself?
You can sharpen carbide-tipped blades with a diamond file if you have the skill and patience. It’s tedious and requires maintaining the original tooth angle. Abrasive wheels and diamond blades cannot be sharpened; they wear down and must be replaced. Most users find professional sharpening cost-effective for carbide blades.
What happens if I install the blade backward?
The teeth cut inefficiently, the saw throws debris upward toward you, and the cut becomes rougher. The motor also strains because the tooth geometry is wrong for the rotation direction. You’ll notice immediately from the noise and debris pattern.
Do I need to wear gloves when changing the blade?
Yes. Cut-resistant gloves protect against sharp tooth burrs and potential slips with the wrench. Even a cool blade can have micro-serrations that cut skin. Gloves also give you a better grip on the blade during handling.
My spindle lock doesn’t seem to engage. What should I do?
Do not proceed. The lock might be worn or broken. Unplug the saw and inspect the lock mechanism.
Sometimes debris jams it. Clean the area. If it’s broken, you must fix it before any blade change. Without a lock, you cannot safely loosen the arbor nut.
Is there a difference between a chop saw blade and a miter saw blade?
Often yes. Chop saw blades are designed for heavier-duty, straight-down cutting, sometimes with more aggressive tooth sets. Miter saw blades prioritize fine finish cuts. Many blades are interchangeable if the arbor size matches, but using a chop saw blade on a miter saw can yield rougher cuts.
The Bottom Line
Changing a chop saw blade is a straightforward task if you follow the sequence: unplug, lock, loosen, clean, install, snug, test. The critical steps are the unplugging and the test run. Skipping either turns a simple swap into a hazard.
Match the blade to your material. An abrasive wheel for metal, carbide for wood, diamond for tile. Misapplication ruins the blade and the workpiece.
Keep the arbor nut snug, not torqued. Over-tightening causes hidden damage that surfaces later.
Finally, treat the old blade with respect. Wrap it for disposal or seek recycling. A blade left exposed is a danger to everyone in the shop.
The process takes about ten minutes. Doing it right saves your workpiece, your saw, and your fingers.