6 Steps to Sharpen Hedge Trimmer Blades the Right Way
This post contains affiliate links. As an Amazon Associate, we earn from qualifying purchases.
Sharpen hedge trimmer blades by cleaning the teeth, securing the tool, and using a flat mill bastard file to match the original bevel angle, typically 30 to 45 degrees, with consistent strokes on the cutting edge only, followed by deburring and lubrication.
Most people grab a file and start rubbing. They skip the clean, ignore the angle, and wonder why the trimmer still tears leaves. The real work happens before the file touches metal.
This guide walks through the six non-negotiable steps, from diagnosing a truly dull blade to the final protective coat that keeps it cutting. It covers the tools, the mistakes that ruin blades, and what to do if a sharp edge doesn’t fix the cut.
Key Takeaways
- A clean blade is a must. Sap and debris clog the file and hide the true cutting edge, guaranteeing an uneven sharpening job.
- Match the existing bevel angle, usually between 30 and 45 degrees. Changing this angle destroys the blade’s cutting geometry.
- File only the beveled edge of each tooth. Filing the flat backside creates a gap that prevents the scissor action and causes immediate jamming.
- Remove the burr. Every sharpening creates a tiny metal flap on the back of the tooth; a few passes with a whetstone are the difference between a sharp blade and one that feels sharp but won’t cut.
- Lubricate immediately after sharpening. The process strips protective coatings, leaving bare metal vulnerable to rust that starts within a day in humid conditions.
Why Dull Blades Are Worse Than You Think
A dull hedge trimmer doesn’t just slow you down. It massacres your plants. Instead of slicing cleanly through stems, the rounded edge mashes and tears plant tissue. That ragged wound is an open invitation for disease, fungi, and pests. The plant spends energy sealing the damage instead of growing.
You’ll feel it too. The tool vibrates more as you force it through growth. It jams constantly, packing green mush between the teeth. The motor strains, drawing more battery or gas. What should be a 30-minute job turns into a frustrating, arm-aching hour.
Hedge trimmer blades function like scissors, with a stationary lower blade and a reciprocating upper blade. The sharp, angled bevel on each tooth shears plant material cleanly against its counterpart. Dullness increases the cutting surface area, requiring exponentially more force and causing cell wall rupture instead of a cut.
I learned this the hard way on a client’s overgrown laurel hedge. My trusty Husqvarna 28T was pulling hard and leaving brown, shredded tips. I assumed it was just thick growth.
After the job, the homeowner pointed out the damage two weeks later, entire sections were browning and dying back from what I now know was blight entering through the torn stems. The cost of replacing those plants was more than a new trimmer. I sharpened my blades that night and haven’t skipped a seasonal touch-up since.
Tools You’ll Need (And One You Should Avoid)
Gather these first. Trying to improvise mid-job leads to rounded edges and damaged blades.
| Tool | Purpose | What Happens If You Skip It |
|---|---|---|
| Flat mill bastard file (8-inch) | Removing metal to recreate the sharp cutting bevel. | Using a round or worn file rounds off the bevel. The edge looks sharp but slides over stems instead of biting. |
| Whetstone (medium grit) | Removing the burr (wire edge) created by filing. | The blade feels sharp to your finger but the microscopic burr folds over on first contact, causing immediate dulling and jamming. |
| Safety glasses & heavy gloves | Protection from metal filings and sharp blade teeth. | A single metal shaving in the eye means a trip to the ER. Gloves prevent nasty cuts while handling the exposed teeth. |
| WD-40 or resin solvent | Cleaning sap and pitch before sharpening; light lubrication after. | Filing through gunk loads the file’s teeth, making it glide without cutting. It also prevents you from seeing the true angle. |
| C-clamps or a bench vise | Securing the trimmer blade assembly firmly. | The blade moves with each file stroke, creating a wavy, inconsistent edge that won’t cut evenly. |
| Stiff brush & rag | Initial debris removal. | You waste time filing off crud instead of metal. |
The one tool to avoid for your first few sharpenings? An angle grinder or rotary tool with a grinding wheel. Yes, it’s faster. It’s also brutally unforgiving.
It removes too much metal in a heartbeat and, more critically, generates intense localized heat. Overheat the thin steel of a trimmer tooth and you draw the temper, the metal goes soft. That edge will dull after cutting three feet of hedge. Stick with the file until the motion is muscle memory.
Before You Start: The Non-Negotiable Safety Ritual
Before you start: Disconnect ALL power. For corded trimmers, unplug. For battery models, remove the battery. For gas trimmers, disconnect the spark plug wire. The trigger lock can fail, and a sudden blade movement will take off a fingertip. Always clamp the blade assembly firmly, never hold it in your hand. Wear safety glasses; metal filings are needle-sharp and fly.
This isn’t paranoia. A friend thought his cordless trimmer was safe with the battery out. He didn’t know a capacitor in the motor controller could hold a charge.
When his file slipped and touched a contact, the blade jerked an inch. It was enough to slice through his glove and into his thumb. Three stitches. Your tools don’t care about your assumptions.
How to Tell If Your Blades Actually Need Sharpening
Not every poor cut is a dull edge. Diagnose correctly before you remove metal.
- The Visual Test. Look at the freshly cut tips of a hedge. Are they cleanly sliced, or frayed and torn? Torn tips mean dull blades.
- The Performance Test. Does the trimmer jam frequently in normal, dry foliage? Do you have to swing it like a axe to get through last year’s growth? Increased effort and jamming are primary signs.
- The Touch Test (Carefully!). With power disconnected, run your gloved thumb gently across the blade teeth, not along them. A sharp edge will catch slightly on your glove. A dull edge feels smooth and rounded.
Here’s the critical twist from that YouTube mechanic: often, the problem isn’t sharpness, it’s alignment. The blades work like scissors. If the bolts are loose or spacers are worn, the upper and lower blades separate, creating a gap.
No amount of sharpening will make them cut if they aren’t meeting properly. Before you file, check for side-to-side wobble in the blade assembly. If there’s play, you need to tighten the mounting bolts or replace worn nylon spacers, a far cheaper fix than a new blade set.
How to Sharpen Hedge Trimmer Blades with a File (Step-by-Step)
This is the core process. Rushing any step will give you a blade that’s theoretically sharp but practically useless.
Step 1: Deep Clean the Blades
This is the most skipped step. It’s also the most important. Sap and plant resins harden into a varnish that clogs file teeth and disguises the cutting bevel.
– Spray the blades liberally with WD-40 or a dedicated resin solvent. Let it soak for five minutes.
– Scrub with a stiff nylon brush to break up debris. Use a wooden stick or plastic scraper to gently chip away stubborn clumps between teeth.
– Wipe clean with a rag. The metal should be visible and free of gunk. A proper cleaning hedge trimmer blades routine before sharpening saves you 15 minutes of futile filing.
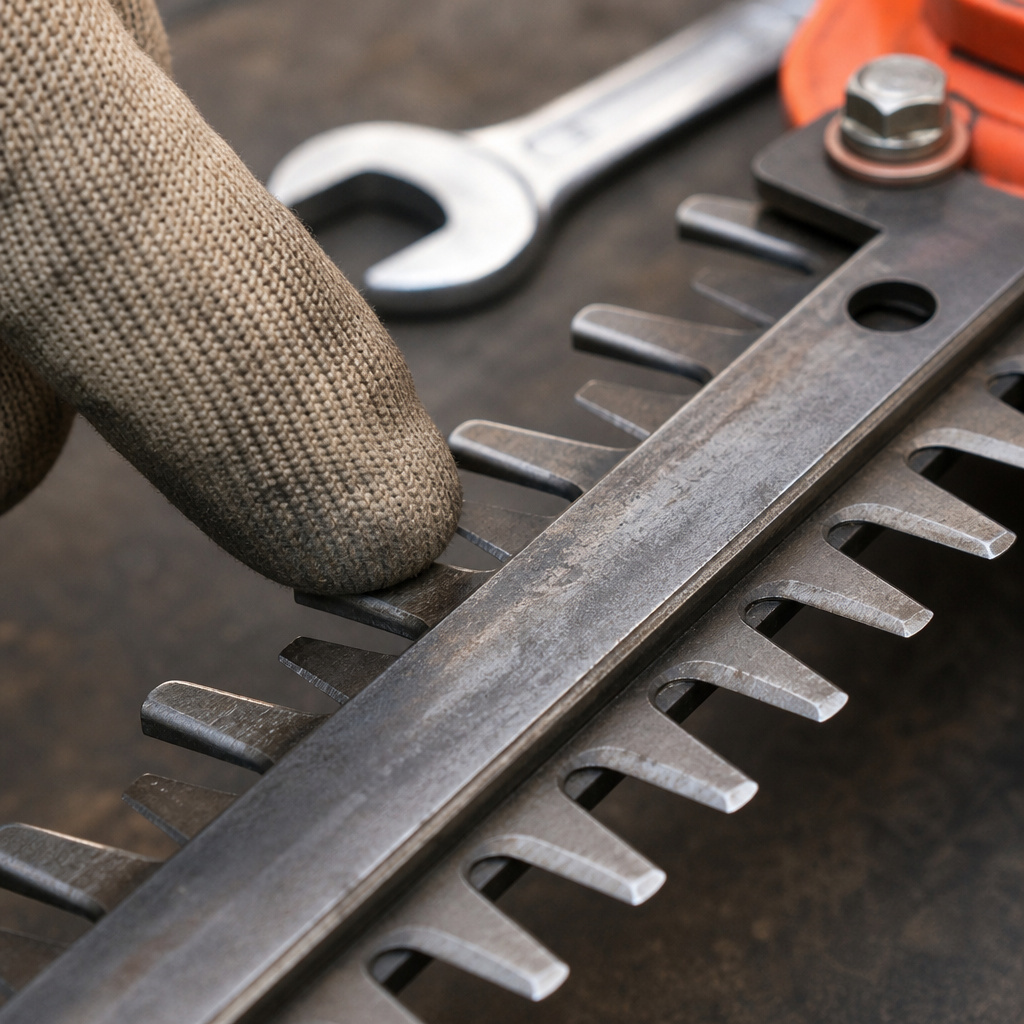
Step 2: Secure the Trimmer and Align Teeth
Clamp the trimmer’s blade assembly firmly in a bench vise or to a sturdy workbench using C-clamps. The goal is zero movement.
– For most trimmers, you’ll need to manually slide the moving blade until the teeth are offset, exposing the beveled edge you need to file. Some models have a locking mechanism for this.
– Ensure the area you’re filing is horizontal and comfortable to work on. You’ll be making dozens of precise strokes, good ergonomics matter.
Step 3: Identify and Match the Original Bevel Angle
Don’t guess. Every blade is ground at a factory angle, usually between 30 and 45 degrees. Hold your file against the existing bevel. If it sits flush across the entire surface, that’s your angle. If it only touches at the heel or tip, adjust until full contact is made. This angle is what creates the sharp, slicing edge.
I keep a small cardboard angle guide in my toolbox, cut at 30, 35, and 40 degrees. Laying it against the blade confirms the angle in two seconds. It’s a trick from a professional landscaper that eliminates doubt.
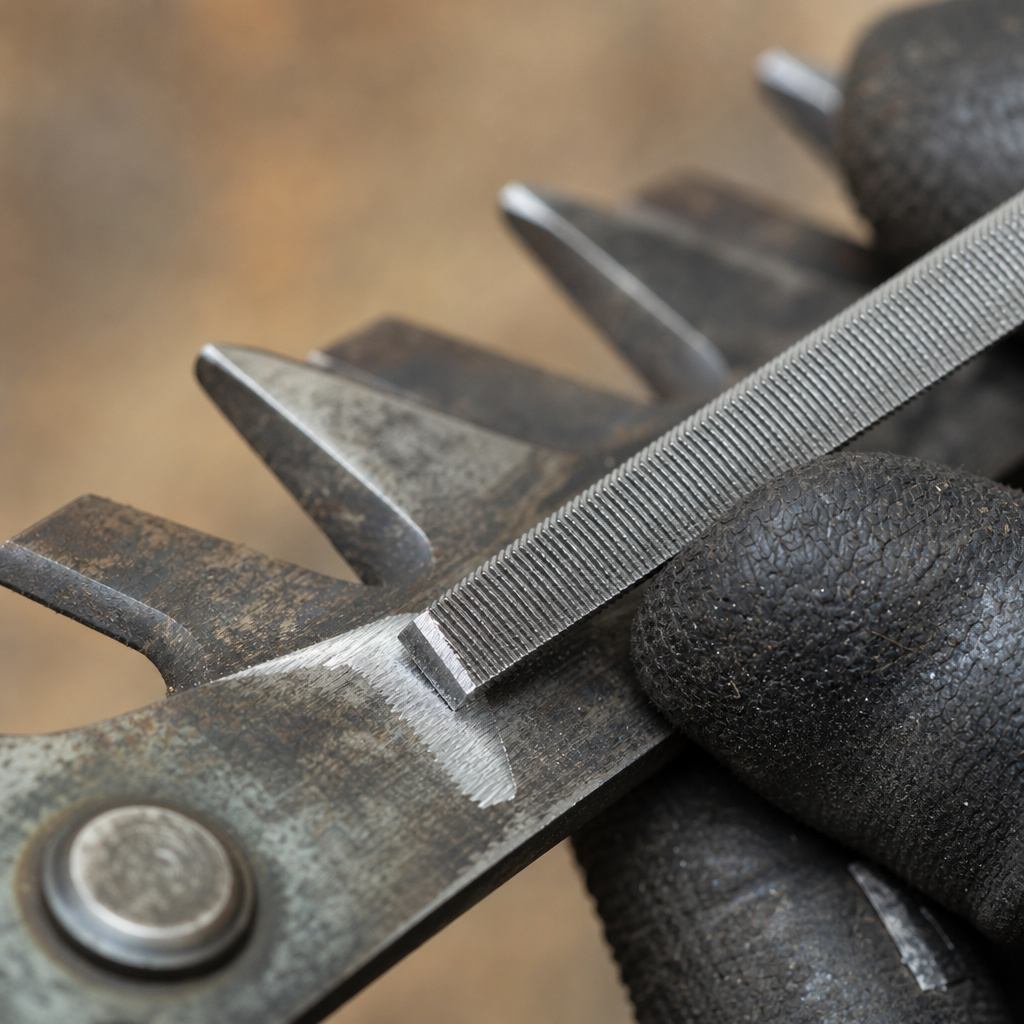
Step 4: File Each Tooth with Consistent Strokes
Grab your 8-inch flat mill bastard file.
– Place it on the beveled edge of the first tooth, maintaining that locked-in angle.
– Push the file forward in one smooth, confident stroke, following the contour of the tooth. Only push forward. Files cut in one direction. Dragging it back dulls the file itself.
– Apply moderate pressure. Let the file’s teeth do the work; you’re guiding, not forcing.
– Give each tooth the same number of strokes, usually 5 to 10, depending on dullness. Consistency is key for an even cut. Count them.
– Work your way down the entire blade length. Then, slide the moving blade to expose the next set of teeth and repeat.
Crucial: You are only filing the beveled, sloping edge of each tooth. The flat backside must remain untouched. Filing the back destroys the clearance and the blades will bind against each other.
Step 5: Deburr with a Whetstone
After filing, each tooth will have a tiny, almost invisible burr, a thin flap of metal on the back (flat side) of the edge.
– Take your medium-grit whetstone and make 2-3 very light, flat passes along the back of each tooth. You’re not sharpening, just knocking off that wire edge.
– You can feel the burr with your fingernail before; after stroking, it should be gone. This step alone can transform a grabby, jamming blade into a smooth cutter.
Step 6: Lubricate and Protect
Sharpening leaves bare, unprotected metal. It will rust quickly.
– Wipe the entire blade clean with a dry rag to remove all filings.
– Apply a light coat of WD-40, 3-in-1 oil, or a dedicated blade lubricant. Wipe off the excess to avoid attracting dirt.
– For storage, use a long-term protectant like Boeshield T-9. This is part of a proper post-sharpening lubrication routine that extends the life of your work.
Why Won’t My Trimmed Hedge Look Clean? (Post-Sharpening Troubleshooting)
You followed the steps, but the cuts are still ragged. Here’s what to check, in order of likelihood:
| Symptom | Most Likely Cause | The Fix |
|---|---|---|
| Blades jam immediately | Burr not removed, or blades misaligned/worn. | Re-deburr thoroughly with a whetstone. Check for lateral play; tighten bolts or replace worn spacers. |
| Trimmed ends are frayed | Incorrect filing angle (too shallow) or insufficient sharpening. | Re-clamp and inspect the bevel. You may need a few more file strokes at the correct, steeper angle. |
| Cut is uneven (one side sharp) | Inconsistent stroke count per tooth. | You likely rushed. You must re-sharpen the whole blade, counting strokes to ensure uniformity. |
| Excessive vibration | Blade set is unbalanced from uneven metal removal. | This is a professional fix. The blade may need to be professionally reground or replaced. |
The most common post-sharpening issue I see is jamming due to overlooked burrs. People run their finger along the edge and feel it’s sharp, but that burr folds over on contact. Run your fingernail across the flat side of the tooth. If it catches, you’ve found the culprit. Three passes with the stone fixes it.
How to Maintain Sharp Blades Longer
Sharpening is work. Make the results last.
- Lubricate during use. Every few minutes of cutting, hit the blades with a quick spritz of resin solvent. It prevents sap buildup, which is abrasive and dulls the edge.
- Avoid the dirt and fence. Never let the blades hit soil, rocks, or metal fencing. This chips the edge instantly. Maintain a clean cutting line a few inches above the ground.
- Clean after every use. A two-minute wipe-down with solvent and a brush prevents corrosive sap from sitting on the metal. This is the single biggest factor in maintaining sharp blades between full sharpenings.
- Store properly. Hang the trimmer up or store it on its side. Leaving it resting on the blades can bend the delicate teeth.
Frequently Asked Questions
How often should you sharpen hedge trimmer blades?
Sharpen at the start of the growing season and then after every 50 hours of use. If you notice ragged cuts, frequent jams, or the tool requires excessive force, it’s time for a touch-up.
Can you use an angle grinder to sharpen hedge trimmer blades?
Yes, but it’s risky. A power grinder removes metal quickly and can overheat the blade, drawing out the temper and creating a soft edge that dulls immediately. A hand file offers more control and is recommended for most users.
Why do my blades still jam after sharpening?
Jamming after a sharpening usually points to leftover burrs on the back of the teeth or misaligned blades. Deburr thoroughly with a whetstone. If jams persist, check the blade spacers for wear, they’re a common failure point that creates lateral play.
What’s the best lubricant after sharpening?
Use a dedicated resin solvent or a light machine oil like 3-in-1 oil. Avoid heavy grease as it attracts debris. For long-term corrosion protection on stored tools, a product like Boeshield T-9 forms a protective wax film.
Is it worth sharpening or should I just buy new blades?
Sharpen until the teeth become visibly shortened or chipped. For most quality trimmers (Stihl, Husqvarna, Echo), blades are expensive, $50 to $100. Sharpening costs you an hour and a $10 file. The economics are clear. Replace only when metal fatigue or damage is too great.
The Bottom Line
Sharp hedge trimmer blades aren’t a luxury. They’re a necessity for plant health and your own sanity. The process boils down to discipline: clean thoroughly, clamp securely, match the angle, count your strokes, remove the burr, and protect the metal. Skip one, and you’ll be redoing the job sooner than you think.
The file is the right tool. It’s slow, deliberate, and gives you feedback. That slowness is what builds the skill.
After three or four sharpenings, you’ll know the angle by muscle memory, feel the burr without looking, and finish in half the time. Your hedges will look crisper, your trimmer will last longer, and you’ll never again wonder why the cuts look torn. Now go put that edge to work.