How to Clean Hedge Trimmer Blades for Safety and Longevity
This post contains affiliate links. As an Amazon Associate, we earn from qualifying purchases.
Cleaning hedge trimmer blades requires three specific actions performed in order: safely disconnect the power, physically scrub off sap and debris with an appropriate solvent, then lubricate the moving parts before storage. The goal isn’t a cosmetic shine—it’s preventing the gummy friction and microscopic corrosion that silently wears down the cutting edges between uses.
Most people hose off the blades or wipe them with a dry rag and call it a day. That leaves behind a thin, sticky film of plant sap. It hardens. By the third or fourth use, the blades start to drag, the motor strains, and you’re left wondering why a two-year-old tool cuts like it’s ten years old.
This guide walks through the right way to do it. We’ll cover the non-negotiable safety steps, the best cleaners for the job (store-bought and homemade), and the one post-cleaning task that matters more than the cleaning itself. We’ll also get into when you need to pull the blades off for a deep clean and how to spot the line where cleaning stops and sharpening begins.
Key Takeaways
- Disconnect ALL power first. For cordless, pull the battery. For corded, unplug. For gas, remove the spark plug wire. This isn’t just a suggestion.
- Clean immediately after use. Wet sap wipes off. Dried sap needs chemical solvents and elbow grease, and it attracts abrasive grit that acts like sandpaper on the blade teeth.
- Lubricate every single time. A dry, clean blade will rust and create metal-on-metal friction. Use a dedicated blade oil or a light spray lubricant on the cutting teeth and pivot points.
- Sharpening is separate. Cleaning removes gunk; sharpening restores a worn edge. If blades are clean and lubricated but still tear leaves, they need a proper sharpening guide.
Why You Can’t Skip Cleaning Hedge Trimmer Blades
It feels like busywork. You just finished trimming, you’re hot, and putting the tool away clean seems like an extra chore. I get it. I’ve done the lazy put-away more times than I’d like to admit.
The problem isn’t the visible leaves. It’s the plant sap, a sugary resin that’s essentially nature’s glue. When you cut a stem, this sap coats the blades.
If left to dry, it hardens into a clear, tacky varnish. That varnish is hygroscopic—it pulls moisture from the air. The moisture mixes with the sap and creates a mildly acidic, sticky paste that holds onto every speck of dirt and pollen you blow past.
A blade coated in dried sap and grit doesn’t just cut poorly. The abrasive particles grind against the hardened steel with every stroke, acting like a fine-grit sandpaper. This dulls the cutting edge far faster than cutting wood ever could, and the added friction makes the motor or engine work 20–30 percent harder, shortening its lifespan.
The first time I ignored this was with a Ryobi 18V trimmer. The blades got darker and stickier over a summer of casual use. By fall, it sounded like a bag of gravel when it ran, and it barely cut through new growth.
I thought the battery was dying. A full teardown showed the pivot points gummed solid with blackened sap. It took a can of brake cleaner and a wire brush to salvage it. Now I wipe the blades before the sap sets.
What You’ll Need to Clean Hedge Trimmer Blades
You don’t need a professional workshop. Almost everything is probably in your garage or under the sink. Gathering it before you start is the difference between a ten-minute job and a frustrating hunt.
Safety & Preparation:
- Heavy-duty work gloves (not cloth gardening gloves)
- Safety glasses
- A stable work surface (bench, sawhorse, not the grass)
Cleaning Tools & Materials:
- Stiff-bristled nylon brush or old toothbrush
- A small wire brush (for stubborn, baked-on deposits)
- Lint-free rags (microfiber or old cotton t-shirts)
- A putty knife or plastic scraper (for thick clumps)
- Container for warm, soapy water (Dawn dish soap works)
- Spray bottle for solvents
Cleaning Agents (Pick One):
- Warm, soapy water: For light, fresh sap and general dirt. Cheap and effective if used immediately.
- Isopropyl alcohol (70% or higher): Evaporates quickly, dissolves sap, and disinfects. A good all-rounder.
- Commercial resin solvent: Products like STIHL Superclean or equivalent are formulated for this. They cut through hardened sap and often leave a corrosion-inhibiting layer.
- Mineral spirits: Effective on oily residues and old sap, but requires better ventilation.
Lubrication & Finishing:
- Light machine oil: 3-in-1 oil or dedicated hedge trimmer oil.
- Spray lubricant: WD-40 Specialist Long-Term Corrosion Inhibitor or Fluid Film. Avoid standard WD-40 as a final lubricant—it’s a water displacer, not a long-term protectant.
- Dry rag for wiping excess.
A basic cleaning kit requires only gloves, a brush, soapy water, a rag, and oil. The specialized solvents are for rescuing neglected tools or dealing with particularly sappy evergreens like pines or cedars.
Before You Start: The Non-Negotiable Safety Steps
Before you start: The blades are under spring tension and can snap shut even with the power off, capable of taking off a fingertip. Always wear cut-resistant gloves. For electric trimmers, water introduced into the motor housing can cause a short circuit or fatal shock next time it’s powered on—clean only the blade assembly. For gas trimmers, fuel residue is flammable; work in a well-ventilated area away from sparks.
This isn’t paranoia. It’s the rules written in the manual nobody reads. Your first action is to make the tool inert.
- Cordless Trimmers: Remove the battery pack. Set it aside.
- Corded Electric Trimmers: Unplug the tool from the wall outlet. Don’t just rely on the trigger switch.
- Gas-Powered Trimmers: Turn the fuel valve to OFF. Remove the spark plug wire from the spark plug. This ensures the engine cannot possibly start, even if you bump the starter.
Place the trimmer on your stable work surface with the blades hanging over the edge. This gives you access and keeps the body stable. Put on your gloves and glasses. Now you can touch the blades.
Step-by-Step Cleaning Process
Follow this sequence. It’s designed to move from dry removal to wet cleaning to lubrication without backtracking.
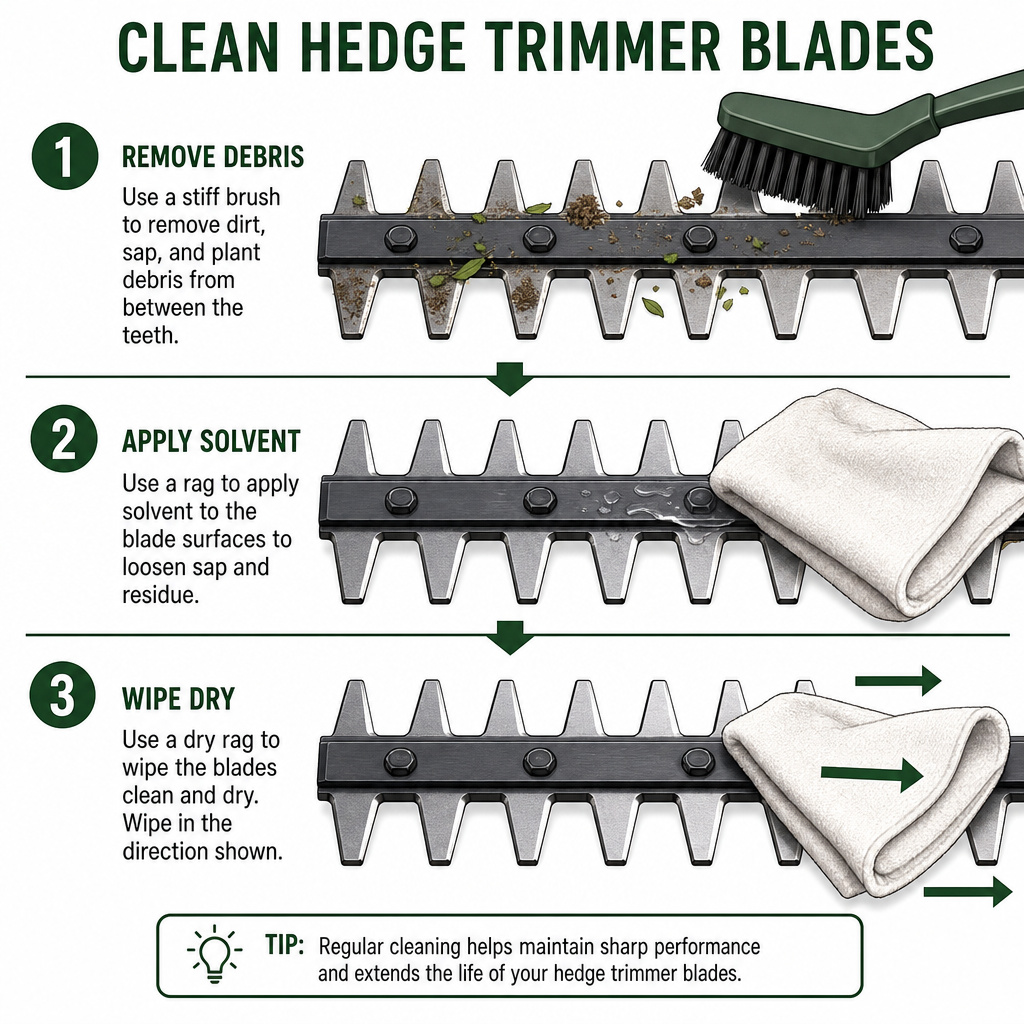
Step 1: Dry Brush & Debris Knock-Off
Use your stiff nylon brush to scrub away all loose material—clippings, dirt, spiderwebs. Brush in the direction opposite the cutting teeth to flick debris out, not wedge it in. Tap the tool on the bench to dislodge anything stuck in the teeth gaps.
* Skip this, and you’ll just make muddy paste when you add solvent, pushing grit deeper into the mechanism.
Step 2: Apply Solvent and Scrub
Dampen a rag with your chosen cleaner (soapy water, alcohol, or solvent). Wipe down both sides of the blade assembly thoroughly. For stuck-on sap, let the solvent sit for 60 seconds to soften it. Use the brush dipped in solvent to scrub the teeth and the recessed pivot area where the blades slide.
* For stubborn spots: Use the plastic scraper or wire brush gently. Don’t gouge the metal.
Step 3: Rinse (Optional) & Dry COMPLETELY
If you used soapy water, wipe the blades down with a water-dampened rag to remove soap residue. If you used alcohol or a solvent that evaporates, you can skip this. This is critical: take a dry rag and wipe every surface until it’s bone-dry. Run the rag between the teeth. Moisture left here is an invitation for rust to start by tomorrow.
* Airing out isn’t enough. Capillary action holds water in the tight spaces between the blades. You have to physically wipe it.
Step 4: Lubricate the Blades
This is the step that makes the cleaning worth it. Apply a light coat of oil or spray lubricant along the cutting edges and the central rail where the blades slide. Manually move the blades back and forth a few times to work the lubricant into the pivot points. Wipe off any excess with your dry rag. A thin film is what you want—a dripping mess will just attract dirt.
* Why lubricate a clean blade? The oil displaces any residual moisture, prevents oxidation (rust), and ensures smooth movement. Friction between dry, clean metal parts causes wear just as surely as grit does.
Deep Cleaning: When and How to Remove the Blades
For annual maintenance, or if the tool has been neglected and performance is sluggish, you need to remove the cutting attachment. This lets you clean the drive socket and the entire blade length.
When to Go Deep:
- Before winter storage.
- If the blades feel “gummy” or hesitate even after surface cleaning.
- If you see rust starting on the blade backs or mounting points.
- After cutting diseased plant material (for disinfection).
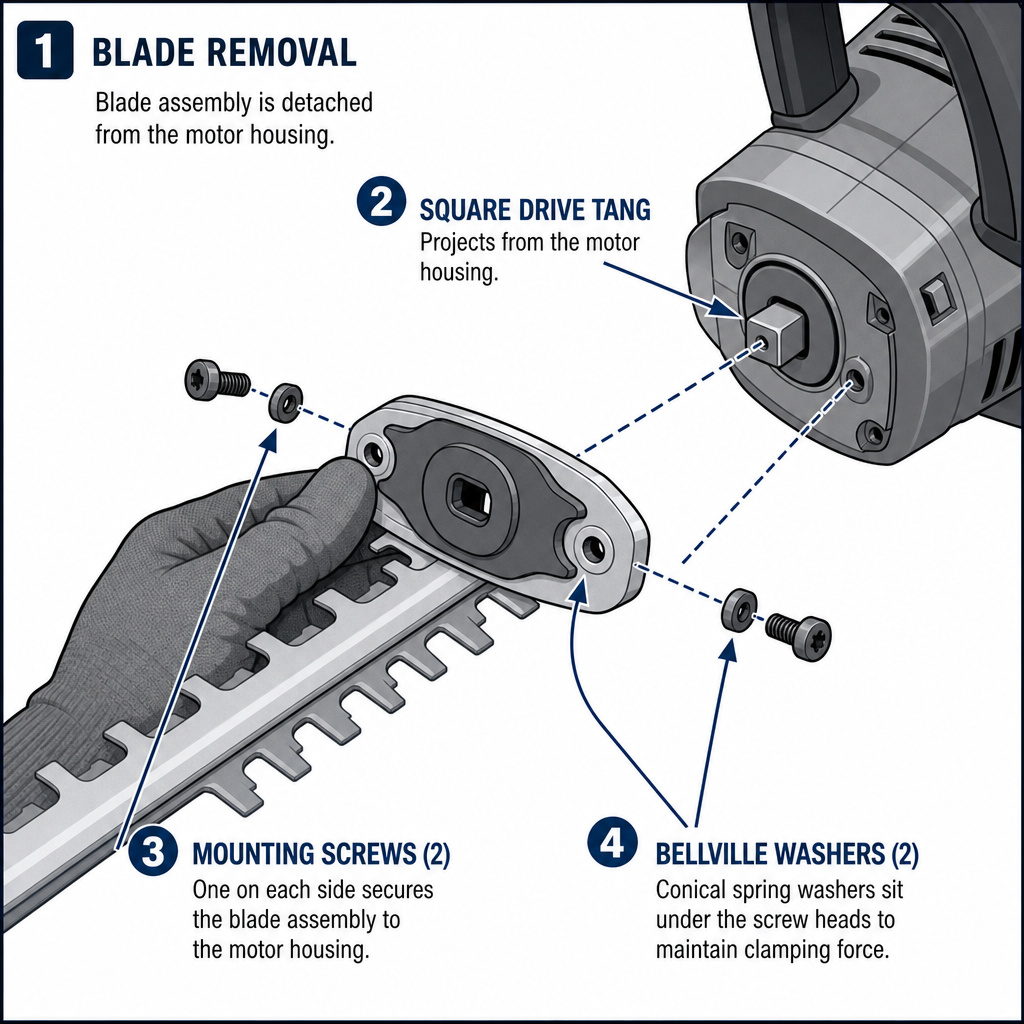
| Blade Removal Factor | What to Look For | Tool Typically Needed |
|---|---|---|
| Mounting Screws | Usually two on the sides of the blade assembly. May have left-hand threads. | Socket set or screwdriver matching the head (often Torx T25/T27). |
| Drive Mechanism | A square or hexagonal drive tang that connects to the motor. | None for removal, but clean this socket with a rag and brush. |
| Spring Washers | Small Bellville washers under screw heads that maintain tension. | Keep track of these—they must go back in the same order. |
Never force a screw. If it won’t budge, apply a drop of penetrating oil like Liquid Wrench to the threads, wait ten minutes, and try again. Stripping these screws means drilling them out, and that’s a half-day project nobody wants.
The Removal Process:
- After power disconnection, locate the two mounting screws.
- Using the correct bit in a hand-held screwdriver or wrench, break the screws loose. An impact driver can crack the housing.
- Once loose, remove the screws completely and set them and any washers aside in a small container.
- Gently pull the blade assembly straight off the drive tang. It may require a light wiggle.
- Clean the exposed drive tang and the inside of the blade assembly with solvent and a rag. This is where old grease and dirt hide.
- Clean the detached blades as described in the main steps, with full access to both sides.
- Before reattaching, apply a small amount of grease (white lithium is fine) to the drive tang.
- Slide the blades back on, replace washers and screws, and tighten firmly but do not overtighten. Refer to your manual for torque specs if available; if not, tighten until snug, then add a quarter-turn.
What to Use for Cleaning: Solvent Showdown
Not all cleaners are equal. Your choice depends on the state of the blades and what you have on hand.
| Cleaner | Best For | Pros | Cons & Warnings |
|---|---|---|---|
| Dish Soap & Warm Water | Fresh sap, light dirt, general wipe-down after every use. | Non-toxic, cheap, readily available. Effective on fresh residues. | Ineffective on dried, hardened sap. Can promote rust if not dried thoroughly. |
| **Isopropyl Alcohol (90%+) ** | Dissolving dried sap, disinfecting, quick evaporation. | Dries fast, no residue, kills fungi/bacteria that spread plant disease. | Flammable. Use in ventilated area. Can dry out plastic parts with repeated use. |
| Commercial Resin Solvent (e.g., STIHL Superclean) | Heavy, baked-on sap from pines, cedars, or neglected tools. | Powerful formula cuts through toughest residues. Often contains corrosion inhibitors. | More expensive. Chemical odor requires gloves and ventilation. |
| Mineral Spirits | Oily grime, old grease, mixed dirt/sap buildup. | Good degreaser, useful for deep cleans on gas trimmer blades near the engine. | Strong odor, flammable, requires proper disposal as hazardous waste. |
| WD-40 (as cleaner) | Loosening light, sticky residues before wiping. | Penetrates light gunk. Ubiquitous in workshops. | Leaves an oily film that attracts dust. Not a substitute for final lubrication. |
The Ryobi manual says to avoid water. They’re worried about people hosing down the entire tool and frying the electronics. Using a damp rag on just the metal blades, followed by immediate and thorough drying, poses no risk. It’s the difference between a shower and a swim.
The Critical Post-Cleaning Step Everyone Forgets
You’ve cleaned. You’ve dried. The tool looks great. If you put it on the shelf now, you’ve done half the job.
Lubrication is non-optional. A clean, dry steel blade in a humid garage will develop a fine layer of surface rust within 48 hours. That rust creates friction. The blade lubrication steps are simple but vital.
How to Lubricate Correctly:
- With the tool powered off, apply a thin bead of light machine oil or a spray of lubricant along the length of the cutting teeth.
- Manually move the blades back and forth several times. You’ll feel them get smoother as the oil works into the pivot.
- Wipe away any excess oil with a clean rag. You want a protective micro-coating, not a sticky attractant for dust.
- For the long term, consider a heavier protectant like Fluid Film or Boeshield T-9 before off-season storage.
I prefer a spray can of light oil for this. It gets into the cracks easier than drip oil. The one time I used a heavy grease thinking it would last longer, it collected so much grit over the next two trims that the blades jammed. Lesson learned. Light and frequent beats heavy and never.
Troubleshooting: Clean But Still Not Cutting Right?
You followed all the steps. The blades are shiny and move smoothly. But when you trim, the leaves are torn, not sliced. The tool bogs down. What gives?
The blades are dull. Cleaning removes impediments; it does not restore a worn cutting edge. The teeth have a precise bevel that, over time, is beaten flat by hitting small branches, dirt, and even just friction. When that bevel is gone, the blade smashes through plant material instead of shearing it.
Signs You Need Sharpening, Not Cleaning:
- Leaves and small stems look ragged and torn after a cut.
- You have to make multiple passes on the same spot.
- The tool requires more pressure to advance through the hedge.
- You see visible nicks or rolled edges on the teeth when you inspect them closely.
If you see these signs, it’s time for a proper dull blade restoration. Sharpening requires a flat file, a steady hand, and maintaining the original angle of each tooth. It’s a meticulous job. For most homeowners, doing it once a season is enough if you’ve kept the blades clean and lubricated in between.
Frequently Asked Questions
Can I use WD-40 to clean hedge trimmer blades?
You can use it to help clean. Spray it on to loosen light, sticky sap, then wipe and scrub. However, standard WD-40 is not a good long-term lubricant or rust preventative. After cleaning with it, you must still apply a proper lubricating oil to the blades.
How often should I clean the blades?
After every use is ideal, especially if you’ve cut sappy plants. At a bare minimum, give them a quick brush-off and lubrication before you put the tool away for more than a week. A full deep clean with solvent is needed once a season or whenever performance drops.
Is it safe to use water on an electric hedge trimmer?
Yes, but with extreme caution. Water should only touch the metal blade assembly. Never spray water directly at the tool, and never let it soak into the motor housing, battery port, or switch. Dampen a rag, wipe the blades, and dry them completely immediately. The risk is water ingress causing an electrical short the next time you power it on.
What’s the black staining that won’t come off?
That’s likely carbon scoring from the blades getting very hot during extended use, often combined with polymerized sap. It’s baked on. A commercial resin solvent and a brass wire brush (softer than steel) may reduce it, but it may be permanent. This staining doesn’t affect performance if the blades are lubricated and sharp.
Why do my blades rust even after I oil them?
You’re either not drying them completely before oiling (trapping moisture under the oil), using an insufficient oil, or storing the tool in a very damp location like an unsealed shed. Ensure bone-dry blades, use a corrosion-inhibiting oil or spray, and consider a desiccant packet in your storage case.
Before You Go
Cleaning hedge trimmer blades isn’t about making them look new. It’s a functional maintenance step that prevents the slow, expensive degradation of your tool. The sequence is simple: disconnect power, remove loose debris, dissolve sap with the right solvent, dry everything meticulously, and finish with a light lubricant.
Doing this takes ten minutes after a job. Neglecting it costs you hundreds in premature tool replacement or repair. Keep the sap off, keep the oil on, and your trimmer will cut cleanly for years. When it finally starts tearing instead of cutting, you’ll know it’s time to learn how to put a fresh edge back on it.