Can You Cut Sheetrock with a Circular Saw? A Pro’s Guide
This post contains affiliate links. As an Amazon Associate, we earn from qualifying purchases.
You can cut sheetrock with a standard circular saw, but it requires a specific blade and turns your workspace into a dust storm. The right tool is a carbide-tipped blade with at least 40 teeth, not the standard wood-cutting blade that comes with the saw. You must also wear a proper respirator and connect a vacuum to manage the incredible volume of fine gypsum dust.
Most people grab the saw, slap on whatever blade is already mounted, and go to town. That’s the mistake. The wrong blade shreds the paper face, splinters the gypsum core, and creates three times more dust than necessary. It works, but the mess and the ruined edge aren’t worth it.
This guide walks through the exact blade to buy, the non-negotiable safety steps, and the technique for a clean cut. More importantly, it explains when you should put the circular saw down and grab a utility knife instead.
Key Takeaways
- Never use a standard 24-tooth framing blade. It must be a carbide-tipped combination or fine-finish blade with 40+ teeth (like a Freud D1072X) to cut cleanly and reduce dust.
- Respiratory protection isn’t optional. You need a sealed N95 respirator or half-mask; a dust mask is insufficient for the fine, lung-irritating gypsum particles.
- For a single sheet or a few cutouts, a sharp utility knife and a drywall saw are faster, cleaner, and smarter. The circular saw only pays off on large projects with many long, straight cuts.
- Always set the blade depth to protrude just 1/4 inch past the back paper of the drywall. Cutting deeper risks hitting hidden pipes, wires, or the floor underneath.
- Attach a HEPA-rated shop vacuum to the saw’s dust port. If your saw doesn’t have a port, work outdoors or accept that you’ll be cleaning dust from every surface in the room.
What Blade Do You Need?
The blade already on your saw will ruin the job. Standard wood-cutting blades, especially those with fewer than 30 teeth, have an aggressive hook angle designed to rip through wood fibers. Drywall’s paper face and brittle gypsum core tear out instead of cut, leaving a ragged, crumbly edge that’s a nightmare to tape and mud.
A carbide-tipped combination blade with 40 to 60 teeth, like the Freud D1072X or Diablo DS0908CFN, provides the cleanest cut on sheetrock. The high tooth count shears the material with minimal tear-out, and the carbide tips last significantly longer against the abrasive gypsum than standard steel teeth.
You need a blade that shears more than it rips. The high tooth count provides more scoring points, which slices the paper facing cleanly before the gypsum core can fracture. Carbide tips are mandatory because gypsum is mildly abrasive and will dull a standard steel blade in just a few cuts. The difference in cut quality and dust production is immediate and obvious.
| Blade Type | Tooth Count | Best For | Cut Quality on Drywall | Dust Level |
|---|---|---|---|---|
| Standard Framing Blade | 18-24 | Cutting 2x4s, plywood | Very Poor – Severe tear-out | Extreme |
| General Purpose/Combo Blade | 40-60 | Plywood, sheetrock, some plastics | Good – Clean paper face, minor core fracturing | High |
| Fine-Finish Blade | 80+ | Veneers, melamine, fine woodworking | Excellent – Smoothest edge | Moderate |
| Specialty Drywall Blade | ~24 (Carbide) | Drywall only | Good – Fast but can be dusty | High |
For fire-rated Type X drywall, which has glass fibers mixed into the gypsum, the blade choice is even more critical. A dull or low-tooth-count blade will snag and pull the fibers, creating a fuzzy, weakened edge. Stick with a sharp, high-tooth-count carbide blade and let the saw feed at its own pace.
The Non-Negotiable Safety Setup
Before the saw even spins, you need to suit up. Drywall dust is not like sawdust. The particles are much finer, and gypsum powder is a respiratory irritant. It gets everywhere, in your lungs, eyes, ears, and all over your workspace.
Before you start: Drywall dust is a fine particulate that can cause respiratory irritation and long-term lung damage. The saw is loud enough to cause hearing damage, and a blade binding in the cut can cause violent kickback. Wear a sealed N95 respirator (like the 3M 6000 series), safety glasses, and hearing protection. Never cut drywall resting directly on a concrete floor, the blade will strike it and shatter.
Your gear list is short but absolute:
1. Respirator (N95 or better): A cloth dust mask is useless. You need a respirator that seals to your face. I learned this the hard way after cutting a dozen sheets for a basement ceiling without one. I coughed up grey phlegm for two days and had a gritty feeling in my lungs for a week. Now the respirator goes on before I even open the drywall pack.
2. Safety Glasses: Dust in the eyes is more than an annoyance; it can cause scratches and serious irritation.
3. Hearing Protection: Circular saws run around 100 dB. Foam earplugs or muffs are required.
4. Gloves: Lightweight gloves improve grip and keep the drywall dust from drying out your skin.
The work area matters just as much. Always support the sheet on sawhorses or a pair of sturdy tables. Cutting on the floor is a guarantee you’ll hit a nail, a concrete seam, or the slab itself. That dulls the blade instantly and can cause a dangerous kickback. Set up in a garage with the door open, or better yet, outside if weather permits.
How to Make the Cut (Step-by-Step)
With the right blade and gear, the cutting process is straightforward. The goal is to guide, not force, the tool.
- Mark and Support. Draw your cut line on the paper face (the ivory-colored side) using a pencil and a drywall T-square or a long, straight board. A chalk line works for very long cuts. Place the sheet on sawhorses with the good side up and the line overhanging slightly so the cut-off piece falls away cleanly.
- Set the Blade Depth. This is the most overlooked step. Loosen the depth adjustment lever on your saw and lower the base plate until the blade teeth extend no more than 1/4 inch past the back of the drywall. On a standard 1/2-inch sheet, that means the blade is set to about 3/4 inch depth. Cutting deeper serves no purpose and dramatically increases the risk of hitting something behind the board. It also creates more dust.
- Score for a Clean Edge (Optional but Recommended). For the absolute cleanest edge, run a sharp utility knife along your cut line, scoring through the paper face. You don’t need to cut deep, just through the paper. This gives the saw blade a defined path to follow and prevents the paper from tearing ahead of the cut. It adds 30 seconds and makes a noticeable difference.
- Use a Guide. Freehand cuts are wavy cuts. Clamp a straight piece of lumber or a metal guide fence to the drywall, just outside your cut line. This ensures the saw stays perfectly straight. Align the edge of the saw’s base plate against the guide, not the blade itself.
- Start the Saw and Cut. With the saw positioned at the start of the line and the blade not touching the drywall, pull the trigger. Let the motor reach full speed, you’ll hear the pitch stabilize. Then, gently but firmly push the saw forward, keeping the base plate flush against your guide. Don’t push down or lean into it. Let the blade’s rotation pull itself through the material. Forcing it causes binding, kickback, and a ragged edge.
- Manage the Fall-Off. As you near the end of the cut, support the cutoff piece with your free hand so it doesn’t tear away prematurely. Once the cut is complete, lower the piece to the ground.
If you need to make a plunge cut for an outlet or a pipe, the process changes. Mark the rectangle, set your blade depth, and position the saw with the front of the base plate on the drywall and the blade hovering over the starting point. Start the saw, tilt it forward slowly until the blade plunges through, then carefully navigate the corners. It’s a higher-risk maneuver that requires a very steady hand.
The Big Drawback: Dust
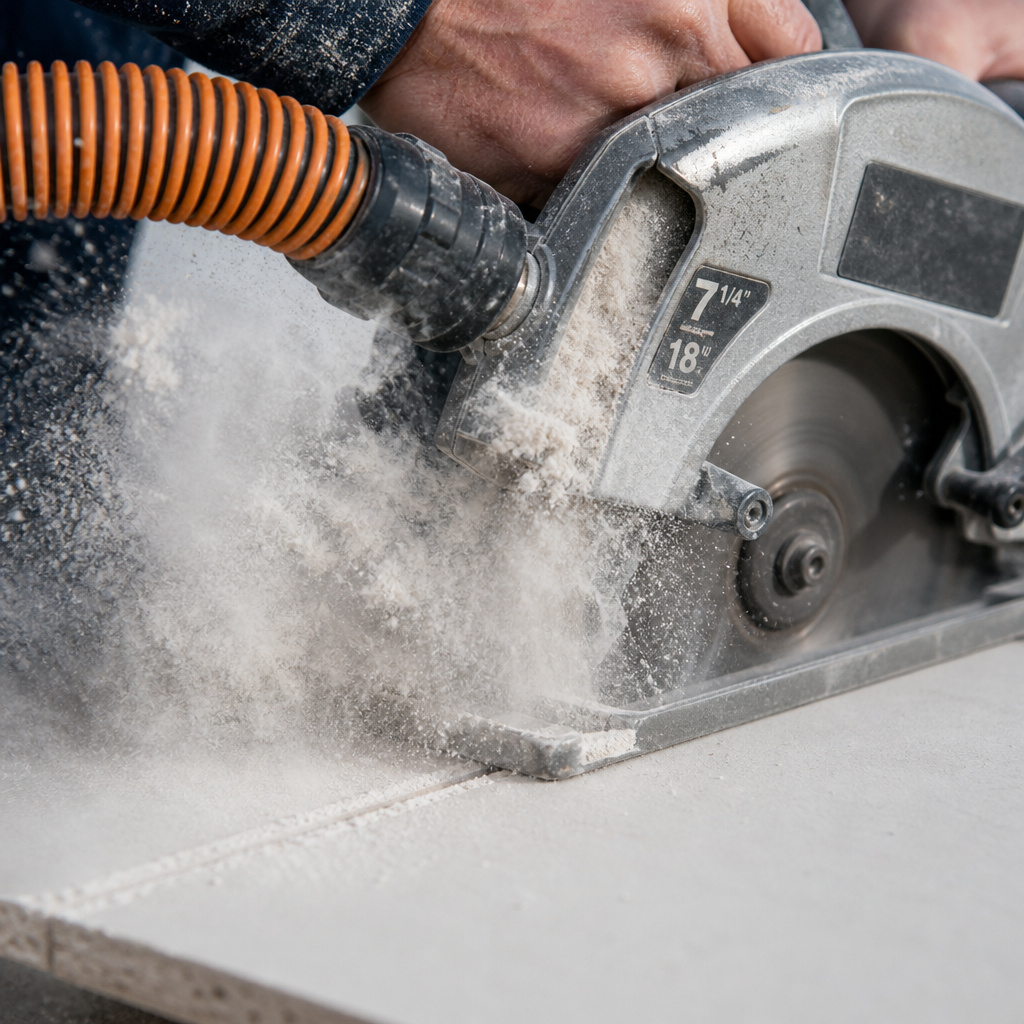
The circular saw’s primary downside isn’t capability, it’s the apocalyptic mess. It generates a fine, pervasive cloud of gypsum dust that coats every surface within 20 feet. This isn’t just a cleaning issue; it’s a health and HVAC hazard.
Never run a circular saw on drywall indoors without a vacuum attached. The fine dust will infiltrate HVAC systems, settle inside electronics, and remain airborne for hours, contaminating the entire house.
The only effective mitigation is mechanical removal at the source. If your circular saw has a dust port (many newer models like the DeWalt DWE575SB do), connect a shop vacuum with a HEPA filter using the appropriate adapter hose. It won’t catch everything, but it’ll capture 70-80% of the dust directly.
If your saw lacks a port, your options are limited. Working outside is best. If you must work inside, seal off the room with plastic sheeting, but know that cleanup will be extensive.
Wetting the drywall along the cut line, a technique called “wet cutting”, can dramatically reduce dust. Use a spray bottle to lightly dampen a 2-inch band along your marked line. Don’t soak it; you just want the surface damp.
The water weighs down the dust particles, turning them into a slurry instead of a cloud. The downside is it can soften the paper facing and potentially warp the sheet if you overdo it. It’s a useful trick for a few cuts, but for a whole room, the vacuum is still your best friend.
When to Use a Different Tool Entirely
The circular saw is a sledgehammer for a job that often needs a scalpel. For many common drywall tasks, other tools are faster, cleaner, and cheaper.
Here’s the simple rule: If you’re installing more than four or five full sheets and need to rip them all to width, the circular saw’s speed can justify the setup and cleanup. For everything else, choose a different tool.
- Utility Knife: For 90% of DIY cuts, especially straight cuts on a single sheet, a sharp utility knife is the right tool. Score the paper face deeply along a straight edge, snap the board backward, then cut the paper backing. It creates almost no dust, is perfectly quiet, and gives a factory-edge finish. It’s also how you’ll finish any rough edges left by a saw cut.
- Drywall Saw: This small, coarse-toothed hand saw is designed for plunge cuts and small cutouts around electrical boxes, pipes, or lights. It’s precise, cheap, and creates manageable chips instead of fine dust. Trying to maneuver a circular saw for a small outlet cutout is overkill and dangerous.
- Oscillating Multi-Tool: With a carbide-grit drywall blade, an oscillating tool like a Makita or Fein model is the king of precision cutouts and repairs. It creates very little dust compared to a circular saw and allows for incredible control in tight spaces. It’s slower for long cuts but unbeatable for detail work.
- Rotary Tool (RotoZip): This is the pro’s choice for fast, accurate cutouts. A Rotozip with a drywall cutting bit lets you zip around outlet boxes in seconds. It generates dust, but it’s more localized than a circular saw. It has a steep learning curve, however, it’s easy to over-cut and ruin a sheet.
Choosing the right tool is part of circular saw operation, knowing not just how to use it, but when. It keeps the project clean and safe.
Troubleshooting Common Problems
Even with the right setup, things can go wrong. Here’s what’s happening and how to fix it.
Problem: The blade binds and the saw kicks back.
Cause & Fix: You’re forcing the saw too fast or the cutoff piece is sagging and pinching the blade. Support the waste piece as you cut, and let the saw feed at its own pace. Also, ensure your blade is sharp. A dull blade requires more force and is more likely to bind.
Problem: The paper face tears out badly, leaving a ragged edge.
Cause & Fix: Your blade is either wrong (too few teeth) or dull. Swap to a 40+ tooth carbide blade. As a field fix, score the cut line deeply with a knife before sawing. The scoring gives the paper a clean break line.
Problem: The cut edge is wavy, not straight.
Cause & Fix: You’re freehanding. You must use a clamped guide. Even experienced pros use a fence for long cuts on drywall. Your guide doesn’t need to be fancy, a straight 2×4 clamped securely works perfectly.
Problem: Incredible, unmanageable dust even with a vacuum.
Cause & Fix: The blade is wrong or the vacuum filter is clogged. A standard wood blade will pulverize the drywall. Switch to a high-tooth-count blade. Also, check that your shop vacuum’s filter is clean and that the hose connection is tight. A small leak sucks.
If you run into persistent issues, it’s a sign to stop and reassess. A problematic cut often means you’re fighting the tool, and that’s when mistakes and injuries happen. Stepping back to check your circular saw maintenance, like blade sharpness and base plate alignment, can solve more problems than you’d think.
Frequently Asked Questions
Does cutting drywall dull a circular saw blade?
Yes, significantly faster than cutting wood. The gypsum core is abrasive. Carbide-tipped blades resist this wear, but they will still dull over time. A blade used exclusively for drywall will last for dozens of sheets, but don’t expect to then use it for fine woodworking.
Can I use the same saw for drywall and wood again?
Absolutely, but you must clean it thoroughly first. Drywall dust is corrosive and will gum up the saw’s motor vents and moving parts if left inside. Blow out the interior with compressed air and wipe down the exterior after each drywall session. Always change the circular saw blade back to a wood-appropriate one for your next project.
What about cutting cement backer board (like Hardiebacker)?
Do not use a circular saw with a standard or drywall blade for cement backer board. The material is far too abrasive and will destroy the blade instantly. You must use a diamond-tipped masonry blade specifically designed for fiber cement, and you must use it with a vacuum attached to control the hazardous silica dust.
Is it worth buying a special drywall blade?
For a one-time project, probably not. A good 40-tooth carbide combination blade you might already own for plywood will work well. If you’re a contractor hanging drywall regularly, a purpose-made drywall blade (like the Diablo DS0908CFN) cuts faster with slightly more dust, which can be a trade-off for speed on large jobs.
The Bottom Line
A circular saw can cut sheetrock, but “can” and “should” are different words. It’s a tool of convenience for scale, not precision. For trimming a few sheets, you’ll spend more time managing dust and changing blades than you would just using a utility knife.
Reserve the circular saw for the big jobs: ripping a stack of full sheets down to a common width for a basement or garage. For that, its speed is unmatched.
Just remember the holy trinity: the correct carbide blade, a serious respirator, and a shop vacuum on standby. Skip any one of those, and the job becomes a miserable, unhealthy mess. Your lungs, your workspace, and the quality of your finished walls will thank you for choosing the right tool for the cut.