Which Way Does a Circular Saw Blade Go? (The 3-Step Check)
This post contains affiliate links. As an Amazon Associate, we earn from qualifying purchases.
A circular saw blade rotates so its teeth cut upward at the front of the saw. The sharp edge of each tooth faces the direction of rotation. The arrow printed on the blade must point the same way as the arrow on the saw’s guard. This upward motion pulls the workpiece down for stability.
Most people assume the blade is symmetrical or that the side with the shiny logo should face out. That assumption is wrong about half the time. It leads to a blade that spins backward, turning your saw from a precision tool into a dangerous, unpredictable hazard. This guide walks you through the definitive visual checks, the ones I use after fifteen years of running saws on job sites and in my own shop, so you never have to guess again.
Key Takeaways
- The blade cuts on the upward stroke. The teeth must point up at the front of the saw. Ignore which side looks “pretty.”
- Match the arrows. A rotation arrow is stamped on the blade. Another is on the saw’s guard or motor housing. They must point the same direction.
- Blade-right and blade-left saws mount blades differently. The label often faces out on blade-right saws, but the “ugly” side may face out on worm-drive blade-left models.
- A backward blade increases kickback risk dramatically. It pushes the workpiece up instead of pulling it down, and the saw will fight you for control.
- After installing, always do a hand-spin test. If the blade binds or rubs, something is wrong, stop and recheck before applying power.
Why Blade Direction Isn’t Optional
The circular saw’s cutting action is an upward pull. As the blade rotates, the teeth at the front of the saw, the half moving upward toward you, bite into the wood. This pulls the workpiece down against the saw’s base plate, stabilizing the cut. The teeth moving downward at the back of the saw are exiting the kerf, clearing debris.
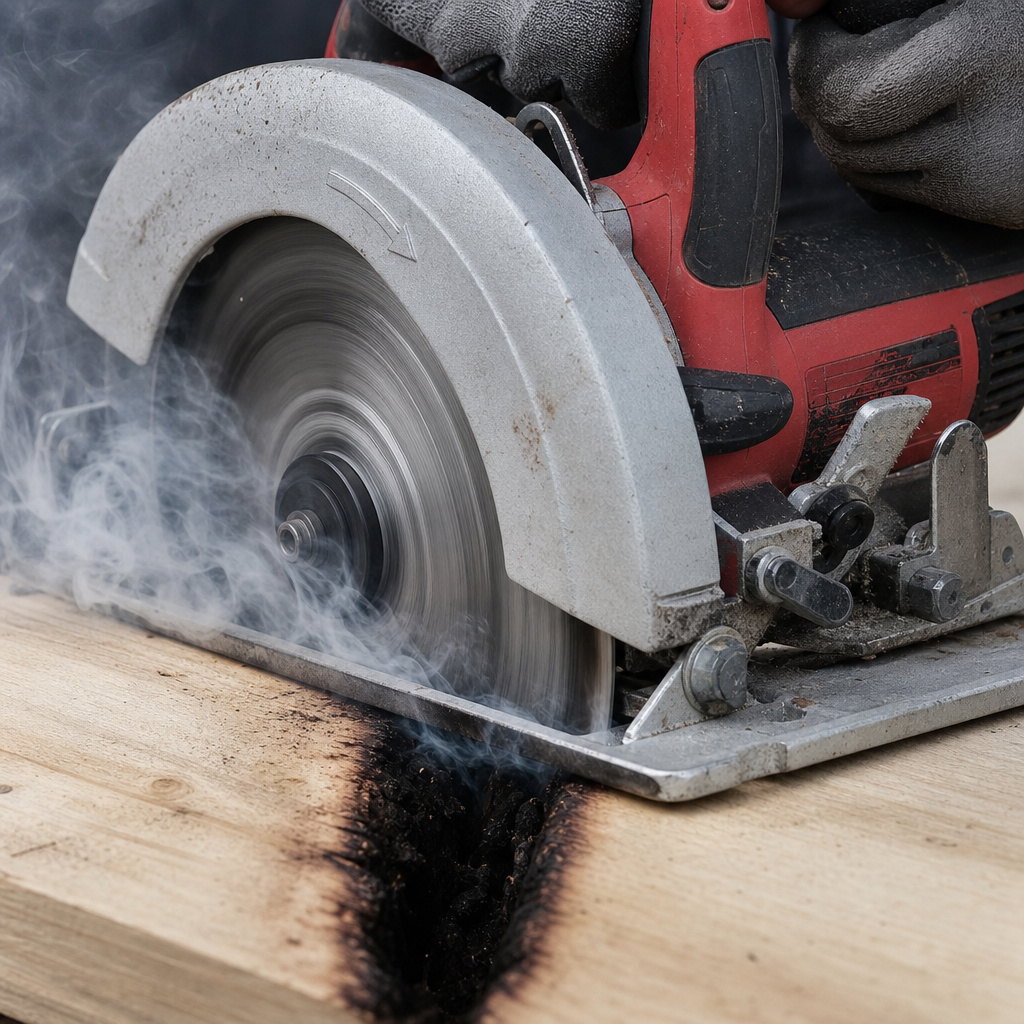
Get the direction wrong, and you reverse the physics. The blade tries to lift the board off the sawhorses. It throws sawdust and chips toward your face instead of down into the guard.
The motor strains because it’s forcing a cutting geometry the carbide teeth weren’t ground for. It’s not just inefficient. It’s a direct path to a ruined workpiece, a burned-up blade, or a nasty kickback incident.
I learned this the hard way on a deck rebuild about a decade ago. I was rushing, popped a fresh Freud Diablo 40-tooth blade onto my old Skilsaw sidewinder without looking, and went to trim a pressure-treated 2×8. The saw bucked so hard it twisted out of my grip and sailed off the deck.
It took a chunk out of the new ledger board on its way down. The blade was backward. That five-second mental shortcut cost me an hour of repair work and a new pair of jeans. I check the arrows every single time now.
How to Visually Confirm the Correct Blade Direction (3-Step Check)
Never rely on memory. Follow this sequence before you tighten the arbor nut.
Step 1: Find and Match the Directional Arrows.
Look at the blade itself. Near the center hole, stamped into the steel, is an arrow indicating the direction of rotation. Now find the corresponding arrow on the saw. It’s usually molded into the plastic of the lower blade guard or etched on the motor housing near the arbor. Your only job here is to make these two arrows point the same way. If you can’t find an arrow on the saw, move to Step 2. Most modern blades and saws have them.
Step 2: Read the Teeth Like a Clock.
Imagine the blade is a clock face, with 12 o’clock at the top of the saw’s guard opening. The teeth that are moving upward toward 12 o’clock are the ones doing the cutting. Look closely at one of these front-facing teeth. You’ll see one side has a sharp, steep, angled face, that’s the leading edge. The other side is more rounded or has a shallower angle, that’s the trailing edge. The sharp face must be pointing forward, in the direction of rotation. If the rounded side is leading, the blade is backward.
Step 3: Verify the “Upward at the Front” Rule.
With the blade mounted provisionally, look at the front opening of the blade guard. The teeth visible at the very front, where the blade first contacts the wood, should be pointing upward, toward the top of the guard. If they point downward, the blade will try to climb the wood. This is the simplest, most reliable check for any saw, old or new.
| Checkpoint | Correct Sign | Wrong Sign | What Happens If Wrong |
|---|---|---|---|
| Directional Arrows | Blade arrow and saw arrow aligned. | Arrows point opposite directions. | Motor strain, poor cut quality, immediate red flag. |
| Teeth Orientation | Sharp edge of tooth leads into the cut. | Rounded edge of tooth leads. | Dull cutting, excessive heat, rapid blade wear. |
| Guard Opening View | Teeth at front point upward. | Teeth at front point downward. | Severe kickback risk, workpiece lifts, loss of control. |
Blade-Right vs. Blade-Left Saws: Where the Confusion Starts
This is where people get tripped up. It’s not about the blade; it’s about the saw’s design.
A blade-right saw (most corded sidewinders and cordless models) has the motor and blade on the right side of the tool. When you look down at it, the blade is to the right of the motor. For these, the “good” side of the blade, the side with the brand label and specs, typically faces outward, away from the motor. The directional arrow still rules, but the label is a helpful secondary cue.
A blade-left saw (traditional worm-drive saws and some modern hybrids) has the blade on the left side of the motor. The weight distribution is different, and the cutting line is more visible for right-handed users. Here’s the twist: on many worm-drive saws, the blade mounts with the label side facing in, toward the motor. The “ugly” side with just the steel blank faces out. This feels counterintuitive, which is why trusting the printed arrow is non-negotiable.
I prefer worm-drive saws for long rip cuts in framing lumber. The first time I changed the blade on my Skilsaw Mag 77, I installed it with the label out because that’s what I was used to. The arrow didn’t align. I forced it, thinking the arrow was a misprint. The resulting cut was so ragged and violent it felt like the saw was trying to walk off the plywood. The blade was backward. Now I know: on that saw, the label faces the motor.
| Saw Type | Blade Position | Typical Label Side | Common Rotation | Best For |
|---|---|---|---|---|
| Blade-Right (Sidewinder) | Right of motor | Faces out | Clockwise (viewed from top) | General DIY, crosscuts, sheet goods |
| Blade-Left (Worm-Drive) | Left of motor | Often faces in | Counter-clockwise (viewed from top) | Framing, long rip cuts, heavy lumber |
| Cordless Brushless | Usually blade-right | Faces out | Clockwise | Jobsite portability, quick cuts |
What a Backward Blade Actually Does to Your Work and Your Saw
The problems aren’t subtle. They escalate quickly.
First, the cut quality disappears. Instead of shearing wood fibers cleanly, the reversed teeth scrape and burn them. You’ll get a wider kerf with fuzzy, charred edges. The saw will require more force to push, and you’ll hear a labored, lower-pitched whine from the motor.
Second, heat builds fast. Friction from scraping, not cutting, heats the blade teeth and the workpiece. If you’re cutting pressure-treated wood or hardwood, you might see smoke within 10 seconds of starting the cut. That heat anneals the hard carbide tips, permanently softening them. A brand-new blade can be ruined in one long backward cut.
Third, and most dangerously, kickback becomes likely. The downward-cutting action of a reversed blade acts like a wedge, lifting the workpiece and pinching the blade. When the blade binds, it can hurl the saw or the wood back toward you with tremendous force. It’s not a gentle push. It’s a violent, unpredictable jerk.
Before you start: The blade is sharp enough to remove flesh before you feel it. Always disconnect power (pull the battery or unplug the cord) before touching the blade. Wear safety glasses to block ejected debris. Ensure the blade guard moves freely and snaps back into place, a stuck guard is a leading cause of blade-contact injuries.
Choosing and Mounting the Right Blade for the Job
Direction is the first rule. Blade type is the second. A 40-tooth general-purpose blade will struggle with laminate flooring, just as a fine-finish blade will choke on wet pressure-treated lumber.
- Framing/ Rip Blades (24 teeth): Big, aggressive gullets for clearing chips fast in with-the-grain cuts.
- Crosscut/ General Purpose Blades (40-50 teeth): More teeth for smoother cuts across the grain of plywood and 2x material.
- Finish/ Plywood Blades (60-80+ teeth): Maximum teeth for veneer plywood, melamine, and trim work with minimal tear-out.
- Specialty Blades: Carbide-tipped abrasive blades for metal, diamond blades for masonry, plastic-cutting blades with triple-chip grind.
Mounting Procedure:
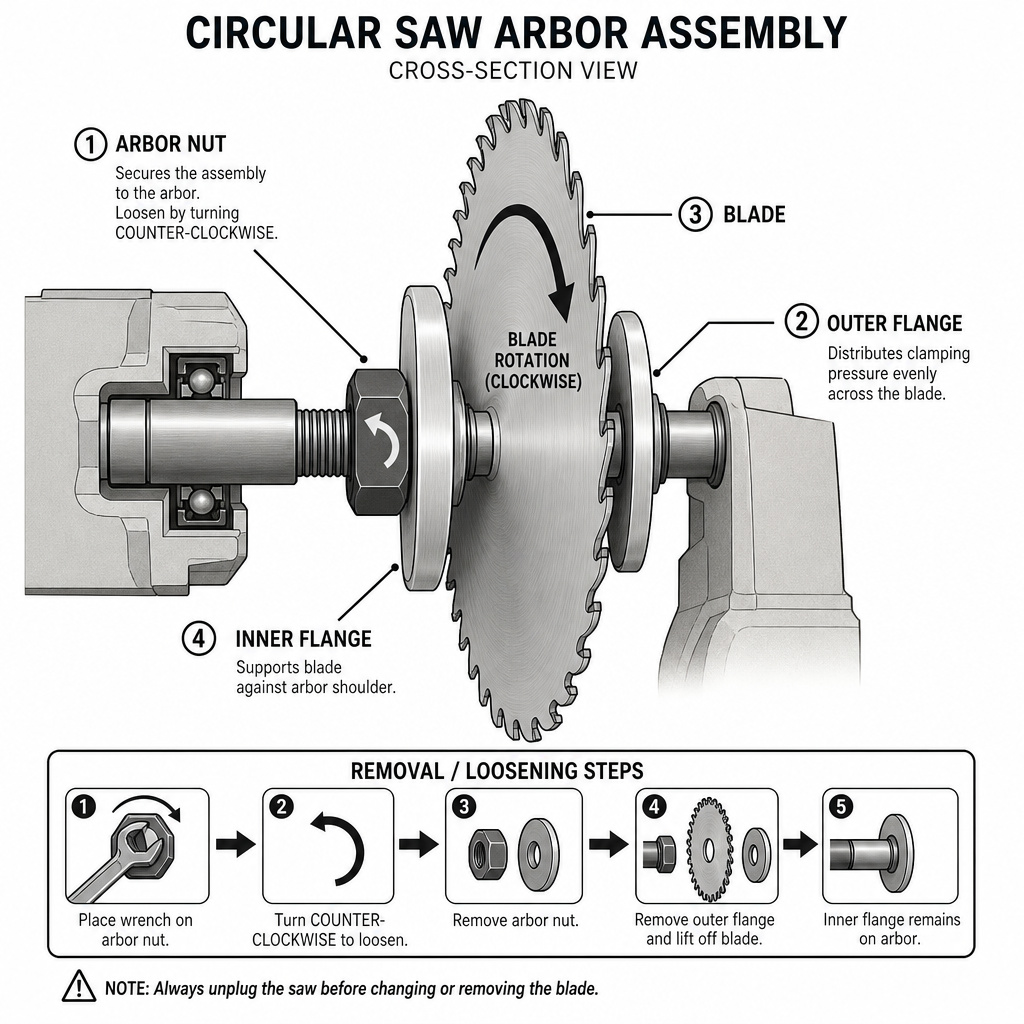
- Lock the spindle. Depress the shaft lock button on your saw. If your saw doesn’t have one, you may need to block the blade with a scrap of wood while loosening the nut.
- Remove the arbor nut. Use the provided wrench, turning in the direction opposite the blade’s rotation (usually lefty-loosey). Note the order of parts: outer flange, blade, inner flange.
- Clean the contact surfaces. Wipe any sawdust or resin off the inner flange and the blade’s center hole. Grit here causes blade wobble.
- Set the blade and align arrows. Slide the blade on, matching the rotation arrows. Ensure it sits flat against the inner flange.
- Reassemble and tighten. Replace the outer flange and arbor nut. Hand-tighten fully, then use the wrench to give it a final firm snug. Do not crank on it with all your strength, you just need to overcome operational torque. Overtightening can warp the flanges.
After mounting, always perform the free-spin test. Rotate the blade by hand a full revolution. It should move silently without rubbing the guard anywhere. If it binds, the blade is misaligned, debris is in the way, or the guard is bent.
Troubleshooting: Signs Your Blade is On Wrong (or Worn Out)
Sometimes the issue isn’t the direction but the blade’s condition. Here’s how to diagnose.
If the saw is vibrating excessively:
First, check for a warped blade. Hold a pencil or fixed point next to the blade (saw unplugged!) and spin it slowly. Watch for side-to-side wobble. More than 1/16 inch of runout is problematic. If the blade is true, re-check that it’s seated flush against the inner flange and that the flanges themselves are clean and undamaged. A wobbly cut is often a mounting issue, not a motor issue.
If you smell burning during the cut:
Stop immediately. Burning means excessive friction. The number one cause is a dull blade. Sharp teeth slice; dull teeth rub. The number two cause is a backward blade. The number three cause is forcing the saw too fast through hard material or using the wrong blade type (e.g., a wood blade on aluminum). Let the blade do the work.
If the saw is bogging down or tripping the breaker:
This points to overload. A backward blade massively increases load. So does a dirty blade clogged with pitch, or a blade with far too many teeth for a thick rip cut. For deep cuts in hardwoods, use a blade with fewer teeth and open gullets.
When in doubt, swap in a fresh, known-good blade installed with the correct direction. If the problem vanishes, your original blade was the culprit. This simple circular saw blade maintenance check can save you from chasing electrical gremlins.
Frequently Asked Questions
My circular saw blade has no arrow. How do I tell the direction?
Look exclusively at the teeth. Find the sharp, angled leading edge on a tooth. That edge must face the direction of blade rotation and must point upward when that tooth is at the front of the saw guard opening. When in doubt, remember the phrase “sharp edge forward, points up at the front.”
Can a circular saw blade spin backwards?
The motor itself cannot reverse direction under normal operation. However, you can physically mount the blade backward on the arbor, which makes the cutting action reversed relative to the motor’s spin. This creates all the problems of a reversed blade. The motor still spins the same way.
Do all circular saw blades go on the same way?
The principle is the same: teeth cut upward at the front. But the physical orientation on the arbor differs between blade-right and blade-left saws. Always use the directional arrows or the teeth inspection method for your specific saw, rather than a universal “label out” rule.
What happens if I cut metal with a wood blade installed backward?
It’s doubly dangerous. A wood blade’s teeth aren’t designed for metal, and backward rotation makes them even less effective. The likely results are severe blade tooth damage (carbide tips snapping off), spectacular spark showers, extreme heat, and a very high risk of the thin metal binding and kicking back. Always use a proper metal-cutting abrasive blade or carbide metal blade installed in the correct direction.
How tight should the circular saw blade nut be?
Tight enough that the blade cannot slip during the cutting torque. Use the wrench provided to tighten the nut firmly after hand-tightening. You should not need a cheater bar or your full body weight. If you overtighten, you risk stripping the arbor threads or warping the blade flanges, which creates wobble. A good practice is to check the nut for snugness after the first few cuts of a new session.
Before You Go
Installing a circular saw blade correctly boils down to three immutable facts: the teeth cut upward, the arrows must match, and your saw’s design (blade-right or blade-left) dictates which side of the blade faces out. Trust the physical evidence, the stamped arrow, the angle of the carbide teeth, over any assumption about logos or symmetry.
Make the 3-step visual check part of your muscle memory. It takes ten seconds and prevents the ninety minutes of repair work I faced on that deck. A correctly oriented blade is safer, makes cleaner cuts, and lasts longer. That’s the real payoff. Now go make some sawdust.