
How to Assemble Ryobi 18V Trimmer/Edger in 5 Steps
This post contains affiliate links. As an Amazon Associate, we earn from qualifying purchases.
Assembling a Ryobi 18V trimmer/edger requires a specific sequence: unbox and inspect, connect the two shaft pieces until they click, install the grass deflector with its screws, attach the auxiliary handle, then install your chosen cutting attachment and the battery. The entire process takes about 15 minutes with a Phillips-head screwdriver.
Most people rush to snap the battery in and test the trigger. They skip the deflector screws or don’t push the shaft pieces together fully. The tool seems to work until the first time you hit a hidden rock, the deflector flies off, or the shaft joint wobbles and strains the motor.
This guide walks you through the exact steps, including the visual and tactile cues that confirm each part is locked in. We’ll cover how to switch between the trimmer and edger functions, the single most important safety step everyone ignores, and what to do if your new tool doesn’t make that satisfying click.
Key Takeaways
- The shaft connection must produce an audible click. If it doesn’t, the internal locking tab isn’t engaged, and the joint will fail under load within a few uses.
- Fully charge the battery before the first use. A partial charge can trigger the tool’s low-voltage protection mid-job, making you think the motor is faulty.
- Never operate the tool without the grass deflector securely screwed on. It’s a critical safety guard, not an optional accessory.
- The auxiliary handle must be tightened enough that it can’t rotate. A loose handle forces your wrist into an awkward, fatiguing angle during edging.
- Store the tool with the battery removed. Leaving it in the compartment for months can lead to a completely discharged, unrecoverable battery.
Before You Start: Non-Negotiable Safety
Before you start: Wear safety glasses. Trim line and blade fragments can travel at high speed. Use hearing protection, the motor whine is sustained at over 85 dB. Wear long pants, closed-toe shoes, and gloves. Clear your assembly area of pets and children.
This isn’t a kitchen appliance. You are assembling a device with a motor that spins a cutting element at several thousand RPM. The common impulse is to treat it like a toy until the first time a piece of trimmed line hits your shin. It feels like a bee sting. A piece of the edging blade would be worse.
Gather your tools: a Phillips-head screwdriver and a clean, flat workspace. The kit includes all necessary hardware.
The 5-Step Assembly Sequence
Follow these steps in order. Jumping ahead, like installing the battery before the deflector, often means disassembling something you just put together.
Step 1: Unbox and Lay Out the Parts
Open the box and remove all components. You should have:
– The main unit (often in two pieces: the upper shaft with controls and the lower shaft with the motor head)
– A grass deflector (a black plastic shield)
– An auxiliary handle with a bolt and wing nut
– A trimmer line head (pre-wound with line) OR an edging blade
– An 18V lithium-ion battery and charger
– The owner’s manual and any additional hardware in a small bag
Inspect each piece. Look for cracks in the plastic housing, especially around the motor head and battery compartment. Check that the trimmer line is not already broken or unraveled. This is the time to note any damage for a warranty claim, not after you’ve fully assembled it.
Step 2: Connect the Upper and Lower Shafts
This is the step where a missed cue causes the most post-assembly frustration.
Locate the connection point. On the Ryobi P20103 and similar models, the lower shaft has a grooved end. The upper shaft has a ridged collar. Align the ridge with the groove. Push the lower shaft straight into the upper shaft with firm, even pressure.
You are listening for a solid, metallic click. That sound is the internal steel locking tab snapping into its detent. If you don’t hear it, the connection is not secure. Wiggle the joint; there should be zero play. A connection that seems “pretty tight” but didn’t click will separate after 30 minutes of edging vibration, potentially damaging the electrical contacts inside.
Step 3: Install the Grass Deflector
The deflector is your primary defense against debris kicked back toward your legs. Two screws should be loosely fitted in the trimmer head from the factory.
Remove these two screws completely. Position the grass deflector so it curves downward, covering the area opposite the direction of cutting rotation (this is pre-shaped, so it only fits one way). Align the holes in the deflector with the threaded holes on the trimmer head.
Insert the screws and tighten them firmly with your Phillips-head screwdriver. Do not overtighten to the point of stripping the plastic threads. A good rule is to tighten until the screw head is flush and then give one more quarter-turn. A loose deflector will vibrate and may eventually crack at the mounting points.
Step 4: Attach the Auxiliary Handle
The handle gives you two-handed control, which is essential for precise edging and reducing fatigue.
Slide the handle onto the shaft. The ideal position for most users is about one-third of the way down from the top controls. This balances the weight between your hands. Insert the provided bolt through the hole in the shaft and handle. Thread the wing nut onto the bolt from the other side.
Tighten the wing nut by hand until the handle cannot rotate on the shaft. You should not be able to twist it with your other hand. A handle that slips during use forces your guiding hand into a weaker position, leading to sloppy cuts and arm strain.
Step 5: Install the Cutting Attachment and Battery
Your tool likely came with either the trimmer line head or the edging blade pre-installed. You’ll need to know how to swap them.
Locate the release button on the side of the trimmer head. Press and hold it while pulling the existing attachment straight out. To install the other attachment, press the button, align the attachment’s drive tangs with the slots in the head, and push in until it clicks and locks. Release the button.
Finally, take your fully charged 18V battery. Align the rails on the battery with the slots in the tool’s battery compartment. Slide it in until it seats fully, then press down until you hear a definitive click. The battery status lights should illuminate briefly.
Which Attachment: Trimmer Line or Edging Blade?
The Ryobi 18V trimmer/edger is a 2-in-1 tool, but the attachments are for distinct jobs. Using the wrong one is inefficient and can damage your lawn or the tool.
| Attachment | Best Use Case | Line/Blade Spec | Risk If Misused |
|---|---|---|---|
| Trimmer Line Head | Cutting grass and weeds along fences, walls, and around trees. General perimeter trimming. | 0.065-inch diameter round or twisted line. 10-inch cutting swath. | Forcing it into thick woody stems or dirt will snap the line rapidly and overload the motor. |
| Edging Blade | Creating or maintaining a crisp, vertical edge between lawn and sidewalk, driveway, or garden bed. | 3-tooth or multi-tooth steel blade. Cuts a clean trench. | Using it to cut ordinary grass is wasteful, dulls the blade quickly, and throws dangerous debris. |
The mechanism for switching is simple, but the technique matters. Always press the head’s release button before trying to pull the attachment out. Yanking it without pressing the button can break the plastic locking pawls inside the head.
I learned this the hard way on an older Ryobi model. The head seemed stuck, so I pulled harder. The attachment came free with a piece of the internal lock still attached to it. The replacement head cost nearly half the price of a new tool.
For a clean edge, you’ll need to master the proper edging techniques that apply whether you’re using a dedicated edger or a converted trimmer.
First-Time Operation and Break-In
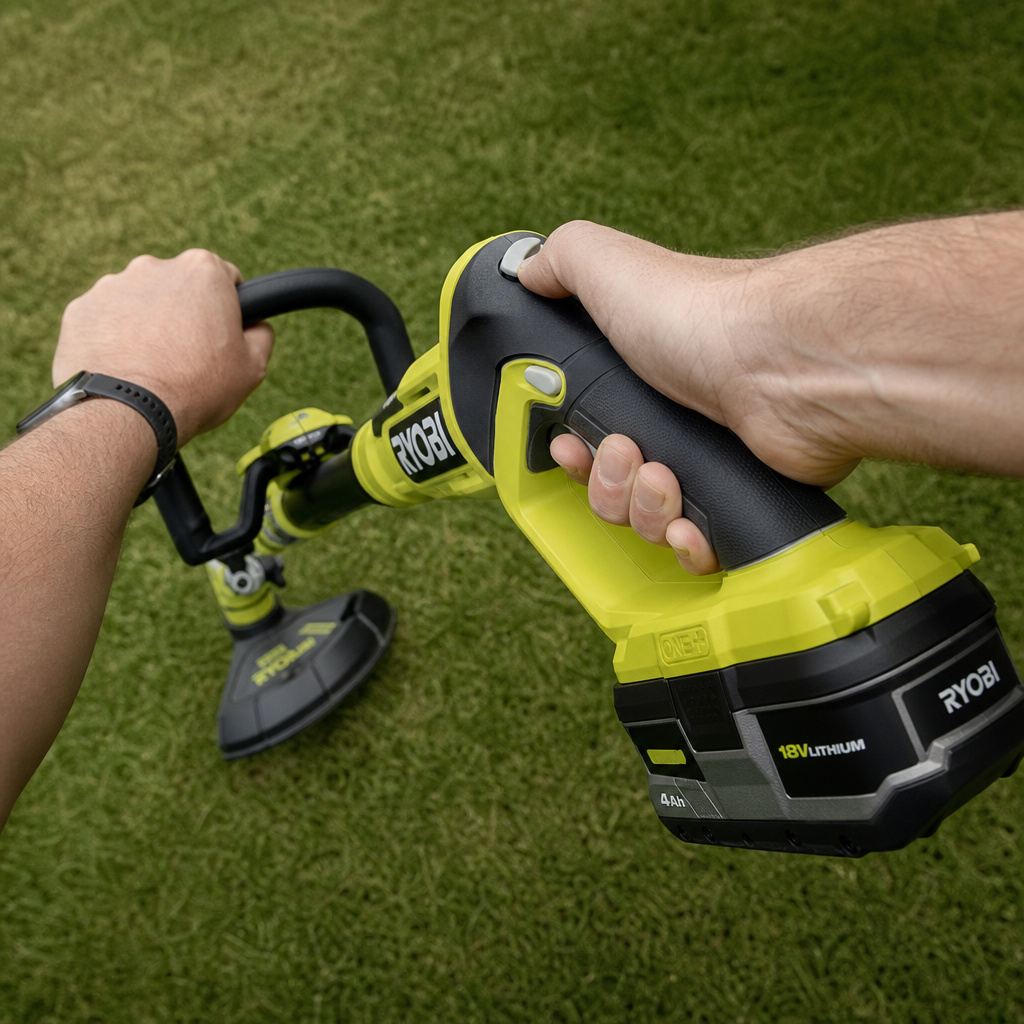
Your tool is assembled. Now what? Don’t just head to the tallest patch of weeds.
First, do a dry run. Hold the tool in the operating position, with both hands on the grips. Your dominant hand operates the trigger on the main shaft.
Your other hand steadies and guides using the auxiliary handle. Feel the balance. Practice engaging the safety lock-off switch and squeezing the trigger without the battery installed.
Insert the battery. Find an open, clear area of grass. Start the tool and let it run at full speed for 30 seconds with no load. This allows the motor and gearbox to circulate lubricant. Listen for any grinding or uneven sounds.
Now, make your first cuts. For trimming, hold the head parallel to the ground and sweep it side-to-side in a smooth, controlled arc. Let the tip of the line do the work, don’t dig the head into the soil.
For edging, tilt the tool so the blade is vertical. Use the wheel on the head as a guide along the sidewalk. Move slowly.
The first battery charge will seem to deplete faster. This is normal. The motor and battery management system are calibrating. Your runtime will stabilize after the second or third full cycle.
Troubleshooting Common Assembly Hiccups
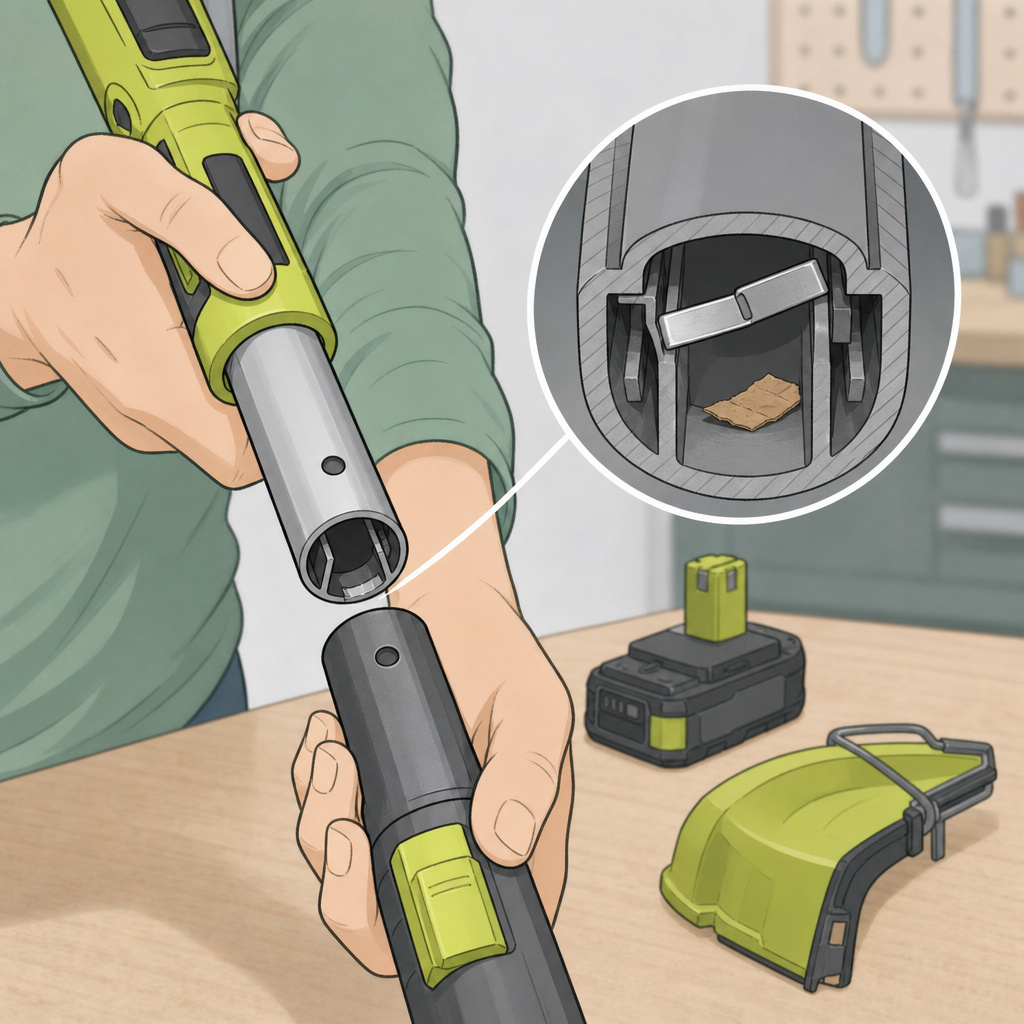
Sometimes, things don’t go as smoothly as the manual promises. Here are the fixes for typical snags.
Problem: The shaft pieces won’t click together.
- Likely Cause: The internal locking mechanism is misaligned or there’s packaging debris in the tube.
- Fix: Pull the shafts completely apart. Look inside the upper shaft for a small, spring-loaded metal tab. Ensure it moves freely. Clear any cardboard or plastic bits. Re-align the ridge and groove and push with steady, increased pressure. If it still won’t click, do not force it. Contact Ryobi support; the locking mechanism may be defective.
Problem: The grass deflector holes don’t line up.
- Likely Cause: The deflector is upside down or rotated 180 degrees.
- Fix: The deflector is asymmetrical. Rotate it so the curved, sweeping portion faces downward and outward, away from the operator. The part number or logo is usually on the top side.
Problem: The battery slides in but doesn’t click or power the tool.
- Likely Cause: The battery isn’t fully seated, or it’s not charged.
- Fix: Remove the battery. Check the compartment for any plastic shipping tabs and remove them. Fully charge the battery, the first charge can take up to 60 minutes. Reinsert the battery, making sure to push it all the way down until the base is flush with the tool, then apply a final firm press to engage the latch.
If you ever need to perform deeper maintenance, like a Ryobi 18V trimmer line replacement, the process starts with knowing how to safely access the head.
Essential Maintenance From Day One
Assembly is a one-time task. Maintenance is ongoing. These habits will double the lifespan of your tool.
- Clean after every use. Use a brush or compressed air to remove grass clippings and dirt from the motor head vents, under the deflector, and around the shaft joint. Never spray with water or a hose.
- Inspect the cutting attachment. For the trimmer head, check that line is feeding properly and replace it before it’s completely gone. For the edging blade, look for nicks or dullness. A dull blade tears grass instead of slicing it.
- Check fastener tightness. After the first hour of use, re-check the grass deflector screws and the auxiliary handle wing nut. Vibration can loosen them.
- Battery care. Store batteries in a cool, dry place. After a cooling period post-use, recharge them. For long-term storage, follow a proper trimmer storage routine which includes removing the battery.
- Sharpening the edging blade. After 10-15 hours of edging, the blade will be dull. Use a flat file to sharpen the existing bevel on each tooth. Maintain the original angle. A sharp blade reduces motor strain and gives a cleaner edge.
I store my Ryobi trimmer hanging from a hook in the garage, battery on a shelf inside. The one winter I left the battery in the tool, parked against a cold exterior wall, it was stone-dead by spring. The replacement cost reminded me that the manual’s storage instructions exist for a reason.
Frequently Asked Questions
Do I have to use Ryobi brand trimmer line?
No, but you must use the correct diameter. The Ryobi 18V trimmer specifies 0.065-inch line. Using a thicker line (like 0.080 or 0.095) will cause feed problems, overheat the motor, and void the warranty. Generic 0.065-inch round or twisted line works fine. Always confirm the correct trimmer line size for your model.
Can I convert my trimmer into an edger and back?
Yes, that’s the primary function of this 2-in-1 tool. Press the release button on the head to swap between the pre-wound trimmer line head and the steel edging blade. The process takes about 10 seconds. For technique tips, see our guide on using a trimmer as an edger.
First, ensure you are pressing the button fully. If it’s stuck, do not pry it with a screwdriver. Try rotating the cutting attachment slightly while pressing the button, sometimes the locking tangs are under tension. If it remains stuck, the mechanism may have debris in it. You may need to follow steps for removing the trimmer head for a more thorough cleaning.
How long does the battery last on a full charge?
Runtime varies drastically based on the attachment and material. With the trimmer line head in average grass, a 2.0Ah battery lasts 20-30 minutes. The edging blade consumes more power, cutting that time by about a third. A 4.0Ah or 6.0Ah battery will proportionally extend the runtime.
Is the trimmer head reloadable or do I buy new spools?
The included head is reloadable. You can buy spools of bulk line and wind it yourself following a proper line winding technique. Ryobi also sells convenient pre-wound spools that snap in, which are great for quick changes but cost more per foot of line.
My tool vibrates excessively. Is that normal?
Some vibration is normal, especially with the edging blade. Excessive shaking or a buzzing sound indicates a problem. Check that the cutting attachment is fully seated and locked. Ensure the shaft connection is clicked in. If the issue persists, the attachment or internal drive might be unbalanced or damaged.
The Bottom Line
Assembling your Ryobi 18V trimmer/edger correctly sets the stage for years of reliable service. The key is respecting the sequence: shaft click first, deflector screws second, handle third, then the cutting attachment and battery. That audible click when joining the shafts is your guarantee of a solid mechanical connection. Charging the battery fully before the first use prevents false alarms about tool performance. And never, ever skip the safety glasses, the cost of a pair is nothing compared to an emergency room visit for a corneal abrasion. Keep the air vents clean, store the battery separately, and this tool will handle your lawn’s edges and trim lines season after season.
