What a Hedge Trimmer Is Used For: Key Functions & Safety
This post contains affiliate links. As an Amazon Associate, we earn from qualifying purchases.
A hedge trimmer is a power tool designed to cut, shape, and maintain hedges and shrubs by using a reciprocating blade with closely spaced teeth. Its primary use is to create clean, uniform lines faster and with less physical effort than manual shears, promoting dense, healthy plant growth. The machine does the repetitive snipping, allowing you to focus on guiding the shape.
Most people think a hedge trimmer is just for making a messy bush look neat. They grab it, run it over the surface, and call it a day. That approach leaves a thin, twiggy outer shell that blocks light and air from the interior. The plant looks good for a week, then the inside starts to brown and die back.
This guide covers what a hedge trimmer is truly for, shaping for health, not just for looks. We’ll break down the types, key features, safe operating techniques, and the non-negotiable maintenance that keeps your tool and your hedges alive for years.
Key Takeaways
- Hedge trimmers are for shaping and encouraging dense growth, not just shearing the surface. Proper technique involves tapering the sides and thinning the interior.
- The right power source depends on your yard: corded electric for small, defined areas; cordless battery for most suburban lots; gas for large, remote, or professional properties.
- Blade teeth spacing dictates your cutting capacity. Standard 3/4-inch spacing handles most hedges, but for woody growth like privet or holly, look for 1-inch or wider spacing.
- Never trim a wet hedge. Water conducts electricity for corded tools and causes plant sap to gum up blades instantly, leading to ragged cuts and disease entry points.
- Post-use cleaning and lubrication aren’t optional. Sap and debris left on blades corrode the metal and attract moisture, dulling the cutting edges within a single season.
What Exactly Does a Hedge Trimmer Do?
A hedge trimmer takes the brute-force labor out of shaping shrubs and hedges. Instead of squeezing hand shears hundreds of times, you guide a powered blade that makes thousands of cuts per minute. The goal isn’t just a straight edge. It’s to stimulate the plant to produce new growth points back along the branch, creating a thicker, greener wall.
Think of it like a haircut for your landscaping. A bad haircut just chops the ends. A good one layers and thins to give the hair body and shape. A hedge trimmer, used correctly, does the latter for your plants.
A double-action hedge trimmer blade moves both cutting teeth in opposite directions simultaneously. This design cancels out much of the vibration transferred to your hands, allowing for longer, more precise shaping sessions without the fatigue and numbness caused by cheaper single-action blades.
The machine’s value is in consistency and scale. You can’t hand-shear a 50-foot laurel hedge to a perfectly level height in an afternoon without your forearms screaming. A hedge trimmer makes that not only possible but manageable. It turns a weekend-long chore into a few hours of focused work.
The Three Main Types: Corded, Cordless, and Gas
Your hedge’s location, size, and your tolerance for noise and maintenance decide the tool.
Corded electric trimmers are the lightest and simplest. They’re plug-in tools, usually under 7 pounds. You get constant power without worrying about battery life. The catch is the 100-foot practical limit from an outlet. If your property is larger or your hedges are far from the house, you’re wrestling with a heavy-gauge extension cord the whole time. They’re a solid pick for small, urban yards with one or two foundation plantings.
Cordless battery trimmers have taken over the suburban market. Modern 18V, 40V, and 56V lithium-ion platforms from brands like EGO Power+, Milwaukee M18, and DeWalt deliver power that rivals many gas models. Run times on a 5.0Ah battery can hit 45 minutes to an hour of continuous cutting, enough for most properties. The weight is a balance between the tool and the battery, often landing around 8 to 10 pounds. The real win is the ecosystem: if you already own a brand’s drill and blower, adding their trimmer means no new chargers or battery types.
Gas-powered trimmers are the heavy lifters. They’re for the acreage with a quarter-mile of perimeter hedging, or for professional landscapers who need all-day runtime. A Stihl HSA 86 or similar model will cut through woody, mature growth that would stall a battery tool. You trade that power for noise, vibration, and the hassle of mixing fuel and maintaining a small engine. They’re also the heaviest, often pushing 11 to 13 pounds. You don’t buy one for a few boxwoods by the front door.
| Type | Best For | Biggest Limitation | Maintenance Burden |
|---|---|---|---|
| Corded Electric | Small yards, precise urban work, low noise | Limited by cord length (100 ft max) | Very Low |
| Cordless Battery | Most suburban yards, moderate-sized hedges, low fuss | Battery runtime (30–60 mins), battery cost | Low |
| Gas-Powered | Large properties, remote hedges, professional use | Noise, vibration, fuel mixing, seasonal engine care | High |
Key Features That Actually Matter When Buying
Blade length, teeth spacing, and blade action aren’t marketing fluff. They determine what you can cut and how long you can comfortably cut it.
Blade length is about reach, not just power. A 22-inch blade lets you trim a wider swath with each pass, speeding up large, flat surfaces. A 16-inch blade is more maneuverable for intricate topiary or tight spaces. Longer blades are heavier and can be harder to control at shoulder height. For most homeowners with 4- to 6-foot hedges, a blade in the 18- to 22-inch range is the sweet spot.
Teeth spacing is your branch capacity. Standard spacing is about 3/4 inch. That’s fine for soft, new growth on arborvitae or boxwood. If you’re tackling overgrown privet, holly, or laurel with pencil-thick stems, you need 1-inch or even 1-1/2 inch spacing. Try to cut a 1/2-inch branch with 3/4-inch spacing, and the blade will pinch and bind, straining the motor.
Double-action vs. single-action blades is a comfort decision. Single-action blades have one moving tooth and one stationary tooth. They’re cheaper and adequate for light duty. Double-action blades move both teeth in opposite directions. This cancels out a significant amount of vibration. Your hands won’t feel like they’ve been holding a jackhammer after twenty minutes. For any hedge over 10 linear feet, the upgrade is worth it.
Weight and balance are everything when the tool is held at chest or head height. A poorly balanced trimmer feels twice as heavy after ten minutes. Always handle a display model before buying. Grip it, hold it out in front of you, and mimic a cutting motion. The battery’s placement often dictates the balance, mid-handle batteries generally feel better than rear-mounted ones.
How to Use a Hedge Trimmer Safely and Effectively

Before you start: The blade moves at over 2,000 strokes per minute. It will not stop for fingers, extension cords, or pet leashes. Always wear safety goggles, a twig can snap back at eye level. Wear cut-resistant gloves; a slip can mean a deep laceration. For corded models, use a GFCI-protected outlet or a GFCI extension cord. If you cut the cord, the GFCI trips instantly, preventing electrocution.
- Clear and inspect. Pull away any vines, irrigation lines, or debris tangled at the base of the hedge. Look for bird nests. If you see an active nest, stop. Wait until the fledglings have left in a week or two. Trimming can wait; destroying a nest can’t be undone.
- Plan your shape. A healthy hedge is slightly wider at the bottom than the top. This “taper” allows sunlight to reach the lower branches, preventing a bare, leggy base. Visualize this A-shape before you make the first cut.
- Trim the sides first, bottom to top. Hold the trimmer vertically, blades parallel to the hedge side. Start at the bottom and sweep upward in a smooth, arcing motion. Let the tool do the work, don’t force it. Overlap each pass by a few inches. This technique is covered in detail in our guide on operating a hedge trimmer for best results.
- Level the top against a string guide. For a straight top, drive two stakes at each end of the hedge and run a taut string between them at your desired height. Hold the trimmer horizontally and cut along the string, moving left to right in long, steady passes.
- Step back and sight. After the initial pass, step back 10 feet and look along the hedge line. You’ll see high spots and dips. Make small, corrective passes to even them out. This is the difference between a hacked job and a professional finish.
- Clean up and care for the tool. Lay a tarp down before you start to catch clippings. When finished, brush all plant debris from the blades. Spray with a dedicated garden tool cleaner or rubbing alcohol to dissolve sap, then wipe dry and apply a light lubricant like 3-IN-ONE Oil. This five-minute ritual prevents rust and keeps the blades gliding smoothly next time.
The most common mistake is holding the trimmer at a right angle to the hedge and jabbing at it. That creates a choppy, uneven surface. The correct method is to keep the blade flat against the greenery and use your whole arm in a sweeping motion, like painting a fence.
Can a Hedge Trimmer Cut Branches?
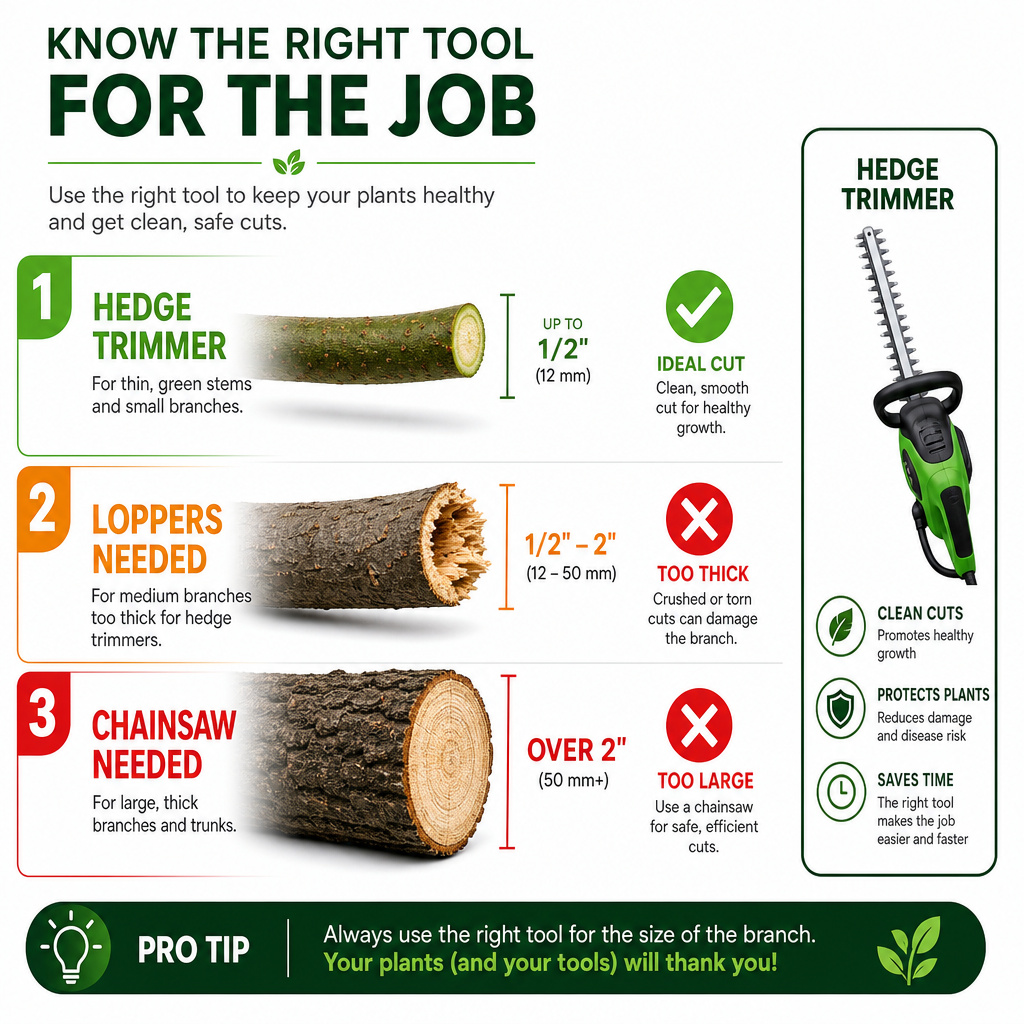
Yes, but with a strict size limit. A hedge trimmer is designed for greenwood, live, growing stems. It can handle branches up to the diameter of its teeth spacing. A model with 1-inch spacing can typically sever branches up to about 3/4-inch thick, roughly the size of your index finger.
Attempting to cut anything thicker is a sure way to damage the tool and the plant. The blades will bind, the motor will strain, and you’ll leave a crushed, ragged wound on the branch that invites pests and disease. For anything thicker than that, you need a different tool.
| Branch Diameter | Correct Tool | Why a Hedge Trimmer Fails |
|---|---|---|
| Up to 3/4 inch | Hedge Trimmer | Within design spec; clean cut |
| 3/4 inch to 1.5 inches | Loppers or Pruning Saw | Blades bind, motor stalls, creates crushed wound |
| Over 1.5 inches | Chainsaw or Arborist Saw | Physically impossible; will damage trimmer blades |
When you encounter a thick, woody stem inside the hedge, stop. Reach for a pair of bypass loppers or a folding pruning saw. Make a clean cut close to a main branch or the trunk.
Then resume trimming with the power tool. This hybrid approach is the secret to managing overgrown hedges without destroying your equipment. For more on this balance, see our tips on cutting branches within a hedge trimmer’s capability.
Maintenance is Non-Negotiable
A hedge trimmer isn’t a tool you can throw in the garage dirty and expect to work next season. Sap is acidic and holds moisture against the steel. Left uncleaned, it starts corroding the blades in weeks, not months.
Clean the blades after every use. I keep a spray bottle of isopropyl alcohol and a rag in my tool bucket. A quick spray and wipe dissolves the fresh sap before it hardens. For a deeper clean, a dedicated garden tool cleaner like Simple Green works well.
Sharpen the blades once a season, or whenever you notice the cuts becoming ragged instead of clean. A ragged cut tears the plant tissue, which stresses the hedge and opens a path for disease. You can use a flat file or a specialized hedge trimmer sharpening stone. Follow the original bevel angle. Don’t try to sharpen it like a knife, you’ll ruin the teeth.
Lubricate the blades before and after storage. A light machine oil on the cutting teeth and the sliding rails prevents rust and keeps the action smooth. For battery tools, remove the battery and store it indoors in a climate-controlled space. Freezing temperatures permanently damage lithium-ion cells.
I learned the lubrication lesson the hard way with a Black & Decker corded model I’d received as a gift. I used it on a rainy autumn day, wiped it down, but didn’t oil it. I hung it in an unheated shed.
By spring, the blades were so rusted they wouldn’t slide past each other. The motor would just hum. A $15 tool turned into a paperweight because I skipped a 30-second oiling step.
Choosing the Right Trimmer for Your Hedge Type
Not all hedges are created equal, and neither are trimmers. Matching the tool to the plant prevents frustration.
- For fine-needled evergreens like arborvitae or juniper: A lighter-duty trimmer with 3/4-inch teeth spacing works fine. The growth is soft and thin. A cordless 20V model is often perfect.
- For broadleaf hedges like boxwood, privet, or holly: You need more muscle and wider teeth spacing. These plants produce tougher, woodier stems. A 40V or 56V cordless trimmer with 1-inch teeth spacing, or a gas model, is a better fit.
- For large, overgrown screens like laurel or photinia: You’re dealing with thick, established wood. Prioritize power (gas or high-volt battery) and blade length (22 inches or more) to cover ground. You’ll also be using a pruning saw alongside it frequently.
- For intricate topiary: Maneuverability is key. A shorter blade (16 inches) on a lightweight cordless tool gives you the control needed for spirals and shapes. A double-action blade is essential to minimize vibration during delicate work.
If you have a mix, buy for your toughest job. A trimmer that can handle privet will glide through arborvitae. The reverse is not true.
Frequently Asked Questions
Can I use a hedge trimmer on wet hedges?
No. Water on the foliage drastically increases the risk of electrical shock with a corded tool. For all trimmers, wet plant sap is incredibly sticky and will coat the blades in a gummy residue that’s difficult to remove, leading to poor cutting performance and accelerated rust.
How often should I sharpen the blades?
Sharpen them once per growing season for typical homeowner use. If you trim frequently or have tough, woody hedges, check the blades mid-season. A sharp blade should slice through a piece of paper cleanly; if it tears or crushes it, it’s time to sharpen.
Is a more expensive hedge trimmer worth it?
Usually, yes. The price jump often buys a double-action blade system (less vibration), better build quality, and a more powerful motor that won’t bog down. For a small, simple hedge, a budget model is fine. For anything more than 50 feet of hedging, invest in reduced fatigue and greater reliability.
Can I use my string trimmer to trim a hedge?
You shouldn’t. A string trimmer is for grass and weeds. Using it on woody stems will shred the plant, leaving torn ends that are prone to disease. It’s also wildly inefficient and dangerous for overhead work. Use the right tool for the job.
What’s the best time of year to trim?
For most hedges, late spring (after the first flush of growth) and early autumn (before frost) are ideal. Avoid trimming in late summer or early fall in very cold climates, as it can encourage new growth that won’t harden off before winter. Always check for nesting birds first.
The Bottom Line
A hedge trimmer turns a labor-intensive chore into a manageable task, but only if you understand its purpose. It’s a shaping and health tool, not a brute-force cutter.
Match the tool’s power and teeth spacing to your specific hedges, prioritize safety gear every single time, and never skip the post-use clean-and-lube ritual. That discipline is what separates a homeowner with a reliable, decade-old trimmer from someone buying a new one every other year because the old one “just stopped working.” Your hedges will look better, and your forearms will thank you.
