
Step-by-Step Guide: How to Cut Plywood with a Circular Saw
This post contains affiliate links. As an Amazon Associate, we earn from qualifying purchases.
Cut plywood cleanly with a circular saw by matching three things: a fine-toothed carbide blade (60 teeth or more), a blade depth set to extend just 1/4 inch past the material, and the plywood oriented good-side-down. Clamp a straight-edge guide to the workpiece for accuracy and push the saw steadily with the shoe flat against that guide.
Most people grab the saw that’s already plugged in and the coarse blade that’s already on it. They lay the pretty side of the plywood face up, eyeball a line, and push. The result isn’t a cut.
It’s a ragged, splintered mess that needs an hour of sanding to fix, if it’s even salvageable. The problem isn’t the tool. It’s skipping the three non-negotiable setup steps that turn a destructive ripper into a precision cutter.
This guide walks through those steps. You’ll learn why blade choice isn’t just about teeth, how to set up a foolproof guide in two minutes, and the exact hand position that keeps a long cut straight. We’ll also cover what to do when things still go wrong — because sometimes they do.
Key Takeaways
- The blade is 90% of the fight. A 60-tooth or higher carbide-tipped “plywood” or “finish” blade with Alternate Top Bevel (ATB) teeth slices the veneer instead of tearing it.
- Always cut with the good side of the plywood facing down. Circular saw blades cut on the upstroke, so any splintering happens on the top surface — which becomes your hidden side.
- Support the entire sheet, including the piece that falls away. Letting it sag binds the blade, kicks back, and guarantees a splintered edge.
- A clamped straight-edge guide is mandatory for accuracy. Freehanding a 4-foot cut on plywood is a guaranteed way to waste a sixty-dollar sheet.
- If you’re still getting splintering on the top surface, score the cut line with a utility knife or apply painter’s tape over the line before cutting.
The Right Blade Makes All the Difference
Forget the 24-tooth framing blade that came with your saw. Using it on plywood is like trying to shave with a hatchet. The coarse, flat-top teeth are designed to rip through wet lumber fast, not to slice delicate veneers. They act like tiny chisels, lifting and tearing the wood fibers instead of cutting them cleanly.
A plywood-specific blade like the Freud D12100X or Diablo D1024X uses 60 to 100 Alternate Top Bevel (ATB) teeth. Each tooth is angled left, then right, creating a knife-like slicing action across the veneer. This shears the wood fibers cleanly, minimizing tear-out and leaving a surface that often needs only light sanding.
You need a blade with a high tooth count — 40 teeth is the bare minimum, but 60 to 80 is the sweet spot for 3/4-inch material. Look for the words “plywood,” “finish cut,” or “laminate” on the blade packaging. The carbide tips are non-negotiable; they stay sharp through an entire sheet, where a steel blade would dull halfway through and start chipping.
The first time I tried to save money, I used a worn 40-tooth “all-purpose” blade on a sheet of birch plywood for a bookshelf. The cut looked fuzzy, but I figured I could sand it. After assembling the case, the splintered edges at every joint were visible through the paint.
I spent more time filling and sanding than I did building. Now I keep a dedicated Freud D12100X 80-tooth blade in a case, and it goes on the saw for any plywood project. The difference in finish is night and day, and it’s saved me countless hours of repair work.
| Blade Type | Tooth Count | Best For | Risk If Used on Plywood |
|---|---|---|---|
| Framing / Rip Blade | 18-24 | Fast cuts in dimensional lumber | Severe splintering, ragged edges, dangerous binding |
| General Purpose Blade | 40-50 | Mixed material cutting (okay in a pinch) | Moderate splintering, requires significant sanding |
| Plywood / Finish Blade | 60-100+ | Clean cuts in plywood, veneers, melamine | None when used correctly. The right tool for the job. |
| High-ATB / Laminate Blade | 80-100+ | Ultra-clean cuts in veneered plywood, acrylic | Can be slower, may burn if forced. Requires steady feed. |
Set Up for Success
With the right blade spinning, the next failures happen on the workbench. Improper support and blade depth cause more ruined cuts than any technique error.
Support the Whole Sheet
Never cut plywood balanced on two sawhorses with the middle unsupported. Never cut it on the ground. The sheet must be fully supported across its entire area. The best methods are:
– Two or more sturdy sawhorses spaced evenly.
– A layer of rigid foam insulation laid on the floor (the 1-inch pink or blue stuff). This supports the sheet fully and lets you cut right into it.
The critical point is supporting the off-cut — the piece that falls away. If it sags during the cut, it pinches the blade. That causes kickback, burns the wood, and tears the veneer. On foam, the off-cut stays level. On sawhorses, have a helper support it, or position your cut so the off-cut is small and manageable.
Set the Blade Depth Correctly
This is a ten-second adjustment with massive consequences. Loosen the depth lever, place the saw next to the plywood, and lower the blade until the teeth extend no more than 1/4 inch (about 0.6 cm) below the bottom of the sheet. Tighten the lever.
– Too deep: More blade is exposed, increasing kickback risk. The extra tooth surface creates more friction and drag, making the saw harder to control. It also pulls more splinters up through the cut.
– Too shallow: The blade doesn’t clear the kerf, causing the saw to overheat, burn the wood, and produce a rough, incomplete cut. The saw will fight you the entire way.
The 1/4-inch protrusion is the safety and performance sweet spot.
Orient the Plywood: Good Side Down
This is the rule beginners get backwards every single time. Circular saw blades rotate upwards towards the front of the shoe. The teeth enter the material from below and exit at the top. Any tearing or splintering force is directed upward.
Therefore, place the plywood with the finished, good-quality veneer facing down. The blade’s cleanest cut happens on the entry side (the bottom). Any minor tear-out will occur on the top surface, which is the back side of your good veneer. It sounds counterintuitive until you see the result. Then it’s obvious.
Clamp a Guide. Every Single Time.
You cannot freehand a straight line on a 4×8 sheet. Your eye isn’t that good, and your arm isn’t that steady. The wobble might be slight, but over four feet it turns into a costly curve. A straight-edge guide eliminates the variable.
You can buy an aluminum guide rail, but a factory-edged piece of plywood or a straight 1×4 works perfectly. Here’s how to set it up:
- Mark your cut line. Measure and clearly draw the line you want to cut on the top (bad) side of the plywood.
- Find your saw’s offset. This is the critical number. Measure the distance from the edge of your saw’s shoe (the flat base) to the blade. On most saws, this is between 1.5 and 2.5 inches. Check your manual or measure it directly.
- Clamp the guide. Place your straight board so its edge is exactly that offset distance away from your cut line, on the side that will be waste material. Clamp it securely at both ends. Double-check the measurement at both ends before tightening the clamps fully.
- Test the alignment. Place your saw against the guide (blade retracted, power off) and see if the blade lines up with your pencil mark. Adjust if needed.
Skipping the guide because you’re “just making one cut” is how you ruin a sixty-dollar sheet. The five minutes it takes to clamp a board saves an hour of frustration and recutting. For repetitive cuts, build a simple sled or a dedicated cutting guide jig for your circular saw. It’s a weekend project that pays for itself on the next cabinet build.
The Cut: Step-by-Step
Now for the action. If your setup is correct, the cut itself is almost anti-climactic.
Before you start: Wear safety glasses—plywood chips fly. Use hearing protection; circular saws are loud. A dust mask is smart; sanding plywood glue later is miserable. Ensure your cord is routed behind you, not in the cut path or under the saw horses.
- Position the saw. Place the saw on the workpiece with the shoe flat against your clamped guide. The blade should be just forward of the start of your cut line, and not touching the wood.
- Start the saw. Pull the trigger and let the motor reach full operating speed. You’ll hear the pitch stabilize. Do not plunge a slow-spinning blade into the wood.
- Initiate the cut. Gently push the saw forward, keeping the shoe firmly pressed against the guide along its entire length. Let the blade do the work. Do not force it or steer it.
- Maintain steady feed rate. Listen to the motor. A high-pitched whine means you’re feeding too slow and the blade is burning the wood. A labored groan means you’re forcing it too fast, which will cause splintering. Aim for a smooth, consistent sound.
- Support the off-cut. As you approach the end of the cut, the waste piece will begin to fall. If you’re on sawhorses, have a helper support it, or slow your feed to minimize tear-out on the final inch.
- Finish and retract. Once completely through, release the trigger but keep the saw steady. Wait for the blade to come to a complete stop before lifting it away or setting it down.
What if the saw binds or kicks? Immediately release the trigger and hold the saw firmly in place. Do not try to pull it back while the blade is spinning. Wait for it to stop, then assess. The cause is almost always inadequate support under the off-cut or a warped guide that pinched the kerf.
Advanced Tips for Flawless Cuts
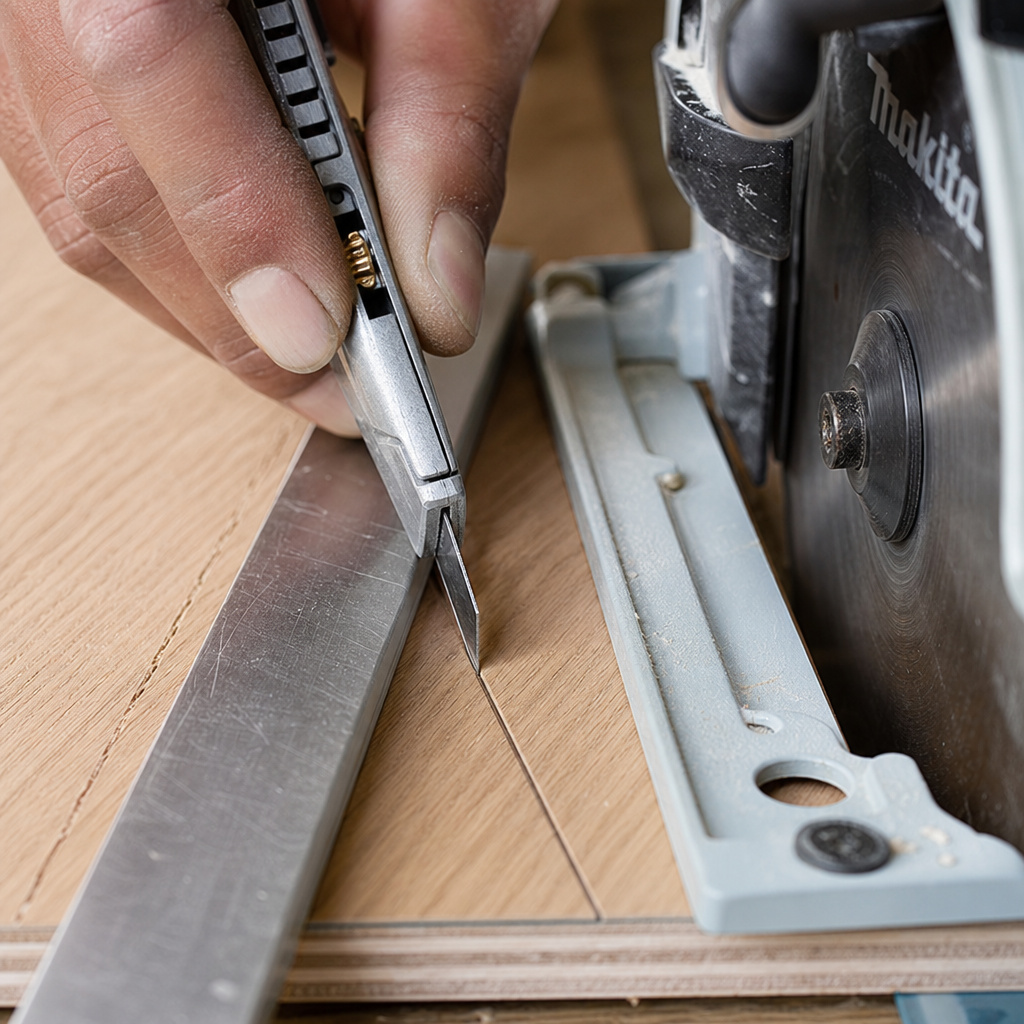
Sometimes, even with a perfect blade and guide, you get a little splintering on the top surface — especially with tricky veneers like oak or maple. Here are two pro tricks.
The Score-and-Cut Method
This is the gold standard for glass-smooth edges. Before making your saw cut, take a sharp utility knife and a metal straight-edge. Align the straight-edge with your cut line and score deeply along the line, slicing through the top veneer. Make two or three passes to ensure you’ve cut the fibers. When you make the circular saw cut, the splintering can’t travel past your scored line. The edge left behind is as clean as a factory cut.
The Painter’s Tape Trick
A faster, slightly less perfect method is to apply a strip of high-quality painter’s tape directly over your cut line. Press it down firmly. Mark your line on top of the tape, then make your cut as normal. The tape holds the delicate veneer fibers together as the blade passes through, significantly reducing tear-out. Peel the tape away after cutting to reveal a clean edge. This is my go-to for quick cuts on expensive sheet goods where I can’t risk any damage.
Troubleshooting Common Problems
You followed the steps, but the cut isn’t perfect. Here’s what likely went wrong and how to fix it next time.
Problem: Splintering on the top (good side you placed down).
- Cause: You placed the good side up by mistake. The blade’s upward tear-out ruined your finish.
- Fix: Remember the rule: Good Side Down. Always. For your next cut, flip the sheet.
Problem: Rough, burned edges along the cut.
- Cause: A dull blade or feeding the saw too slowly. Friction from dull teeth or slow movement generates heat that chars the wood.
- Fix: First, check your blade. If it’s old or has cut metal/nails, replace it. Second, maintain a more consistent, slightly faster feed rate. Let the blade cut.
Problem: The cut wanders away from the line, even with a guide.
- Cause: You’re not keeping constant pressure against the guide, or you’re starting the cut with the blade not aligned.
- Fix: As you push, consciously press the side of the shoe into the guide. Also, ensure the blade is directly on the line before you start moving forward. A slight initial misalignment magnifies over distance.
Problem: The blade binds and the saw kicks back violently.
- Cause: The off-cut piece sagged during the cut, pinching the blade in the kerf.
- Fix: This is a support failure. Always ensure the piece that falls away is supported. Use foam, a helper, or position your cuts to leave a small, manageable off-cut.
Maintaining Your Plywood-Cutting Tools
A clean, sharp blade is a safe and effective blade. After a project involving glue-laden plywood, pitch builds up on the teeth, reducing cutting efficiency and increasing heat.
- Clean the blade. Soak it in a simple solution of household degreaser and warm water for 10 minutes. Use a nylon brush or an old toothbrush to scrub the gunk off the teeth and plate. Dry it thoroughly to prevent rust. Never use a wire brush on carbide tips.
- Inspect for damage. Look for chipped or missing carbide tips. A blade with even one missing tooth will leave a visible ridge in your cut and vibrate excessively. It’s time to replace it.
- Sharpen or replace? Carbide-tipped blades can be professionally sharpened 2-3 times before the carbide is too worn. For a homeowner, it’s often more cost-effective to replace a moderately priced blade like a Diablo D1024X than to pay for sharpening. Keep a spare.
The same goes for your saw. Check the base plate for flatness. If it’s dented or warped, it won’t ride true against your guide. A quick pass with a file on any high spots can fix it. Basic saw maintenance like clearing dust from the vents and checking the power cord for damage ensures reliable performance.
Frequently Asked Questions
What’s the best circular saw for cutting plywood?
Any saw with enough power and a flat, stable shoe will work. A 15-amp corded saw like the Makita 5007MG is a reliable workhorse. For cordless, look for a brushless model from a major brand (DeWalt, Makita, Milwaukee) that uses a 6.0Ah or larger battery to handle the sustained load of cutting a full sheet.
Can I use a circular saw to cut plywood as smoothly as a table saw?
You can get very close, but not identical. A table saw’s stationary blade and precise fence offer ultimate consistency. However, by using a high-tooth-count blade, a clamped guide, and the scoring method, a circular saw can produce edges clean enough for visible cabinet joints that only need light sanding.
How do I cut a large 4×8 sheet by myself?
Use the rigid foam insulation method on a flat garage floor. Place the foam down, then the plywood on top. Set your guide, make your cut. The foam supports everything, and you can walk around the sheet easily. For breaking down a full sheet into smaller pieces, make your first cut a narrow strip to create a new straight factory edge to use as a guide for subsequent cuts.
Why did my brand-new blade still chip the plywood?
Two likely reasons. First, you might have installed the blade backwards. The teeth should point upward at the front of the saw (check the rotation arrow on the blade). Second, you might be using a blade with the wrong tooth geometry. A “thin-kerf” blade can flex slightly during a cut, causing a wobble that chips the edge. For plywood, a standard-kerf blade is often more stable.
Is a track saw better than a circular saw with a guide for plywood?
track saw is purpose-built for this job and excels at it. The integrated track guarantees a perfectly straight, splinter-free cut with zero setup math. However, it’s a significant investment. A circular saw with a well-made DIY guide achieves 95% of the result for 20% of the cost. If you cut plywood frequently, a track saw is a luxury that saves time. For occasional use, master the circular saw and guide.
The Bottom Line
Cutting plywood cleanly with a circular saw isn’t a mystery. It’s a simple, repeatable process that fails only when you skip a step. Start with a 60-tooth carbide blade.
Set its depth to a 1/4-inch protrusion. Place your sheet good-side down on full support. Clamp a straight board as a guide, using your saw’s offset measurement. Then make the cut with steady, even pressure.
The difference between a hacked-up sheet and a professional-looking panel is about ten minutes of setup. Those ten minutes save hours of repair, gallons of frustration, and the cost of ruined material. Grab your saw, swap the blade, and make the next cut the one you’re proud of.
