
How to Cut Wood with a Circular Saw (Safely & Accurately)
This post contains affiliate links. As an Amazon Associate, we earn from qualifying purchases.
Cutting wood with a circular saw requires matching three things: the correct blade for the material, a blade depth set to extend 1/4 inch below the workpiece, and a rigid guide clamped to the wood for every cut you want to be straight. The saw’s power does the cutting; your job is to control the path and feed rate.
Most people grab the saw, mark a line, and push. They fight the tool, the cut wanders, and the board pinches the blade. That’s how kickback happens. The tool isn’t wrong. The setup is.
This guide covers the setup. You’ll get the exact steps for crosscuts, rip cuts, and bevels. We’ll talk about which blades leave a clean edge on plywood and which ones power through framing lumber. I’ll also show you how to build a simple track guide for under ten dollars that works as well as a factory model.
Key Takeaways
- Set the blade depth so only 1/4 inch of tooth protrudes beneath the wood. More depth increases kickback risk dramatically.
- Never cut freehand. Use a speed square for crosscuts under 12 inches and a clamped straight-edge for any longer cut.
- Match the blade to the job: a 24-tooth Diablo D0740X for fast framing, a 40-tooth Freud LU91M010 for splinter-free plywood.
- If the saw smokes or burns the wood, you’re pushing too hard or the blade is dull. Let the tool work at its own pace.
- Check your saw’s 90-degree and 45-degree bevel stops with a machinist’s square twice a year. A saw that’s off by two degrees ruins every joint.
Essential Circular Saw Setup
Before you pull the trigger, you need to verify three settings on the saw itself. Skipping this is why first cuts are always crooked.
First, set the blade depth. Unplug the saw or remove the battery. Loosen the depth lever, place the shoe flat on your workpiece, and lower the blade until the teeth just puncture the wood’s surface. Now lower it one more 1/4-inch increment and lock it. That’s the sweet spot.
A blade set too deep exposes more teeth, increasing the chance the blade will grab and kick the saw back toward you. The extra exposed carbide also creates more friction and heat, which leads to burn marks on hardwoods like oak or maple. The 1/4-inch rule is a safety margin, not a suggestion.
Second, pick the blade. The one that came with your saw is a compromise. For rough cuts in 2x4s, switch to a 7-1/4-inch 24-tooth framing blade like the Diablo D0740X.
The large gullets clear sawdust fast. For plywood, MDF, or any finished cut, you need a blade with at least 40 teeth, such as the Freud LU91M010. The higher tooth count makes smaller chips, which reduces tear-out on the top surface of the sheet.
Third, check the bevel stop. This is the little bolt or setscrew that stops the shoe at 90 degrees and 45 degrees. Over time, it drifts.
Place a machinist’s square against the blade (not the teeth) with the shoe flat. If you see light between the blade and the square, adjust the 90-degree stop. Do the same at 45 degrees. A saw that’s off by even a degree will make miters that don’t close.
What safety gear do you absolutely need?
- Eye Protection: Safety glasses are non-negotiable. Sawdust and wood chips fly.
- Hearing Protection: Circular saws run around 100 dB. Use muffs or plugs.
- Dust Mask: A basic N95 mask keeps the fine dust out of your lungs.
- No Loose Clothing: Sleeves, cords, or drawstrings can get caught in the blade guard.
Before you start: The blade guard is spring-loaded for a reason. Never tie it back. If it sticks, clean the mechanism before cutting. A exposed spinning blade will grab loose clothing in under a second. Also, always know where the cord is. Cutting your own power cord is a spectacular way to ruin your day.
How do you make a straight crosscut?
A crosscut goes across the wood grain, like cutting a 2×4 to length. The tool for this is a speed square.
Line up your pencil mark on the board. Hold the speed square’s lip against the edge of the board, aligning its ruler edge with your mark. Now clamp it. Don’t just hold it—clamp it. Your hand will shift.
Start the saw and let it reach full speed. Place the front notch of the shoe against the edge of the speed square. Push forward with steady pressure.
The square guides the shoe perfectly. Halfway through, the cutoff piece will start to sag. Support it with your free hand or a scrap block to prevent pinching.
| Crosscut Guide | Best For | Maximum Cut Width |
|---|---|---|
| Speed Square | 2x4s, 2x6s, trim | 12 inches |
| Framing Square | Sheet goods, long boards | 24 inches |
| DIY Track Guide | Plywood panels, precise rip cuts | Unlimited |
What happens if you don’t support the cutoff? It drops, pinches the blade, and the saw kicks straight back into your gut. I learned this the hard way cutting a treated 2×8 for a deck.
The piece was only 10 inches long, but it was heavy. It twisted as it fell, grabbed the blade, and the Makita 5007MGA jumped out of the cut and smacked my thigh. No cut, but a bruise that lasted two weeks. Now I use a scrap block to hold the piece until the cut is finished.
The sequence matters. Mark, square, clamp, support, then cut. Reverse those steps and you’re guessing.
How do you make a long, straight rip cut?
Ripping is cutting with the grain, like trimming a 12-inch width off a sheet of plywood. This is where a guide is mandatory. Your saw’s built-in rip fence is only useful for narrow cuts and is notoriously inaccurate for anything over six inches.
You need a straight edge. An 8-foot aluminum level or a factory-cut 1×4 works. Here’s the math: measure from the edge of your saw’s shoe to the blade.
On most sidewinders, this is about 1.5 inches. Clamp your straight edge that distance away from your cut line, parallel to it. The shoe rides against the guide, and the blade follows the line.
For repeat cuts, build a dedicated track guide. Glue and screw a 4-inch-wide strip of 1/2-inch plywood to an 8-foot length of 1/4-inch hardboard. The plywood rides against the shoe, the hardboard acts as the clamping surface. It costs about eight dollars in materials and works as well as a track saw guide costing ten times more.
I prefer the worm-drive saw for long rips. The blade is on the left, the motor in the back. Your right hand is behind the blade, not over it, and you can see the cut line clearly without leaning over the saw. The weight and gear drive also make it less likely to wander on an 8-foot cut.
What are the signs of a bad rip cut setup?
- Burn Marks: The blade is dull, you’re feeding too slow, or the guide is pinching the shoe.
- Wandering Cut: The guide isn’t parallel to the line, or you’re not keeping the shoe firmly against it.
- Splintering (Top Side): You’re cutting with the good side up. Always cut with the finished face down.
- Splintering (Bottom Side): Your blade is dirty or has missing carbide tips. Time for a new one.
How do you set up and cut a bevel?
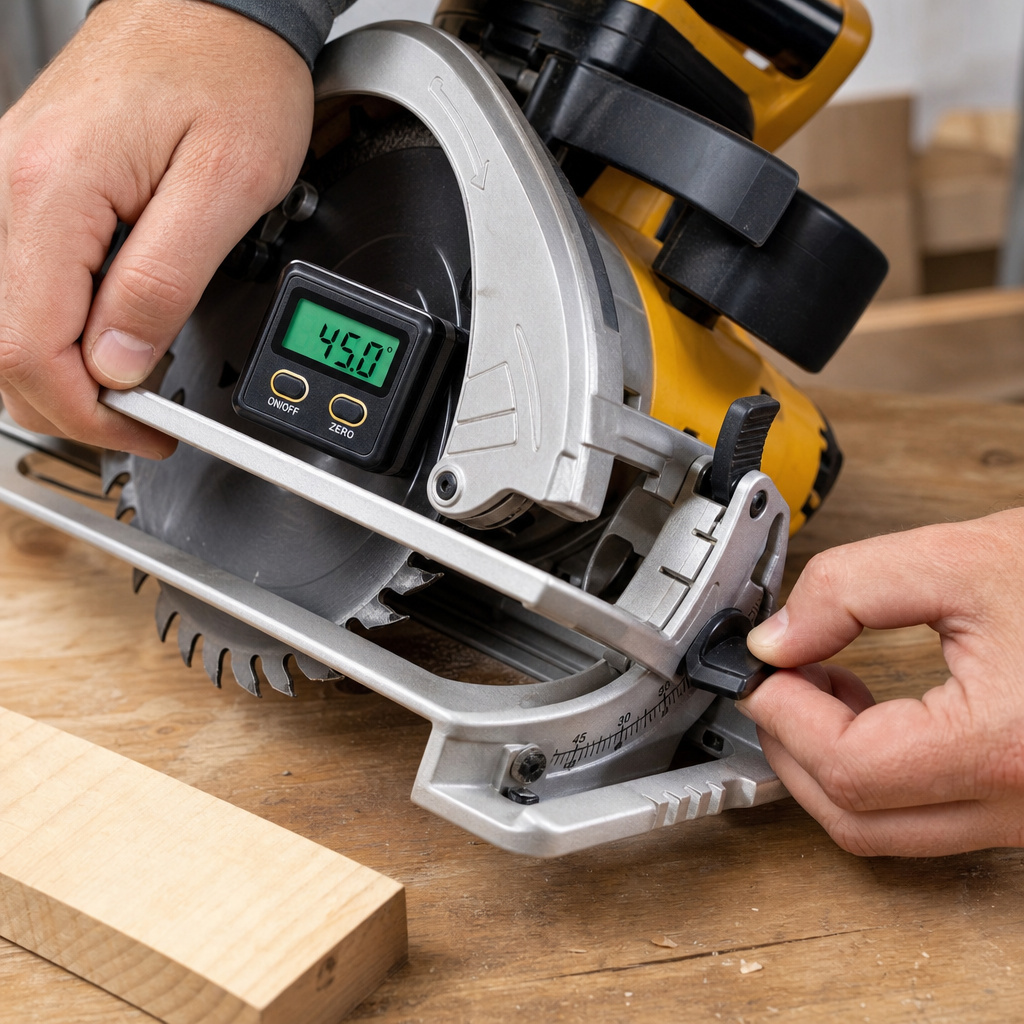
A bevel is an angled cut through the thickness of the board. You’ll use this for trim work or joining corners.
Loosen the bevel lever at the front of the saw. Tilt the shoe to your desired angle, using the scale as a rough guide. For critical work, always verify with a digital angle finder or a speed square set to 45 degrees. Tighten the lever firmly.
Bevel cuts expose more blade. Go slower. The blade is cutting through a thicker section of wood because it’s entering at an angle. Let the saw work. For a 45-degree bevel on a 2×4, it should take about 50 percent longer than a square crosscut.
Never assume the 45-degree mark on your saw is accurate. I built a set of shed rafters where every cut was off by two degrees. The peaks wouldn’t meet. The problem was a worn detent in the bevel mechanism on my older DeWalt. Now I check it with a precise angle cutting guide before any major project.
What blade should you use for different materials?
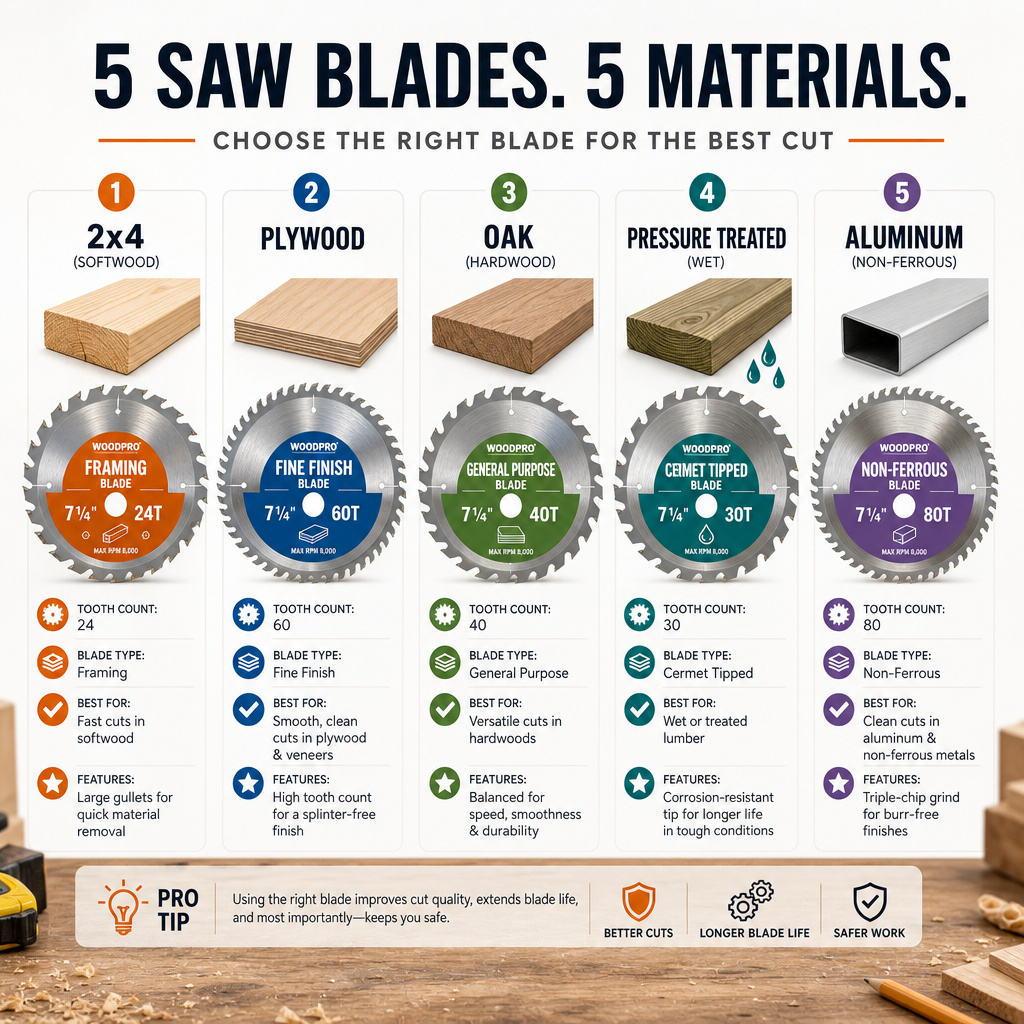
The blade is the most important accessory. Using a framing blade on oak plywood will shred the veneer. Using a fine-finish blade on pressure-treated pine will load up with sap and overheat.
| Material | Blade Type | Tooth Count | Key Feature | Example Blade |
|---|---|---|---|---|
| Framing Lumber (2×4, Pine) | Framing/General Purpose | 24 | Large gullets for fast chip clearance | Diablo D0740X |
| Plywood, MDF, Melamine | Fine Finish/Crosscut | 40-80 | Alternate Top Bevel (ATB) grind for clean edges | Freud LU91M010 |
| Hardwood (Oak, Maple) | Combination/Crosscut | 50-60 | Sharp ATB teeth with anti-vibration slots | Freud LU87R010 |
| Pressure-Treated, Wet Wood | Framing with Coating | 24 | Non-stick coating to resist pitch buildup | Diablo D0724X |
| Aluminum, Non-Ferrous Metal | Carbide Tipped Metal Cutting | 64+ | Specialized tooth geometry, negative hook angle | Diablo D0760N |
The hook angle matters. A positive hook angle (like on a framing blade) pulls the wood into the cut aggressively. A negative or zero hook angle (like on a metal-cutting blade) pushes the material away, reducing grab and kickback. That’s why you never use a wood blade on metal—it will catch and shatter.
Storing blades matters too. Hang them or lay them flat. Stacking them in a drawer knocks the carbide teeth off. A single chip missing from a tooth creates vibration, and that vibration turns into a wavy cut you can feel with your hand.
What are the most common mistakes and how do you fix them?
Even with the right setup, things go wrong. Here’s how to diagnose the problem mid-cut.
Problem: The saw is smoking and burning the wood.
Cause: Dull blade or too-slow feed rate. You’re generating heat faster than the blade can clear chips.
Fix: Stop. Let the blade cool. Check for pitch buildup on the teeth. If the blade is clean, it’s dull. Swap it. On your next cut, push a little faster—let the blade bite.
Problem: The cut is veering off the line, even with a guide.
Cause: The shoe is not parallel to the blade. This is a manufacturing defect or damage from a drop.
Fix: Unplug the saw. Measure from the blade to the front and back of the shoe slot. If the measurements differ by more than 1/32 inch, the saw needs service. This isn’t a user-adjustable fix on most models.
Problem: The bottom of the cut is excessively ragged or splintered.
Cause: Dull blade, or you’re cutting with the good side up. Circular saws cut on the upstroke, so the teeth exit the material on the top side, creating a cleaner edge there.
Fix: Flip your workpiece so the finished face is down. If the splintering persists, your blade is shot. This is common after cutting plywood with a blade that’s seen too much MDF or particle board—the glue dulls carbide fast.
Problem: The saw binds and kicks back at the end of a cut.
Cause: The cutoff piece is sagging and pinching the blade.
Fix: Support the cutoff with your free hand or a stand. For long sheets, have a helper support the off-fall. Never let a piece hang unsupported.
How do you cut thick posts or beams?
A standard 7-1/4-inch circular saw can only cut about 2.5 inches deep. To cut a 4×4 or 6×6, you make multiple passes and “roll” the beam.
Mark your cut line on all four sides of the post. Set your blade to full depth. Make your first cut, using a square as a guide. Rotate the beam 90 degrees.
Use the kerf (the slot) from the first cut to align your blade for the second cut. Repeat for all four sides. A small, uncut section will remain in the center. Finish it with a hand saw. It’s slower, but it works with the tool you have.
For a cleaner job on a 4×4, consider a beam-cutting attachment that clamps to your saw, turning it into a makeshift chainsaw mill. They’re niche, but they exist.
Frequently Asked Questions
Can you cut curves with a circular saw?
Not really. You can make a series of relief cuts to approximate a curve for rough work, but a circular saw is designed for straight lines. For true curves, you need a jigsaw or a band saw.
Why does my circular saw blade keep getting stuck?
The wood is pinching the blade. This is usually because the wood wasn’t clamped, the cutoff piece wasn’t supported, or the wood itself has internal stress (warp, twist) that closes the kerf as you cut. Always clamp your workpiece and support both sides.
How often should I change my circular saw blade?
Change it when the cut quality suffers—excessive burning, ragged edges, or the saw requires much more force to push. For a DIYer using a carbide blade, that might be once every two years of moderate use. A pro cutting all day might change blades monthly.
What’s the difference between a sidewinder and a worm drive saw?
sidewinder has the motor beside the blade, making it lighter and more common. A worm drive has the motor behind the blade, connected by gears, making it longer, heavier, more powerful, and better balanced for long rip cuts. The worm drive saw is a favorite among framers.
Is it safe to use a circular saw in the rain?
No. Never use an electric power tool in wet conditions. Water can cause a short circuit, leading to electrocution. Even battery-powered tools have electronics that can be damaged by moisture.
The Bottom Line
A circular saw is a brute-force tool that demands precision from the operator. The difference between a clean, safe cut and a dangerous mess is in the minutes you spend before the cut: selecting the blade, setting the depth, and clamping a guide. Your saw doesn’t know where you want the line to be. You have to show it, every time.
Remember the 1/4-inch depth rule. Build a simple track guide for sheet goods. And check those bevel stops with a square.
This isn’t about being a master carpenter. It’s about getting the job done without a trip to the emergency room or a wasted stack of plywood. The saw is just a motor and a spinning disk. You are the guide.
