How to Cut Baseboard with a Miter Saw: Pro Angles & Cuts
This post contains affiliate links. As an Amazon Associate, we earn from qualifying purchases.
Cutting baseboard with a miter saw requires matching three things: the actual corner angle of your wall (not a guess), the correct saw setting (half the corner angle), and the board’s orientation (long point in for inside corners, short point in for outside corners). A sharp 60-tooth or finer blade and a test cut on scrap wood are non-negotiable.
Most people grab their saw, set it to 45 degrees, and slice. The joint doesn’t close. They blame the saw, the blade, or the house. The real problem is the wall. It’s never a perfect 90 degrees, and a generic 45-degree cut can’t fix that.
This guide walks through measuring the real angle, setting the saw to match it, and executing the cut cleanly. We’ll cover inside corners, outside corners, and the pro’s secret for perfect joints on wavy walls: coping.
Key Takeaways
- Your wall corners are not 90 degrees. Measure them with a digital angle finder or a speed square before you touch the saw.
- For a miter joint, divide the measured corner angle by two. That’s your miter saw setting. A 92-degree corner needs two 46-degree cuts.
- Always cut a test joint from scrap 1×4 pine first. A 30-second test cut saves a $30 piece of primed baseboard.
- Coping the inside corner is more forgiving than a miter on imperfect walls. It’s slower, but the joint stays tight even if the wall moves.
- Use a blade with at least 60 teeth, like a Freud Diablo 80T. A 24-tooth framing blade will splinter the trim’s face and leave a ragged edge you can’t caulk away.
Cutting baseboard trim requires precise angle transfer from the wall to the miter saw. For a standard miter joint, the saw is set to half the measured corner angle. A 10-inch or 12-inch compound miter saw with a fine-toothed blade (60-80 teeth) provides the cleanest cut on common materials like pine, MDF, or PVC trim.
Before You Start: The Safety Callout
Before you start: The miter saw blade spins at over 3,000 RPM and will throw a loose piece of trim with enough force to break drywall. Always clamp the workpiece or hold it firmly against the fence with both hands, keeping them at least 6 inches from the blade path. Wear safety glasses, a fragment of MDF in the eye feels like ground glass. Let the blade reach full speed before lowering it into the cut; starting the cut at low RPM chips the wood grain.
I learned the clamping lesson the hard way. I was cutting a short return on a piece of oak baseboard, figured I could just pinch it. The blade caught the end grain, spun the 10-inch piece like a propeller, and sent it straight into the garage door.
It left a dent I still see every morning. Now anything under 12 inches gets a clamp. Every time.
What’s the Right Miter Saw Angle for Baseboards?
Forget 45 degrees. That number is almost always wrong. The correct miter saw angle is exactly half of whatever angle your wall corner actually forms.
Find the corner angle first. A digital angle finder is best, press it into the corner, read the number. No fancy tool? Use a speed square.
Hold a scrap of baseboard flat against one wall in the corner. Butt your speed square against it and the adjacent wall. The gap at the point of the square reveals the error. A 1/8-inch gap over a 7-inch leg means the corner is off by about a degree.
Once you have the angle, the math is simple. A 90-degree corner = two 45-degree cuts. A 92-degree corner = two 46-degree cuts. A tight 88-degree corner = two 44-degree cuts. Set your saw’s miter accordingly, left for one piece, right for the other.
The board’s orientation on the saw matters more than people think.
| Corner Type | Saw Setting | Board Orientation (Face Against Fence) | Key Visual |
|---|---|---|---|
| Inside Corner | Half the corner angle (e.g., 46°) | Upright, profile facing you | The long point of the cut faces into the room. |
| Outside Corner | Half the corner angle (e.g., 46°) | Laying flat, back against table | The short point of the cut faces into the room. |
Cut the wrong orientation and the joint reverses, the long point will be at the back, leaving a gap you can fit a pencil into. I mark the long point with a bold “L” on the top of the board before I approach the saw.
The Step-by-Step Process for a Flawless Cut
This isn’t just about pulling the trigger. The sequence before the cut determines the quality after it.
- Measure and Mark the Long Point. Hold your baseboard in place in the corner. Mark where it meets the adjacent wall, that’s the long point for an inside corner. Add at least 2 inches to the length for wiggle room. Mark the top of the board with an arrow showing the direction of the cut (left or right miter).
- Set the Saw and Verify with a Test Block. Set your miter angle. Before cutting your $40 piece of primed trim, grab a scrap of 1×4 pine. Cut two test pieces at your set angles. Hold them together in a corner. If light shines through the joint, adjust the miter by half a degree and try again. This five-minute step has saved me more material than any other.
- Position and Secure the Board. For a standard baseboard (under 5 inches tall), lay it flat on the saw table with the back against the fence. The decorative profile should face up. For an inside corner cut, the long point mark should be on the side of the blade corresponding to your miter direction. Hold it down firmly.
- Make the Cut. Start the saw, let the blade reach full speed, then lower it smoothly through the board. Don’t force it. Let the teeth do the work. A slow, steady feed rate prevents tear-out on the back side of the cut.
- Dry Fit Immediately. Take the cut piece back to the wall. Does it fit? Is the joint tight at the front? If there’s a slight gap at the back of the joint, the wall is likely bowed. This is where coping or strategic caulking comes in. Never nail it up hoping the gap will close, it won’t.
Skipping the test block means you’re trusting your wall, your saw’s calibration, and your marking accuracy all at once. That’s a bad bet. One summer I did three rooms without testing, assuming the corners were consistent.
The last corner was off by 3 degrees. I had to re-cut six pieces because I was out of material. Now the test block is the first tool out of the box.
Miter vs. Cope: Which Joint is Best for Inside Corners?
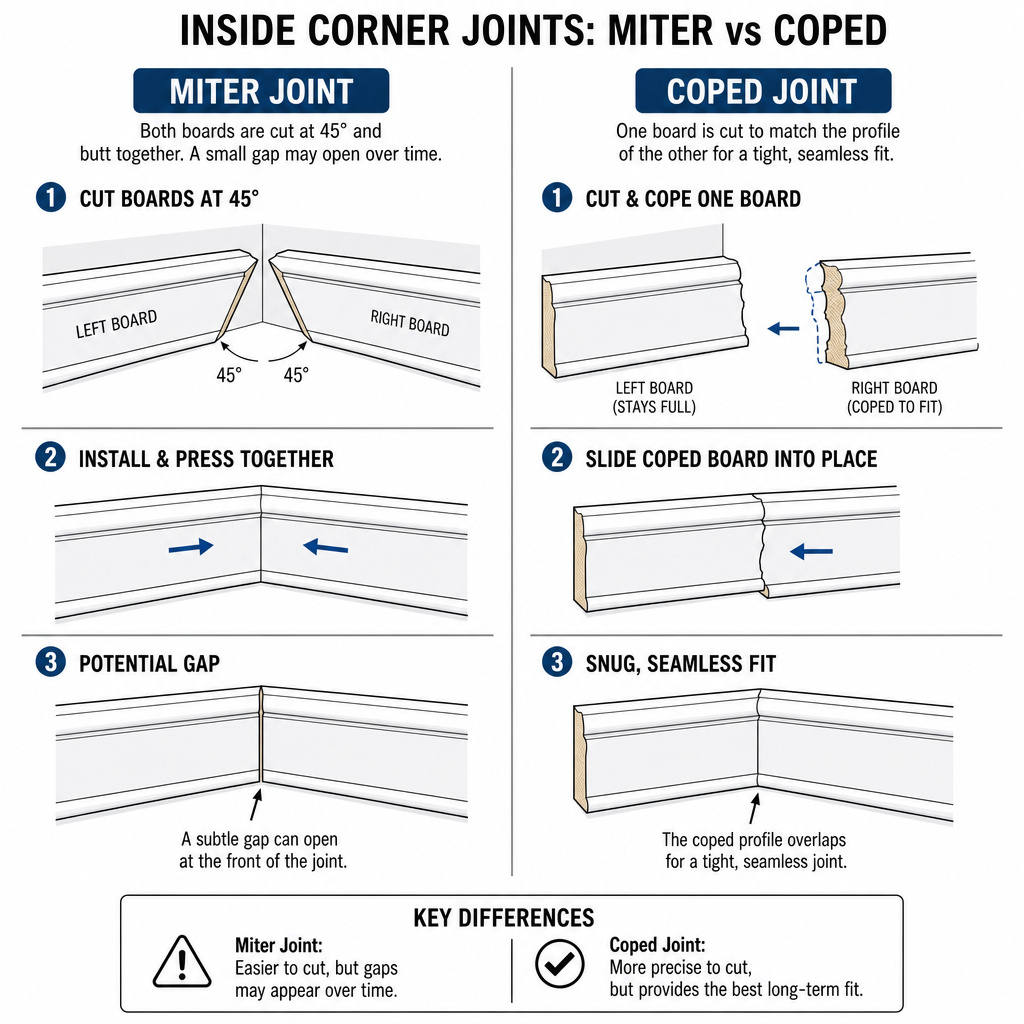
Most DIY guides tell you to miter both pieces of an inside corner. Professionals often do something else: they miter the first piece and cope the second.
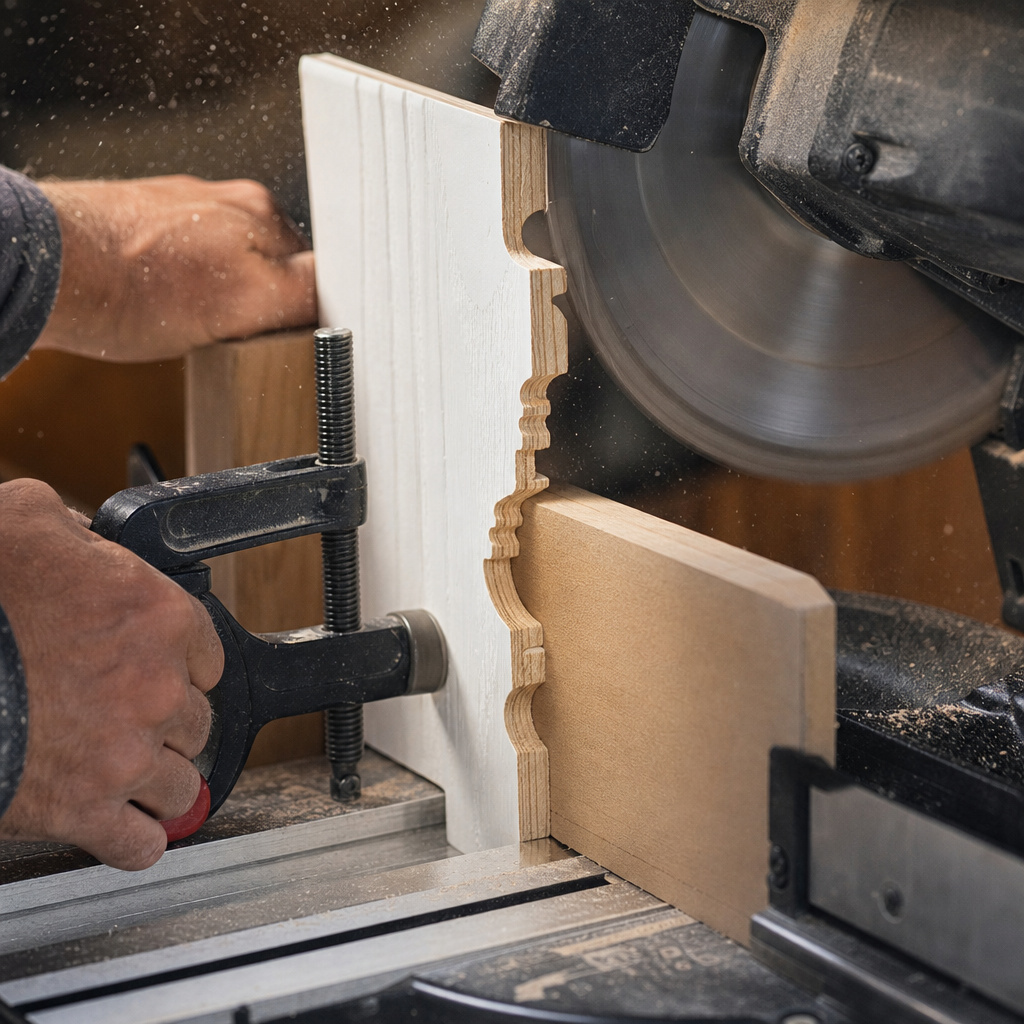
A coped joint is when you cut the second piece to match the profile of the first. You cut a 45-degree back-bevel on the end of the board, then use a coping saw to follow the profile line left by that cut. The result is a piece that fits over the face of the first piece, like a puzzle piece.
Why go through the trouble? Walls move. Houses settle.
A miter joint is two flat planes trying to meet in a three-dimensional space that’s never perfect. When the wall shifts or the wood expands, a miter opens up at the front. A coped joint has a sprung fit, it presses against the face of the first board, and if the wall moves a little, the joint stays tight because it’s not trying to meet in the middle of the corner.
I use a coped joint on every inside corner in old houses. The trim in my 1950s home would have hairline cracks at every miter by November without it. With coping, the joints look hand-fitted even when the plaster behind them is wavy.
Here’s a quick decision guide:
| Situation | Recommended Joint | Reason |
|---|---|---|
| New construction, walls are fairly square | Miter | Faster, perfectly acceptable if the angles are true. |
| Old house, plaster walls, visible corners | Cope | Forgives out-of-square corners and wall irregularities. The gold standard. |
| Paint-grade trim (MDF) | Miter | MDF doesn’t cope cleanly; it fuzzes. Caulk will hide minor gaps. |
| Stain-grade trim (oak, poplar) | Cope | You can’t caulk stained wood. A perfect, tight joint is mandatory. |
Coping takes practice. Your first few attempts will be ragged. Use a coping saw with a fine-toothed blade and take your time following the profile. A little gap is okay, you can clean it up with a rat-tail file or sandpaper. The goal isn’t machine perfection, it’s a mechanical fit that stays closed.
How Do You Handle Tall or Intricate Baseboard Profiles?
A standard 3.5-inch colonial baseboard cuts easily lying flat. Modern tall baseboards (6 inches or more) or those with a deep, complex profile present a problem: the saw blade might not have enough vertical capacity to cut through the entire profile in one pass when the board is flat.
The solution is to cut them upright. This technique is crucial for complex trim projects like crown or tall base.
- Position the baseboard vertically against the miter saw fence, with the back of the board flat against it.
- The decorative profile will now be facing sideways. This orientation uses the blade’s diameter (its height) to get through the tall profile.
- Clamping is essential here. Use a hold-down clamp or a dedicated vertical cutting clamp. The force of the blade can twist the board.
- Make the cut slowly. You are now cutting across the grain of the profile’s details, which can cause splintering. A sharp, fine-toothed blade is non-negotiable.
If your saw struggles or burns the wood, you might need to make a scoring cut first. Raise the blade guard, position the board, and gently lower the spinning blade just enough to score the cut line about 1/16-inch deep. Then make the full-power cut. This scoring severs the wood fibers cleanly and prevents tear-out on the face.
Troubleshooting Common Baseboard Cutting Problems
You’ve made the cut. The joint doesn’t fit. Here’s what’s likely wrong and how to fix it without starting over.
Problem: Gap at the top or bottom of an inside miter joint.
- Cause: The wall corner is not plumb (vertical). One wall is leaning in or out.
- Fix: This requires a compound miter cut. You need to add a bevel angle to your miter. Loosen the bevel lock on your saw and tilt the blade a degree or two toward the gap, then recut. This is where a compound miter saw earns its keep over a basic miter saw.
Problem: The joint is tight at the back but open at the front.
- Cause: Your miter angle is too acute. The corner is more obtuse than you measured.
- Fix: Increase the miter angle on both pieces by half a degree. Re-cut a test block to verify.
Problem: Splintering on the face of the cut.
- Cause: Dull blade, or a blade with too few teeth. Also, cutting too fast.
- Fix: Install a new 80-tooth finishing blade. Make a scoring cut first, or place a piece of painter’s tape over the cut line and cut through the tape. The tape stabilizes the wood fibers.
Problem: The cut piece is slightly too long and bows when forced into place.
- Cause: You didn’t account for the spring of the board. Baseboard is rarely perfectly straight.
- Fix: Don’t force it. Take it down and shave a 1/16-inch off the back of the cut using a rasp or a sanding block. This is called “sneaking up on the fit.” It’s slower but guarantees no gaps from tension.
For persistent issues, revisit your fundamentals. A quick guide on squaring your miter saw can solve a multitude of mysterious fitting problems. A saw that’s even a fraction of a degree out of square will throw off every cut.
Tool and Blade Recommendations
The right tool doesn’t just make the job easier; it makes the result professional.
- Miter Saw: A 10-inch or 12-inch sliding compound miter saw is ideal. The sliding feature lets you cut wider boards (like for outside corners on baseboard stacked with shoe molding). The Dewalt DWS780 or the Bosch 12-Inch are workhorses with good dust collection. For smaller jobs, a basic 10-inch compound miter saw works.
- Blade: This is the most important part. Use a blade with 60 to 80 teeth designed for finish cuts. The Freud Diablo 80T Fine Finish blade is my go-to. Its thin 0.093-inch kerf cuts smoothly with minimal tear-out on MDF and hardwoods. The anti-stick coating helps, too.
- Measuring: A 25-ft tape measure, a speed square, and a digital angle finder (like a General Tools model) are the holy trinity.
- Support: A stable stand is key. A DIY miter stand with long extension wings supports long pieces of trim and prevents sagging during the cut.
Don’t use a blade that came with the saw for framing. That 24-tooth blade is for 2x4s, not trim. It will leave a ragged edge that even caulk struggles to hide. The $50 you spend on a good finish blade pays for itself on the first room.
Frequently Asked Questions
Why does my baseboard miter cut keep opening up after I nail it?
Wood shrinks across its width as it acclimates to your home’s drier air, especially in winter. If you cut and installed the trim when it was humid or fresh from the store, it can shrink away from the joint.
Always let trim acclimate in the room for at least 48 hours before cutting. Also, the nails might be pulling the joint open if you nailed too close to the end. Use a small amount of wood glue in the miter joint before nailing for a permanent bond.
Can I cut baseboard with a circular saw?
You can, but it’s far from ideal. You’d need to build a jig to guide the saw at precise angles, and achieving a clean, splinter-free cut is difficult. A miter saw is purpose-built for this exact task. If you’re doing more than one or two cuts, it’s worth renting one for the day.
What if my wall is curved, like in a bay window?
For a gently curved wall, you “spring” the baseboard. This means cutting a series of very shallow, overlapping miters (like 5-degree cuts every few inches) on the back of the baseboard only, not all the way through. This allows the board to flex to match the curve. For tight curves, you may need to use a flexible PVC trim board instead of wood.
Should I paint the baseboard before or after cutting?
Paint it before. Install it, then do a final touch-up coat to cover nail holes and any caulk. Cutting pre-painted trim is cleaner, you don’t get sawdust embedded in wet paint. Just be sure to mask the area where you’ll apply adhesive or caulk so it can bond properly to the wood, not the paint.
The Bottom Line
Cutting baseboard is a test of patience, not strength. Rushing the measurement or skipping the test cut guarantees a visible gap you’ll stare at for years. Invest the ten minutes to measure the actual corner angle and verify your saw setting on scrap wood. That’s the difference between a job that looks DIY and one that looks professional.
Remember the hierarchy of fixes: First, get the angle right with a test block. Second, use a sharp 80-tooth blade. Third, cope inside corners in old houses.
Fourth, use a rasp to sneak up on the final fit. Caulk is the last resort, not the first step. Get those first four right, and you’ll barely need the tube.