What Is A Compound Miter Saw
This post contains affiliate links. As an Amazon Associate, we earn from qualifying purchases.
A compound miter saw is a power tool that makes angled cuts in wood. It pivots horizontally for miter cuts and tilts vertically for bevel cuts. This dual-axis movement allows it to make compound cuts, which combine both an angle and a bevel in a single pass.
A compound miter saw is a specialized power tool designed for making precise angled cuts in wood and other materials. Its defining feature is the ability to pivot the blade head horizontally for miter cuts and tilt it vertically for bevel cuts. This dual-axis movement allows it to perform compound cuts—which involve both an angle and a bevel simultaneously in a single pass.
While a basic miter saw only pivots left and right, a compound miter saw adds the vertical tilt function. This makes it the essential tool for intricate woodworking projects like installing crown molding, creating picture frames, and cutting door and window casings.
Key Takeaways
- Core Function: A compound miter saw makes both miter (angled) and bevel (tilted) cuts, enabling complex compound-angle cuts in one setup.
- Versatility: It’s indispensable for trim work, crown molding, framing projects where angles are involved.
- Power & Precision: These saws offer more cutting power and built-in features like positive stops and laser guides for greater accuracy than basic models.
- Safety First: Always follow manufacturer instructions, use safety gear (goggles, ear protection), and unplug the tool before servicing.
How Does a Compound Miter Saw Differ from Other Saws?
It’s easy to confuse the different saws built for angled cutting. Here’s how the compound miter saw fits in.
Compound Miter Saw vs. Standard Miter Saw
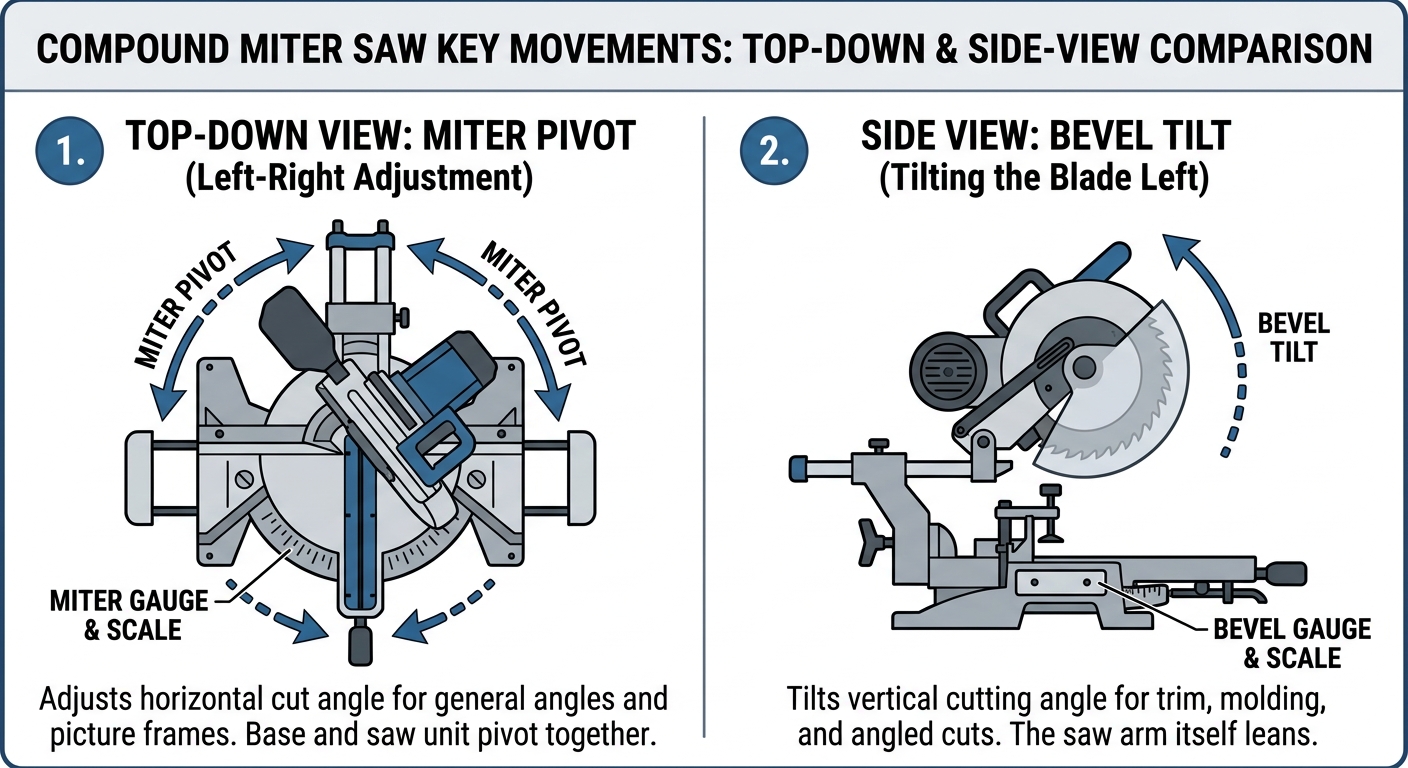
The standard miter saw only pivots on its base for miter cuts (angles in the horizontal plane). It’s perfect for basic trim work like door casings and picture frames. The compound miter saw adds the crucial ability to tilt the blade, typically to the left, for bevel cuts. This tilt function is what unlocks the ability to cut crown molding lying flat on the table, as the saw can replicate the spring angle of the molding.
Compound Miter Saw vs. Sliding Compound Miter Saw
This is the most common comparison. A standard compound miter saw has a fixed blade arm that moves up and down. A sliding compound miter saw incorporates rails that allow the entire blade and motor assembly to slide forward and backward. This significantly increases its cutting capacity, allowing it to cut wider boards and crown molding up to 12 inches or more. The sliding feature comes at a higher cost and requires more space behind the saw.
Compound Miter Saw vs. Dual-Bevel Compound Miter Saw
Most basic compound miter saws are single-bevel, meaning the blade tilts in only one direction (usually left). A dual-bevel compound miter saw can tilt both left and right. This is a massive time-saver on complex projects. Instead of flipping a heavy workpiece to make a matching bevel cut on the opposite side, you simply tilt the blade the other way. For frequent crown molding or large framing work, the dual-bevel feature is worth the investment.
| Saw Type | Key Feature | Best For | Limitation |
| :———————– | ———————— | ——————————————- |
| Standard Miter Saw | Pivots left/right for angled cuts. | Basic trim, picture frames, straight crosscuts. | No bevel function. |
| Compound Miter Saw | Pivots and tilts (usually left). | Crown molding, door casings, basic compound angles. | Fixed arm limits width of cut. |
| Sliding Compound Miter Saw | Pivots, tilts, and slides on rails. | Wider boards, crown molding, larger framing. | Larger footprint, higher price. |
| Dual-Bevel Compound Miter Saw | Pivots and tilts both left and right. | Complex crown molding, large projects with matching bevels. | Premium price point. |
Key Features to Consider When Buying
Not all compound miter saws are created equal. Here are the specifications that matter.
1. Amperage (Motor Power)
This measures the motor’s raw power. For general DIY and light trim work, a 10- or 12-amp motor is sufficient. For cutting dense hardwoods or frequent use on larger lumber (like 2x6s or 4x4s), look for a 15-amp motor. More amps mean less strain and bogging down in tough cuts.
2. Cordless Options
Cordless compound miter saws offer excellent portability and convenience for job sites without power or for working in the yard. They often use brushless motors for quieter operation and less maintenance. They are available in single and dual-bevel styles. Just be aware that runtime is limited per battery, the power can be slightly less than a high-amp corded model. Popular platforms include DeWalt 20V MAX, Milwaukee M18, and Makita 18V LXT.
3. Blade Size
The most common sizes are 8, 10, এবং 12 inches. The blade diameter determines the maximum cutting depth and width. A 10-inch saw can typically cut a 2×6 at 90 degrees and a 2×4 at 45 degrees. A 12-inch saw expands that capacity significantly. Choose based on your most common material sizes.
4. Tooth Count
This affects cut smoothness. Lower tooth counts (20-40) are for aggressive, faster cuts in framing lumber, but they leave a rougher edge. Higher tooth counts (60-100) provide much smoother finishes, ideal for trim work, molding, and delicate materials. Many users keep two blades: a low-Tooth-count for construction and a high-Tooth-count for finish work.
5. Positive Stops
These are pre-set click detents at common angles (0°, 15°, 22.5°, 31.6°, 45°). They allow for quick and precise angle adjustments without fiddling with a gauge. This is a must-have feature for efficiency.
6. Laser Guides
A laser projects a beam onto the workpiece to show exactly where the blade will cut. This helps with accurate blade alignment, can prevent costly mistakes. Not all lasers are created equal—some are more precise and easier to see in bright light.
7. Electric Brake
This safety and convenience feature stops the blade from spinning within seconds after the trigger is released, instead of letting it coast to a stop. It gets you back to work faster and safer.
8. Dust Collection
Saws create a lot of dust. A saw with a decent dust chute that connects to a shop vacuum makes a huge difference in keeping your workspace clean and your lungs healthy. Some models have built-in blowers or bags.
9. Table Extensions/Fences
These provide crucial support for longer or taller workpieces, preventing sag and ensuring a square cut. Some are included, while others are sold as accessories.
How to Use a Compound Miter Saw Safely and Effectively
Using this powerful tool correctly is non-negotiable. Here’s the basic workflow.
Before you start:
- Read the Manual: Know your specific saw’s controls and safety features.
- Wear Safety Gear: Always use safety goggles, hearing protection, and a dust mask. Avoid loose clothing.
- Inspect the Saw: Ensure the blade is tight, sharp, and appropriate for the material. Check that guards move freely.
- Secure the Workpiece: Clamp it firmly against the fence. Never hold it with your hand.
- Clear the Area: Make sure the path of the blade is clear of cords, scraps, or other obstacles.
The Cutting Process:
- Set Your Angles: Loosen the miter lock and rotate the saw to your desired angle, using the positive stops or gauge. Then, loosen the bevel lock and tilt the blade if a bevel cut is needed. Tighten both locks.
- Position the Workpiece: Hold it firmly against the fence with your hand at least 6 inches from the blade path. For small pieces, use a clamp or a specialized holder.
- Start the Saw: Let the blade reach full speed before beginning the cut.
- Make the Cut: Lower the blade smoothly and steadily through the material. Do not force it; let the blade do the work.
- Retract the Blade: Once through the cut, release the trigger, wait for the blade to stop completely, and then raise it back to the top position.
- Retrieve the Piece: Only remove the cut piece and offcut scrap after the blade has fully stopped.
A common beginner mistake is pulling the hand back too soon while the blade is still moving down.
I’ve seen a brand new user pull their hand back the instant the cut finishes. That’s a recipe for kickback. Wait that extra second.
Frequently Asked Questions
What’s the most important maintenance task on a compound miter saw?
Keeping the blade clean, sharp, and properly tensioned is paramount. After use, wipe off pitch and sap with a rag and appropriate cleaner. Check the bevel and miter mechanisms for sawdust buildup. Lubricate moving parts as per the manual.
Can a compound miter saw cut metal?
Not unless specifically designed for it with the correct blade. Standard wood-cutting blades will be destroyed and can shatter. For metal, you must use a ferrous-metal-cutting blade designed for miter saws and follow all safety precautions for metal cutting (slower speed, secure clamping).
Why does my saw bog down or burn the wood?
This usually indicates a dull blade, trying to cut too fast, or using the wrong blade type. A blade with too few teeth for finish work will tear rather than cut. Also, ensure the blade is not installed backward—the teeth should point downward toward the front of the saw.
Is a laser guide worth it?
For most users, yes. It provides a visual confirmation of where the blade will land, can prevent mis-cuts, especially on expensive molding. If your saw doesn’t have one, you can add an aftermarket laser kit.
How do I make a perfect 45-degree corner for a picture frame?
The trick is in the setup, not just the cut.
1. Ensure your saw blade is perfectly 90 degrees to the table (square).
2. Set the miter angle to 45 degrees, using a positive stop or verifying with a speed square.
3. Cut one end of the first board.
4. Without moving the miter setting, flip the board over (so the good edge is against the fence) and cut the other end. This creates a complementary pair.
5. Repeat for the second board. This method compensates for minor saw misalignment.
The Bottom Line
A compound miter saw transforms angled woodworking from a frustrating guessing game into a precise, repeatable process. Whether you’re installing baseboards or building a deck, its ability to handle both miter and bevel cuts is indispensable.
For the DIY homeowner tackling periodic projects, a 10-inch or 12-inch single-bevel compound miter saw from a reputable brand like DeWalt, Makita, or Milwaukee will serve you excellently. If you frequently work with wide crown molding or large lumber, invest in a sliding compound model. And if complex, multi-angle work is your norm, the dual-bevel sliding compound miter saw is the ultimate time-saving powerhouse.
Understand your needs, respect the tool’s power, and you’ll find the compound miter saw is one of the most valuable additions to any workshop.
