How to Cut Crown Molding on a Miter Saw: The Real Angles
This post contains affiliate links. As an Amazon Associate, we earn from qualifying purchases.
Cutting crown molding on a miter saw requires matching two precise angles: the miter (horizontal swing) and the bevel (vertical tilt). For the common 52/38-degree spring angle crown, the settings are 31.6° miter and 33.9° bevel. The molding is cut upside-down and backwards against the fence, or vertically nested if your saw has a tall enough fence.
People get this wrong because they treat crown like baseboard. Baseboard sits flat against the fence. Crown doesn’t.
It’s angled in space between the wall and ceiling. If you lay it flat on the saw table the normal way, your cuts will be off by a full spring angle, leaving gaps you can see from across the room. That’s the universal mistake.
This guide covers the two main methods, the exact settings for standard and non-standard corners, how to cope joints for perfect inside corners, and the tool choices that actually matter. You’ll also get the timing and sensory details most guides skip, like the smell of burning MDF on a dull blade and the exact sound a perfect coped joint makes when it seats.
Key Takeaways
- Crown molding must be cut either upside-down and backwards against the fence (flat method) or vertically nested to mimic its installed position. Laying it flat like baseboard guarantees a bad fit.
- The spring angle (e.g., 52/38) is the single most important number. It determines your miter and bevel settings. Wrong angle, wrong cut.
- Coping inside corners is almost always better than trying to miter them. It hides wall imperfections and creates a tighter joint.
- A sharp, 80-tooth or higher finish blade is non-negotiable. A 40-tooth framing blade will tear the molding’s profile and leave a fuzzy edge.
- Test every angle setup on scrap first. Even a half-degree miscalibration on your saw can turn a $100 piece of molding into firewood.
Before You Start: The Non-Negotiables
Before you start: A miter saw blade spins at 3,000–4,000 RPM. A loose piece of molding can kick back with enough force to break a finger. Always clamp your workpiece or use a dedicated crown molding jig. Wear safety glasses, wood chips fly sideways, not just down. And hearing protection matters. A 12-inch sliding compound miter saw running an 80-tooth blade hits 95 decibels. Ten minutes of that without muffs gives you a ringing that lasts till dinner.
Get your saw square first. If the blade isn’t 90 degrees to the table and fence, your compound angles compound the error. I’ve watched guys spend an hour recutting a 16-foot piece of poplar because they trusted the factory detent. Don’t be that guy. Check it with a precision square.
You also need a fine-tooth blade. That 24-tooth Diablo framing blade that came with your saw? It’s for 2x4s. On crown, it’ll chew the detailed profile into splinters. A Freud Diablo 80T or a Forrest Woodworker II 80-tooth leaves a glassy cut that needs almost no sanding.
What Are the Two Main Methods for Cutting Crown Molding?
You have two proven paths, and your saw’s fence height decides which one you take.
The first, and most common, is the flat method. You lay the crown molding flat on the saw table, but you flip it so the bottom edge (the part that touches the wall) is against the fence, and the top edge (the part that touches the ceiling) is on the table. It’s upside-down and backwards.
This method works on any miter saw, even a basic non-sliding model. The catch is that it requires compound angles, both miter and bevel adjustments. Your saw must be a compound miter saw at minimum.
For a standard 52/38 spring angle crown molding cut flat, the saw must be set to a 31.6° miter angle and a 33.9° bevel angle. These numbers are derived from the spring angle, not arbitrary. The miter setting positions the horizontal cut, while the bevel angles the blade to match the molding’s tilt against the wall.
The second method is vertically nested. You stand the crown molding upright against the fence, exactly as it will sit on the wall. The saw’s fence needs to be tall enough to support it, many contractor-grade saws like the DeWalt DWS780 have extended fences for this.
The huge advantage here is simplicity: you often only need to set the miter angle. The bevel stays at 0 degrees because the molding is already at its spring angle. This method is faster and less mentally taxing, but it’s limited by your saw’s fence height and the width of your molding.
Which one should you use? If your saw’s fence is under 4 inches tall, you’re using the flat method. If you have a tall fence or a dedicated crown molding jig like the Kreg Crown Pro, go vertical. It’s more intuitive.
Decoding Spring Angles: The One Number You Can’t Guess
Spring angle isn’t marketing. It’s geometry. It’s the angle the molding makes between the wall and ceiling.
Most off-the-shelf crown from big-box stores is 52/38. That means 52 degrees from the wall, 38 degrees from the ceiling. Some older homes or custom profiles use 45/45 or even 38/52.
You can’t eyeball this. If you guess 52/38 on a 45/45 piece, your cuts will be off by 7 degrees. That’s a gap you can’t caulk.
Here’s how to find it if the packaging is gone. Place a scrap piece in a corner. Use a digital angle finder on the back flat surface, the part that touches the wall and ceiling. Or, cut a small sample at 90 degrees, hold it in the corner, and see if it sits flush. If it rocks, the angle is wrong.
| Common Spring Angle | Wall Angle | Ceiling Angle | Typical Use Case |
|---|---|---|---|
| 52/38 | 52° | 38° | Standard big-box crown, most modern homes |
| 45/45 | 45° | 45° | Colonial-style profiles, some custom millwork |
| 38/52 | 38° | 52° | Less common, often found in older craftsman homes |
Why does this matter for the cut? Because the saw settings are calculated from these numbers. For the flat method, the formula is: Miter Setting = arctan(tan(Spring Angle) × sin(Bevel Angle)).
Don’t worry, you don’t need the math. Just know that 52/38 translates to 31.6° miter and 33.9° bevel. Write that on a piece of tape and stick it to your saw.
The Foolproof Step-by-Step Guide (Flat Method)
This assumes you’ve identified a 52/38 crown. If yours is different, you’ll need to look up the specific settings or use a digital angle calculator.
- Mark your cuts clearly. Use a pencil to mark the back of the molding where it will be hidden. Write “TOP” on the ceiling edge and “WALL” on the wall edge. This seems obvious until you’re holding a 10-foot piece upside down and can’t remember which side is which. Do it.
- Set the saw for the first outside corner piece. Position the molding upside-down and backwards against the fence. For the left piece of an outside corner, set the miter to 31.6° LEFT. Set the bevel to 33.9° LEFT. The blade will tilt left. Clamp the piece securely. Make the cut.
- Set the saw for the matching piece. For the right piece of the same outside corner, the miter goes to 31.6° RIGHT. The bevel stays at 33.9° LEFT. Yes, the bevel direction doesn’t change for outside corners on the same saw setup, only the miter does. This is where people second-guess themselves and flip the bevel. Don’t.
- Test the fit with scrap. Before you touch your finished stock, cut two short pieces (6 inches) with these settings. Hold them together in a 90-degree corner. The joint should be tight. If there’s a gap at the front, your saw is out of square or your spring angle is wrong. Adjust in half-degree increments.
- Cut your actual pieces. Repeat steps 2 and 3 on your measured lengths. Always cut the longest pieces first. If you mess up a short piece, you might have enough leftover from a long one to recut.
I once ruined three 12-foot pieces of painted MDF crown because I assumed my saw’s bevel gauge was accurate. It was off by 1.5 degrees. The joints looked fine held in my hands, but on the wall, the gap was a visible 1/8 inch. Now I verify with a digital protractor before every crown job. The $40 tool saved $200 in material.
What happens if you skip the test cut? You commit to a length. You nail the piece up.
The joint is open. Now you have to pull it down, recut, repaint the end, and hope you have enough length left. That’s a two-hour mistake. Test cuts take five minutes.
Inside Corner Cuts: To Miter or to Cope?
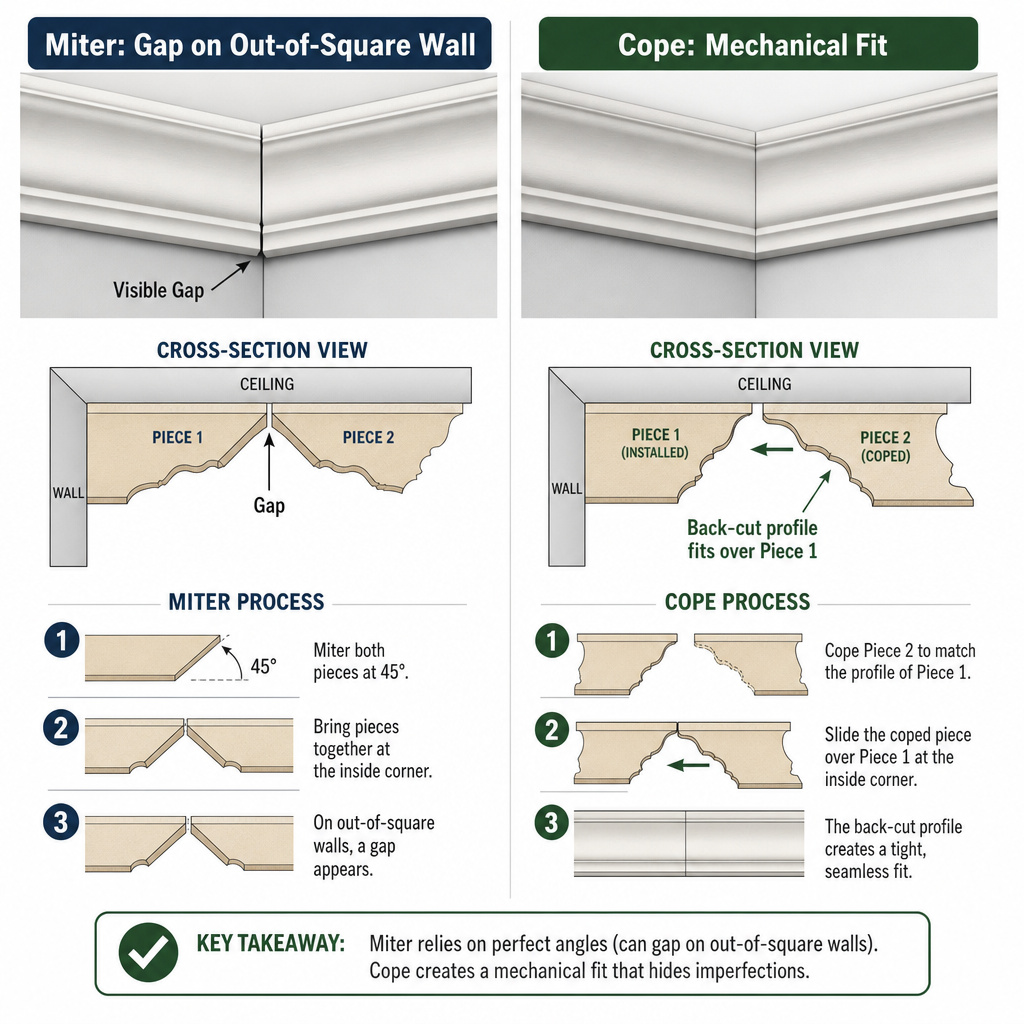
For outside corners, you miter. For inside corners, you have a choice: miter or cope. Mitering is faster but less forgiving. Coping is slower but guarantees a perfect fit, especially on walls that aren’t perfectly square.
Mitering an inside corner uses the same principle as an outside corner, but the settings are mirrored. For a 52/38 crown flat cut:
– Left inside piece: Miter 31.6° RIGHT, Bevel 33.9° LEFT.
– Right inside piece: Miter 31.6° LEFT, Bevel 33.9° LEFT.
The problem? If your walls aren’t a true 90 degrees, that miter joint will show a gap. Caulk can fill a 1/16-inch gap. More than that, and it looks sloppy.
Coping is the professional’s choice. Here’s the process:
1. Cut the first piece square (a 90-degree straight cut) and install it tight into the corner.
2. For the second piece, cut it with a 45-degree miter (bevel at 0, miter at 45°) on the end that will meet the first piece. This exposes the profile’s contour.
3. Use a coping saw to back-cut along that exposed profile. You’re removing the material behind the visible face, leaving only the profile’s front line.
4. Test the fit. The coped piece should slide over the profile of the first piece, forming a tight seam regardless of the wall angle.
The advantage is mechanical. A coped joint doesn’t rely on the walls meeting at exactly 90 degrees. It locks in. In a house with plaster walls that haven’t been square in 80 years, coping is the only way.
| Joint Type | Best For | Risk If Skipped |
|---|---|---|
| Mitered Inside Corner | Quick jobs, painted MDF where caulk will hide imperfections | Visible gaps on out-of-square walls; caulk lines that crack over time as house settles |
| Coped Inside Corner | Finished wood (stained or clear-coated), older homes with uneven walls, high-visibility rooms | Takes 3–4× longer per joint; requires a steady hand with the coping saw |
| Mitered Outside Corner | All outside corners; no practical alternative | Same as inside corners—must have accurate saw settings and square walls |
What Blade Should You Use for Crown Molding?
The blade is everything. A dull or inappropriate blade turns a crisp ogee profile into a chewed-up mess.
You need a fine-tooth crosscut blade. 80 teeth is the sweet spot. A 60-tooth blade will work, but you’ll see more tear-out on the back side of the cut. A 100-tooth blade is overkill for softwoods like pine but is brilliant for hardwoods or MDF.
The Freud Diablo 80T is the go-to for a reason. It’s affordable, stays sharp through a few hundred linear feet of molding, and leaves a surface smooth enough for paint without sanding. For hard maple or oak crown, step up to a Forrest Woodworker II or a Freud Industrial 80T. The carbide is harder and the grind is finer.
Why not use a general-purpose 50-tooth blade? The gullets are too deep. They grab and splinter the molding’s thin edge. You’ll spend more time filling and sanding than you saved on the cut.
Never cut pre-finished or painted crown with a blade that’s been used on pressure-treated lumber. The resin and grit embedded in the teeth will scratch the finish irreparably. Keep a dedicated finish blade for trim work. I learned this after scratching a $300 piece of pre-stained cherry crown. The scratch ran the full length of the cut.
Blade maintenance is simple. Clean the pitch off with a dedicated blade cleaner or simple green after every major job. A gummed-up blade heats up, deflects more, and makes worse cuts.
How Do You Handle Non-90-Degree Corners?
Not every room is square. Bay windows, angled walls, and old-house quirks mean you’ll encounter corners that aren’t 90 degrees.
The rule is this: divide the corner angle in half. That’s your miter setting. If you have a 135-degree corner (common in octagonal rooms), half is 67.5 degrees. Set your miter to 67.5 degrees. The bevel setting remains the same as for a 90-degree corner (33.9° for 52/38 crown).
The tricky part is determining the corner angle. A digital angle finder is the most accurate. Place it on the walls, not the ceiling. Ceilings can be wavy.
Once you have the angle, practice on scrap. Angles over 90 degrees are obtuse, and the cut feels backward. Take your time.
Troubleshooting Common Crown Molding Problems
Even with perfect settings, things go wrong. Here’s what to check.
Problem: The joint is tight at the back but open at the front.
Cause: Your saw blade is not perfectly vertical (bevel) to the table. The cut is leaning. Re-square your saw. This is a calibration issue, not a setting issue.
Problem: Both pieces meet, but the joint looks “twisted” or mismatched.
Cause: The molding wasn’t held consistently against the fence and table. You shifted pressure during the cut. Use a crown molding jig or clamp a stop block to the fence to ensure identical placement every time.
Problem: The cut surface is fuzzy or torn.
Cause: Dull blade or too-fast feed rate. Let the blade do the work. Don’t push the molding through. A sharp 80T blade should glide through pine crown with almost no pressure.
Problem: The measurements are perfect, but the piece is too short/long when installed.
Cause: You measured the wall, but you didn’t account for the spring angle. The “length” of crown molding along the wall is longer than the piece you cut. For precise work, use a crown molding calculator app or the old-school method: hold the piece in place and mark the back with a pencil.
Frequently Asked Questions
Why do I have to cut crown molding upside down?
Because the saw’s table represents the ceiling and the fence represents the wall. To match the molding’s installed position, you flip it. If you cut it right-side up, the angles are reversed and the joint won’t close.
Can I cut crown molding with a basic miter saw (not compound)?
Only if you use a crown molding jig that holds the piece vertically. A basic miter saw only swings left and right (miter). It cannot tilt the blade (bevel), which is required for the flat cutting method. For any serious trim work, a compound miter saw is the minimum.
My walls aren’t square. Should I adjust the miter or the bevel?
Adjust the miter. The bevel angle (33.9° for 52/38) is derived from the molding’s spring angle and doesn’t change with wall angles. The miter setting is what you alter to match the corner. For a 92-degree corner, set your miter to 31.6° plus half the 2-degree error, so 32.6°.
Is it better to cope or miter inside corners?
Cope. Always. The only exception is if the crown is a simple, flat profile with no detail (like a basic cove). Mitered inside corners open up over time as the house settles and wood moves. A coped joint mechanically locks and hides wall imperfections.
How do I know if my saw is accurate enough for crown molding?
Make a test cut on a 90-degree corner with scrap. Hold the two pieces together. If you see light through the joint, your saw is out of calibration. Invest in a good square and learn how to adjust the miter and bevel stops on your specific model. Squaring a miter saw is a foundational skill for all trim work.
The Bottom Line
Cutting crown molding cleanly isn’t about strength or fancy tools. It’s about consistency. Hold the molding the same way every time.
Set the angles from a known spring angle, not a guess. Test on scrap. And for the love of clean lines, use a sharp 80-tooth blade.
The flat method with compound angles works on any saw. The vertical method is simpler if your fence allows it. Inside corners should be coped, not mitered, unless you’re painting and don’t mind a caulk line.
The difference between a pro job and a DIY hack is in those test cuts. The pro spends ten minutes verifying the setup. The hack ruins a $80 piece of poplar and has to go back to the store. Be the pro. Your walls will thank you.