The Right Way to Clean Your Trimmer and Its Attachments
This post contains affiliate links. As an Amazon Associate, we earn from qualifying purchases.
Clean your trimmer and attachments by first making the tool safe, then scrubbing the cutting head with a brush and solvent, degreasing and lubricating the metal parts, cleaning the power unit’s vents and exterior, and finally reassembling for use or preparing it for storage. The entire process takes about 30 minutes and prevents rust, overheating, and performance loss.
Most people hose down their trimmer after a job and call it clean. That’s a shortcut to a short tool life. Water gets into bearings, electrical connections, and the carburetor. It leaves behind mineral deposits that attract more grime and starts corrosion in places you can’t see until the motor seizes or the line feed jams permanently.
This guide walks through the five-step clean that actually extends a trimmer’s life. We’ll cover gas, electric, and battery models, plus the specific needs of string trimmer heads and hedge trimmer blades.
Key Takeaways
- Never use a hose or pressure washer. Forced water ruins bearings and electrical components, and moisture trapped in a gas tank breeds ethanol separation and varnish in the carburetor.
- Lubricate after every clean, but use the right product. A PTFE-based dry lubricant on hedge trimmer blades prevents sap buildup; a drop of light oil on a string trimmer’s spool bearings keeps it spinning freely.
- Storage prep is different for each power type. Gas trimmers must have their fuel systems run dry or treated with stabilizer. Lithium-ion batteries should be stored at 40-60% charge in a climate-controlled space.
- Vibration is your enemy. After cleaning, check and tighten every screw and bolt on the cutting attachment and shaft. A loose guard or handle bolt works itself free in one season of use.
- Sap and resin are the real performance killers. A dedicated citrus-based or commercial resin solvent cuts through pine sap and grass juice that water and soap leave behind.
Cleaning a trimmer isn’t just about removing visible dirt. It’s a preventative maintenance routine that addresses three failure points: abrasive debris wearing down moving parts, corrosive sap and moisture causing rust, and clogged cooling vents leading to motor overheating. A 30-minute clean after heavy use can add years to the tool’s service life.
What You’ll Need to Get Started
Grab these items before you pull the trimmer out of the shed. Using the wrong tool, like a wire brush on aluminum or WD-40 as a lubricant, can do more harm than good.
- Brass-bristle brush: Stiff enough to scrape, soft enough not to score metal. A nylon brush works for plastic parts.
- Clean, lint-free rags: Microfiber or old cotton t-shirts. Avoid paper towels; they leave fibers.
- Resin solvent or citrus-based cleaner: For dissolving pine sap and grass gum on blades. I use a commercial aerosol resin remover.
- PTFE-based lubricant spray or light machine oil: PTFE (Teflon) spray for hedge trimmer blades, 3-in-1 oil for string trimmer spool bearings.
- Flathead and Phillips screwdrivers: For removing guards and covers.
- Compressed air can (optional): Excellent for blowing dust out of motor vents and switch mechanisms.
- Mild degreaser or isopropyl alcohol: For cutting through oily film on the shaft and motor housing.
- Fuel stabilizer (gas models only): If you’re not running the carburetor dry before storage.
I learned the hard way about using the wrong brush. I used a stainless steel wire wheel on a drill to clean a caked-on hedge trimmer blade. It took the protective coating right off the steel. A week later, the blade had a fine layer of surface rust. A brass brush and some elbow grease would have saved it.
Step 1: Make It Safe and Strip It Down
This isn’t just unplugging it. You have to make it mechanically impossible to start.
For a gas trimmer, pull the spark plug wire off the plug. Wrap the boot in a rag and tuck it away so it can’t accidentally reconnect. For a cordless model, remove the battery. For a corded electric trimmer, unplug it from the wall and from any extension cord. Now you can touch the tool without fear.
Next, remove the cutting attachment. For a string trimmer, this usually means unlocking the head, often by pressing two tabs or turning a locking collar, and pulling the spool assembly off the drive shaft. For a hedge trimmer, locate the mounting bolts or knob that secures the blade assembly to the power unit. Have a tray or rag ready; this is where the greasy, grassy mess falls out.
Before you start: A spinning blade or string can cause serious lacerations in a fraction of a second. A gas engine can kick back if the spark plug wire is still connected. A lithium-ion battery can short if terminals contact metal debris. Verify the tool is inert before disassembly.
Step 2: Scrub the Cutting Attachment
This is where the real work happens. The goal is to remove all organic matter that holds moisture and causes corrosion.
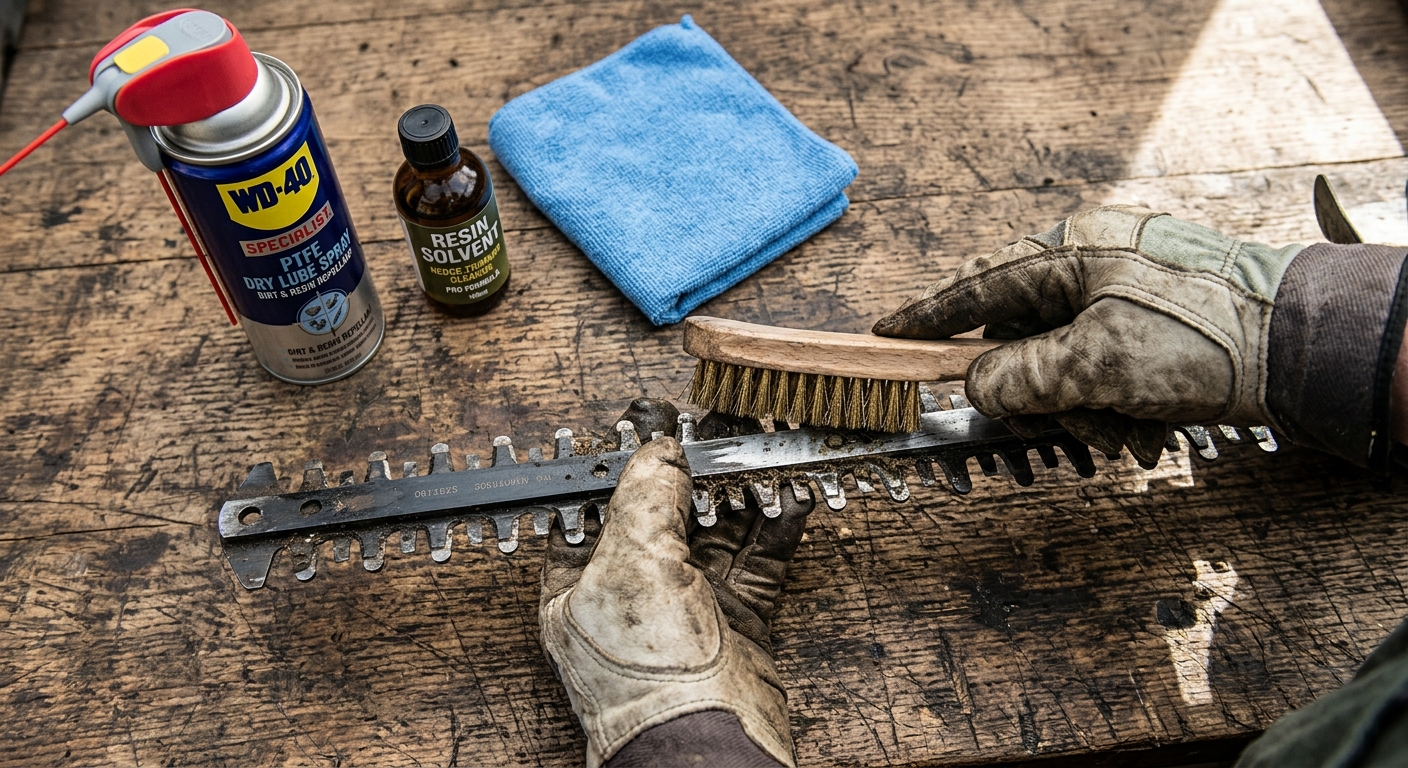
Start with a dry brush. Use the brass-bristle brush to knock off all loose dirt, grass clippings, and sawdust. Get into the teeth of a hedge trimmer and the exit holes of a string trimmer head. For a bump-feed head, you often need to remove the trimmer head to access the inner spring and drive mechanism.
For sap and resin, that sticky, varnish-like coating from cutting pine or wet weeds, you need a solvent. Spray it on, let it penetrate for five minutes, then scrub. The gunk will turn to a slurry you can wipe away. Don’t use gasoline or brake cleaner; they can degrade plastics and rubber seals.
| Attachment Type | Primary Grime | Best Cleaning Tool | Risk If Skipped |
|---|---|---|---|
| String Trimmer Head | Wrapped grass, dirt | Brass brush, compressed air | Line feed jams, unbalanced spin causing vibration |
| Hedge Trimmer Blade | Plant sap, resin | Resin solvent, brass brush | Blades bind, motor overheats, cuts become ragged |
| Metal Brush Cutter Blade | Greasy grass, mud | Degreaser, wire brush (if steel) | Rust pits the cutting edge, blade becomes dangerously unbalanced |
Rinsing is a judgment call. If you can blast with water and then dry the part immediately and thoroughly with compressed air and a rag, it’s okay. If the part has bearings or a sealed gearbox, avoid water altogether. When in doubt, wipe with a rag dampened with solvent or degreaser instead.
Step 3: Degrease and Lubricate
Cleaning strips away protective oils. If you stop here, bare metal will rust faster. This step puts the protection back.
Wipe every metal surface you cleaned with a rag lightly dampened with isopropyl alcohol or a mild degreaser. This removes the solvent residue and any remaining oily film. Let it air dry completely. You should see bare, clean metal.
Now apply lubricant, but in the right place. For hedge trimmer blades, spray a PTFE-based lubricant along the cutting bar and teeth. It dries to a slick film that resists sap buildup. For the pivot points on a string trimmer head or the spool bearings, a single drop of light machine oil is enough. Do not spray lubricant into the electric motor vents or onto the drive shaft splines.
I used to oil my hedge trimmer blades with standard 3-in-1 oil. It worked for a week, then it became a sticky magnet for every bit of dust and pollen in the yard. Switching to a dry PTFE spray meant I could go a full month between cleans before performance dropped. The blades just glide.
Step 4: The Power Unit Cleanup (Gas, Electric, Battery)
The body of the trimmer needs attention too, but it’s more about cooling and longevity than cutting performance.
Use compressed air or a soft brush to clear all debris from the cooling vents. These are the slots on the motor housing. A clogged vent turns the motor into an oven.
Brush out the trigger mechanism and the area where the shaft meets the motor. For gas trimmers, pop the air filter cover and inspect the filter. A dirty filter chokes the engine. Tap it clean or wash it if it’s a foam type, but let it dry completely before reinstalling.
Wipe down the entire shaft, handle, and motor housing with a damp cloth. For greasy grips, a little dish soap on the cloth helps. Dry it thoroughly.
Gas Trimmer Specifics:
- Check the spark arrestor screen on the muffler (if equipped). Carbon buildup here restricts exhaust flow and kills power.
- Look at the fuel filter inside the tank. If it’s dark brown or black, replace it.
- This is the time to decide on storage: either add fuel stabilizer to a full tank, or run the engine until it stalls to empty the carburetor.
How Do You Clean a Trimmer for Storage?
A trimmer put away dirty or wet won’t be the same tool in the spring. Storage cleaning is a more thorough version of the steps above, with a focus on preserving the fuel system and battery.
For all trimmers, perform the full clean and lubricate as described. Then, add these steps:
For Gas Trimmers:
- Fuel Decision: Either add a fuel stabilizer (like STA-BIL) to a full tank and run the engine for 5 minutes to circulate it, or run the engine until it completely runs out of fuel. Storing with untreated fuel for months leads to varnish in the carburetor jets.
- Oil the Cylinder: Remove the spark plug, add a teaspoon of engine oil into the cylinder, and slowly pull the starter cord a few times to coat the walls. Reinstall the plug.
- Store Fuel Safely: Never store gasoline or mixed fuel in living areas. Use an approved container in a well-ventilated shed.
For Battery-Powered Trimmers:
- Charge to 60%: Lithium-ion batteries degrade if stored fully charged or fully depleted. Charge the battery to about 60% before storage.
- Store Separately: Remove the battery from the tool. Store it in a dry place with a stable temperature, away from the charger.
For All Trimmers:
- Hang It Up: Store the trimmer vertically by its handle or on a wall hook. Keeping it off concrete floors prevents moisture wicking.
- Cover It: Use a breathable cloth cover or store it in a cabinet to keep dust off.
What’s the Best Way to Clean Hedge Trimmer Blades?
Hedge trimmer blades are a special case. They have two reciprocating blades that must slide perfectly. Gummed-up sap is their worst enemy.
After brushing and solvent cleaning, you must check alignment. Manually slide the blades back and forth. They should move smoothly without catching. If they bind, look for a bent tooth or debris caught between the blades. A small needle file can gently remove a burr on a tooth.
The final, critical step is lubrication. Apply a light coat of lubricant to the full length of both blades. Then, with the tool still off and safe, pull the trigger for just a second to let the blades cycle and distribute the oil. Wipe off the excess. This process is detailed further in our guide on hedge trimmer maintenance.
| Problem | Likely Cause | Fix | Timeline if Ignored |
|---|---|---|---|
| Blades bind or jam mid-cut | Built-up sap/resin between blades | Clean with resin solvent, lubricate with PTFE spray | Next major use will overheat the motor |
| Cuts are ragged, leaves torn | Dull blades or bent teeth | Sharpen blades or replace blade set | Damages plant stems, encourages disease |
| Excessive vibration | Loose blade mounting bolts or unbalanced wear | Tighten all bolts, check for damaged sections | Wears out gearbox bearings within a season |
| Motor runs but blades don’t move | Stripped drive gear or shear pin | Inspect and replace damaged gear/pin | Complete failure, requires professional repair |
Frequently Asked Questions
Can I use WD-40 to clean my trimmer?
WD-40 is a water-displacer and light penetrant, not a cleaner or lubricant. It’s fine for breaking up light surface rust or displacing moisture after a wipe-down, but it will not dissolve sap and it evaporates, leaving metal unprotected. Use a dedicated resin solvent to clean, then a proper lubricant to protect.
How often should I clean my trimmer?
Give it a basic brush-off after every use. Perform the full degrease and lubricate process after every 5-10 hours of runtime, or immediately after cutting sappy plants like pine or cedar. Before seasonal storage, always do the full deep clean.
Is it okay to pressure wash my trimmer?
Never. The high-pressure water will force itself past seals into the gearbox, motor bearings, and electrical connections. This guarantees corrosion and early failure. Always clean by hand with brushes and rags.
My string trimmer head is full of wrapped grass. How do I get it out?
First, make the tool safe. Then, use a utility knife or a hook tool (like a bent coat hanger) to carefully pick and cut the wrapped material away. For a stubborn bump-feed head, you may need to disassemble it completely. Soaking it in warm, soapy water for 15 minutes can soften the grass first.
Why does my gas trimmer run poorly after storage?
Old fuel is the most common culprit. Ethanol-blended fuel absorbs water and separates, leaving gummy varnish in the carburetor’s tiny jets. The fix is to drain the old fuel, clean or replace the carburetor, and use fresh, stabilized fuel. Running the carburetor dry before storage prevents this.
Do I need to sharpen trimmer blades?
Yes, but less often than you think. Hedge trimmer blades need sharpening every 20-50 hours of use. String trimmer line is consumable, you just replace it. For metal brush cutter blades, sharpen them when you notice a decline in cutting aggression or an increase in vibration. Our guide on keeping trimmer blades sharp covers the techniques.
The Bottom Line
Cleaning a trimmer isn’t about making it look new. It’s a functional process that removes the three things that kill tools: abrasive dirt, corrosive moisture, and clogging sap. Spend 30 minutes with a brush, some solvent, and the right lubricant after the season’s last big job. That ritual is cheaper than a new carburetor, a replacement battery, or a whole new tool. Your future self, pulling a reliably starting trimmer off the wall next spring, will thank you.