Ryobi 40V Trimmer String Guide: What Size You Need to Use
This post contains affiliate links. As an Amazon Associate, we earn from qualifying purchases.
For most Ryobi 40V string trimmers, the manufacturer-recommended line diameter is 0.080 inches (2.0 mm). This size balances cutting power, durability, and motor efficiency. Using a thinner line like 0.065 inches will break constantly on tough weeds, while a thicker line like 0.095 inches can overwork the motor and drain your battery faster.
The confusion starts because people assume all trimmer line is the same. They grab whatever’s on the shelf – a thicker line for “more power” or a cheaper, thinner spool – and end up fighting their tool instead of using it. The motor, gearbox, and feed mechanism in your Ryobi 40V are engineered for a specific load.
This guide covers why 0.080 inches is the sweet spot, how to confirm it for your specific model, the real difference between round, twisted, and multi-sided line, and the exact steps to replace it without the common tangles and jams.
Key Takeaways
- The Ryobi 40V trimmer line size is almost universally 0.080 inches. Check your manual or the label on the trimmer head itself to be certain.
- Using a thicker line (0.095 inches or more) forces the motor to work harder, leading to premature wear, faster battery drain, and potential overheating.
- A thinner line (0.065 inches) snaps constantly in anything thicker than soft grass, turning a 30-minute job into a frustrating hour of re-feeding.
- The line’s shape matters as much as its diameter. Round line is durable and feeds reliably, while twisted or multi-sided line cuts more aggressively but wears faster.
- Always remove the battery before any line replacement. It’s the first and most important safety step.
What Happens if You Use the Wrong Size String?
The wrong line diameter doesn’t just perform poorly. It actively fights the tool’s design. A 0.065-inch line feels weak because it is weak.
It lacks the mass and stiffness to maintain momentum when it hits a dandelion stalk or a woody weed stem. The line deflects, slows down, and either snaps or fails to cut cleanly. You’ll find yourself bumping the head constantly, feeding out more line, and watching your battery percentage drop as the motor revs to compensate for the ineffective cutting.
Before you start: The trimmer head spins at several thousand RPM. Never work on it with the battery installed. A accidental bump of the trigger can cause severe lacerations. Always wear safety glasses—flying debris and snapped line pieces are common.
A 0.095-inch or 0.105-inch line creates the opposite problem. It has more mass, so it requires more torque from the motor to get up to speed and maintain it.
Your Ryobi 40V motor can handle it for short bursts, but sustained trimming in thick grass will cause the motor to bog down, draw more amps, and heat up. You’ll feel the tool slowing, hear the strain, and your runtime will be cut by a third. Over time, that extra strain wears down the gearbox and motor brushes.
The 0.080-inch line sits in the middle. It’s stiff enough to transfer the motor’s energy into a clean cut, but light enough that the system isn’t perpetually stressed. The battery lasts as advertised, the head doesn’t overheat, and the line feeds smoothly without constant manual intervention.
The Physical Reason 0.080 Inches Works Best
It’s about rotational inertia and centrifugal force. The trimmer head is a flywheel. When you spin a heavier object (thicker line), it takes more energy to get it moving and keep it moving. The Ryobi 40V motor and battery pack are calibrated for the rotational mass of a specific line diameter—0.080 inches. Go thicker, and you’re asking the electrical system to push a heavier flywheel than it was designed for.
The gearbox is another factor. The gears are cut to deliver optimal torque at a specific rotational load. Overload them with a thicker line, and you’ll hear a grinding whine under heavy cutting. That’s the sound of metal teeth wearing against each other faster than they should. Underload them with a thinner line, and the system is inefficient, wasting power as the line flails instead of cutting.
I learned this the hard way with a Ryobi 40V EXPAND-IT model a few summers ago. I ran out of my usual 0.080 line and used a leftover spool of 0.105 “professional grade” line I had for a gas trimmer. The first few passes through some overgrown fence line were great. Then the motor started getting hot to the touch.
Twenty minutes in, the battery—which normally lasts me 45—was dead. The next time I used it, the feed mechanism jammed because the thicker line wouldn’t retract cleanly into the spool chamber. I had to disassemble the head to clear a bird’s nest of melted nylon. Never again.
Which Ryobi 40V Model Do You Have? (It Matters Slightly)
While 0.080 inches is the standard, you should always verify. The information is stamped directly on the trimmer head or in the manual. Here’s a quick reference for common models:
| Ryobi 40V Model | Official Line Recommendation | Notes |
|---|---|---|
| RY40210 (40V String Trimmer/Edger) | 0.080-inch twisted single line | The most common model; uses a bump-feed head. |
| RY40250 (40V EXPAND-IT Attachment Capable) | 0.080-inch | Compatible with the Expand-It attachment system; often comes with a 0.080″ spool pre-installed. |
| Older 40V Brushless Models | 0.080-inch or 0.095-inch | Check the head label. Some older kits recommended 0.095″ for heavy brush. |
If your head is labeled for 0.095 inches, you can use it. Just know your battery life will be shorter, and you should let the motor cool down every 15 minutes during heavy use. If it says 0.080 inches, never go to 0.095. The feed mechanism and exit holes are sized specifically for that diameter.
For the RY40210 and similar 40V trimmers, Ryobi specifies a 0.080-inch diameter, twisted line. This configuration optimizes the balance between cutting aggression, line durability, and smooth feeding through the fixed eyelets on the bump-feed head.
String Shape: Round, Twisted, or Multi-Sided?
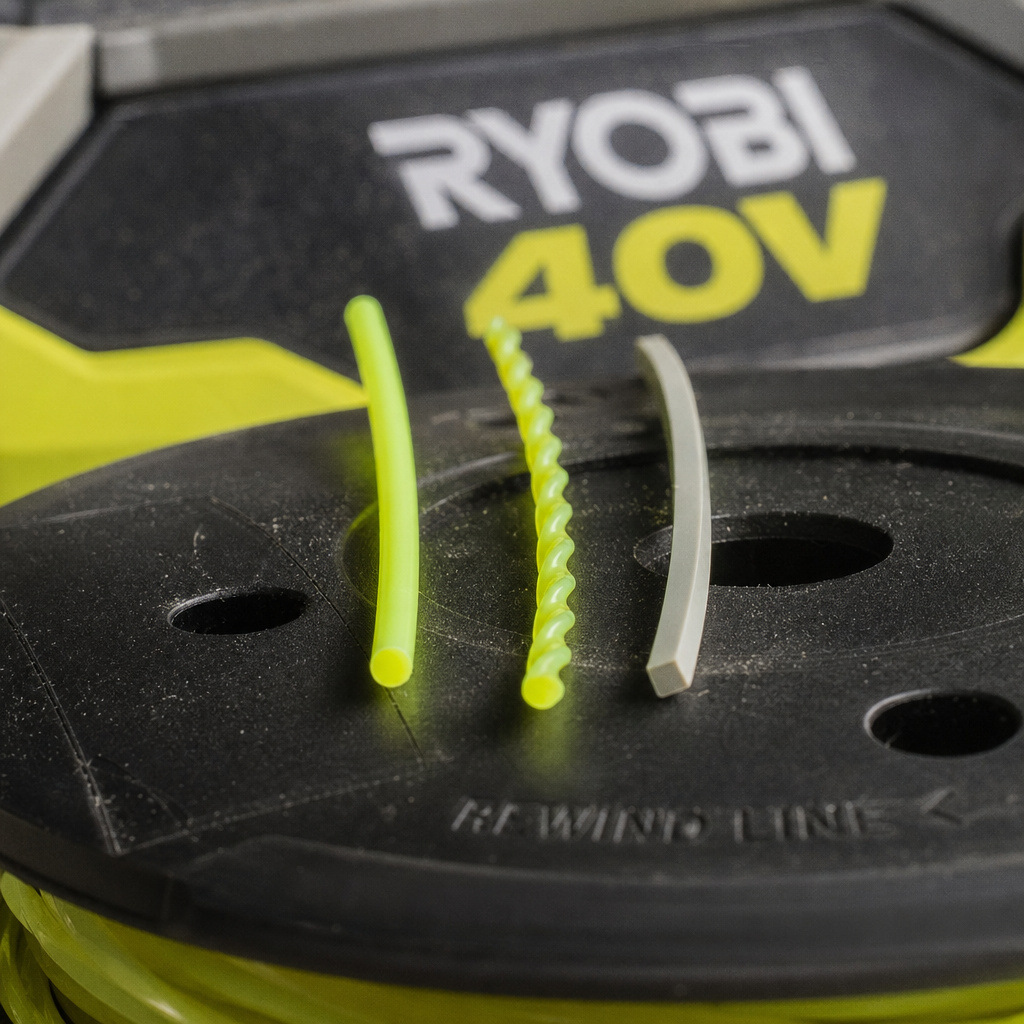
Diameter is the first decision. Shape is the second. It changes how the line interacts with vegetation.
- Round Line: The default. It’s durable, feeds the most reliably, and is generally the cheapest. The smooth surface spins with less air resistance, which is easier on the motor. It tends to wear evenly rather than fracture. This is your go-to for general lawn maintenance and edging.
- Twisted Line: Ryobi’s own premium line is twisted. The twisted profile creates a slightly sharper leading edge, which can slice through fibrous weeds like crabgrass a bit cleaner. It also produces a quieter “swish” compared to the buzz of round line. The trade-off is that the twisted edges can wear down or chip if you hit pavement or rocks frequently.
- Multi-Sided (Square, Star, Serrated): These are aggressive cutters designed for thick, woody vegetation. The corners act like tiny blades. They’re overkill for a suburban lawn and will strain your 40V motor if you’re not careful. They also wear down faster on hard surfaces and can be more prone to breaking at the corners. I only recommend these if you’re clearing light brush and you accept the reduced battery life and faster line consumption.
My personal pick for 90% of Ryobi 40V trimming jobs is a 0.080-inch twisted line. It offers a noticeable cut quality improvement over round line without the downsides of the aggressive shapes. It’s the factory recommendation for a reason.
Step-by-Step: How to Replace Your Ryobi 40V Trimmer Line
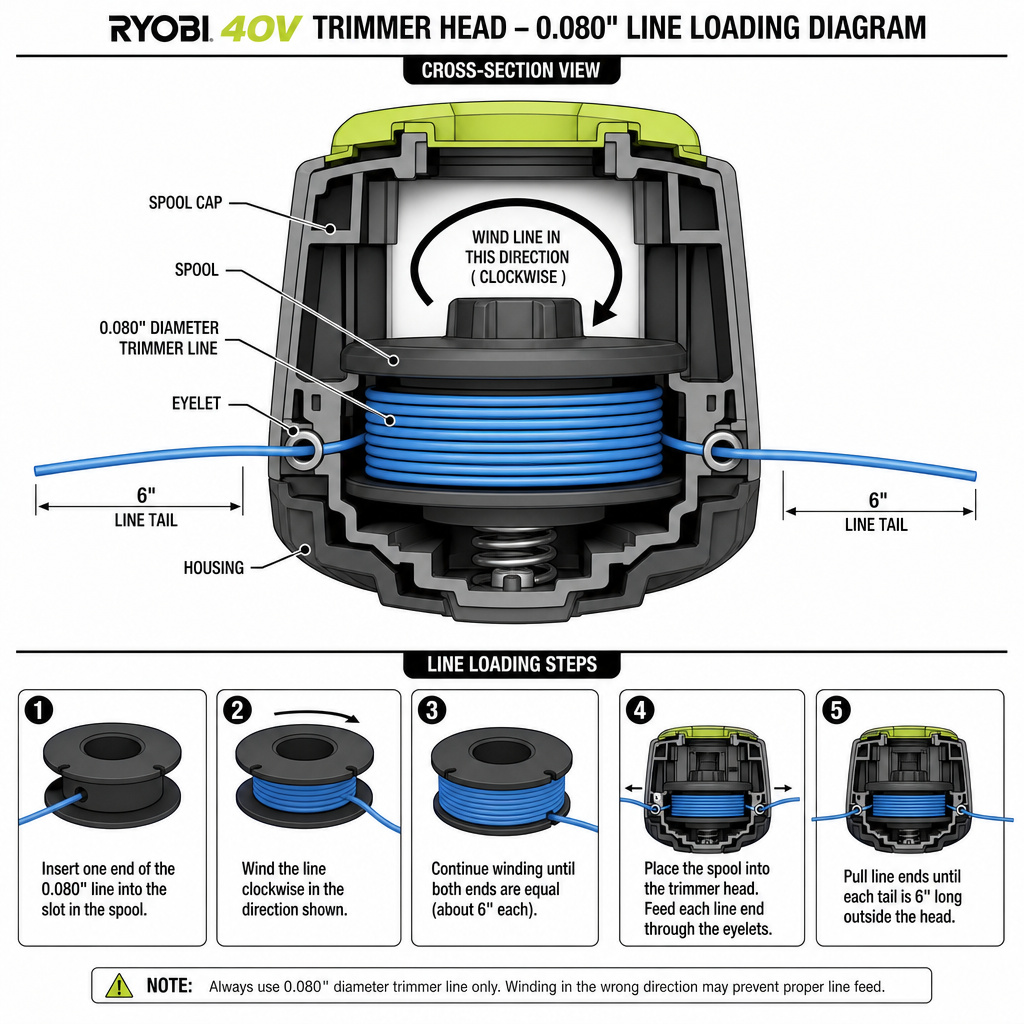
Replacing the line is straightforward if you follow the order. The most common mistake is winding the line the wrong direction or overfilling the spool.
- Remove the battery. This is non-negotiable. Place the trimmer on a stable surface.
- Unlock and remove the power head. Find the locking collar on the shaft. Depress the tab and rotate the head until it unlocks, then slide the entire power head off the shaft. This gives you room to work.
- Open the trimmer head. Hold the spool housing steady and look for the alignment arrows. Rotate the bump knob until the arrows line up. The cap should then release. Press the green button in the center to pop the spool out.
- Clean the spool chamber. Use a brush or compressed air to remove any grass, dirt, or old line fragments. Debris here is the main cause of feed jams.
- Cut and thread your new line. Cut a length of about 20 feet of 0.080-inch line. Find the center anchor hole on the spool and thread the line through, pulling until you have equal lengths on both sides.
- Wind the line onto the spool. This is the critical step. Look for the directional arrow on the spool. Wind each line end tightly and evenly onto its respective side, following that arrow. Keep the winds neat and side-by-side. If the lines cross or loop loosely, they will tangle during use.
- Leave the tails. Stop winding when you have about 6 to 8 inches of line left on each side. This tail will be pulled out during the first few bumps.
- Reassemble. Seat the spool back into the housing, ensuring it clicks down. Feed each line tail out through its respective exit eyelet. Realign the arrows on the housing and snap the cap back on.
- Reattach the power head. Slide the power head back onto the shaft, rotate until it locks, and you should feel it click into place.
- Pull the line tails. With the battery still out, manually pull on both line tails to release them from the spool’s retention slots. They should move freely.
- Test. Reinstall the battery, start the trimmer in a safe area, and tap the head on the ground to feed out the final few inches of line. It should cut off cleanly against the guard.
If the line doesn’t feed, the spool is likely wound in the wrong direction or is overfilled. Take it apart and re-wind it. It’s faster to re-do it now than to fight it later.
I wind my spools by hand, pulling the line taut with every turn. A loose wind guarantees a jam the first time you hit a thick patch of grass and need to bump-feed more line. That popping sound you hear isn’t the head working—it’s the line tangling inside the chamber.
Troubleshooting Common Line Feed Problems
Even with the right line, things can go wrong. Here’s a quick diagnostic table.
| Problem | Likely Cause | Fix |
|---|---|---|
| Line won’t feed when bumped | Line wound in wrong direction; spool overfilled. | Disassemble, unwind, and re-wind following the arrow. Don’t overfill. |
| Line feeds too much, gets too long | Worn or broken bump-feed spring; tails too long. | Replace the spring inside the head. Trim tails to 6-8 inches after winding. |
| Line snaps immediately on contact | Using line that’s too thin (0.065″); hitting hard surfaces like concrete. | Switch to 0.080″ line. Keep the cutting swath to grass and weeds only. |
| Motor strains, battery dies quickly | Line is too thick (0.095″+); vegetation is too dense for the tool. | Use correct 0.080″ line. For dense growth, make multiple lighter passes. |
| Head makes a clicking/grinding noise | Debris jammed in spool housing; worn gear teeth. | Disassemble and clean thoroughly. If noise persists, gearbox may need service. |
If you’re constantly battling feed issues, the process for unlocking the trimmer head and cleaning the internal mechanism is the same across most Ryobi 40V models.
Bulk Line vs. Pre-Wound Spools: What’s the Better Value?
You have two buying options: a long coil of bulk line you wind yourself, or pre-wound spool cartridges.
- Bulk Line: Much cheaper per foot. A 500-foot spool of 0.080-inch twisted line costs about the same as two 25-foot pre-wound spools. The trade-off is the time and occasional frustration of winding it yourself. It’s the choice if you use your trimmer often.
- Pre-Wound Spools: Convenience incarnate. You pop out the old spool and click in the new one in 30 seconds. The cost is significantly higher per foot of line, and you’re locked into the brand’s line quality. They’re perfect for quick fixes or if you only trim a few times a season.
I buy bulk line for my primary trimmer. I keep a pre-wound spool in the garage as a backup for when I’m in a hurry or when a helper is using the tool. The trimmer line replacement process is simple enough that bulk line is worth the minor hassle.
Frequently Asked Questions
Can I use a 0.095 line on my Ryobi 40V if the manual says 0.080?
You can, but you shouldn’t. The motor and gearbox are engineered for the rotational mass and air resistance of 0.080-inch line. A 0.095-inch line increases that load by about 40%. You’ll experience reduced battery life, more motor heat, and a higher chance of feed mechanism jams. Stick with the manufacturer’s specification.
How often should I replace my trimmer line?
Replace it when it’s worn down to about half its original diameter, or if it’s becoming brittle and snapping constantly. For typical weekly lawn maintenance, a spool might last a full season. If you’re clearing dense weeds or have a large property, you might go through a spool every month or two. Inspect the line before each use.
Is there a biodegradable trimmer line option?
Yes, several manufacturers offer lines made from plant-based materials like corn starch or other polymers that break down faster than standard nylon. They are a good choice if you’re trimming near garden beds or water features. Be aware they are often less durable and may wear down faster, especially if you hit abrasive surfaces.
Why does my line keep breaking even though I’m using the right size?
You’re likely hitting hard surfaces like rocks, fence posts, or concrete edging. The tip of the line travels at over 200 miles per hour. Contact with a solid object instantly vaporizes a section of the nylon, causing it to snap. Practice keeping the cutting swath a few inches away from solid obstacles. Also, old, sun-bleached line becomes brittle. Store your trimmer and spare line out of direct sunlight.
Before You Go
The right line turns your Ryobi 40V trimmer from a frustrating chore machine into a reliable workhorse. Memorize the number: 0.080 inches. Confirm it on your trimmer head, buy a quality twisted line in that diameter, and learn to wind the spool neatly. That combination alone solves 80% of trimmer performance complaints.
Keep a spare spool or a coil of bulk line in your shed. Nothing kills a Saturday morning’s momentum like running out of line halfway through the job. And remember, let the tool do the work—if you’re forcing it, the line is either wrong, worn out, or you’re asking it to cut something it wasn’t designed for. For everything else, that 40V motor has more than enough power.