How to Use a String Trimmer as an Edger (5 Proven Steps)
This post contains affiliate links. As an Amazon Associate, we earn from qualifying purchases.
Using a string trimmer as an edger requires matching three things: the correct vertical angle (90 degrees), a fresh line of the right diameter, and a slow, steady walking pace that lets the tool’s weight do the cutting. Get any wrong and you get a ragged, wavy line that looks worse than no edge at all.**
Most people swing the trimmer like they’re clearing weeds. They hold it at a 45-degree angle and move too fast. The line glances off the grass, tears the tops, and throws a cloud of debris back at their ankles. The edge is uneven within three feet.
This guide walks through the physical adjustments, the muscle memory, and the common corrections that turn a string trimmer from a weed whacker into a precision edger. You will learn how to read the line’s wear, position your body to avoid fatigue, and fix an existing edge that’s gone off the rails.
Key Takeaways
- Hold the trimmer at a strict 90-degree angle with the cutting line spinning top-to-bottom, not side-to-side. The debris shield should be parallel to the ground.
- Walk slowly, letting the trimmer’s weight and the spinning line slice the grass. Pushing or forcing it creates wavy lines and wears out the line in minutes.
- Use a straight-shaft trimmer for edging. Curved-shaft models force your wrist into an unsustainable position that guarantees an uneven edge.
- Always edge onto a hard surface (concrete, driveway) or into a mulch bed, never into standing grass. This contains debris and defines the edge cleanly.
- Inspect and refresh your trimmer line before starting. Worn, short line tears grass instead of cutting it, which is the main cause of a ragged, brown edge.
Before You Start: The Non-Negotiables
Before you start: A spinning trimmer line travels at over 200 mph. It will throw rocks, glass, and metal fragments with enough force to break skin and cause permanent eye injury. Always wear ANSI-rated safety glasses, long pants, closed-toe shoes, and gloves. Clear the work area of debris, and never operate the tool near children or pets.
This isn’t a suggestion. I’ve pulled gravel chips out of my shin after a line snapped and whipped a stone from the driveway. The cut was shallow but bled for an hour.
Glasses stop that. Long pants stop that. Do the boring stuff first.
Also, locate underground utilities if you’re creating a new edge. Call 811. The line can cut through shallow irrigation lines or low-voltage lighting wire in one pass. The repair bill is more than the cost of the phone call.
What’s the Best Angle for Edging with a String Trimmer?
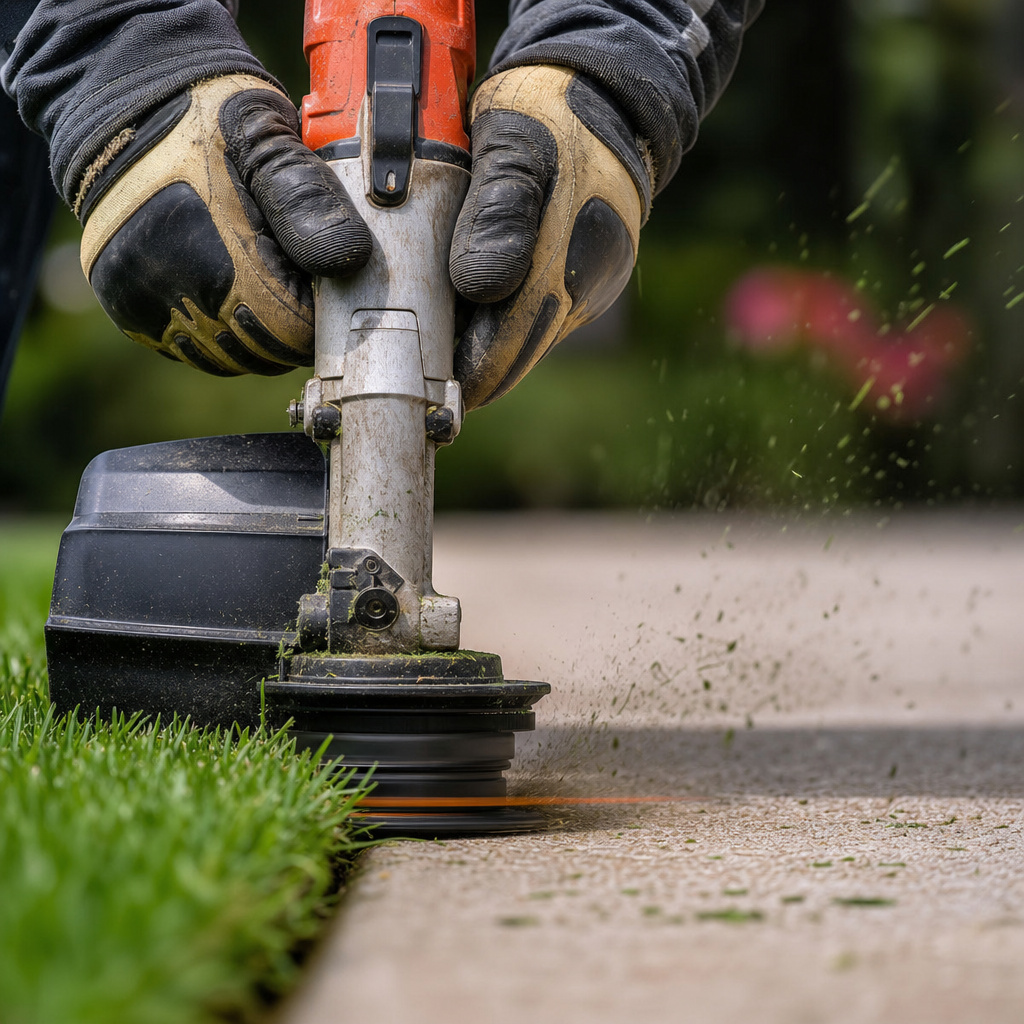
The angle is everything. For trimming, you hold the tool roughly horizontal so the line spins parallel to the ground. For edging, you pivot the entire tool 90 degrees so the line spins perpendicular to the ground.
When edging with a string trimmer, the cutting plane must be vertical. The debris shield, normally facing forward for trimming, should rotate to sit parallel with the ground surface. This repositions the guard to deflect debris downward rather than toward the operator, while maintaining the critical top-to-bottom line rotation necessary for a clean vertical cut.
If the shield doesn’t rotate, you’ll have to adjust your stance to keep debris away from your legs. On most homeowner-grade trimmers like the Echo SRM-225, the shield unlocks with a button and swivels 90 degrees. If yours doesn’t swivel, note the spin direction.
Most trimmers rotate clockwise (viewed from above). That means debris is thrown to the right. Stand so the debris is thrown onto the area you’ve already cut, or onto a hard surface.
Why the vertical angle matters: Grass stems are vertical. A horizontal spinning line hits them sideways, often bending and tearing them. A vertical spinning line meets the stems head-on, slicing through them cleanly. It’s the difference between chopping a carrot with the blade versus slapping it with the flat side.
How Your String Trimmer’s Design Affects Edging
Not all trimmers are created equal for this task. The shaft design dictates your comfort and the edge’s consistency.
| Shaft Type | Best For | Edging Limitation |
|---|---|---|
| Straight Shaft (e.g., Stihl FS 56 RC-E) | Extended edging, professional results | Heavier, can be more expensive |
| Curved Shaft | Light trimming, overhead work | Poor ergonomics for vertical hold; causes wrist fatigue |
| Bump-Feed Head | Most user-friendly, easy line refresh | Head can drag on the ground if angled incorrectly |
| Fixed-Line Head | Minimal maintenance | Requires full disassembly to replace worn line |
Straight-shaft trimmers align the engine or motor with the shaft. When you hold it vertically, your forearm, wrist, and the shaft form a straight, strong line. You can guide it for thirty minutes without cramping.
Curved-shaft trimmers force your wrist into a constant, awkward pronation. After five minutes, your forearm burns. After ten, your edge starts to wobble because your muscles are fighting the tool’s geometry.
I used a curved-shaft Black+Decker for a season because it was cheap. By the end of every edging session, my right wrist ached for hours. Switching to a straight-shaft Echo SRM-225 felt like upgrading from a kitchen knife to a chef’s knife. The tool disappeared in my hands.
Attachment-capable systems like the Ryobi Expand-It can work, but the added connection point introduces a slight flex. It’s manageable for short runs, but for a long, crisp driveway edge, a dedicated straight-shaft trimmer is the right tool.
How to Edge a Lawn with a String Trimmer (Step-by-Step)
This sequence assumes you have a mowed lawn and a defined edge to follow, either existing or marked. If you’re establishing a new edge, use a garden hose to lay out the curve. Walk on it to imprint the line in the grass.
Step 1: Prepare the Tool and the Edge
Mow your lawn first. Trying to edge through long grass is like cutting fabric with scissors while it’s still on the roll. It bunches and pulls. Then, manually trim any obvious overhang along the edge with your trimmer in normal horizontal mode. This clears the way for the vertical cut. Finally, inspect your line. It should have at least 6 inches of fresh line extended from the head. If it’s worn down to nubs, replacing trimmer line is your first task. Worn line shreds grass.
Step 2: Assume the Stance and Grip
Position yourself so the edge is to your left (for a right-handed user with a standard clockwise-spinning trimmer). Hold the shaft with your left hand near the balance point, your right hand on the trigger handle. Engage the throttle to get the line spinning at full speed before it touches the grass. Your body should be square to the direction you’re walking, not twisted.
Step 3: Lower into Position and Make First Contact
Pivot the entire trimmer to the 90-degree vertical angle. The debris shield should be flat, facing the ground. Lower the spinning line until it just kisses the ground at the very edge of your lawn. You’ll hear the pitch change from a high whine to a deeper thrum as it loads. Don’t plunge it in. Let it find its depth.
Step 4: Walk the Line
Start walking sideways, maintaining the angle. Your movement should be a slow, steady shuffle. Do not use your arms to swing the tool. Let the forward walking motion pull the trimmer along the edge. The line should be cutting, not digging. If you feel the tool bog down or see soil flying, you’re too deep. Lift slightly.
Step 5: Manage Debris and Overlap
For a clockwise-spinning trimmer, debris is thrown to the right—onto your already-cut path or onto the driveway. This is why you edge from the lawn onto the hard surface. When you reach the end of a pass, release the throttle, lift the trimmer, and walk back to your starting point for the next section. Overlap each pass by an inch or two to avoid missing a spot.
I learned the overlap rule the hard way on a long fence line. I’d get into a rhythm, stride a little too far, and leave a 3-inch uncut tuft every fifteen feet. From the house it looked like a dotted line. Now I watch the cut path, not my feet.
For complex curves, take smaller steps and pivot your whole body, not just the tool. Tight curves require almost a standing-in-place shuffle. Rushing them creates a scalloped edge.
Troubleshooting Common Edging Problems
You will run into these. Everyone does.
Problem: Wavy, inconsistent edge depth.
Cause: Inconsistent walking speed or varying downward pressure. Your body is steering, not guiding.
Fix: Pick a visual guide on the trimmer head—like the edge of the debris shield—and keep it at a fixed distance from the hard surface (e.g., 1/2 inch above the driveway). Watch that guide, not the spinning line. Your pace will even out automatically.
Problem: Brown, torn grass along the edge.
Cause: Dull or too-short trimmer line. It’s ripping the grass blades instead of cutting them.
Fix: Stop immediately. You’re damaging the lawn. Bump out fresh line or, better yet, replace the entire spool with new 0.095-inch line. Torn grass invites disease and dies back, making the edge look worse than before you started.
Problem: Soil and mud being thrown up.
Cause: You’re cutting too deep. The line is hitting soil, not just grass.
Fix: Lift the trimmer head a quarter-inch. The goal is to slice the grass at the soil line, not trench into the dirt. A shallow trench just fills with water and erodes.
Problem: Extreme vibration or line breaking constantly.
Cause: The spool is improperly wound, unbalanced, or the line is hitting a fixed object (a buried paver, a tree root).
Fix: Stop and inspect. For vibration, restringing a trimmer with even, tight winds is the cure. For breakage, clear the edge of hidden obstacles. If breakage persists, you may have a worn or cracked trimmer head that needs replacement.
Edging Different Surfaces: Concrete, Mulch, and Garden Beds
The surface you’re edging against changes the technique slightly. The core angle and pace remain the same.
| Surface Type | Technique Adjustment | Watch Out For |
|---|---|---|
| Concrete / Asphalt Driveway | Standard 90-degree angle. Edge from lawn onto concrete. | Line wear is high. The abrasive surface quickly dulls round line. Use reinforced square line. |
| Mulch Beds | Angle the trimmer slightly (5-10 degrees) away from the bed. Edge from lawn into the mulch. | Mulch will be thrown into the lawn. Blow or rake it back into the bed afterward. |
| Gravel Paths | Not recommended. Gravel will be launched violently. | Use a metal edging blade or a manual edger instead. A string trimmer here is a safety hazard. |
| Fence Lines | Hold the trimmer so the debris shield faces the fence. Debris sprays away from it, preventing buildup and staining. | Watch for wire fencing at the base. It will shred your line instantly. |
Edging against mulch is forgiving. The loose material absorbs errant cuts and hides small mistakes. Concrete is the unforgiving master. It shows every wobble. That’s why practicing your edging with a string trimmer technique on a back fence line before tackling the front driveway curb appeal is a smart move.
Post-Edging Cleanup and Tool Maintenance
The job isn’t done when the edge is cut. Leaving clippings and dirt on the edge is an open invitation for weeds to germinate and for the crisp line to blur.
- Blow or sweep the edge. Use a leaf blower on a low setting or a stiff broom to clear all loose material from the cut channel and the adjacent hard surface. This reveals the true quality of your work and discourages regrowth.
- Clean the trimmer. Grass sap and dirt build up on the shield and under the head. Wipe it down with a damp rag. For a deeper clean, especially after edging damp grass, follow a full cleaning your string trimmer routine.
- Inspect the line. Note how much line is left. If you used more than a third of it, wind on a fresh batch before storing the tool. You always want to start the next job with a full spool.
- Store properly. For battery units, remove the battery. For gas units, either run the carburetor dry or use fuel stabilizer. Hang the tool or store it standing up, not on its head. Detailed steps are in our guide on proper trimmer storage.
This maintenance adds five minutes to your job. It also adds years to your tool’s life. A trimmer caked in dried grass and mud overheats, corrodes, and the head mechanism seizes. I’ve had to chisel apart heads that were neglected for one season too many.
Frequently Asked Questions
Can any string trimmer be used as an edger?
Most string trimmers can edge, but straight-shaft models are far easier. Curved-shaft trimmers force an awkward wrist angle that leads to fatigue and wavy lines within ten minutes. Look for a model where the shaft aligns naturally with your forearm when held vertically.
Why does my string trimmer leave a ragged edge?
ragged edge usually means one of three things: the trimmer line is worn down to nubs, you’re moving too fast, or you’re not holding a consistent 90-degree angle. Worn line tears grass instead of cutting it. Slow down and let the tool’s weight and the spinning line do the slicing.
How often should I edge my lawn?
Edge every other mow during peak growing season. For cool-season grasses in spring and fall, that’s about once a week. In summer heat or winter dormancy, you can stretch it to once a month. Consistent light edging is easier than reclaiming an overgrown border.
What’s the best trimmer line for edging?
For edging against hard surfaces, use a reinforced square or star-shaped line in 0.095-inch diameter. The shape and thickness resist fraying when it glances off concrete or brick. Round line works but dulls faster against abrasive surfaces.
Is it bad to edge when the ground is wet?
Yes. Wet soil tears instead of shears, leaving a muddy, torn edge that invites disease and weeds. It also clumps on your trimmer head and shield. Wait at least 24 hours after a heavy rain for the soil to firm up.
The Bottom Line
A string trimmer is a capable edger if you respect its mechanics. Lock in that 90-degree angle, feed it fresh line, and move with deliberate slowness. The tool will reward you with a crisp, professional edge that makes your entire lawn look sharp.
Forget speed. This is a finesse job. The most common mistake is rushing it.
Your second job will be twice as fast as your first once the muscle memory sets in. Keep the line fresh, keep the shield clean, and always edge onto a hard surface. The alternative is a ragged line, a frustrated afternoon, and a trimmer that needs common trimmer repairs sooner than it should.