How to Install a Wire Trimmer Head (Step-by-Step Guide)
This post contains affiliate links. As an Amazon Associate, we earn from qualifying purchases.
Installing a wire trimmer head requires matching three things: the shaft’s thread direction (right-hand or left-hand), the correct adapter for the shaft diameter, and a clean, debris-free mounting surface. Hand-thread the new head on for several turns to prevent cross-threading, then tighten it snugly — not with maximum force.
Most people grab a universal head from the store and start cranking. They force it, hear a plastic crunch, and spend the next hour picking shredded nylon threads out of the drive shaft with a dental pick. The head never seats right after that. You feel a wobble at full throttle that wasn’t there before.
This guide walks through the safe removal of the old head, how to identify what you’re working with when the manual is long gone, and the precise steps to seat a new head correctly the first time. We’ll cover the tools you actually need, not just a generic list, and what to do when things don’t go as planned.
Key Takeaways
- Thread direction is not universal. Stihl and some other brands commonly use left-hand (reverse) threads. Tightening the wrong way strips the shaft instantly.
- Universal heads are not plug-and-play. You must select the correct plastic or metal adapter from the kit and push it fully onto the shaft before threading the head.
- Overtightening is the leading cause of future removal problems. Tighten the head firmly by hand, then give it a final quarter-turn with a wrench. More force damages the threads.
- Persistent vibration after installation is a diagnostic flag. It usually means an incompatible adapter, a mismatched thread, or debris trapped between the head and the gearbox.
- Soak new trimmer line in water for 24 hours before use. This restores the nylon’s elasticity, reducing brittleness and breakage during the first few cuts.
What You’ll Need Before You Start
Gather these items on a clean work surface. Using the right tool for each step prevents rounded bolts and stripped threads.
The required tools are simple, but their quality matters. A cheap, ill-fitting wrench will slip and mar the plastic locking nut, making future service a headache. A set of needle-nose pliers with a fine tip is better for retrieving debris than standard pliers.
Before you start: Disconnect all power sources. For battery trimmers, remove the battery. For corded models, unplug them. For gas trimmers, disconnect the spark plug wire and secure it away from the plug. The trigger lock can fail, and a spinning head at 7,000 RPM will remove flesh before you can react.
- Work Gloves: Lightweight mechanics gloves protect your hands from sharp line ends and hot metal.
- Needle-Nose Pliers: For removing grass-wrapped debris from the shaft threads.
- Correct Wrench or Spanner: Often a pin spanner, open-end wrench, or a specific tool included with your trimmer. Check the old head for shape.
- Shaft Locking Tool: This could be a dedicated pin, a 4mm Allen key, or a flathead screwdriver to insert into the gearbox hole.
- Clean Rag & Brush: A stiff-bristle brush (an old toothbrush works) and rag to clean the exposed drive shaft.
- New Trimmer Head & Adapter Kit: Ensure it’s compatible with your trimmer’s brand and shaft type.
Identifying Your Trimmer Head Type and Thread Direction
You can’t install a new head if you don’t know what you’re removing. There are three common head types, and the removal method differs slightly for each.
Bump-feed heads are the most common. You tap the head on the ground to advance fresh line. Fixed-line heads use pre-cut segments that you replace individually — they’re low maintenance but less common. Auto-feed heads use centrifugal force or motor speed to advance the line, and they often have more complex internals.
Determining thread direction is critical. If the manual is lost, look for an arrow on the old head housing that indicates rotation direction. The thread direction is usually the opposite of this arrow. If no arrow exists, remember this: most universal-brand and homeowner-grade trimmers use standard right-hand threads (tighten clockwise, loosen counter-clockwise). Many commercial brands, especially Stihl, use left-hand threads on their straight-shaft models.
I learned this the hard way on a Stihl FS 56 RC-E. The head was stuck, and I assumed “righty-tighty.” I applied more leverage with a pipe on my wrench. The head didn’t budge, but I felt a faint crack from the gearbox.
I’d sheared the internal locking pin. The repair bill was more than the cost of a new head. Now I always verify thread direction before applying force.
| Head Type | Identification Clue | Common Thread Direction | Primary Use Case |
|---|---|---|---|
| Bump-Feed | Button on bottom you tap. | Right-hand (most brands) | General trimming, homeowner use. |
| Fixed-Line | Pre-cut line segments, no spool inside. | Right-hand | Low-maintenance trimming in open areas. |
| Auto-Feed | No bump button, often says “SpeedFeed” or similar. | Varies by brand (check manual) | Commercial or frequent use where stopping to bump is inefficient. |
Step-by-Step Installation Guide
Follow this sequence. Rushing leads to cross-threading, the single most common installation error that ruins a new head.
Step 1: Safe Removal of the Old Head
First, lock the drive shaft. Locate the hole near the gearbox or on the shaft itself. Insert the locking pin, Allen key, or screwdriver provided with your tool. You’ll feel it engage, preventing the shaft from spinning.
If the old head is stubborn, do not hammer on it. Apply steady pressure with the correct wrench. If it’s reverse-threaded, turn clockwise to loosen.
If it’s standard, turn counter-clockwise. If it won’t budge, our guide on alternative removal methods covers techniques using penetrating oil and careful leverage. Once loose, spin the head off by hand and set it aside.
Step 2: Cleaning and Inspection
This is the most skipped step. Grass, dirt, and old nylon fuse into a hard cake on the shaft threads and shoulder.
Use your brush and rag to scrub every thread and the flat surface where the head seats. Run your fingernail along the threads — they should feel sharp and defined, not rounded or clogged. Inspect the shaft for any cracks or obvious damage. A damaged shaft will never hold a head securely and can cause dangerous vibration.
A clean, dry drive shaft ensures the new head seats flush against the gearbox. Debris left between the head and the gearbox creates a gap, causing an imbalance that manifests as a heavy vibration at operating speed. The imbalance fatigues the shaft bearings within 10–15 hours of runtime.
Step 3: Selecting and Fitting the Adapter
Universal heads come with a small bag of plastic or metal adapters. Your job is to find the one that fits your shaft snugly with zero side-to-side play.
Test each adapter by pushing it onto the clean shaft. The correct one will slide on with slight resistance and stop against the shaft’s shoulder. Do not force an adapter that’s too small. An adapter that’s too loose will cause a wobble, even if the threads seem to catch. If you’re working on a system like Ryobi Expand-It, you may need a specific metal collar instead of a plastic adapter.
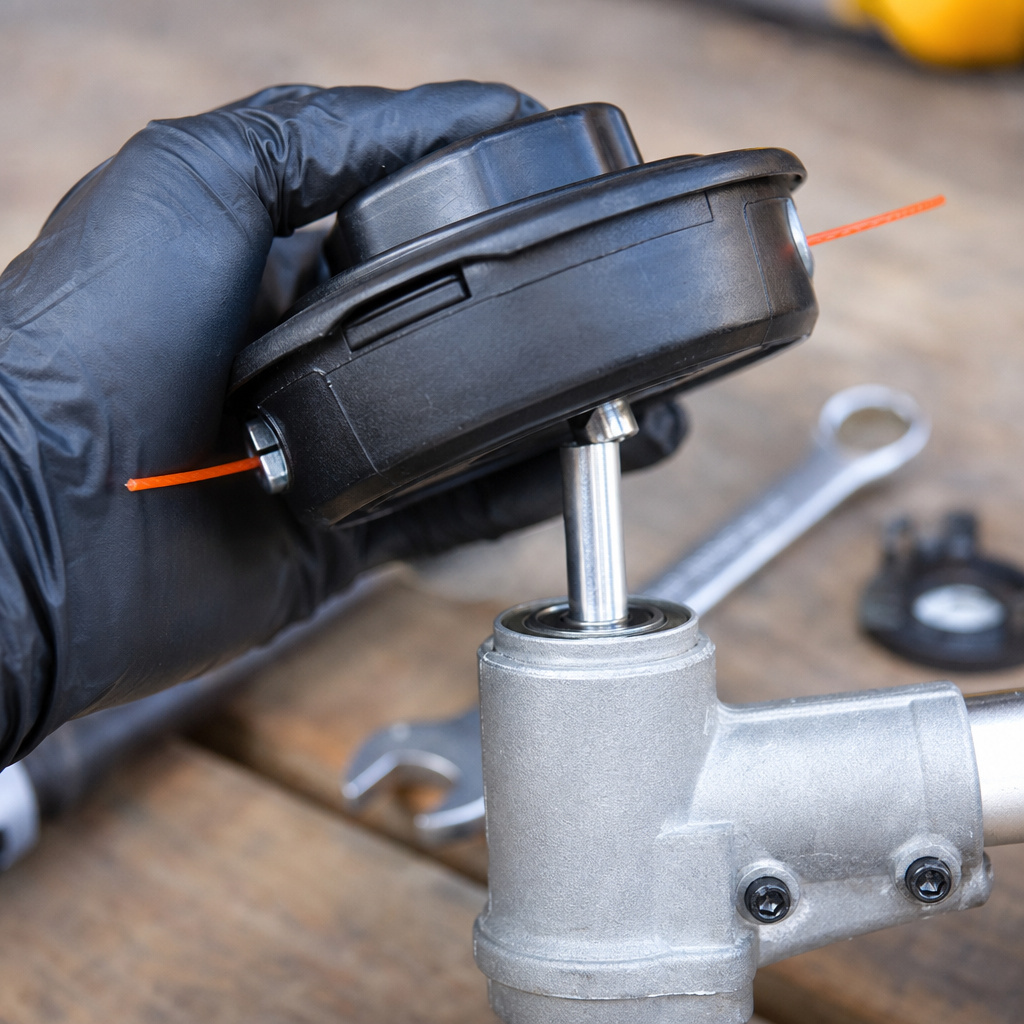
Step 4: Hand-Threading the New Head
This is the moment of truth. Do not use tools yet.
Place the new head over the adapter and begin turning it by hand in the direction you believe is “tighten.” It should spin on smoothly and easily for at least four or five full rotations. If you feel gritty resistance or it stops after one turn, you are cross-threading. Stop immediately. Unscrew it completely, realign, and try again. Forcing it here guarantees a ruined head and a potentially damaged shaft.
The first three rotations of the trimmer head must be done by hand. If the threads engage cleanly, the head will seat itself squarely against the gearbox housing without wobble. Cross-threading begins with the first misaligned turn and progressively damages both sets of threads, making proper tightening impossible.
Step 5: Final Tightening and Torque
Once the head is hand-tight, you need to secure it. If your trimmer uses a standard nut, use the appropriate wrench.
The goal is “snug plus a quarter-turn.” You are not trying to achieve maximum torque. Over-tightening stretches the plastic threads, weakens them, and makes the head nearly impossible to remove later. A properly seated head tightened to specification will not come loose during operation. After tightening, remove the shaft lock tool.
Final Pre-Start Checklist:
- Adapter is fully seated on the shaft.
- Head is hand-threaded on cleanly.
- Head is wrench-tightened to a snug fit.
- Shaft lock tool is removed.
- Power is still disconnected.
Troubleshooting Common Post-Installation Issues
Even a correct installation can have hiccups. Here’s how to diagnose the most frequent problems.
Problem: The trimmer head wobbles or vibrates excessively when running.
This is the number one complaint after a new head install. The cause is almost always an imbalance.
- Likely Cause 1: Incorrect or Incompatible Adapter. The adapter isn’t the right size for your shaft, creating play.
- Likely Cause 2: Debris on the Seating Surface. You didn’t clean the gearbox face, so the head isn’t sitting flat.
- Likely Cause 3: Damaged Drive Shaft. The previous head failure or removal may have bent or cracked the shaft.
- Fix: Stop the tool. Disconnect power. Remove the head and inspect the adapter fit and cleanliness. If those are good, manually spin the bare shaft by hand. If you see or feel a bend, the shaft needs replacement.
Problem: The trimmer head will not thread on by hand.
If the new head refuses to start threading, the threads are mismatched.
- Likely Cause: Wrong Thread Direction. You have a reverse-thread head and a standard-thread shaft, or vice-versa.
- Fix: Verify the thread direction of your trimmer model (check manufacturer website if needed) and compare it to the new head’s packaging. Some universal heads are marked “LH” for left-hand thread.
Problem: The head seems tight but spins freely under load.
The head engages but slips when you hit thick grass.
- Likely Cause: Worn Drive Shaft Splines. The internal splines on the shaft that transfer torque are rounded off.
- Fix: This is a mechanical wear issue. You’ll need to replace the drive shaft or the entire gearbox assembly. A temporary fix is to add a single wrap of Teflon tape to the shaft splines before installing the head, but this is a short-term solution.
Universal Head vs. OEM: Which Should You Choose?

You have two paths: the manufacturer’s original part or a third-party universal head. The choice isn’t just about cost.
OEM heads are guaranteed to fit and perform as the engineer intended. They often have better-balanced internals and higher-quality line eyelets that resist wear. The downside is price and sometimes availability.
Universal heads, like the popular Oregon models, offer tremendous value and flexibility. They come with a suite of adapters, making them compatible with dozens of brands. The trade-off is that you must select the right adapter, and the plastic housing may not be as impact-resistant. For most homeowners, a quality universal head is a perfect, cost-effective solution.
| Factor | OEM Replacement Head | Universal Replacement Head |
|---|---|---|
| Fit & Compatibility | Guaranteed perfect fit. | Requires correct adapter selection from kit. |
| Cost | Typically 2–3x more expensive. | Very affordable. |
| Availability | May require ordering. | Widely available in stores. |
| Durability | Engineered to original specs. | Varies by brand; generally good. |
| Best For | Users who want exact replacement, have a high-end trimmer, or had issues with universals. | DIYers, multi-tool owners, and anyone looking for a cost-effective fix. |
Maintenance Tips for Your New Trimmer Head
Installation is just the beginning. How you use and care for the head determines its lifespan.
Always use the line diameter specified on the head housing. Thicker line (.095″ or .105″) in a head designed for .080″ line creates excess drag, overheats the head, and strains the trimmer motor. Soak new line rolls in a bucket of water for a full day before winding them. This re-hydrates the nylon, making it less brittle and reducing breakage.
After each use, tap the head to clear any wrapped grass. Every few months, remove the head and clean the spool mechanism and the shaft threads. A light coating of silicone spray on the spool bearings reduces friction. When the head is finally worn out, check with your local waste facility — many accept old plastic trimmer heads for recycling if they are clean and separated from metal parts.
Frequently Asked Questions
My new head came with a spool of line. Do I need to wind it before installing the head?
Yes, almost always. Most heads are sold as a housing only. You must wind the spool with line following the direction arrows inside the spool chamber, then insert the spool into the head before installing it on the trimmer. Our guide on winding trimmer line covers the exact technique to avoid tangles.
How tight should the trimmer head really be?
Tighten it firmly by hand until it stops, then use a wrench for a final quarter to half-turn. If you’re using a wrench longer than 6 inches, you’re probably applying too much force. The goal is secure, not maximum.
Can I install a metal blade head using the same process?
The removal and threading process is similar, but safety requirements are stricter. You must always use the specific metal blade deflector/shield designed for your trimmer model when installing a blade. Never operate a trimmer with a metal blade without the correct, undamaged guard in place.
Why does my brand-new line keep breaking immediately?
Two main reasons. First, you may be using line that’s too thin for your trimmer’s power or the vegetation. Second, and most commonly, the line is old and dry. Always soak new line before use. If it’s still breaking, check the line exit holes on the head for sharp burrs and smooth them with a round file.
The head worked for a week, now it won’t feed line. What happened?
The bump mechanism inside is likely jammed with grass debris or a small stick. You’ll need to disassemble the head, clean all internal parts, and re-wind the spool. This is a normal maintenance task for bump-feed heads.
The Bottom Line
Installing a trimmer head is a simple five-minute job if you respect the details. Match the thread direction, clean the shaft, hand-thread first, and tighten snugly — not with all your strength. The most expensive mistake is forcing a part that doesn’t want to go on. Listen to the tool.
A correctly installed head spins true with minimal vibration, feeds line reliably, and comes off easily when it’s time for the next replacement. Keep the old head for a week as a spare in case you need to diagnose an issue with the new one. Then recycle it properly. Your trimmer will thank you with seasons of clean, trouble-free cutting.