How to Replace Trimmer Line: Complete Step-by-Step Guide
This post contains affiliate links. As an Amazon Associate, we earn from qualifying purchases.
To replace trimmer line, match three specs: your head’s type (bump-feed, fixed-line, or auto-feed), the line diameter printed on the head, and a tight, even wind in the direction marked by the arrow on the spool. Use roughly 10 feet of line for bump-feed heads and 18 inches for fixed-line heads.
Replacing trimmer line requires matching three things: the head type (bump-feed, fixed-line, or auto-feed), the line diameter printed on the head, and a tight, even wind in the direction marked by the arrow on the spool. Cut roughly 10 feet of line for a bump-feed head, 18 inches for a fixed-line head.
Most people get this wrong because they buy the wrong diameter, wind it loosely, or ignore the arrow direction on the spool. Wind it loose and it tangles inside the head. Wind it opposite the arrow and it won’t feed when you bump. You’ll be back inside the garage with a jammed head before you finish the first edge.
This guide walks through the exact steps for bump-feed, fixed-line, and universal replacement heads, the physical signs of a jam starting, and what to do when the line just won’t feed no matter how hard you bump.
Key Takeaways
- The line diameter printed on your trimmer head is a maximum limit, using thicker line than specified creates friction that overheats the motor shaft and can burn out a cordless trimmer’s battery in under 20 minutes of heavy use.
- Wind the line tight against the spool’s arrow direction. A loose wind creates slack that catches on the spool’s central post, causing a jam that requires disassembly.
- For gas trimmers, disconnect the spark plug wire before any work on the head. A bump-feed head can spin unexpectedly if the engine is hot and the carburetor hasn’t settled, risking a deep cut across your knuckles.
- Soaking nylon line overnight makes it more flexible and less prone to snapping on the first impact, but it doesn’t make brittle, sun-damaged old line usable again.
- After replacing line, run the trimmer for 30 seconds with the guard on to let the new line settle. If it doesn’t feed smoothly, the wind is backwards or the spool is overfilled.
Before you start: Disconnect the power source completely. For gas trimmers, pull the spark plug wire. For battery trimmers, remove the battery. For corded electric, unplug it from the outlet. A hot engine can idle the head enough to spin it when you’re pressing the bump mechanism, and that rotation will grab loose line and whip it around the housing at several hundred RPM, enough to cut through jeans and into skin. Work on a flat, clear surface where dropped parts won’t roll under a bench.
What Size Trimmer Line Do You Need?
Check the head itself. Most manufacturers stamp the maximum line diameter directly on the plastic housing, look for numbers like .065.080.095, or .11 inch. If it’s worn off, your manual has the spec. Using a thicker line than the head accepts increases drag on the motor.
That drag matters more on battery-powered units. A Ryobi 40V trimmer rated for .095-inch line will bog down and drain its battery rapidly if you load .11-inch line. The motor works harder, the battery heats up, and you’ll get maybe half the runtime. On a gas trimmer, the extra drag just makes the engine sound labored and can overheat the drive shaft bearings over a season.
The diameter stamped on the head is the maximum the exit holes and spool channel can physically pass. A 0.095-inch head cannot feed 0.11-inch line, the line binds at the exit hole, and the bump mechanism fails because the line can’t slide out. You’ll hear a clicking sound each time you bump, but no new line emerges.
Line shape also affects cutting. Round nylon is standard. Square or twisted line cuts more aggressively but also wears down faster and can be harder to feed through some heads. For a universal head like the Husqvarna universal bump head, stick with round line unless the manufacturer explicitly says otherwise.
| Line Diameter (inches) | Common Use Case | Typical Trimmer Power |
|---|---|---|
| 0.065 | Light-duty electric, small yards | Corded or 18V–24V battery |
| 0.080 | Medium-duty battery, suburban lawns | 40V battery, smaller gas |
| 0.095 | Heavy-duty battery, most gas trimmers | 40V–60V battery, 25cc–30cc gas |
| 0.11 | Commercial-grade, thick brush | 30cc+ gas, professional models |
The wrong diameter is the single biggest cause of feed failure. It’s not about strength. It’s about clearance.
How to Replace Line on a Bump-Feed Head (Step-by-Step)
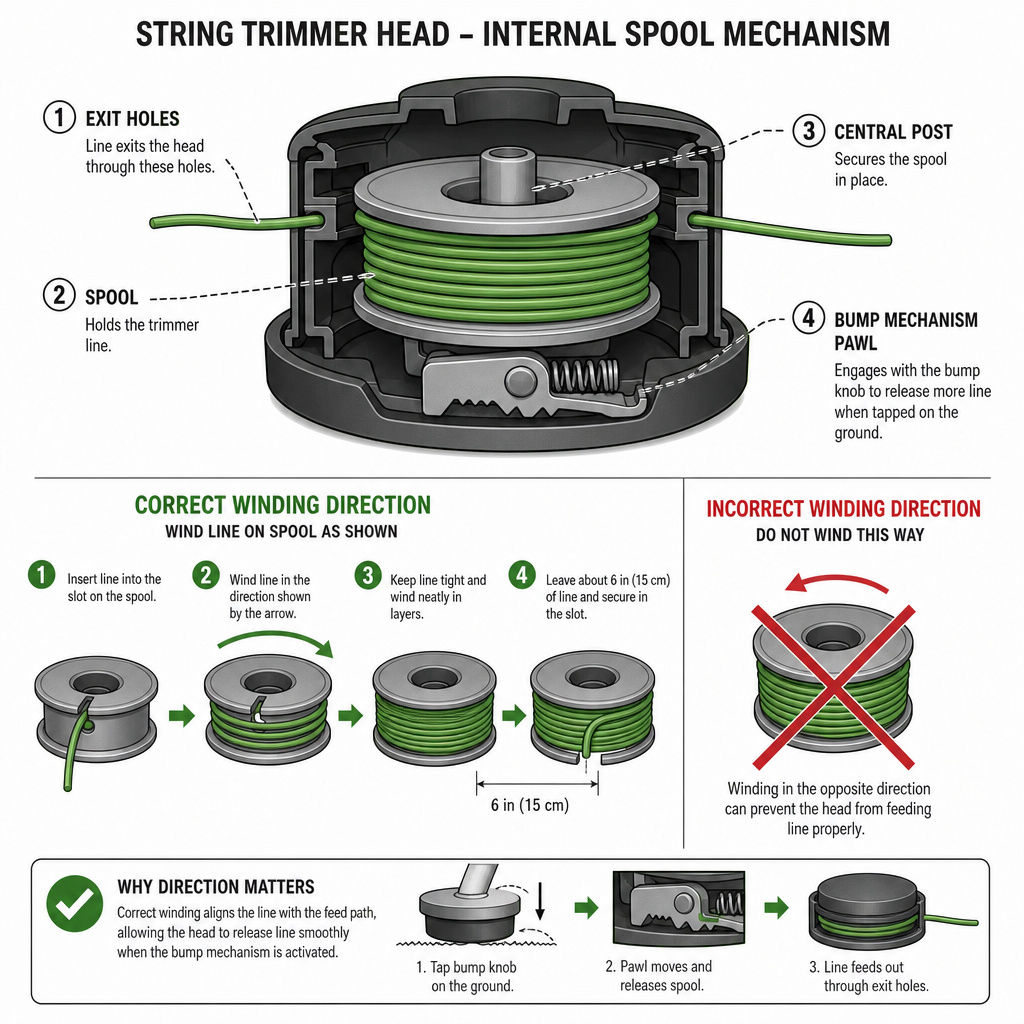
Bump-feed heads are the most common. They hold a spool inside a two-part housing. You’ll see an arrow on the spool, that’s the wind direction. Ignoring it guarantees a jam.
- Remove the spool. Press the locking tabs on the head cover and lift it off. Pull the spool out. If it’s stuck, a flathead screwdriver can pry it up from the edge. Don’t force it, cracked spools won’t seat correctly later.
- Clean the housing. Grass debris and old line fragments clog the channel. Scrub it out with a dry rag. Left inside, they’ll block the new line’s path.
- Cut and feed the line. Measure about 10 feet of line. Feed one end into the anchor hole on the spool until about 6 inches protrudes. Some spools have a notch or clip to hold the line, use it.
- Wind tightly against the arrow. Wind the line around the spool, keeping tension so each turn sits flat and tight. Overlap causes tangles. Stop when the spool is full but not overflowing, the line should sit below the spool’s outer rim.
- Thread the loose ends. Pass the two loose ends through the exit holes in the spool. Pull them through until they’re even, leaving about 4–6 inches of line extending from the head.
- Reassemble and test. Seat the spool back into the housing, align the cover’s tabs, and snap it shut. Run the trimmer for 30 seconds to let the line settle. If it doesn’t feed when you bump, the wind direction is wrong or the spool is overfilled.
If the line feeds but snaps immediately, you likely have a nick or burr on the exit hole edge. That sharp edge acts like a knife on the nylon. Smooth it with a small round file or replace the head.
How to Replace Line on a Fixed-Line or Quick-Load Head
Fixed-line heads use pre-cut lengths. Quick-load heads, like the Echo Speed Feed 450, let you thread new line without opening the head at all.
Fixed-line replacement:
- Cut two lengths of line, each about 18 inches long.
- Insert each piece into its designated slot on the head until it clicks or locks.
- Ensure the ends are even. Uneven lengths cause the trimmer to vibrate excessively because one side strikes the ground first every rotation.
Quick-load head replacement (Echo Speed Feed 450 style):
- Cut a single length of line about 10 feet long.
- Straighten the first foot of line, coiled line won’t thread through the eyelets.
- Insert the line through one of the head’s entry holes.
- Hold the head base and rotate the top knob clockwise. The head will draw the line in automatically until about 6 inches remain on each side.
- No disassembly required. The mechanism works until debris jams the internal gears, which happens after about two seasons of heavy use.
The Echo Speed Feed 450 is popular because it skips the spool-winding step entirely. But its internal gears are plastic. If you hit concrete or stone regularly, the impact shock can crack a gear tooth. The head then spins but won’t grab new line. You’ll need a full head replacement.
When Your Trimmer Line Won’t Feed: Troubleshooting Steps
The line isn’t feeding after a fresh reload. You bump the head against the ground and nothing happens. Here’s the sequence to diagnose it.
First, check the obvious. Are the line ends trimmed to 4–6 inches? Longer tails can wrap around the head and block the exit holes. Trim them.
If the tails are correct, the problem is inside the spool.
I loaded a spool backwards on a STIHL FS 56 once, wound it clockwise when the arrow pointed counterclockwise. The trimmer ran fine for five minutes, then the line stopped feeding entirely. I had to disassemble the head, rewind it correctly, and lost a half-hour of work. The spool was jammed tight.
- Overfilled spool. The spool looks full, but the line is piled above the outer rim. This creates pressure against the cover, pinching the line and preventing movement. Remove the spool, unwind about three feet of line, and rewind it tighter and lower.
- Reverse winding. The arrow on the spool dictates rotation. If you wound opposite the arrow, the line’s anchored end gets pulled across the spool’s central post and binds. You must rewind it.
- Debris in the channel. Old line fragments or packed grass block the path. Disassemble and clean.
- Damaged exit holes. The holes are worn or have a sharp edge. This is common on heads used for years on rocky soil. The nylon line snags and breaks. Smooth the hole with a file or replace the head.
If none of those fix it, the bump mechanism itself might be worn. On some models, a plastic pawl inside the head wears down after hundreds of bumps. It no longer engages the spool to rotate it. That requires a head replacement, restringing a string trimmer won’t help.
Maintaining Your Trimmer Beyond the Line
Line replacement is one task. Keeping the trimmer running season after season requires a few more steps, especially for gas models.
For gas trimmers:
- Air filter. Check it every 10 hours of operation. A clogged filter starves the engine, causing it to run hot and lose power. Tap it clean or replace it if it’s oily.
- Spark plug. Replace it annually. A worn plug causes hard starting and uneven RPMs, which makes the head spin inconsistently.
- Fuel. Use fresh fuel or add a stabilizer. Old gas gums up the carburetor, you’ll notice the engine surges and dies at idle. That idle surge can also spin the trimmer head unexpectedly when you’re working on it.
For battery trimmers:
- Battery care. Store batteries indoors over winter. Cold damages lithium cells. Recharge before they’re fully depleted, deep discharges shorten lifespan.
- Clean the head area. Grass and dirt buildup around the head increases drag. A quick brush-off after each use prevents it.
For all trimmers:
- Check the shield. The plastic guard cracks over time, especially if you drop the trimmer. A cracked shield lets debris fly toward your legs. Replace it if you see cracks or deep scratches.
- Lubricate the shaft. Once a season, apply a light grease to the drive shaft where it enters the head. Dry shafts squeal and wear down the head’s internal bushing.
A clean, lubricated trimmer with fresh line cuts smoother and lasts years longer. Neglect these steps and you’ll replace the entire head or motor within three seasons.
Does Soaking Trimmer Line Actually Help?
Soaking nylon line in water for 12–24 hours before use makes it more pliable. The water molecules penetrate the nylon polymer, reducing its stiffness. That means the line is less likely to snap on the first impact with a thick weed or fence post.
But it’s a temporary fix. Once the line dries out during use, it returns to its original stiffness. Soaking also doesn’t revive old, sun-damaged line that’s already brittle and faded. That line will break quickly regardless.
If you’re using standard round nylon line, soaking can reduce initial breakage. For premium twisted or square line, manufacturers often pre-treat it, so soaking adds little benefit. The practice is worth it for soaking trimmer line in cheap, bulk line but skip it for branded, high-grade line.
Choosing Between Universal and OEM Replacement Heads
Your original head breaks or wears out. You see universal replacement heads for half the price of the OEM part. Should you switch?
Universal heads, like the Husqvarna universal bump head or aftermarket equivalents, often include a set of adapters to fit different shaft sizes and thread patterns. They work, but they’re not always a perfect match.
- Shaft diameter mismatch. If the adapter isn’t exactly right, the head will wobble on the shaft. That wobble transfers vibration to your hands and can loosen the head over time.
- Thread direction. Some trimmer shafts have reverse threads (left-hand threads). A universal head with the wrong thread direction won’t tighten, it’ll spin off when you use the tool.
- Bump mechanism weight. A heavier head requires more engine power to spin up. On a smaller electric trimmer, that extra weight can slow the startup RPM and make the tool feel sluggish.
I ran a universal head on a Ryobi 18V trimmer for a season. It worked, but the vibration was noticeably higher than the OEM head. I switched back to the Ryobi original head the next year because the fatigue in my hands after an hour was real. The OEM part was engineered for that specific motor balance.
If your OEM head is available and affordable, stick with it. If it’s discontinued or overly expensive, a universal head with the correct adapter kit is a functional substitute. Just expect a slight trade-off in vibration or weight.
Frequently Asked Questions
How much line should be sticking out after I replace it?
Aim for 4 to 6 inches of line extending from the head on each side. Less than 4 inches reduces cutting reach and makes the trimmer less effective. More than 6 inches increases the chance the line wraps around the guard and tangles. You can find more specifics on optimal line length in our dedicated guide.
Can I use a thicker line than what’s stamped on the head?
No. The stamped diameter is the maximum the head’s exit holes and internal channel can accommodate. Thicker line will not feed through, causing immediate jams. It also increases drag on the motor, which can lead to overheating and premature wear on electric models.
Why does my new line keep breaking immediately?
Two likely causes. First, a sharp burr on the exit hole from hitting rocks or pavement acts like a cutter on the nylon. Smooth it with a small file. Second, you might be using brittle, old line that has degraded from UV exposure. Fresh line from a sealed package performs better.
How often should I replace trimmer line?
Replace line when it breaks frequently during normal use or when less than 2 inches remain protruding from the head. For average suburban lawn use, a spool lasts 3–4 months of weekly trimming. In rocky or brush-heavy areas, you might replace it monthly.
Do I need to replace the entire spool every time?
Not necessarily. For bump-feed heads, you can reload the existing spool with new line as long as the spool itself isn’t cracked or warped. Fixed-line heads require new pre-cut segments each time. Quick-load heads feed from a continuous line supply until it runs out.
What’s the best way to store a trimmer for winter?
For gas trimmers, run the engine until the fuel tank is empty or add a stabilizer to the fuel. Remove the battery from electric models and store it indoors. Clean the head and guard, and hang the trimmer upright to prevent oil or residue from settling in the engine. More details are in our guide on cleaning your trimmer before storage.
The Bottom Line
Match the line diameter to the head’s stamp. Wind it tight and follow the arrow on the spool. Keep the ends at 4–6 inches. That’s the core sequence.
Ignore any of those three and you’ll fight jams, breakage, and a trimmer that feels sluggish. The right line and a clean wind make the job predictable. After that, a quick check of the air filter and spark plug on gas models, plus battery care on electric ones, keeps the tool running for years.
Buy a spare spool and keep it in the garage. When the line runs short, you’re 10 minutes from a fresh reload instead of an hour of frustration.