
What Is a Drill Press? Defining the Stationary Drilling Tool
This post contains affiliate links. As an Amazon Associate, we earn from qualifying purchases.
A drill press is a stationary power tool that uses a rotating spindle to drive a cutting tool vertically into a workpiece. Its rigid frame and adjustable table guarantee holes are drilled perfectly perpendicular (90 degrees) to the work surface, a task difficult to achieve with a handheld drill. Beyond simple drilling, its precision enables operations like reaming, countersinking, boring, and tapping in materials ranging from wood and plastic to steel.
That perpendicular guarantee is the whole point. A handheld drill wanders with arm pressure and visual guesswork. A drill press removes those variables, locking the bit’s path straight down. This isn’t just about neatness. For joinery, metal fabrication, or any assembly with bolts, a hole that’s off by a few degrees weakens the joint or strips the threads.
What follows breaks down the machine itself: the names of its parts, the real difference between bench and floor models, the other jobs it can do, and the non-negotiable safety rules pulled directly from federal and institutional training manuals.
Key Takeaways
- The “swing” measurement (e.g., 12-inch) is twice the distance from the spindle center to the column, dictating the maximum width of material you can center-drill.
- Beyond drilling, a drill press accurately performs tapping, reaming, countersinking, and counterboring using specialized bits and attachments.
- The spindle often uses a Morse Taper system (MT2, MT3) for secure, self-holding tool mounting, superior to a standard chuck for heavy loads.
- OSHA and institutional safety protocols mandate clamping the workpiece, never wearing gloves, and using a chip shield for every operation to prevent rotational hazards.
- Choosing between a benchtop and floor-standing model hinges on required power, throat depth, table height range, and workspace footprint.
The Core Components of a Drill Press
Every drill press, from a small hobby model to an industrial unit, shares the same basic anatomy. Knowing the names is how you follow a manual, diagnose a problem, or set up a complex cut.
The head houses the motor and the drive mechanism. This is the brain and the muscle. Inside, belts and pulleys (or an electronic variable-speed drive) translate the motor’s power into the spindle’s rotation at a specific speed. The spindle is the rotating shaft that extends down from the head. It’s the direct connection to your cutting tool. The spindle travels vertically within the quill, a precision sleeve you raise and lower using the feed lever or handwheel.
Mounted to the end of the spindle is the chuck, the three-jaw vise that grips drill bits with shanks up to 1/2 inch. For larger tools, the chuck is removed, and tools with a tapered shank mount directly into the spindle’s internal Morse Taper. This friction-fit system, identified by numbers like MT2 or MT3, locks the tool in place under load and is essential for serious metalwork. A drift key is the wedge-shaped tool you use to knock a tapered shank loose.
The spindle’s Morse Taper bore must be kept clean of grease and chips. A dirty taper won’t grip properly, allowing the tool to spin and ruin both the tool and the spindle socket. Twist a clean rag soaked in mineral spirits into the bore before seating any tapered tool.
The table is the work surface. It can be raised, lowered, and often tilted on a trunnion to drill angled holes. It’s drilled with slots for clamping bolts. The column is the vertical post that the head and table ride on. Its diameter and rigidity directly affect the machine’s stability and precision. The base is the heavy, wide foot that anchors the entire machine to a bench or the floor.
What “Swing” Really Means (It’s Not What You Think)
The most confusing spec on a drill press tag is the swing. A “12-inch drill press” does not mean it drills 12 inches deep. That number refers to the machine’s swing, which is twice the throat distance.
The throat distance is the measurement from the center of the spindle to the front of the column. This is the radius of the circle you can work within. The swing is the diameter of that circle. So, a 12-inch swing drill press has a 6-inch throat. You can center a drill bit on a workpiece up to 12 inches wide, but only if the workpiece’s center is within 6 inches of the column.
| Swing (Inches) | Throat Distance (Inches) | Max Workpiece Width for Center-Drilling |
|---|---|---|
| 8 | 4 | 8 inches |
| 10 | 5 | 10 inches |
| 12 | 6 | 12 inches |
| 15 | 7.5 | 15 inches |
| 17 | 8.5 | 17 inches |
This matters when you’re drilling into the center of a wide board or a metal plate. If your workpiece is wider than the swing, you cannot reach its center. You’ll have to drill from the other side or use a different machine. For most cabinet and furniture work, a 12-inch swing is the practical minimum. An 8-inch model feels cramped immediately.
TL;DR: Swing = 2 x Throat. Throat is the reach from column to bit. Always buy for the throat you need, not the bigger swing number.
Drill Press Types: Bench Top vs. Floor Standing
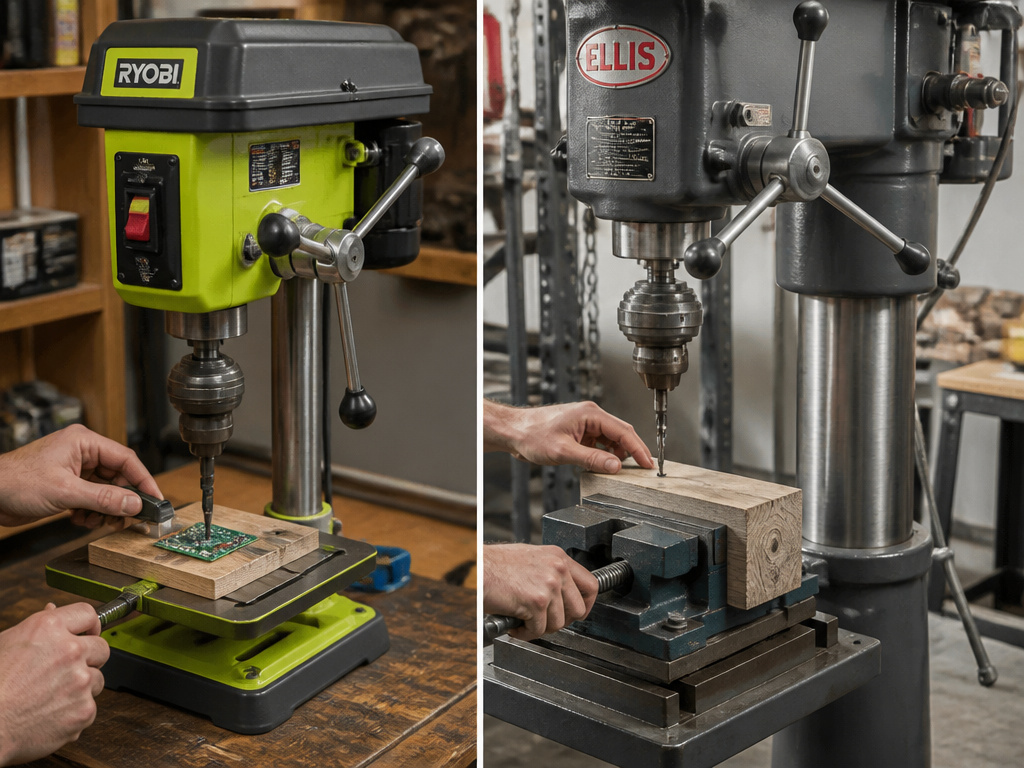 This is the first real decision. Both types perform the same fundamental how a drill press works, but their capabilities and footprints differ dramatically.
A benchtop drill press sits on a workbench. Models like a typical Ryobi 10-inch are common in home workshops. They are lighter, cheaper, and have smaller motors (often 1/2 to 3/4 HP). Their table travel is limited by the shorter column, so drilling into very tall objects is tricky. They are perfect for circuit boards, small wood projects, and light metal drilling.
A floor-standing drill press is a freestanding unit. Think of the Ellis Model 9400, which weighs 677 pounds. It has a longer column, providing greater spindle-to-table distance (over 46 inches on the Ellis). This lets you lower the table to accommodate a welding vice or a large block of wood. Motors are more powerful (2 HP and up), handling larger drill bits in steel without bogging down. The extra mass dampens vibration, yielding cleaner holes.
| Feature | Bench Top Drill Press | Floor-Standing Drill Press |
|---|---|---|
| Typical Motor Power | 1/2 – 3/4 HP | 1.5 – 2+ HP |
| Weight | 50 – 150 lbs | 300 – 700+ lbs |
| Spindle-to-Base Max | ~24 inches | ~40 – 50+ inches |
| Best For | Small shops, hobbyists, light-duty | Professional shops, metal fabrication, large stock |
| Space Required | Bench space | Dedicated floor space |
Where this goes sideways: Assuming a benchtop model can handle occasional “heavy” jobs. Drilling a 1-inch hole in steel with a 1/2 HP motor stalls the bit, work-hardens the metal, and ruins the cutting edges. The job is now twice as hard.
For a dedicated home workshop doing mixed materials, the floor-standing model’s versatility wins. If you only drill small holes in wood and plastic, a benchtop saves money and space. There’s also a niche for a magnetic drill press, a portable floor-standing variant that clamps to steel beams with a powerful electromagnet for on-site metal fabrication.
More Than a Drill: Other Operations You Can Perform
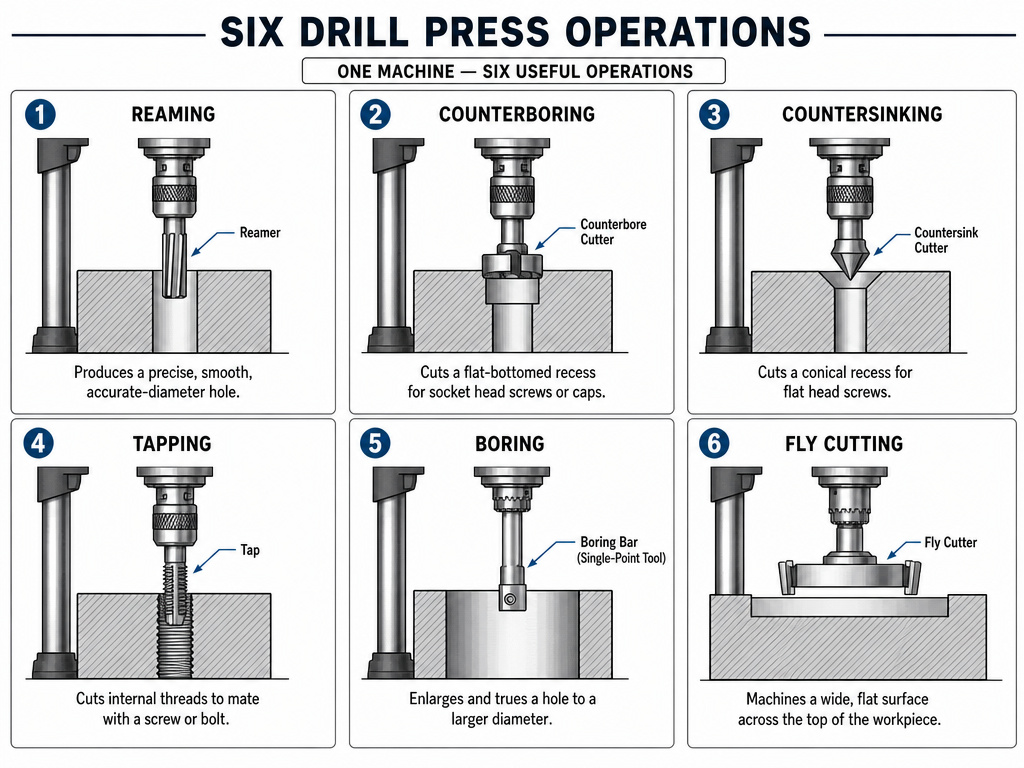 Calling it just a drill press sells it short. By changing the cutting tool, it becomes a versatile boring machine. Understanding these common drill press tasks expands your project possibilities.
Reaming is the process of slightly enlarging and finishing a pre-drilled hole to an exact diameter. A reamer is a multi-fluted cutting tool that removes minimal material. It creates a smoother, more dimensionally accurate hole than a drill bit alone, essential for precision pins and bearings.
Counterboring creates a flat-bottomed, larger-diameter cavity at the top of a hole. This allows the head of a bolt or socket-head cap screw to sit flush with or below the workpiece surface. You use a pilot-guided counterbore tool after drilling the pilot hole.
Countersinking cuts a conical recess at the top of a hole to match the angled underside of a flat-head screw. A countersink bit, often with a 82-degree included angle, is used. The depth stop on the press is critical for consistent results.
Tapping is cutting internal threads into a hole. You do this by securing a tap in the chuck (or a special tapping head attachment), setting the spindle to its lowest speed, and often using a reversing switch. The drill press ensures the tap starts perfectly perpendicular, which is the single biggest factor in preventing broken taps.
Boring uses a single-point cutting tool in an adjustable boring head to create large-diameter, precise holes that are impossible with standard drill bits. It’s the go-to method for odd sizes or exceptional accuracy.
Fly Cutting uses a similar single-point tool in a fly cutter assembly to face off large surfaces or create wide, shallow recesses. It’s an aggressive operation that requires a rigid machine, secure workpiece clamping, and slow feed rates.
The Non-Negotiable Safety Rules
This is a YMYL topic. The hazards are amputation and eye injury. The rules are compiled from the OSHA drill press trainer script and the Argonne National Laboratory safety reference.Ignoring one because the cut seems “quick and easy” is how accidents happen.
Before you start: The rotating chuck and cutting tool are a snag hazard. Unsecured work can spin with the bit at high speed. Flying chips are sharp and travel fast. These risks are present every single time the spindle is turning.
- Clamp everything. Never hand-hold a workpiece. Use a drill press vise, and then clamp that vise to the table. For flat stock, use strap clamps or toggle clamps. The force of the drill bit can grab and spin the work instantly.
- No gloves, no loose anything. Do not wear gloves, loose sleeves, neckties, or jewelry. Long hair must be tied back. Rotating machinery will grab fabric or hair and pull it in before you can react.
- Always use eye protection. Safety glasses with side shields are the minimum. A full-face chip shield is better, especially when drilling through metal.
- Use the chip shield. Position the magnetic or mounted transparent guard between you and the point of operation. It stops flying chips and is a physical reminder to keep your hands away.
- Stop the machine for everything. The spindle must be completely stopped before you adjust the workpiece, take a measurement, brush away chips, or change a tool. Use a brush or vacuum, not your hands, to clear chips.
- Set the depth stop for through-holes. When a drill bit is about to break through the bottom of the workpiece, it can grab aggressively. Set the depth stop to limit travel, or consciously reduce feed pressure at the breakthrough point to prevent the bit from jerking through and breaking.
- Know the emergency stop. Locate and test the emergency stop button. On many machines like the Ellis, hitting it cuts power and engages a brake.
These procedures form a university drill press standard for a reason. They work. Your goal is to make every operation boringly predictable.
Choosing and Using Bits: Speed & Feed Basics
The drill press gives you control over two critical variables: speed (RPM) and feed (how fast you push the bit in). Getting these wrong burns up bits, ruins workpieces, and strains the machine.
Speed (RPM) is set by moving drive belts on pulleys or turning an electronic dial. The rule of thumb: larger diameter bits and harder materials require slower speeds. A 1/8-inch bit in aluminum can run at 3000 RPM. A 1-inch Forstner bit in oak should run below 1000 RPM. A 1/2-inch bit in mild steel needs about 600 RPM. The label inside the pulley cover provides a chart; follow it.
Feed is the pressure you apply via the feed lever. Let the bit cut. Do not force it. Forcing a dull bit or one at the wrong speed generates heat, work-hardens metals, and produces rough, oversized holes. A sharp bit at the correct RPM will pull itself in with moderate pressure. You should see continuous, manageable chips, not dust or smoke.
Common mistake: Using a hand drill’s “push and pray” technique on the drill press. The machine’s rigidity means the bit cannot deflect to relieve pressure. If you force it, something has to give—usually the bit’s cutting edges.
For drilling straight holes, start with a center punch mark. Bring the bit down to touch the mark before starting the spindle to check alignment. For drilling angled holes, tilt the table to the desired angle and use a protractor or digital angle gauge to set it. Clamp a backstop fence to the table to prevent the workpiece from sliding during the cut.
When you need to change bits frequently or use a tool without a tapered shank, you’ll become familiar with removing a drill press chuck. It typically involves a wedge-shaped chuck key or a hex bolt at the bottom of the spindle sleeve.
Frequently Asked Questions
What’s the difference between a drill press and a milling machine?
drill press vs milling machine** comparison comes down to movement and force. A drill press only moves the spindle vertically. A milling machine’s spindle can move vertically, and the workpiece can move precisely in X and Y axes under it. This allows milling machines to cut slots, pockets, and complex contours. A drill press is for making holes; a mill is for shaping metal.
Can I use hole saws and Forstner bits in a drill press?
Absolutely. This is where a drill press shines. The stability prevents the wobble that destroys hole saw pilots and makes Forstner bits chatter. Always use slower speeds for these large-diameter cutters. Clamp the workpiece securely, as the cutting torque is significant.
How do I maintain my drill press?
Keep it clean. Wipe down the table and column after use. Periodically check the belt tension and condition. Lubricate the quill mechanism and the rack-and-pinion table lift according to the manual. The most important maintenance is keeping the Morse Taper socket in the spindle clean and free of dings.
Why does my drill press vibrate or make noise?
Vibration usually means an imbalance. Check that the chuck is tightened evenly onto the bit shank. Ensure the workpiece and vise are clamped tight to the table. Noise from the head often indicates worn motor bearings or a loose drive belt. A rhythmic “knock” could be a damaged chuck jaw.
Is a laser guide or digital readout worth it?
For woodworking and general DIY, no. These are bells and whistles aimed at metal machinists who need extreme positional accuracy. A center punch and your eyes are sufficient for aligning holes in wood and most metal projects. The money is better spent on a quality vise or better cutting tools.
The Bottom Line
A drill press transforms a basic drilling operation from a hopeful gesture into a precise, repeatable process. It’s the difference between a wobbly hole that compromises a joint and a clean, perpendicular one that fits perfectly.
For the home workshop, a 12- or 15-inch swing floor-standing model offers the most flexibility without overwhelming a space. Start with a good drill press vise, a set of center punches, and learn the safety rules by rote. Your first project should be building a larger auxiliary wooden table with a fence—it expands the machine’s utility immediately.
The precision it unlocks is for anyone who wants their work to look professional and hold up over time. Once you use one for a week, you’ll wonder how you ever managed without it.
