
How to Drill Through Tile Without Breaking: The 1/8″ Rule Guide
This post contains affiliate links. As an Amazon Associate, we earn from qualifying purchases.
To drill through tile without breaking it, you need three things: a diamond-tipped core bit, a drill speed under 300 RPM, and constant water cooling. The hole must be at least 1/8 inch larger than the fixture’s stem to prevent stress transfer. Skip any one of these, and the tile cracks before the bit gets halfway through.
That 1/8 inch gap isn’t a suggestion. It’s the difference between a clean pass and a hairline fracture that spreads from the mounting screw over the next three months. Tile doesn’t bend. When a fixture fits tight, thermal expansion and daily use transfer all the stress directly into the ceramic or glass. The crack starts at the hole’s edge.
What follows is the breakdown most guides skip: the OEM-specified drill speeds, the ISO standard for substrate flatness that decides if your tile cracks before you even start, and the two-step method for square cutouts that keeps large-format slabs in one piece.
Key Takeaways
- Drill speed is non-negotiable. For ceramic and glass tile, OEM manuals specify 250 to 300 RPM. A standard drill on high speed generates enough heat to thermal-shock the glaze.
- Fixture openings need a 1/8 inch clearance around the pipe or stem. A snug fit guarantees a stress fracture.
- Substrate flatness matters more than your technique. If the floor or wall isn’t flat to within ±3mm over 2 meters (ISO 7976-1), the tile will bridge a void and crack under load, no matter how carefully you drill.
- You can drill a round hole dry, but you must vacuum the dust continuously. The Mapei manual for large-format tile explicitly allows dry coring if you remove all abrasive particulates.
- For rectangular holes, drill a round hole at each corner first. Then connect them with straight cuts. This prevents the corner stresses from spider-webbing across the tile face.
The Three Things That Crack Tile (It’s Not the Bit)
A diamond core bit gets the blame, but it’s rarely the primary failure. The crack usually starts because one of three background conditions was wrong. Get these right before you pick up the drill.
Heat, stress, and a bad base. That’s the short list.
Substrate flatness tolerance for large-format tile is ±3mm over a 2-meter straight edge, per ISO 7976-1:1989. If your wall or floor isn’t that flat, the tile will bridge a hollow. When you step on that spot or drill into it, the concentrated point load fractures the tile.
The first is substrate flatness. Tile is a brittle, non-flexible plane. If the thinset bed underneath has a dip or hump larger than 3mm, the tile spans the gap like a bridge. Drill into that unsupported span, and the vibration alone can snap it. This is why the pros level floors with products like ULTRAPLAN MAXI or PLANITOP FAST 330 before they even think about tile. Your drill technique is irrelevant on a bad base.
The second is mechanical stress from the fixture itself. Lunada Bay Tile’s installation sheet for ceramic and glass is explicit: openings for fixture fittings should be 1/8 inch larger than the fitting. A toilet flange, shower arm, or pipe that fits tight transmits every shift and temperature change directly into the tile edge. The crack propagates slowly, often showing up weeks after the bathroom is finished.
The third is thermal shock. Ceramic and especially glass are poor conductors. Friction heat from the drill bit builds up in one tiny spot faster than the material can dissipate it. The localized expansion is what actually causes the micro-fractures you see as chipping or a radial crack. Water isn’t just a lubricant, it’s a heat sink.
| Failure Cause | What Breaks | How to Prevent It |
|---|---|---|
| Substrate Not Flat | Tile bridges a void; point load from drilling or weight cracks it. | Check with a 2m straight edge. Fill gaps >3mm with leveling compound before setting tile. |
| Fixture Fit Too Tight | Stress transfers from pipe/toilet flange to tile edge, causing a slow radial crack. | Drill pilot hole 1/8″ larger than the fixture stem. Use a plastic or rubber gasket/spacer. |
| Friction Heat (Thermal Shock) | Glaze chips; core bit glazes over; glass tiles crack radially from the hole. | Use constant water feed. Keep drill speed at 250-300 RPM. Never use a hammer setting. |
Diamond Core Bit vs. Carbide Masonry Bit: There Is No “Good Enough”
This is the single most common hardware mistake. A carbide masonry bit is for brick and concrete. A diamond core bit is for tile and glass. They are not interchangeable.
A carbide tip works by crushing and scraping. On tile’s hard, glazed surface, it skates, dulls fast, and requires downward pressure that often cracks the tile before it bites. A diamond core bit, sometimes called a diamond hole saw, works by grinding. The diamond grit embedded in its rim abrades the material away with minimal downward force.
For porcelain, which is denser and harder than standard ceramic, the diamond core bit is the only tool that will finish the job without chipping the edges. The Rubi blog states it bluntly: carbide-tipped bits “are not recommended for porcelain stoneware.”
Your default pick for any tile job should be a diamond core bit. The Rubi EASYGRES or DRYGRES lines are built for this. They cost more, but they last through dozens of holes and don’t burn out on the first porcelain tile.
Where this goes sideways: Using a worn-out masonry bit you already own. The worn tip requires more pressure, heats up faster, and skates across the glaze. You’ll crack the tile before the bit even starts to cut.
Step-by-Step: The Wet Drill Method That Works
This is the sequence for a clean hole in glazed ceramic, porcelain, or glass tile. The clock starts when your substrate is flat and your tile is firmly supported.
- Mark the hole with painter’s tape. Place a strong ‘X’ over the exact center point. The tape gives the bit an initial grip and reduces glaze chipping.
- Secure the tile. If it’s already installed on the wall, you’re set. If you’re drilling a loose tile, clamp it to a scrap wood board. The backing board prevents blow-out on the back side.
- Fit a diamond core bit into your drill. Use the arbor that came with the bit. Hand-tighten it.
- Set your drill to its lowest speed setting and disable the hammer function. For most cordless drills, that’s the ‘1’ setting on the gear selector. You want 250-300 RPM. If your drill doesn’t have a speed setting, use variable trigger pressure and go painfully slow.
- Begin drilling at a 45-degree angle. Apply light pressure and start the hole on the diagonal. This creates a small groove for the bit to seat into without skating.
- Straighten the drill to 90 degrees and begin a constant, light feed. Let the diamond grit do the work. The sound should be a steady, gritty hum, not a high-pitched whine. If the motor strains, you’re pushing too hard.
- Apply constant water cooling. Have a helper spray water into the hole with a bottle or use a drill guide with a built-in water reservoir. The moment you see dry powder, you’re generating destructive heat.
- Break through the last millimeter from the back. When you see the pilot bit tip emerge on the other side, stop. Flip the tile over (or if it’s on the wall, drill from the opposite side) to finish the hole. This prevents the tile from chipping out as the core bit exits.
Drilling Ceramic vs. Porcelain vs. Glass: The Pressure Gauge Changes
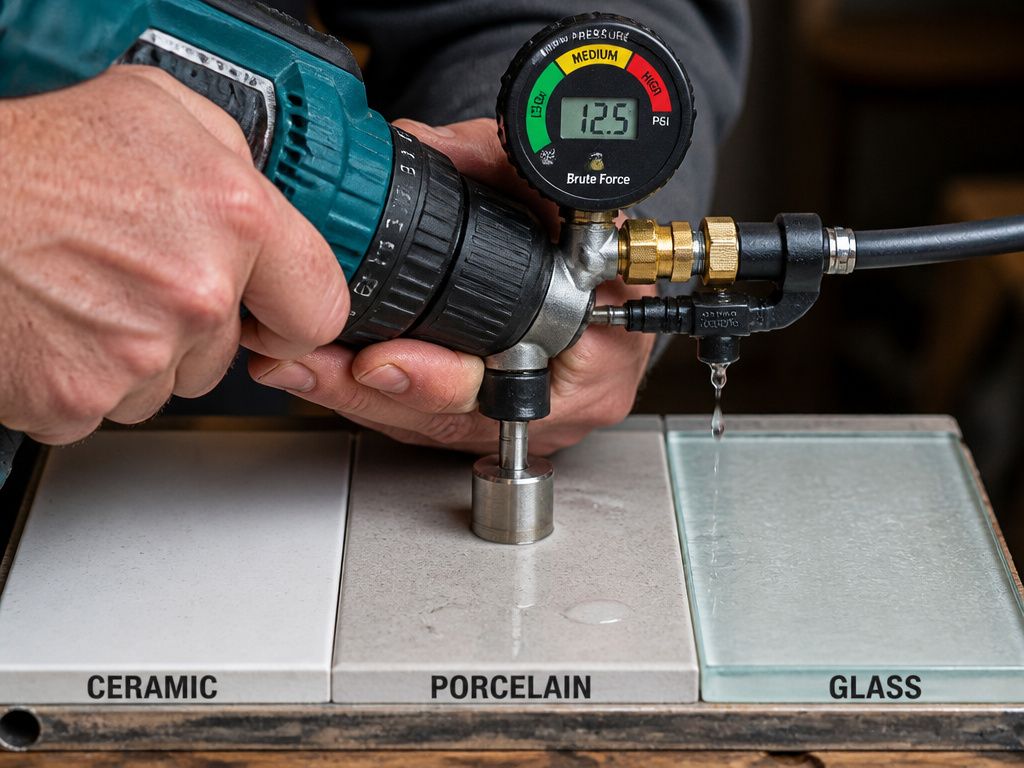
The core process is identical, but the required patience is not. Think of ceramic as soft pine, porcelain as hard maple, and glass as acrylic sheet.
- Ceramic Tile: The softest common tile. A sharp diamond core bit will glide through with minimal pressure. The risk here is rushing and cracking the brittle body underneath the glaze. Drill at the 250-300 RPM range, but you can lean slightly harder on the feed once the groove is established.
- Porcelain Tile: Dense and homogenous. It will take longer and demand perfect cooling. Use the same 250-300 RPM, but reduce your feed pressure by about half compared to ceramic. Let the bit grind. The Lunada Bay guideline for porcelain specifies a 3/8 inch drill with a water swivel attachment for best results.
- Glass Tile: The most fragile. There is zero margin for error on pressure or heat. Lunada Bay’s glass tile installation sheet mandates a wet saw with a diamond blade like the Montolit CPV Series, Alpha Vetro Series, or MK Series for cutting, and the same extreme care for drilling. The 250-300 RPM rule is critical. Any hammer action or high speed will shatter it.
Common mistake: Drilling glass tile with the same pressure you’d use on porcelain. The bit should barely feel like it’s touching the surface. The weight of the drill is almost enough.
Drilling Rectangular or Square Holes (For Outlets or Vents)
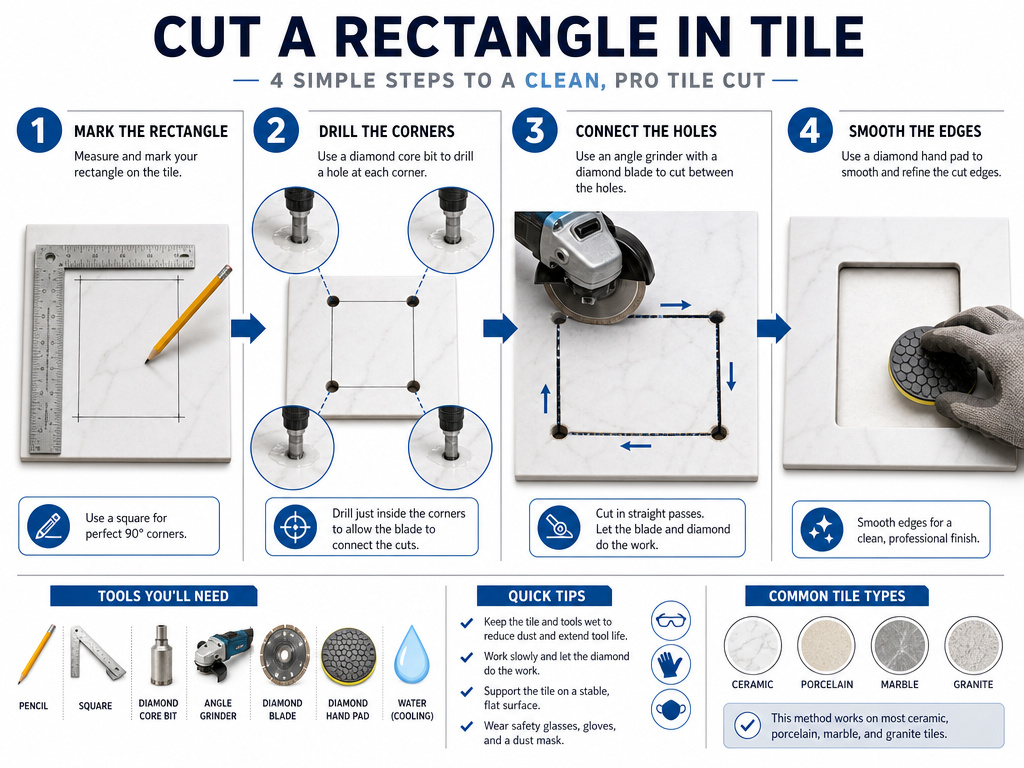
You need a rectangular hole for a thermostat, an electrical outlet, or a vent cover. Cutting straight lines in tile is a recipe for a crack that runs from corner to corner.
The Mapei manual for large-format ceramic tiles prescribes a specific method to redistribute the stress.
- Mark your rectangle on the tile. Use a pencil and a square.
- Drill a round hole at each of the four corners. Use a diamond core bit the same diameter as your desired corner radius. This removes the high-stress point before any straight cutting begins.
- Use a diamond blade on an angle grinder or wet saw to connect the holes. Make the straight cuts between the drilled corners. The pre-drilled corners absorb the stress that would otherwise cause the crack to propagate.
- Smooth the edges with a diamond hand pad or a rubbing stone.
This isn’t just a pro tip, it’s the difference between a perfect cutout and a tile split diagonally from corner to corner. The same principle applies to cutting Perspex or acrylic sheets; you must relieve the corner stress first.
Can You Drill Tile Without Water?
Sometimes water is messy or impossible, like drilling into an already-installed backsplash. The official word from the Mapei large-format tile manual is yes, round holes can be made using a dry diamond cutter.
But there’s a condition: “all resulting dust must be removed during drilling.”
Dry diamond bits like the Rubi DRYGRES are designed to dissipate heat through their segmented rim. The killer is the dust. It acts as an abrasive between the bit and the tile, generating intense heat and clogging the bit’s diamond segments.
If you must drill dry, you must vacuum. Use a shop vac with the hose held right at the drilling point. Drill for 3-5 seconds, vacuum clean, drill another 3-5 seconds. It’s tedious, but it’s the only way to avoid thermal shock without water. This technique is also crucial when you need to drill a hole in a mirror without shattering it.
The part nobody mentions: The dust from dry-drilling porcelain is a fine, abrasive powder that will wreck your drill’s motor bearings if it gets inside. Tape a bag around the drill’s vent holes or use a vacuum attachment designed for dust collection.
The 4 Tools You Actually Need (And 2 You Don’t)
You can spend a fortune on specialty gear. For 95% of tile drilling jobs, this kit covers it.
You need:
- A variable-speed drill with a low gear setting. A corded drill often offers more consistent low-speed torque than a cordless model.
- Diamond core bits in the sizes you need. Buy a set like the Bosch GT2000 or a single quality bit like the Rubi EASYGRES. For larger holes for pipes, a tile hole saw kit is a better investment than individual bits.
- A steady water source. A spray bottle is the minimum. A drill guide with a water reservoir is better.
- Painter’s tape and a center punch (or a nail). The tape prevents skating; the punch gives the bit a tiny dimple to start in.
You don’t need:
- A hammer drill. The hammer function is for masonry. On tile, it creates microfractures that become big cracks. Leave it off.
- A drill press. While great for precision on loose tiles, it’s overkill. A hand drill with a guide block works fine.
Choosing the right drill bits for tile is more important than the drill itself. A $200 drill with a worn masonry bit will fail. A $50 drill with a sharp diamond core bit will succeed.
Troubleshooting: Why Did My Tile Crack?
You followed the steps and still heard that sickening pop. Here’s the decoder ring for that sound.
- A star-shaped crack radiating from the hole: Thermal shock. You drilled too fast, with no water, or with a blunt bit. The heat differential between the drilled spot and the surrounding tile caused it to fracture.
- A single straight crack running away from the hole: Stress from a tight fixture or substrate flex. The tile was under tension from an uneven base, or the fixture you installed forced it to bend.
- The tile surface “spalled” (chipped) around the hole edge: The bit skated. You didn’t use tape or a starter dimple, or you started drilling at 90 degrees instead of an angle.
- The back of the tile blew out in a crater: Lack of support. You didn’t back the tile with a scrap wood board when drilling a loose tile, or you didn’t finish the hole from the reverse side.
If you’re working with a natural stone like marble, the rules shift again. The crystalline structure is different, and the risk of chipping is even higher if you use the wrong technique. The principles for how to drill marble focus on even lighter pressure and specialized diamond bits.
Frequently Asked Questions
Can I use a regular masonry bit on tile?
No. Carbide-tipped masonry bits are designed for abrasive materials like brick and concrete. They require hammer action and high downward pressure to cut, which will crack tile glaze immediately. You must use a diamond-tipped core bit designed for tile or glass.
What’s the best way to keep the tile cool when drilling?
Constant water feed is the only reliable method. Use a spray bottle and have a helper spray directly into the hole as you drill. For larger jobs, a drill guide with a built-in water reservoir or a continuous drip from a sponge above the bit works. The goal is to see a slurry of wet paste, not dry dust.
How do I drill through a tile that’s already on the wall?
The process is the same, but water management is harder. Use painter’s tape to dam a small area around the hole and pack it with a plumber’s putty or modeling clay to form a tiny reservoir. Fill it with water. Drill slowly, letting the water and paste stay in the putty dam. Have a vacuum or sponge ready for the slurry.
My drill only has one speed. Can I still drill tile?
It’s risky. Most single-speed drills operate far above the 250-300 RPM sweet spot. If you must use one, employ a technique called “pulse drilling”: press the trigger in very short, half-second bursts to mimic a low speed. This prevents heat buildup but requires extreme patience. Investing in an inexpensive variable-speed drill is a better solution.
Is it easier to drill tile before or after installation?
Before is almost always easier. You can secure it flat to a workbench, use ample water without worrying about walls, and drill from both sides to prevent blow-out. The main reason to drill after installation is for precise alignment of multiple fixtures, like a shower handle set.
Why does my diamond bit seem to stop cutting?
The diamond segments are likely “glazed over” with hardened tile dust. This happens from dry drilling or insufficient water. Stop drilling. Use a dressing stone or a piece of concrete brick to gently resharpen the bit’s diamond edge by drilling into it for a few seconds with water.
The Bottom Line
Drilling tile without breaking it comes down to managing heat and stress. The diamond core bit is your only real choice for the bit. Keep the speed at a crawl, 250 to 300 RPM is the OEM-specified range. Flood the work with water. And always, always drill a pilot hole 1/8 inch larger than the fixture stem.
That last rule is what separates a lasting install from a callback. Tile can’t flex. Your hole must give it room. The same mechanical principle applies when you need to drill a drain hole in a ceramic pot, the hole must be clean and sized for expansion.
If your wall or floor isn’t flat to within 3mm, fix that first. No drill bit in the world can overcome a void underneath. Get the base right, match the bit to the material, and let the tool do the work. The tile will stay in one piece.
