
How to Drill Screws into Concrete | The Step Most DIYers Skip
This post contains affiliate links. As an Amazon Associate, we earn from qualifying purchases.
Drilling screws into concrete requires a pre-drilled pilot hole, a hammer drill with a carbide masonry bit, and a concrete screw with the correct diameter and thread design. The hole must be 1/4-inch deeper than the screw and match the screw’s specified diameter, using a bit just 1mm too large can cut the screw’s holding power in half. Never install the screw with the drill in impact mode; that destroys the threads’ grip in the concrete.
You cannot drive a screw directly into concrete like you would into wood. The material is too brittle and dense. The entire process hinges on the mechanical bond between the screw’s hardened threads and the walls of a clean, correctly sized hole you create first.
What follows is the breakdown most guides gloss over: the exact bit-to-screw diameter match from manufacturer sheets, the one tool setting that guarantees failure, and what to do when your hole fills with water before you can get the screw in.
Key Takeaways
- The pilot hole diameter is non-negotiable and specific to the screw brand, a fischer ULTRACUT FBS II 10mm screw needs a 10mm hole, not a 3/8-inch bit.
- Never install the screw with your drill in impact mode. Use the drill’s standard rotary setting or an impact driver, but hammer action is for drilling only.
- Drill the hole at least 1/4-inch deeper than the screw length to trap dust and prevent the screw from bottoming out.
- For outdoor or damp locations, choose 410 or 304/316 stainless steel screws; standard zinc-coated screws will corrode.
- If the hole fills with water, you can still install the screw, the European standard EAD 332795-01-0601 explicitly covers installation in water-filled drill holes.
The Non-Negotiable First Step: Drilling the Pilot Hole
Skip this and you will shatter the concrete or snap the screw. A pilot hole gives the screw’s threads a clean path to cut into. This isn’t a suggestion; it’s the only way the fastener works.
You need two tools here: a hammer drill and a carbide-tipped masonry bit. A standard drill will overheat and dull instantly. The hammer drill’s pounding action pulverizes the concrete as the bit rotates, creating a clean hole.
For a 1/4-inch diameter concrete screw, the pilot hole must be drilled with a 3/16-inch carbide bit. This size relationship is critical, the screw’s threads need concrete to bite into, and a hole that’s too large provides nothing to grip.
The bit size is dictated by the screw manufacturer, not a general rule. Using a bit from your general-purpose set that’s “close enough” is the most common reason screws pull out.
| Screw Type & Size | Required Pilot Hole Diameter | Source |
|---|---|---|
| Tapcon 1/4″ Screw | 3/16″ (0.1875 in) | Tapcon Spec |
| fischer ULTRACUT FBS II 8mm | 8mm | fischer Manual |
| fischer ULTRACUT FBS II 10mm | 10mm | fischer Manual |
| fischer ULTRACUT FBS II 12mm | 12mm | fischer Manual |
Depth is the second half of the equation. The hole must be deeper than the screw. Concrete dust created during drilling has to go somewhere. If the screw hits the bottom of the hole, it will either stop dead or split the concrete around it.
Set your hammer drill’s depth stop or wrap tape around the bit as a guide. The rule is hole depth = screw length + 1/4 inch. For a 3-inch screw, drill a 3.25-inch hole.
Clean the hole thoroughly after drilling. Use a shop vac, a dedicated hole brush, or compressed air. Leftover dust acts as a lubricant, letting the screw spin without gripping.
Choosing and Using the Right Concrete Screw
Not all screws that go into concrete are “concrete screws.” These are specialized fasteners made of hardened steel with aggressive, spaced-out threads designed to cut and compact material, not expand it.
You’ll choose based on three things: diameter, length, and corrosion resistance. The diameter determines strength. The length ensures enough thread engages in the concrete. The coating decides if it rusts in a year.
Diameter: For most home tasks, hanging a ledger board, securing a wall to a floor, mounting heavy shelves, a 3/16-inch screw is sufficient. It’s easier to drill for and install. Step up to a 1/4-inch screw if you’re anchoring structural framing, heavy machinery, or if the concrete is especially hard and you snap a 3/16-inch screw.
Length: The screw must be long enough to pass through the material you’re attaching and embed deeply into the concrete. A minimum embedment of 1 inch is standard for light duty. For heavier loads, aim for 1.5 to 2 inches of thread inside the concrete.
Corrosion Resistance: This is where DIYers get burned. – Zinc-coated (blue): For interior, dry locations only. – Stainless Steel (410): Good for outdoor, general-use. Strong and moderately corrosion-resistant. – Stainless Steel (304/316): Essential for coastal areas, salt, or constant dampness. This is what you use for deck footings, outdoor fixtures, or in a basement that sees moisture.
Common mistake: Using blue concrete screws on pressure-treated lumber or outdoors. The chemicals in the wood and moisture will corrode the zinc coating, leading to failure within a couple of seasons.
The head style matters for installation. Hex heads are vastly superior to Phillips for concrete screws. They resist cam-out, allowing you to apply the significant downward pressure needed without stripping the head. Use Phillips only when the head must be flush and you’re working with a low-torque driver.
The Installation: Driving the Screw Without Breaking It
You have a clean, correctly sized hole. You have the right screw. Now you can ruin it all in five seconds with the wrong tool setting.
Impact mode is for drilling the hole only. When it’s time to drive the screw, switch your hammer drill to standard rotary mode or use an impact driver. The ITW Buildex technical sheet for Sammys screws states it plainly: installing a concrete screw with the drill in impact mode “will destroy the pullout factor of the screw.” The hammering action fractures the delicate threads’ engagement with the concrete.
Here is the step-by-step that prevents stripped heads, snapped shanks, and loose fittings.
- Insert the screw into the hole. Make sure it’s started straight.
- Set your drill or impact driver to a low speed setting. High speed generates too much heat and doesn’t allow the threads to cut.
- Apply firm, constant downward pressure. You need to keep the screw’s threads engaged with the concrete. Letting up causes it to spin and ream out the hole.
- Drive until the head is flush and tight. You’ll feel a distinct increase in resistance. Stop immediately. Do not over-tighten. The goal is snug, not maximum torque.
If the screw stops turning before it’s flush, you’ve likely hit the bottom of the hole. Back it out and drill deeper.
If the screw spins freely without tightening, the hole is too large. Your only fix is to step up to the next screw diameter, use a 1/4-inch screw in a hole meant for a 3/16-inch screw, for example.
Concrete Screw Sizes and Selection
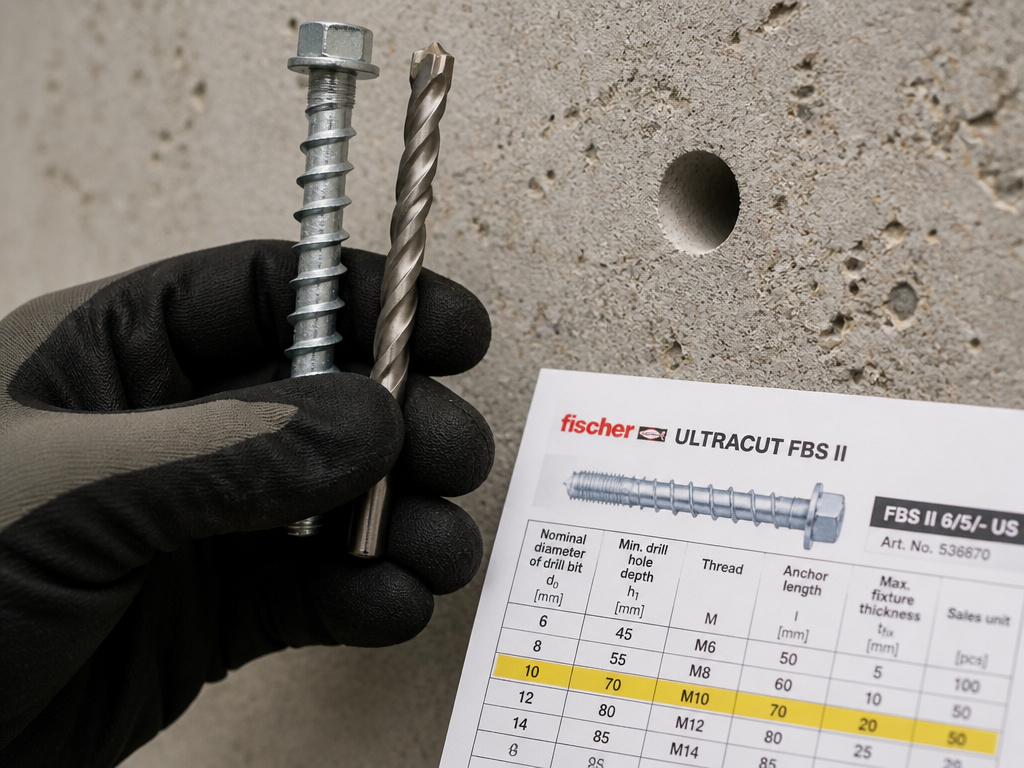
Picking a screw isn’t just about grabbing the longest one on the shelf. You’re matching a system: screw diameter, pilot hole size, and required embedment depth. Manufacturer tables remove the guesswork.
The fischer ULTRACUT FBS II specs show how precise this gets. A 10mm screw requires a 10mm hole, a nominal screw-in depth of 55mm for light duty, and 85mm for heavier loads. The clearance hole in your fixture must be between 12.8 and 14mm. Miss one of these numbers and the rated holding power is void.
| fischer ULTRACUT FBS II Screw | Drill Hole (mm) | Min. Embedment (hnom1) | Heavy-Duty Embedment (hnom3) |
|---|---|---|---|
| 8mm | 8mm | 50mm | 65mm |
| 10mm | 10mm | 55mm | 85mm |
| 12mm | 12mm | 60mm | 100mm |
| 14mm | 14mm | 65mm | 115mm |
For North American screws like Tapcon, the system is similar but in inches. The classic Tapcon 1/4″ x 1-1/4″ screw uses a 3/16″ bit and needs about 1″ of embedment.
The big takeaway? You cannot mix systems. Do not use a 5/16″ drill bit because it’s close to 8mm. Do not assume a 2-inch screw is fine if the spec calls for 2.5 inches of embedment. This is where “good enough” isn’t.
Edge Cases and Problem Solving
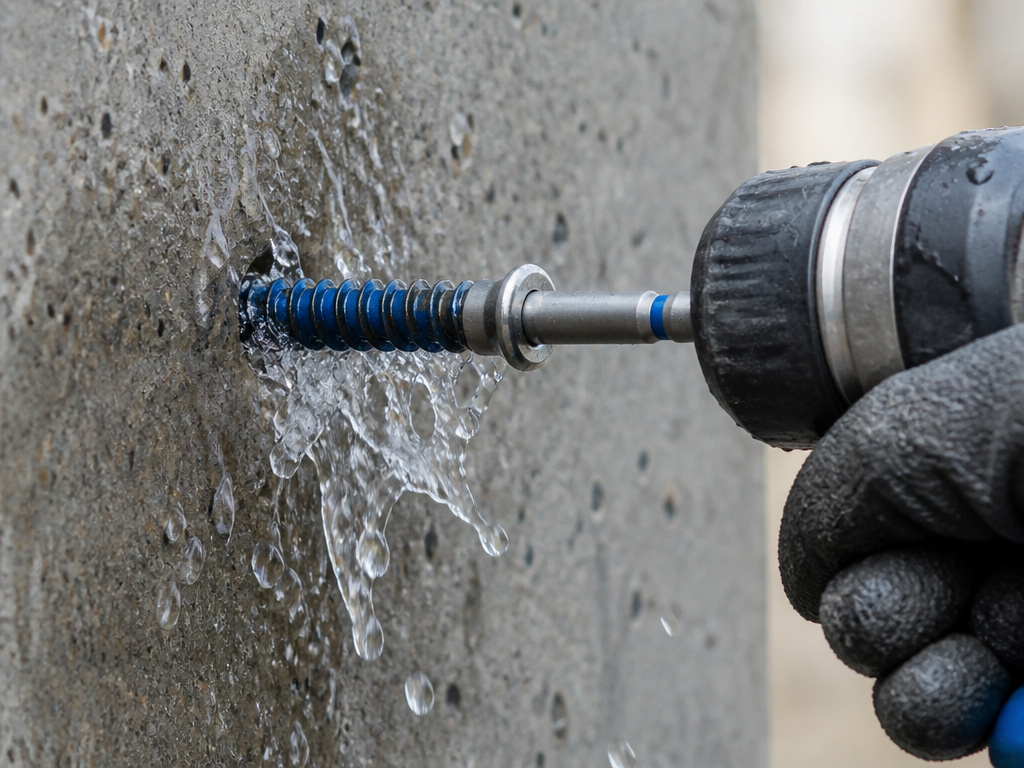
Concrete isn’t always in a perfect, dry, vertical wall in your 70°F garage. Here’s what to do when the standard procedure meets real-world mess.
The hole fills with water. From rain, a leaking pipe, or a damp basement wall. Do not try to blow it out and hope for the best. The European Assessment Document EAD 332795-01-0601 for bonded screw fasteners explicitly includes provisions for installation in water-filled drill holes. The concrete screw can be installed directly into the water. The water actually helps keep dust down. Drive the screw in; it will displace the water and the threads will still cut.
Drilling vertically upward or into overhead concrete. Gravity works against you. The fischer manual notes that when drilling vertically upwards, you can omit cleaning the hole, the debris falls out. When drilling straight down, increase the hole depth by an additional 3 times the drill diameter to ensure debris doesn’t pack at the bottom and prevent the screw from seating fully.
The concrete is old or crumbly. If the concrete spalls or cracks easily when drilling, it may be low-strength. In this case, a screw that relies on thread engagement might not hold. Your alternatives are a mechanical anchor that expands behind the weak surface or a chemical adhesive like an epoxy anchor.
Extreme temperatures. The EAD standard specifies an installation temperature range of -40°C to +40°C for the bonding material of adhesive screws. While standard concrete screws are less sensitive, avoid installing in freezing conditions where ice could form in the hole, or in extreme heat where the metal and concrete expand at different rates.
Frequently Asked Questions
Can I use an impact driver to install concrete screws?
Yes, an impact driver is an excellent tool for installing concrete screws. Its rotational impacts help drive the screw without the cam-out risk of a standard drill. Crucially, it does not hammer the screw axially into the concrete like a hammer drill’s impact mode, which would damage the threads.
What happens if the pilot hole is too big?
If the pilot hole is even 1mm too large, the screw’s threads cannot bite into the concrete. The screw will spin freely, never tighten, and offer little to no holding power. Your only recourse is to use a larger-diameter concrete screw designed for that bigger hole, or to switch to a different anchoring system like an epoxy anchor.
How deep should the pilot hole be for a 3-inch concrete screw?
Drill the pilot hole to a depth of 3 1/4 inches. The extra 1/4 inch provides space for concrete dust to accumulate so the screw can seat fully without hitting the bottom. Always drill deeper than the screw is long.
Can concrete screws be removed and reused?
Sometimes, but don’t count on it. You can back them out if needed. However, the threading action damages the concrete threads in the hole. Reinstalling the same screw into the same hole will result in a very weak hold. If you must re-use the same location, you’ll need to use a larger screw or a different type of anchor.
What’s the difference between a concrete screw and a wedge anchor?
Concrete screws thread directly into the concrete. Wedge anchors are inserted into a hole and expand when a nut is tightened, creating a mechanical lock from behind the concrete. Screws are faster, removable, and good for medium loads. Wedge anchors are generally stronger for heavy, structural loads but are permanent and require precise hole depth.
Why did my concrete screw snap off?
Concrete screw typically snaps for one of two reasons. First, you hit a rebar or aggregate stone while driving it. Second, you used too high a speed or an impact hammer setting, which overheated and embrittled the hardened steel, causing it to shear. Always drill clear of rebar and drive screws at a slow, steady speed.
The Bottom Line
Drilling screws into concrete is a mechanical process, not a magical one. Success comes from matching three specifics: the exact drill bit to the screw, the correct installation tool setting, and a screw long enough to hold your load.
Default to a 3/16-inch screw for most jobs and a 1/4-inch for anything structural. Use a hammer drill for the hole, then an impact driver or a drill in rotary mode to set the screw. Keep the hole clean and 1/4-inch deeper than the screw.
The part that turns a frustrating failure into a solid hold is respecting the manufacturer’s numbers. That 10mm hole for a 10mm screw isn’t a suggestion. It’s the difference between a shelf that stays up and one that doesn’t.
