
The Correct Way to Drill Into a Metal Door for Hardware
This post contains affiliate links. As an Amazon Associate, we earn from qualifying purchases.
Drilling into a metal door requires matching three things: the correct drill bit type for steel, the exact pilot hole size for 75% thread engagement, and a perpendicular drilling angle to prevent the screw from pulling out under load.
That 75% figure isn’t a suggestion. It’s the normal condition defined in the ANSI/SDI A250.6 hardware standard for steel doors. Drop below 65% and the attachment is officially inadequate. The difference between a door that swings smoothly for decades and one that sags in a year often comes down to the drill bit you picked for the pilot hole.
What follows is the field-prep sequence the Steel Door Institute documents: how to select bits, mark locations, drill and tap for maximum holding power, and handle the edge cases that break generic advice.
Key Takeaways
- Use a center punch to mark every hole. Skipping this lets the drill bit skate across the hardened steel face and ruins your placement.
- Match your pilot hole drill bit to the screw size using a chart from Machinery’s Handbook. A #25 drill yields 75% thread for many common machine screws.
- Drill perpendicular to the door surface. An angled hole prevents the screw head from seating flat and concentrates stress on one side of the threads.
- For surface-mounted hardware on unreinforced areas, you must use thru-bolts with spacers. Sheet metal screws into thin face steel will strip out.
- On high-use or vibrating doors, consider thread-locking inserts or liquid. The standard calls this out for a reason, fatigue loosens even properly tapped holes over time.
The 65% vs 75% Thread Rule That Holds Hardware
You need three full threads of a screw inside the metal for a secure hold. A standard 18-gauge steel door face is too thin for that. This is why doors have reinforced plates behind hinge and lock locations, to provide enough material.
The installer shall assure that tapped holes have 75% of full thread (considered a normal condition). This percentage shall not fall below 65% to be considered adequate for proper hardware fastenings.
ANSI/SDI A250.6-2024
That blockquote is the core of the ANSI/SDI A250.6 PDF standard. The “full thread” percentage is controlled by your pilot hole size. Drill too big, and you lose thread depth. The screw sits in a loose, weak hole.
| Drill Size | Diameter (inches) | % of Full Thread | Condition |
|---|---|---|---|
| #27 | 0.144 | 85% | Very tight |
| #26 | 0.147 | 79% | Tight |
| #25 | 0.149 | 75% | Normal |
| #24 | 0.152 | 34 70% | Acceptable |
| #23 | 0.154 | 66% | Minimum |
The #25 drill is the sweet spot for many standard machine screws used in door hardware. Going to a #23 drill gets you down to 66% thread, barely above the 65% floor. If your bit is even slightly worn, you’ll dip below adequate.
Where this goes sideways: Using the wrong size drill because it’s “close enough.” A 1/8-inch drill bit is 0.125 inches. That’s smaller than a #25. You might think a smaller hole means a tighter grip. It doesn’t. It means the tap can’t cut clean threads, you risk breaking the tap in the hole, and the screw will either not go in or will gall the threads. The holding power plummets.
The Steel Door Institute’s experience is that most hardware failures come from field installation errors, not weak doors. An oversized pilot hole is the prime error. It’s easier to tap, so installers take the shortcut. The door pays for it later with sagging hinges or a loose lock.
Drill Bit Types for Steel Doors: HSS vs. Cobalt
A hollow metal door is typically made from cold-rolled steel. It’s not mild steel, and it’s certainly not pot metal or soft alloy. You need a bit that can work-harden without immediately dulling.
For the vast majority of residential steel doors, a High-Speed Steel (HSS) drill bit is the correct choice. It’s tough enough for the job and far more affordable than specialty bits. Look for a 135-degree split point. It starts easier and wanders less than a 118-degree point, especially on a curved door surface.
When should you step up? If you’re drilling into the reinforced plate, often 10 or 12-gauge steel, or if you’re installing hardware on a commercial door that sees hundreds of cycles a day, move to a cobalt drill bit. Cobalt (often labeled HSS-Co) retains its hardness at higher temperatures. It’s the pick for stainless steel or hardened metal components, and it handles the thicker gauges without overheating.
Common mistake: Using a “titanium” coated bit designed for wood. The coating is for wear resistance on abrasive materials, not for penetrating metal. It will glaze over and stop cutting almost immediately, leaving a polished dimple where your hole should be.
What about wood vs metal bits? A wood bit has a aggressive, spade-like tip designed to pull itself in. That tip will dig, skate, and snap on metal. The flutes are different too. Always use a bit ground for metal. The color of metal bits can be a clue, plain HSS is a dull silver, cobalt is a distinctive straw-gold hue.
Bottom line: Keep a set of HSS bits for general door work. Have a few cobalt bits in common sizes (#25, #17, 1/8″) for the tough spots.
Field Preparation: From Marking to Tapping
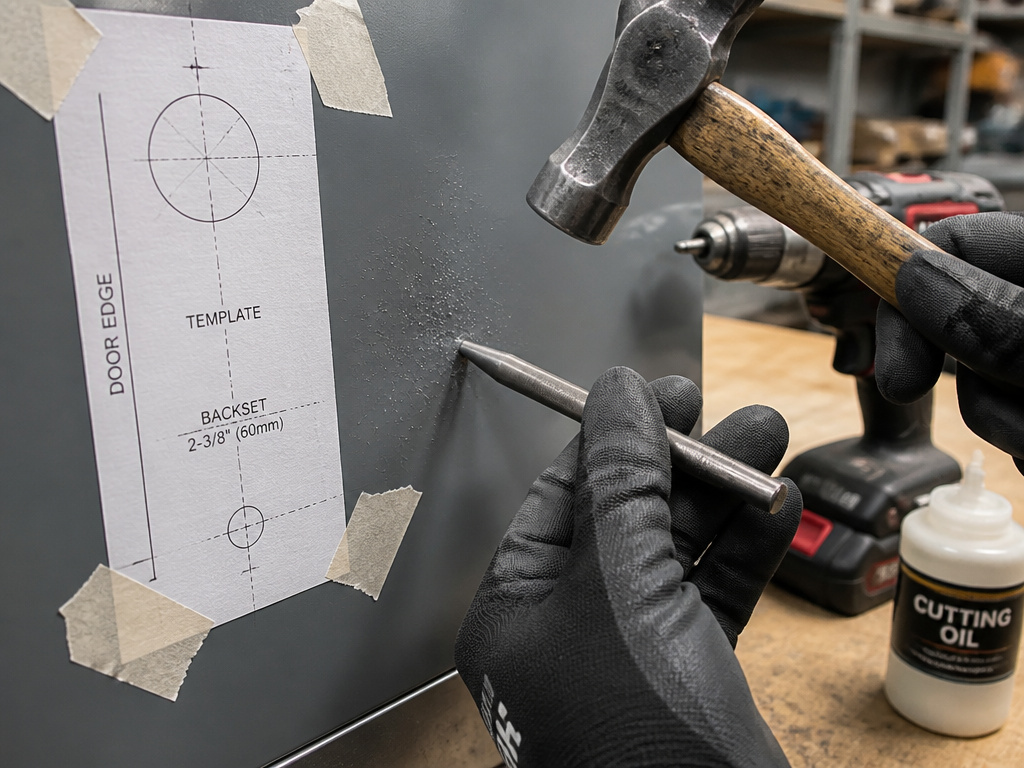
This is the sequence that separates a pro install from a weekend headache. You need more than a drill.
The Tools You Actually Need
- Center punch
- Hammer
- Variable speed drill (corded or high-torque cordless)
- Correct drill bits (HSS or Cobalt)
- Cutting oil or lubricant
- Appropriate tap and handle
- Template provided with the hardware
- Clamps or a helper
The template is non-negotiable for surface-mounted devices like closers, exit devices, or pulls. The standard mandates its use. For mortise hardware (hinges, locks), the prep is usually factory-done. But for continuous hinges, anchor hinges, or floor pivots, you’re drilling in the field.
Step-by-Step: Drilling the Pilot Hole
- Locate and mark with the template. Tape the template securely to the door. For holes on the edge, wrap the template around and mark the centerline.
- Center punch every mark. Hit it firmly once. This dimple prevents drill wandering on the hard surface.
- Apply cutting fluid. A drop on the punch mark, not just on the bit. It needs to flow into the cut.
- Drill perpendicularly at low speed. Start slow with steady pressure. Let the bit cut; don’t force it. The goal is a clean hole, not speed.
- Clear chips frequently. Pull the bit out every few seconds to clear metal shavings. This keeps the hole clean and prevents the bit from binding.
What happens if you skip cutting fluid? Friction heat builds fast. It work-hardens the steel around the hole, making it even tougher to drill. It also anneals (softens) the cutting edges of your HSS bit, dulling it permanently. The bit smokes, the hole gets rough, and you ruin a bit in thirty seconds.
Tapping for Threads
The tap must match the screw thread perfectly. Most door hardware uses coarse-thread machine screws (e.g., 10-24, 12-24).
- Load the tap into the handle. Drip cutting fluid into the pilot hole.
- Start the tap straight. Turn it clockwise two full turns, then back it out half a turn to break the chip.
- Continue slowly, backing out often to clear chips. Feel for resistance. If it gets hard, back out, clean the tap flutes, add oil, and continue.
- When the tap goes through, run it all the way back out to clean the new threads.
I won’t tap a hole without a squirt bottle of dark threading oil next to me. The cheap stuff works. Going dry guarantees torn threads, a stuck tap, and a ruined door prep. That’s a hundred-dollar mistake you feel in your wrists.
After tapping, blow out the hole with compressed air. Run the screw in by hand first to feel for cross-threading. If it binds, back it out and re-tap, don’t force it.
Door Thickness, Reinforcing, and Thru-Bolting
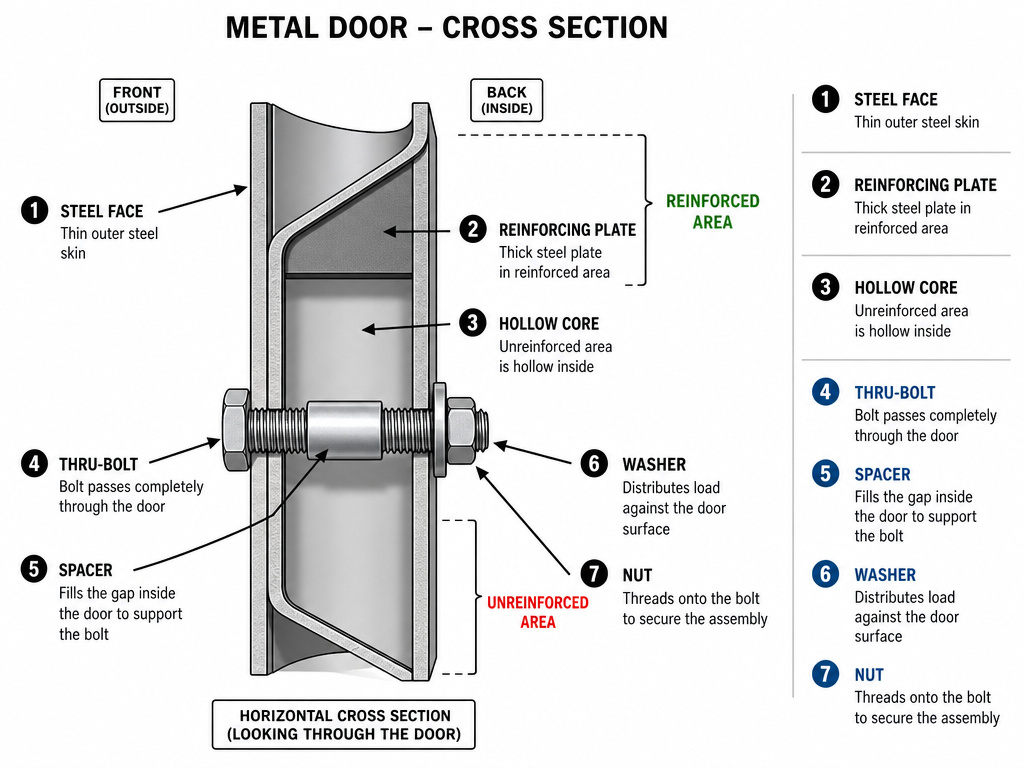
Not every spot on the door is created equal. The ANSI standard specifies minimum reinforcing thicknesses.
| Door Thickness | Reinforcing Gauge | Minimum Thickness (inches) | Typical Use |
|---|---|---|---|
| 1-3/8″ | 12 gauge | 0.093 | Mortise locks, lighter doors |
| 1-3/4″ | 10 gauge | 0.123 | Heavy-duty hinges, exit devices |
If you’re drilling for a mortise lock or hinge, you’re likely drilling into this reinforced plate. Good. If you’re adding a surface-mounted pull, mail slot, or kickplate, you are not.
For surface hardware on unreinforced areas, you must use thru-bolts. A sheet metal screw into the thin face steel will strip out the first time someone leans on the pull. Thru-bolts pass completely through the door and use a nut and washer on the back side. For hollow doors, you must use spacers or sex-bolts to prevent collapsing the door face when you tighten the nut.
This is where knowing your drilling through metal basics pays off. You’re often drilling a larger clearance hole (for the bolt shaft) and a smaller pilot hole (for threading into a backing plate or nut). The perpendicular rule is doubly important here.
Edge Cases and Pro Tips
The standard procedure covers 95% of jobs. These are the exceptions that still matter.
Vibration or High-Frequency Doors: Classroom doors, bathroom doors in public restrooms, any door that gets slammed or cycled constantly. The ANSI standard suggests considering thread-locking inserts (like a Helicoil), liquid threadlocker, or binding-head screws. Vibration will loosen even a perfectly tapped machine screw over a few thousand cycles.
Continuous Hinges: These often require field preparation. They also often need specific reinforcement ordered with the door. Don’t assume you can just screw a continuous hinge into a standard door edge. Check the specs.
What if you mess up a hole? If you drill off-center or strip the threads, the fix is a thread-locking insert. You drill the hole slightly larger to the insert’s required size, tap it, and screw in the insert. It provides a new, hardened threaded bore. It’s stronger than the original material. This is also the solution if you accidentally drill the pilot hole too large.
Making holes for latch bolts. The door hardware installation instructions from major manufacturers are specific: for a 2-3/8″ latch, the edge bore must be a full 3-1/2″ deep. For a 2-3/4″ backset, at least 3-3/4″. Drilling shallow means the latch won’t seat fully, and the door won’t latch.
Sometimes, you need to make a hole in metal without a drill. For a metal door, that’s rarely a good option. Punching or plasma cutting is destructive and rarely precise enough for hardware. If your drill is dead, you’re better off waiting.
Frequently Asked Questions
What is the best drill bit angle for metal doors?
135-degree split-point bit is best. It penetrates faster with less pressure and resists walking on curved surfaces better than the common 118-degree bit. The differences between 118 and 135 degree drill bits matter most when starting the hole accurately.
Can I use an impact driver to drill into a metal door?
Do not use an impact driver to drill the pilot hole. The hammering action can shatter the cutting edges of your drill bit and create an out-of-round, ragged hole. Use a drill in standard mode. You can use the impact driver to drive the screws after tapping, as the impacts can help seat them tightly.
How do I know if my door has a reinforcing plate?
Use a strong magnet. Run it over the area where you need to drill (typically near the lock edge and hinge locations). A noticeable increase in magnetic pull indicates a thicker steel plate behind the face. If the pull feels uniform and weak, you’re likely just on the thin door skin.
Why does my drill bit keep slipping off the punch mark?
Your center punch dimple is too shallow, or you’re not starting the drill at a dead stop. Use a sharper, heavier center punch. Place the drill bit tip directly in the dimple, hold the drill firmly, and pull the trigger at its lowest speed setting. Let the bit find its bite before increasing speed.
Is a pilot hole always necessary for sheet metal screws?
Yes, even for self-drilling sheet metal screws on a steel door. The door face is too hard for most self-drillers to start cleanly without a pilot. Drill a pilot hole slightly smaller than the screw’s thread major diameter. This guides the screw, reduces driving torque, and prevents the screw head from chewing up the door finish.
The Bottom Line
Drilling into a metal door isn’t about power. It’s about precision and patience. The ANSI standard gives you the numbers: 75% thread is normal, 65% is the absolute floor. Your drill bit choice. HSS for general work, cobalt for reinforced plates, decides whether you hit those numbers.
Use the template. Punch the mark. Drill slow and straight. Tap with oil. That sequence, followed exactly, turns a potential failure point into a connection that lasts as long as the door itself. The right metal drill bit and ten minutes of care beat a bag of anchors and a year of rattling hardware every time.
