
How to Drill Perfect Angled Holes in Wood Using Simple Jigs
This post contains affiliate links. As an Amazon Associate, we earn from qualifying purchases.
Drill a hole at an angle in wood by using a purpose-built drill guide like the Kreg Drill Guide Pro or UJK Drill Guide for accuracy, or by creating a wooden block jig for freehand work. The primary challenge is bit wander; a guide or a deep pilot hole anchors the bit to prevent it from skating across the wood surface.
That challenge of bit wander is mechanical. The tip of a drill bit is designed to cut straight down. When you tilt the drill, the cutting edges on one side contact the wood before the others, creating a sideways force that pushes the bit off its mark. A guide eliminates this by physically preventing the drill from moving sideways during the initial plunge.
What follows is the decision between a dedicated tool and a shop-made jig, the specific limits of each method, and the one mistake that ruins more angled joinery than any other.
Key Takeaways
- A drill guide like the Kreg KDG6500 or UJK 106072 is the only way to get repeatable, accurate holes at any angle between 0 and 60 degrees.
- Forstner bits skate on angled surfaces because their center point has nothing to bite; you must drill a perpendicular pilot hole first or use a drill press.
- The maximum bit shank diameter for most guides is 3/8 inch, but the guide itself can handle hole saws and Forstner bits up to 2-3/4 inches in diameter.
- Freehand drilling at an angle requires a sacrificial block jig clamped to the workpiece; eyeballing it fails 9 times out of 10.
- Always clamp your workpiece. An unsecured board will shift as the bit bites, guaranteeing a crooked hole.
What a Drill Guide Actually Does (And Doesn’t Do)
A drill guide isn’t a magic box. It’s a mechanical bracket that holds your handheld drill in a fixed position. It converts the drill’s natural tendency to wobble into a single, controlled axis of motion. The Kreg Drill Guide Pro manual states its intended use covers twist bits, hole saws, spade bits, and Forstner bits in materials from wood to masonry.
The real value is in the stops and scales. Guides have preset detents or marked quadrants so you can return to the same 15-degree or 22.5-degree angle for every hole in a project. Without that, your joinery gets sloppy. A half-degree variance across six holes is enough to rack a frame.
A drill guide provides extra stability and accuracy when you need to drill straight or at an angle. The beauty of the system is you can take your cordless drill and convert it to the near perfect accuracy of a pillar drill. — UJK Drill Guide manual
The limitation is torque. A powerful drill in a lightweight aluminum guide can twist the whole assembly if you lean into it. You control the feed rate, not the drill.
The Kreg Drill Guide Pro vs. The UJK Drill Guide
You have two serious contenders for a dedicated tool. They solve the same problem with different approaches.
| Feature | Kreg Drill Guide Pro (KDG6500) | UJK Drill Guide (106072) |
|---|---|---|
| Max Bit Diameter | 2-3/4″ (hole saw/Forstner) | 60mm (~2-3/8″) |
| Max Shank Diameter | 3/8″ | 1/4″ hex drive (adapts via chuck) |
| Angle Range | 0–90 degrees (manual set) | +/- 60 degrees with precision stops |
| Best For | General shop work, larger holes, composite/masonry | Fine woodworking, repeatable angles, integrated workholding |
| Key Limitation | Bulkier, less portable | Smaller chuck capacity, requires secure mounting |
The Kreg is the workhorse. Its open-frame design handles a 2-3/4 inch hole saw, which covers most door hardware and plumbing pass-throughs. The UJK is the precision instrument. Its twin steel guide bars and oil-filled bronze bushes have almost zero play, and the precision angle stops are machined for dead-on 90-degree drilling and repeat stops at any angle.
For drilling pocket holes, the Kreg’s fixed 15-degree setting is hard to beat. For dowel joints that need absolute alignment, the UJK’s rigidity wins.
How to Use a Drill Guide: The 5 Steps Nobody Skips
The process is simple, but three mistakes here waste more time than the drilling itself.
Step 1: Mount and Square the Guide
If your guide has mounting holes, bolt it to a bench. If it has a non-skid pad, clean the bench surface. A guide that shifts during the first hole is useless for the second. Use a square against the guide column to verify it’s perfectly perpendicular to the work surface before you lock any angle adjustments.
Step 2: Set the Depth Stop
This is the step every beginner forgets. Drill guides plunge too deep by default. Loosen the depth stop collar, push the guide bridge down to your desired depth, and tighten it. For a through-hole, set the stop just shy of the workpiece thickness and finish by hand to prevent tear-out.
Step 3: Set the Angle
Loosen the guide rods or tilt clamp. Use the printed scale for rough work. For fine work, set a digital angle finder on the guide bridge, then tighten everything down. Double-check the angle after tightening — the act of locking it down can shift a lightweight guide a degree or two.
Step 4: Secure the Workpiece and Guide
Clamp your wood to the bench. If you’re drilling near an edge, use the guide’s self-centering notch or V-grooves. For the Kreg, that means rotating the base until the notch contacts both sides of the board. Never hold the workpiece by hand.
Step 5: Drill Slowly and Clear Chips
Attach your drill, start at a low speed, and let the bit cut. Don’t force it. For deep holes or softwoods like pine, pull out halfway to clear chips. A clogged bit overheats and burns the wood.
Where this goes sideways: Skipping the depth stop. The bit plunges through your workpiece, digs into your bench, and snaps. It happens on the first hole when you’re excited to test the tool.
When a Drill Guide Isn’t the Right Tool
A guide is fantastic for edges and smaller stock. It struggles with large panels and steep angles over 45 degrees.
The Center-of-a-Panel Problem
Most guides need an edge to register against. To drill an angled hole in the middle of a 4×8 sheet, you’d need to build a riser platform the size of the sheet. At that point, a drill press with a tilting table is the right tool.
The Steep-Angle Torque Problem
As the angle increases, the sideways force on the guide increases. The UJK manual warns to securely tighten the drill chuck over its 1/4” hex drive shaft “to prevent it from breaking under load.” At 60 degrees, you’re pushing the design limits. For a one-off hole, it’s fine. For production work, it stresses the components.
The Large-Diameter Hole Problem
This is where the manuals and real-world experience split. The Kreg guide lists Forstner bits as compatible. But a Forstner bit’s center point needs a perpendicular surface to bite and prevent skating. On a 45-degree angle, that point is dangling in air.
A Forstner bit tends to skate around when you’re dealing with angles that steep. There’s nothing for the center point to grab into until you’re halfway through the piece.
The fix is a two-step process: drill a small, perpendicular pilot hole first to give the Forstner’s center point a seat, then follow with the Forstner bit set to your desired angle. It works, but it adds a setup.
How to Drill Angled Holes Freehand (And When to Try It)
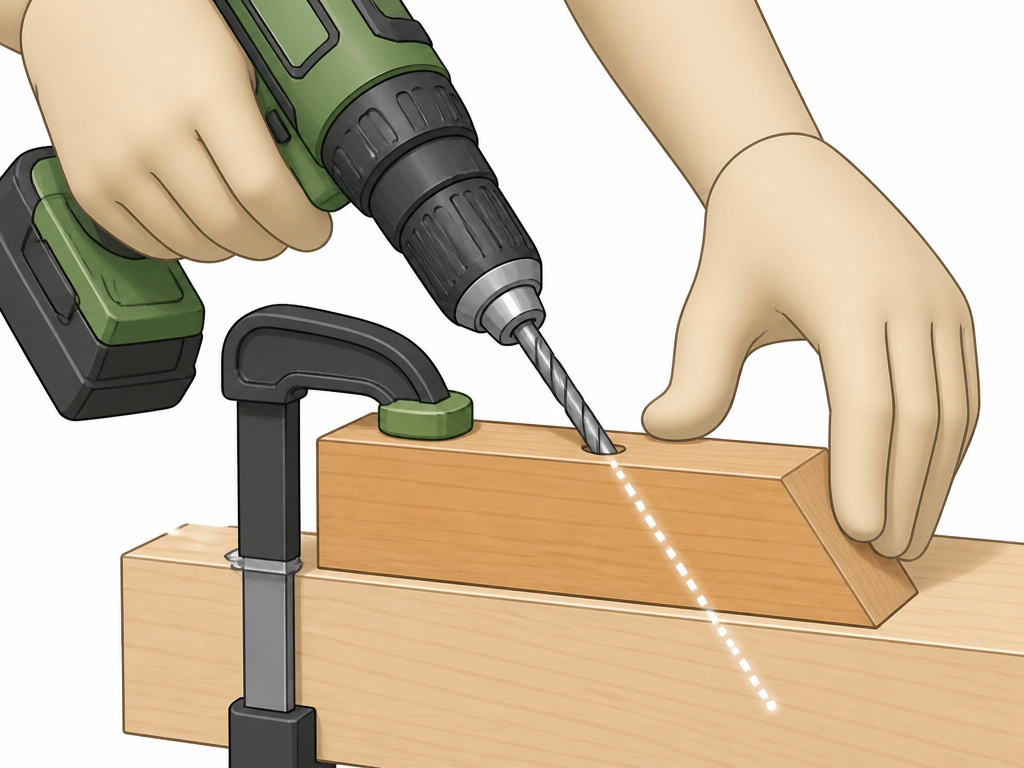
Freehand drilling at an angle is a skill for one-off holes where setting up a guide takes longer than the drill time. It is not for joinery.
The Block Jig Method
This is the only reliable freehand technique. Cut a scrap block of wood to your desired angle on a miter saw. Clamp this block firmly to your workpiece. The flat side of the block becomes a temporary guide for your drill. Hold the drill tight against the block and start the hole. The block prevents the initial skate.
The Starter Hole Method
Use a center punch to make a deep dent exactly where you want the hole. Drill a small, shallow pilot hole straight down. This gives the full-sized bit a starting channel. Then, tilt your drill to the desired angle and enlarge the hole. You’re effectively drilling a second, angled hole inside the first.
Why Eyeballing Fails
Your brain cannot judge a 22-degree angle by sight. Your drill will be off by at least five degrees. That error multiplies over the length of the hole, so the exit point is nowhere near where you planned. This is the primary cause of misaligned dowel joints and split wood when driving screws.
Choosing the Right Bit for Angled Drilling
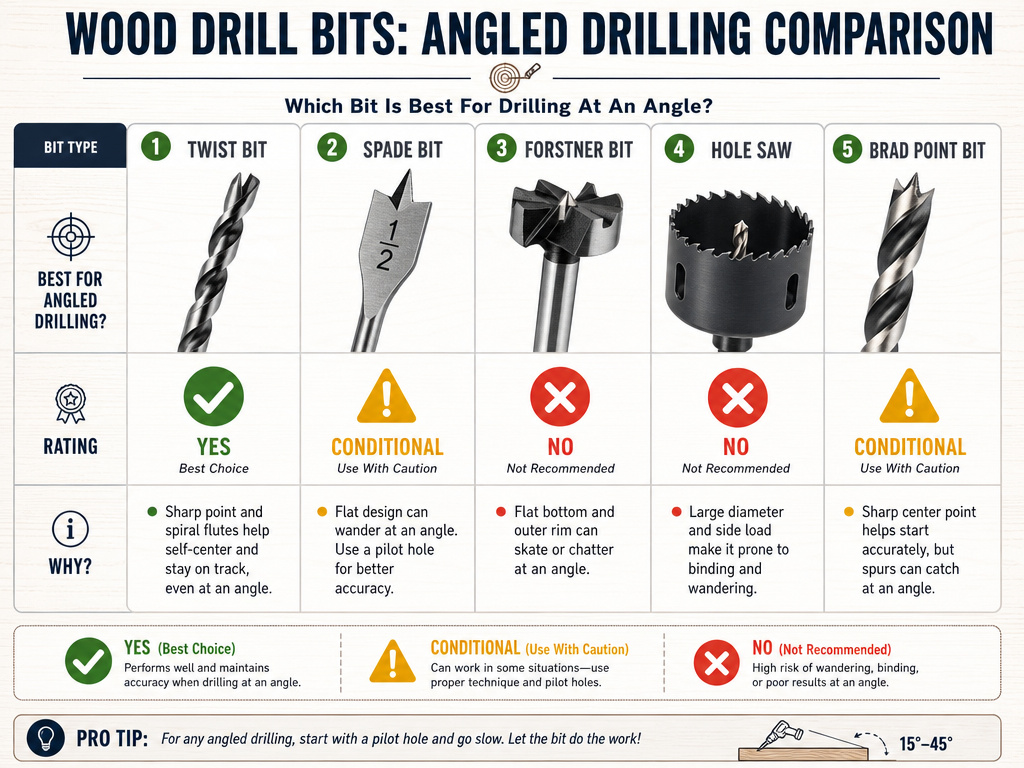
Not all wood drill bits behave the same on a slanted surface.
| Bit Type | Best For Angled Drilling? | Why |
|---|---|---|
| Twist Bit | Yes | Sharp point self-centers, least likely to skate. The default for most angled basic holes. |
| Spade Bit | No | Flat blade wants to skate violently. Requires a perfectly perpendicular starter hole or a guide. |
| Forstner Bit | Conditional | Cuts clean flat-bottomed holes but will skate without a pilot. Essential for overlapping angled holes. |
| Hole Saw | Yes, with guide | Pilot drill guides it, but the large diameter creates tremendous torque. Use slow speed. |
| Brad Point | Yes | The sharp spurs score the wood perimeter before cutting, reducing tear-out on angled exits. |
A spade drill bit is the worst choice. Its flat cutting edge has no centering ability. If you must use one, clamp a block jig to the workpiece to trap the bit at the correct angle for the first 1/4 inch of travel.
A Forstner drill bit is the best choice for a clean, flat-bottomed hole at an angle, but only after you’ve given its center point a place to sit. Drill a 1/8-inch pilot hole straight down at your mark first.
The Most Common Angled Drilling Projects
You’re not drilling angles for fun. These are the applications that demand it.
Pocket Holes
This is the classic. A pocket hole joint uses a shallow, 15-degree angled hole to drive a screw from one board into the edge of another. Dedicated pocket hole jigs are faster, but a drill guide set to 15 degrees works perfectly. The shallow angle creates tremendous mechanical leverage to pull boards tight.
Dowel Joints
Strength here depends on alignment. Drilling accurate dowel holes at the same angle in two separate pieces is nearly impossible freehand. A drill guide ensures the holes in both boards are parallel, so the dowel slides in without forcing the joint.
Mounting Hardware
Installing cabinet handles or drawer pulls often means drilling into a curved or angled face frame. A guide lets you set the exact angle so the pull sits flush against the curved surface.
Structural Framing
Toenailing—driving a nail at an angle—has a drilled counterpart. Drilling an angled pilot hole for a lag bolt through a rafter into a beam prevents the wood from splitting under load. The angle spreads the force.
Troubleshooting Crooked, Wandering, or Broken Holes
The bit walks across the surface as soon as it touches.
You didn’t anchor it. The solution is a starter dimple with a center punch or a pilot hole. For large Forstner bits, drill a small, perpendicular hole first.
The hole is angled correctly at the top but curves as it goes deeper.
You changed pressure. The drill bit follows the path of least resistance. If you start leaning on the drill halfway through, you’ll deflect the bit, especially with long twist bits. Use steady, even pressure and let the bit cut.
The wood splinters and tears out on the exit side.
You drilled too fast on the breakthrough. As the bit’s tip exits the back of the wood, the last fibers tear instead of cut. Place a sacrificial backer board behind your workpiece. Slow your drill speed and ease up on pressure as you feel the bit about to break through.
The hole is the wrong size.
You rocked the drill. On an angle, any side-to-side movement widens the hole. If you need a precise diameter for a dowel joint, use a drill press or guide. If the hole is already oversized, switch to a larger dowel or fill the hole with a glued dowel and re-drill.
The drill bit snaps.
You forced a dull bit or used a guide incorrectly. A bit binds in the wood, the drill torque twists, and the shank shears. This is common with the 3/8 inch shank diameter limit on guides—using a larger bit creates a lever arm that breaks the bit or the guide’s chuck. Keep bits sharp and respect the tool’s capacity.
Frequently Asked Questions
Can you drill an angled hole with a regular drill?
Yes, but not accurately by hand. You need a physical guide like a block of wood cut to the angle or a commercial drill guide. Holding a 20-degree angle by eye is not repeatable.
What is the best angle for pocket holes?
Pocket holes are almost always drilled at 15 degrees. This shallow angle creates a strong mechanical lock and allows the screw to draw the joint tight. Most pocket hole jigs are preset to this angle.
How do you drill a hole at a 45-degree angle in wood?
Use a drill guide set to 45 degrees, or create a wooden block jig with a 45-degree edge. Clamp the block to your workpiece, then run your drill along the block’s edge. For deep holes, ensure your bit is long enough to reach through at the slant.
Why does my drill bit wander when starting on an angle?
The cutting edges contact the wood unevenly, creating a sideways force. The bit’s tip hasn’t penetrated enough to stabilize it. A center punch dimple, a small pilot hole, or a guide that surrounds the bit eliminates this.
Can you use a spade bit at an angle?
It’s difficult and not recommended. A spade bit has a flat cutting edge with no centering point. It will almost certainly skate. If you must, clamp a sturdy block jig to the workpiece to fully support and guide the bit for the first 1/4 inch of travel.
The Bottom Line
For more than two holes, buy a guide. The Kreg Drill Guide Pro handles the tough jobs with big bits and diverse materials. The UJK Drill Guide delivers machine-shop precision for fine woodworking. For a single hole, the block jig method works if you take the time to cut the block accurately.
The goal isn’t just a hole. It’s a hole that aligns with a matching hole in another piece of wood. That only happens when the angle is repeatable. Your joinery is only as straight as your drill bit.
