
How to Drill Cabinet Handle Holes | The 3/16″ vs 1/4″ Rule
This post contains affiliate links. As an Amazon Associate, we earn from qualifying purchases.
To drill holes for cabinet handles, you need the correct drill bit size, accurate placement marks, and a technique that prevents wood splintering. For most knobs and pulls, use a 3/16″ drill bit. For pulls with integrated “studs,” use a 1/4″ bit. Screw length should be 1/4″ longer than your cabinet door or drawer front thickness.
The difference between a 3/16″ hole and a 1/4″ hole isn’t academic. It’s the gap between a handle that mounts securely and one that wobbles loose after a month. The wrong size lets the screw threads chew up the wood instead of gripping it.
What follows: the manufacturer specs that settle the bit-size debate, the one tool that guarantees straight holes, and the drilling trick that stops ugly splintering on the backside of your cabinet doors.
Key Takeaways
- The standard drill bit size for cabinet handles is 3/16-inch, but pulls with molded “studs” require a 1/4-inch hole.
- Screw length is critical: use screws that are 1/4 inch longer than your cabinet material thickness. Standard 1-inch screws fail on drawers over 3/4″ thick.
- Always drill a pilot hole first, especially in finished wood or laminate, to prevent the drill bit from wandering and ruining your mark.
- To avoid backside splintering, drill from one side until the point just breaks through, then finish the hole from the opposite side.
- A self-centering drill guide or a simple hardware template is non-negotiable for consistent, perpendicular holes across multiple cabinets.
The Right Drill Bit Size (3/16″ vs 1/4″)
You’ll see conflicting advice online. Some sites say to match the screw diameter, others suggest going slightly larger. The manufacturer instructions cut through the noise.
For most knobs and pulls, a 3/16″ hole is recommended. The exception is pulls that have ‘studs’—an extension of the molded screw holes. If a pull has a stud, then a 1/4″ hole is required. — Amerock Cabinet Hardware Installation Guide
A “stud” is a small, solid post cast into the back of the pull. The screw threads into this stud instead of passing directly through the cabinet. That stud needs a larger, precise hole to seat into. If you force a stud into a 3/16″ hole, you’ll crack the pull’s mounting bracket.
| Handle Type | Recommended Hole Size | Why It Matters |
|---|---|---|
| Standard Knob or Pull | 3/16″ | The screw threads bite directly into the wood for a tight fit. |
| Pull with Integrated Studs | 1/4″ | The stud must seat fully into the cabinet; a smaller hole will not allow it. |
| Daily Hand Tools Suggestion | 7/32″ for 3/16″ screws | Slightly larger hole for easier screw alignment, but can reduce grip. |
The “7/32″ suggestion from some DIY guides creates a sloppier fit. It can help if your screws aren’t perfectly aligned, but it also means the threads have less wood to grab. For a secure, long-term install, trust the 3/16” spec.
What most people get wrong: Assuming all pulls are the same. Before you drill, flip the pull over. If you see two solid posts instead of just empty screw holes, you’re holding a stud-style pull. That means you reach for the 1/4″ bit, not the 3/16″.
Screw Length: The Formula Every DIYer Misses
The screws included with your hardware are a starting point, not a guarantee. Amerock packs 8-32 x 1″ machine screws because they assume a standard 3/4″-thick cabinet door.
Your kitchen isn’t standard.
The screw length(s) used should be 1/4″ longer than the thickness of your cabinet door or drawer front material. It is not uncommon for some drawers to be constructed with a 3/4″ thick front attached to a 3/4″ thick drawer box. In this situation, the total drawer thickness is 1-1/2″, making a 1-3/4″ long screw necessary. — Amerock Cabinet Hardware Installation Guide
Here’s the simple formula: Material Thickness + 1/4″ = Screw Length.
Grab a tape measure and check both a door and a drawer. Drawers are often the culprit. A framed drawer front might be 3/4″ thick, but the actual box it’s mounted to adds another 1/2″. A 1-inch screw will bottom out before it pulls the handle tight. The handle stays loose, and overtightening strips the threads.
Gather Your Tools and Materials
You can drill a hole with just a drill and a bit. You can drill a good hole with a few extra tools that prevent regret.
- Power Drill: A cordless drill offers the best control. Set it to the correct clutch setting to avoid over-driving screws.
- Drill Bits: A 3/16″ brad point bit and a 1/4″ brad point bit. Brad point bits have a sharp tip that centers itself in your pencil mark, reducing wander.
- Self-Centering Drill Guide: This is the single best investment for this job. It clamps to your cabinet and ensures every hole is drilled perfectly perpendicular. It eliminates tilted handles.
- Painter’s Tape: Applied over your mark before drilling, it minimizes surface splintering.
- Sharp Pencil & Measuring Tape: For marking.
- Cabinet Hardware Template: You can buy a reusable one (like the Liberty Hardware AN0191C-G-Q1) or make your own from scrap wood. This is essential for consistent hole placement for pulls.
- Safety Glasses: Always.
A self-centering guide turns a frustrating job into a repeatable process. Without one, you’re eyeballing 90-degree angles, and the human eye is terrible at that. The result is a handle that rocks slightly because the screws enter at a subtle angle.
Marking Placement: Rules, Ratios, and When to Ignore Them
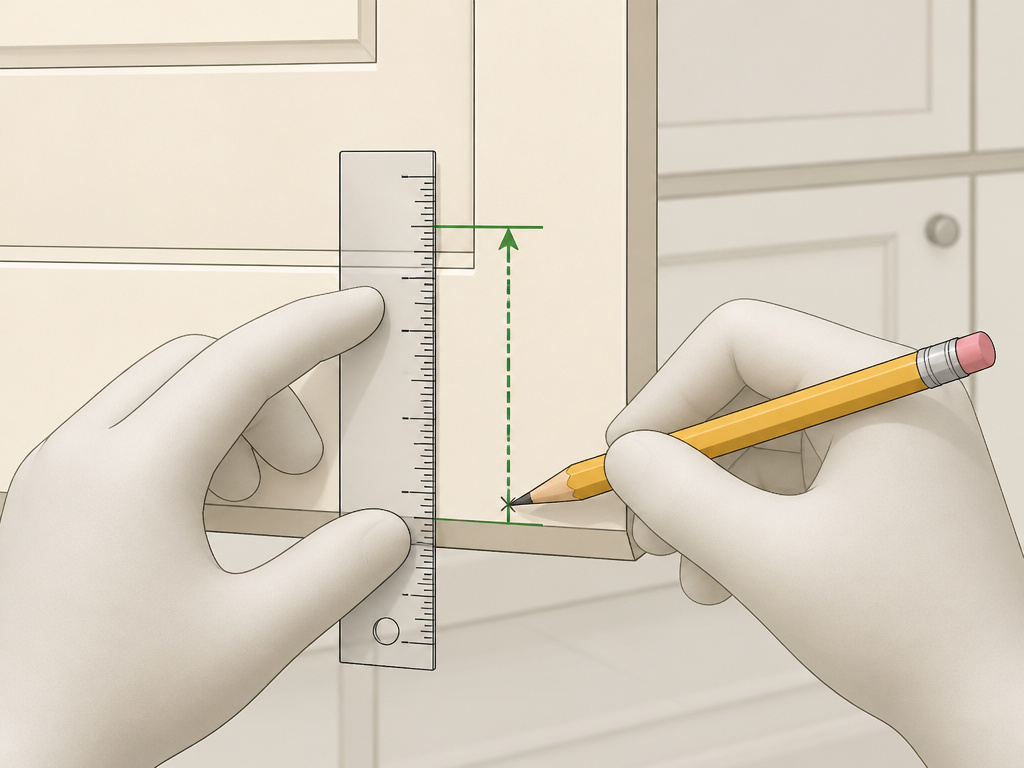
Placement is about ergonomics and aesthetics. There are traditional rules, but your comfort matters most.
For Cabinet Doors:
- Upper Cabinets: Place the knob or pull 2-4 inches down from the bottom corner of the door (the corner opposite the hinges).
- Lower Cabinets: Place the hardware 2-4 inches up from the top corner of the door.
- Full-Length Doors (Pantry, etc.): The Kohler M Series guide specifies 27 3/4″ from the top of the door to the bottom of the handle. This is a specific, sourced number for a clean, modern look.
For Drawers:
- Center the pull horizontally. For a knob, center it both horizontally and vertically.
- Vertical placement is flexible. A common guideline is 1.5 to 2 inches down from the top edge of the drawer front. On very tall drawers, placing the pull in the top third often looks better than dead center.
The Universal Rule for Door Handles:
While not for cabinets, the principle is instructive. Kwikset’s standard places the centerline of a door handle 38″ from the floor. This height is a decades-old ergonomic standard. It tells you that consistent, measured placement beats guessing every time.
Use your template. Mark one cabinet, check the height in relation to the countertop or adjacent doors, and then commit. Once you drill, there’s no easy undo.
Step-by-Step: Drilling Clean, Straight Holes
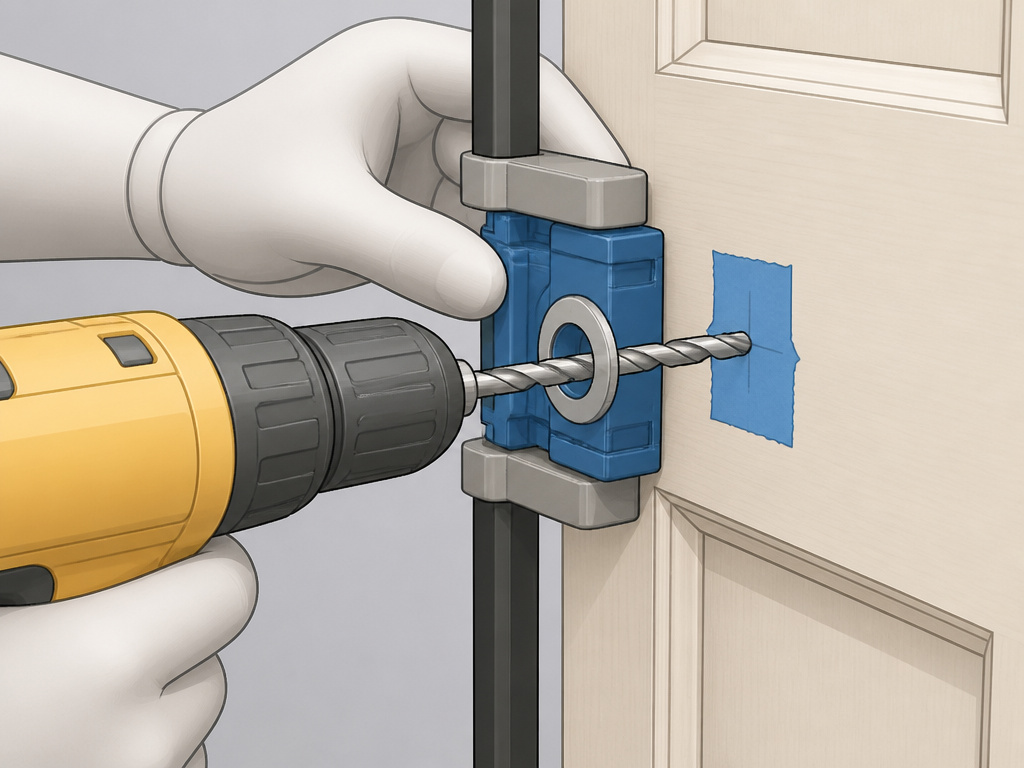
This is where patience pays. Rushing leads to tear-out, wandering holes, and a project you have to hide with filler.
- Mark with Precision. Use your template and a sharp pencil to make a clear, small dot. For a two-hole pull, verify the template is level before marking the second hole.
- Apply Painter’s Tape. Place a small piece of tape directly over your mark. This stabilizes the wood fibers around the drill bit’s entry point.
- Select and Secure the Bit. Insert the correct drill bit (3/16″ or 1/4″) into your drill. If you’re using a self-centering guide, insert the bit into the guide and tighten the set screw.
- Drill the Pilot Hole (Optional but Recommended). If you’re nervous or working with a slick laminate, use a 1/8″ drill bit to create a pilot hole first. This guides the larger bit perfectly.
- Drill the Final Hole.
- If using a guide: Clamp it in place, center the pilot over your mark, and drill straight through at a medium speed.
- If drilling freehand: Position the brad point’s tip exactly on your mark. Start the drill slowly, applying steady, light pressure. Keep the drill perfectly perpendicular. A good trick is to stand directly in front of the work, not off to the side.
- Prevent Backside Splintering. This is the Kwikset method for door locks, and it works perfectly for cabinets: “Drill from one side until the point of the drill just breaks through, then complete the hole from the other side.” That clean exit is the difference between a professional job and a hack job.
- Clean the Hole. Blow out or vacuum any sawdust from the hole. This ensures the screw seats fully and the handle sits flush.
Where this goes sideways: Drilling at an angle, even a slight one. The screw will bind, the handle won’t sit flat, and tightening it will stress the hardware. If you can’t hold the drill steady, you need a guide. It’s that simple.
TL;DR: Tape, pilot, perpendicular pressure, and punch through from the back. Follow that sequence.
Troubleshooting Common Drilling Problems
You might still hit a snag. Here’s what to do.
- The drill bit wandered off the mark. This is why we pilot. If it’s a small wander, you can sometimes correct by angling the drill bit slightly back toward the center as you proceed. If it’s major, you’ll need to fill the hole with a dowel and wood glue, let it dry, and re-drill.
- Splintering occurred on the front. You didn’t use tape, or your drill bit was dull. A brad point bit and painter’s tape are your first defense. For the cleanest drilling in wood, keep your bits sharp.
- The hole is too big. If you accidentally used a 1/4″ bit for a standard pull, the screw will have no grip. The fix is to glue a wooden dowel of the correct size into the hole, cut it flush, and re-drill with the 3/16″ bit.
- The screw won’t tighten; it just spins. The hole is too big, or the screw is too short and isn’t engaging enough threads. Verify your screw length with the “Thickness + 1/4” rule. If the hole is stripped, the dowel fix above is your only option.
The goal is to avoid these problems. Measure twice, check your bit, use a guide. It’s slower, but it’s only slow once.
Pro Tips for Specific Situations
Standard cabinets are one thing. Edge cases are where projects stall.
- Thick, Solid Wood Doors: Drill slower. Let the bit clear the chips. For holes deeper than 1″, back the bit out occasionally to prevent overheating and burning the wood.
- Laminate or Veneer Cabinets: The pilot hole is mandatory. The hard laminate surface wants to deflect the drill bit. The pilot hole gives the brad point a place to seat.
- Metal or Plastic Cabinet Handles: The drilling process is the same, but be cautious when tightening. Over-tightening can crack plastic bases or strip the threads in a metal housing. Snug is enough.
- Drilling Angled Holes: Some modern handle designs call for screws that enter at a slight angle. This is an advanced technique requiring a dedicated jig. If your handles need this, consider the principles for drilling angled holes to avoid splintering or misalignment.
If you’re replacing old hardware and the new holes don’t line up, you’re committed to the dowel-and-repair method. It’s a hassle, but it’s the only way to get a clean look without replacing the door.
Frequently Asked Questions
What if my cabinet handles didn’t come with screws?
Hardware often includes screws, but they may not fit your cabinet thickness. Take one of the screws to a hardware store and match its diameter and thread (e.g., 8-32). Buy a length that follows the “Thickness + 1/4″” rule.
Can I use a spade bit or Forstner bit for cabinet handles?
Never. These bits are for drilling large, flat-bottomed holes, not precise, clean-through holes for screws. They will tear out the back of your cabinet violently. Use only twist drill bits or brad point bits.
How do I drill a hole without a power drill?
You can use a hand drill (brace), but it requires significant effort and skill to keep it straight. For one or two holes in soft wood, it’s possible. For a full kitchen, a power drill is a basic necessity. Our guide on drilling without a drill covers manual alternatives.
My drawer front is curved. Where do I place the handle?
On a curved drawer (usually a “lip” style), you typically drill into the flat, vertical face of the lip itself. The standard placement is centered on that vertical surface. Always test placement with the handle taped in place before drilling.
Is there a difference between drilling holes for knobs vs. Pulls?
The drilling process is identical. The only difference is that a knob requires one hole, while a pull requires two. The challenge with pulls is maintaining perfect alignment between the two holes, which is why a template or a self-centering guide with dual bushings is so valuable.
Before You Go
Drilling holes for cabinet handles boils down to three things: the right size bit (3/16″ for standard, 1/4″ for studs), screws that are long enough to grip (add 1/4″ to your material thickness), and a method that keeps the drill bit perfectly perpendicular (a self-centering guide). Forget the online guesswork and follow the manufacturer specs—they exist so your handles don’t fall off.
Measure your cabinet thickness before you buy screws. Tape your marks before you drill. And for the love of a clean workshop, drill from both sides to avoid that ragged exit wound on the back of your beautiful cabinet doors. Now go upgrade those handles.
