A Guide to the 3 Primary Types of Air Compressor Fittings
This post contains affiliate links. As an Amazon Associate, we earn from qualifying purchases.
Air compressor fittings are not universal and fall into three non-interchangeable categories: threaded standards (NPT in North America, BSP in Europe/Asia), quick-connect coupler styles (A, M, V, G-Type), and connection methods (push-to-connect, barbed). The thread angle, 60° for NPT, 55° for BSP, is the physical barrier; forcing them together ruins both parts. Match the fitting’s thread size, material, and coupler style to your compressor’s output and your tool’s CFM demand to prevent leaks and pressure drop.
That thread-angle difference isn’t academic. It’s the reason a fitting from a US-made compressor won’t seal on a tool bought in the UK, no matter how hard you crank it. The mismatch leaves a spiral leak path that no amount of tape can fully bridge.
What follows: the three thread standards you must never cross-thread, the four quick-connect profiles that decide your tool’s power, and the material choice that stops a fitting from corroding shut in a humid garage within a year. By the end, you’ll read a fitting’s specs in ten seconds and know exactly why it will or won’t work.
Key Takeaways
- NPT and BSP threads are physically incompatible due to a 60° vs. 55° thread angle. Cross-threading them once damages both parts permanently.
- Coupler “style” (A, M, V, G) dictates airflow, not thread size. An A-style coupler flows about 34 SCFM; a G-Type flows over 99 SCFM. Matching style to your tool’s CFM requirement prevents under-powering or damaging it.
- For compressors bought before roughly 2010, check for PCL fittings. The PCL male plug fits loosely into a modern Euro female socket, causing leaks. Adapters exist, but replacing the set is more reliable.
- Brass is the default for a reason. It resists corrosion from moisture in compressed air lines and machines to tighter tolerances than cheap steel or plastic, which leak faster.
- Never reduce fitting size between the compressor and tool. A 3/8” hose connected through a 1/4” fitting creates a bottleneck that chokes airflow and makes your compressor work harder.
The Three Thread Standards That Are Not Interchangeable
Your compressor’s output port, your hose ends, and your tools all have threads. Those threads are not a global language. They come from different dictionaries with different alphabets. The two biggest are NPT and BSP.
NPT. National Pipe Taper, is the North American standard. The threads are tapered, designed to wedge together and create a seal. Its thread angle is 60 degrees. A 1/4″ NPT fitting has an outside thread diameter of about 0.540 inches. You’ll find it on virtually every compressor and tool sold in the US and Canada.
BSP. British Standard Pipe, is the standard across Europe, Asia, Australia, and Africa. It has a 55-degree thread angle. BSP comes in two flavors: BSPT (Tapered) and BSPP (Parallel). BSPP threads are straight and seal via a washer or O-ring at the face, not the threads.
NPT and BSP threads are not compatible, even when the nominal sizes (e.g., 1/4″) appear to match. The 60° vs. 55° thread angle mismatch means the peaks and valleys of the threads will not mesh. Attempting to screw them together cross-threads and deforms the metal. The connection will leak air immediately or fail within days.
This is the most common hard-stop mistake. A homeowner buys a neat tool from a European online retailer, tries to screw it onto their US compressor hose, and meets sudden, stiff resistance. Forcing it seems to work, but the hiss of air starts before they even pick up the tool.
The fix is an adapter, but it’s a band-aid. Every adapter adds two more connection points, which are two more potential leak sources. For a permanent tool, it’s better to re-thread the tool’s port or replace its built-in plug with the correct standard.
| Thread Standard | Thread Angle | Primary Region | Sealing Method |
|---|---|---|---|
| NPT (National Pipe Taper) | 60° | North America | Tapered threads wedge together; requires sealant (PTFE tape). |
| BSPT (British Std. Pipe Tapered) | 55° | Europe, Asia, Australia | Tapered threads wedge together; may require sealant. |
| BSPP (British Std. Pipe Parallel) | 55° | Europe, Asia, Australia | Parallel threads; seals via washer/O-ring at the fitting face. |
The other variable is size. The “1/4 inch” label is a nominal size, not a measurement. It traces back to old pipe inner diameters. The actual outer diameter of the threads is larger. This is why you need a thread gauge or a caliper for certainty, not just a ruler.
When you plumb an air compressor for a permanent shop setup, committing to one thread standard for all your drops and manifolds saves a toolbox full of frustration later.
Quick-Connect Coupler Styles: A, M, V, and G-Type
Threaded fittings are for permanent connections. For everything else, you use quick-connect couplers. A coupler has two parts: the socket (female) that stays on the hose, and the plug (male) that screws onto the tool. Push the plug into the socket to connect; pull the socket’s collar back to disconnect.
The critical detail is the coupler’s profile or style. This is the shape of the plug’s nose and the socket’s internal grippers. The profile determines airflow, not the thread size on the back of the coupler.
- A-Style (Automotive): The old US standard. Low airflow, around 25-34 SCFM. Fine for tire chucks and blow guns, but it will starve a die grinder.
- M-Style (Industrial/Type D): The current North American industrial standard. Flows about 40 SCFM. This is what most new compressors and tools come with. It’s the default for a reason.
- V-Style (High-Flow): Designed for more demanding tools. The bore is larger. It can flow up to 70 SCFM, nearly double the M-style. If your sander or impact wrench feels weak, switching from M to V couplers can restore power without touching the pressure settings.
- G-Type: The high-flow champion. Bore is even larger than V-style, flowing over 99 SCFM. This is for large sandblasters, heavy-duty impacts, or long hose runs where you need to minimize pressure drop.
Where this goes sideways: Assuming a 1/2″ NPT coupler must flow more air than a 1/4″ NPT coupler. You can have a G-Type plug with a 1/4″ NPT thread that flows 99 SCFM, and an A-Style plug with a 1/2″ NPT thread that flows only 34 SCFM. The thread size is just the pipe connection; the internal profile decides the air.
Why does this matter? Plug a high-CFM tool like a die grinder into a low-flow A-style coupler. The tool will never reach its rated RPM, bogging down under load. It’s like feeding a fire hose through a drinking straw. Conversely, a low-CFM tool on a G-Type line faces no physical harm, but you’ve spent money on capacity you can’t use.
The YouTube mechanic’s tip is right: start by identifying the male plug. Lay it next to a reference chart. The length of the tip (the part that sticks out past the locking groove) and its diameter are unique to each style. Many plugs have the style stamped on the side. If not, a chart is your only reliable guide.
Connection Methods: Barbed, Compression, and Push-to-Connect
How does the fitting itself attach to the hose or pipe? You have three main paths, each for a different kind of setup.
Barbed Fittings are the simplest. You push a flexible rubber or PVC hose over the ridged barb. A hose clamp tightens over it. It’s cheap and works for low-pressure applications (under 150 PSI). The risk is the hose blowing off the barb under pressure or during a temperature swing. Always use a clamp.
Compression Fittings are for semi-rigid or rigid lines like copper or nylon. A nut tightens a brass ferrule (a small ring) onto the tubing, creating a metal-to-metal seal. This is the standard for permanent, in-wall air line plumbing. It handles high pressure and vibration well. The catch is that it’s permanent, once the ferrule is crushed, you can’t reuse it.
Push-to-Connect (PTC) Fittings are the speed demons. You take a clean, square-cut piece of nylon or polyurethane tubing and push it straight into the fitting until it clicks. An internal collet grips it, and an O-ring seals it. No tools. To disconnect, you press a collar and pull the tube out. They’re brilliant for quick jigs or reconfigurable shop lines.
Common mistake: Using PTC fittings on scratched or dirty tubing. A small gouge on the tube’s surface will tear the internal O-ring. The leak starts small, then blows out completely the next time you pressurize the line. The tube is trash once that happens.
Your choice here dictates your shop’s flexibility. Barbed for temporary, low-cost lines. Compression for a “set it and forget it” shop backbone. PTC for test benches or setups you change weekly.
Material Choices: Brass, Steel, and Plastic
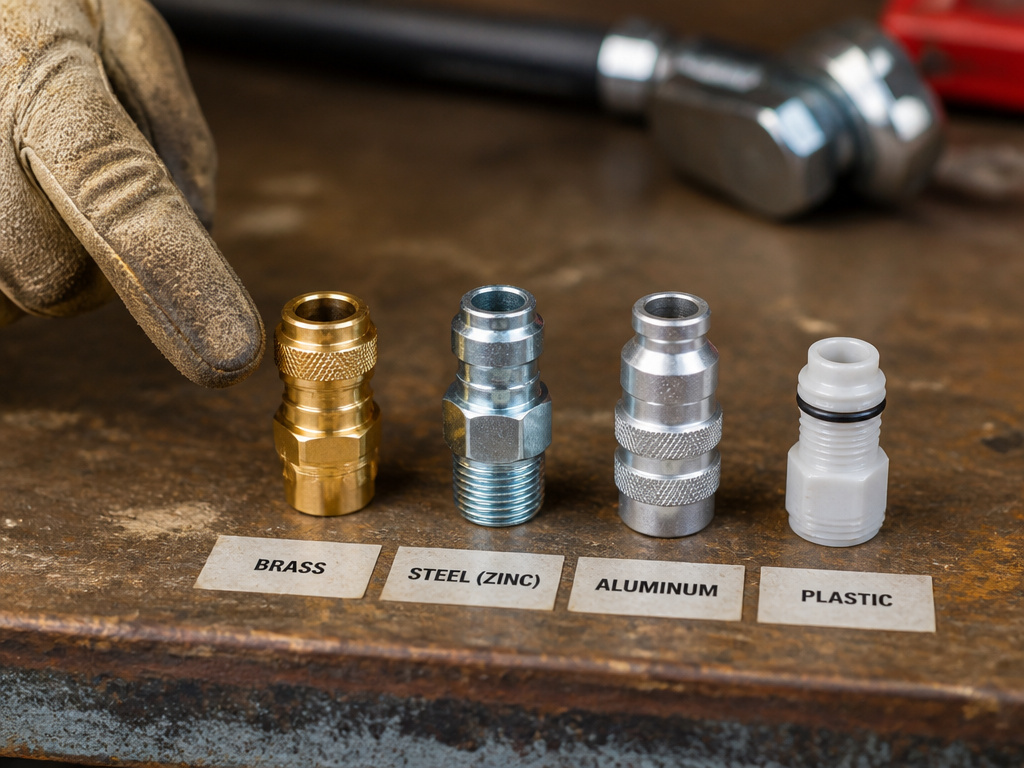 The fitting’s material decides how long it lasts in your environment. Compressed air is hostile. It carries moisture, oil vapor, and heat cycles.
Brass is the default champion. It resists corrosion, machines to precise tolerances for a good seal, and doesn’t spark. For 90% of home shops and garages, brass fittings are the answer. They last for years even in humid conditions.
Steel (usually zinc-plated or stainless) is for strength. Use it in high-pressure permanent lines (over 200 PSI) or where physical impact is a risk. Stainless steel is mandatory in food, pharmaceutical, or marine applications where corrosion cannot happen. It’s a significant investment.
Aluminum is lightweight and corrosion-resistant. It’s common on larger, industrial-grade couplers where weight matters. It’s durable but can gall (fuse) if cross-threaded with steel.
Plastic or Composite fittings are for light duty only. They’re cheap and work for inflatables or very low-pressure air. They crack under UV exposure, become brittle in the cold, and fail without warning. Never use them on a tool line.
In a humid garage, a cheap steel fitting will show surface rust in a single season. That rust flakes off, travels down the line, and can jam a tool’s trigger valve. Brass might cost 20% more upfront, but it’s the one you won’t be replacing next year.
How to Identify What Fittings You Already Have
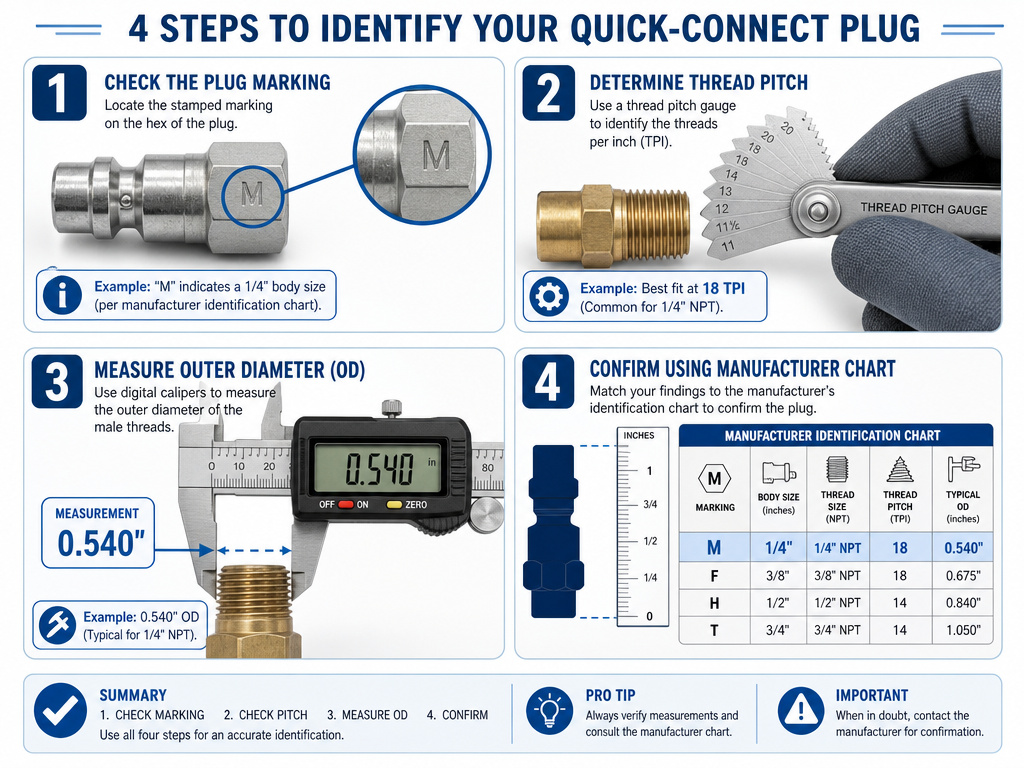 You’re staring at a tangle of old hoses and tools. Here’s the sequence.
- Check for Markings. Look at the flat sides of any quick-connect plug or socket. Many, like those from PCL or Milton, have the style (M, V, G) stamped there.
- Identify the Thread. Is it likely NPT (US/CA) or BSP (import)? Use a thread pitch gauge if you have one. If not, the safest test is a known-good part. Try screwing a 1/4″ NPT nipple from the hardware store into the female port. If it goes in smoothly but gets very tight in the last two turns, it’s likely NPT. If it binds early or feels loose, it’s probably BSP.
- Measure the Thread. Use calipers on a male thread’s outer diameter. A 1/4″ NPT male will measure about 0.540″. A 1/4″ BSP male will measure about 0.518″. This small difference is why they seem to fit at first.
- Profile the Plug. No markings? Use the plug identification method. Measure the tip length and diameter, and compare it to a manufacturer’s chart. This is the only way to be sure with unmarked couplers.
This process is the first step in troubleshooting a compressor that fails to build pressure. A leak at a mismatched fitting is a common culprit.
The PCL vs. Euro Fitting Historical Quirk
If your compressor or old hose is from the UK or Australia and was made before roughly 2010, you might have PCL fittings. PCL was the de facto standard. They have a 5.5mm nominal bore and are rated to 14 bar (200 PSI).
The modern European standard is the DN 7.2 Euro profile. Here’s the problem: an XF-Euro male plug will not fit into a PCL female socket. However, a PCL male plug will fit loosely into a Euro female socket. It feels connected but leaks badly.
Easy to miss: That loose-but-connected feel on an old PCL plug. You’ll hear air escaping from the connection point immediately, and your tool will sputter. This is why adapters or complete replacement sets are still sold.
If you inherit old tools with PCL plugs, you have two choices. Buy a PCL female coupler for your hose, or replace the plug on the tool with a modern Euro style. Mixing them is a guaranteed leak.
Matching Fittings to Your Tools and Compressor
This is where theory meets the shop floor. Your goal is to deliver the required CFM (volume) at the necessary PSI (pressure) to the tool’s inlet with the least possible loss.
- Start with Your Tool’s Demand. Check its manual or spec plate. A framing nailer might need 2-4 CFM at 90 PSI. A die grinder might need 8-12 CFM at 90 PSI. This is your target.
- Know Your Compressor’s Output. Your compressor has a rated CFM at a specific PSI (e.g., 5.0 CFM at 90 PSI). This is your supply. Use an air compressor CFM and PSI relationship chart to visualize the match.
- Size the Hose and Fittings for the Weakest Link. If your tool needs 8 CFM, your hose and fittings must be capable of delivering at least that. A 1/4″ hose and M-style couplers might be borderline. Stepping up to a 3/8″ hose and V-style couplers removes that restriction.
- Never Reduce Size Before the Tool. The compressor outlet, the hose, and the fittings should be the same size or get larger as you go. The only acceptable reduction is at the tool’s inlet itself, using a short adapter. A 3/8″ hose plugged into a 1/4″ coupler at the compressor is a bottleneck.
Think of your air system as a chain. Every component is a link. The strength of the chain is the strength of the weakest link. Your expensive, high-CMF compressor is wasted if the final fitting before the tool chokes the airflow down to a trickle.
For example, to properly use a spray gun that requires 12 CFM, you’ll need a 3/8″ minimum hose and high-flow couplers. Using a standard 1/4″ kit will result in a sputtering, uneven spray pattern no matter how you adjust the pressure switch.
Before You Start: Safety and Leak Prevention
A small air leak is a waste of money. A failed fitting is a hazard. The pressurized air blast can whip a hose or drive metal fragments.
Before you start: Depressurize the system completely. Open the drain valve on the compressor tank and trigger the tool to bleed the hose. Wear safety glasses when making connections, airborne debris and metal shavings are a real risk. Check every new connection with soapy water before putting the system into full service; bubbles mean a leak.
Use PTFE (Teflon) tape or pipe thread sealant on tapered threads (NPT, BSPT). Apply tape clockwise, 2-3 wraps, starting at the second thread. Do not use tape on parallel threads (BSPP) or flare fittings, they seal with a washer or metal-to-metal contact. Tape there can prevent a proper seal.
After you attach a hose, make a habit of the soapy water test once a month. A leak you can’t hear can still cost 5-10% of your compressor’s runtime, wearing it out prematurely.
Frequently Asked Questions
Are all air compressor quick-connect fittings interchangeable?
No. Quick-connect fittings must match in style (A, M, V, G) to connect and seal. An M-style plug will not lock into an A-style socket. Styles are often region-specific, but the physical profile is the deciding factor, not the brand.
Can I use NPT and BSP fittings together?
You cannot directly screw them together. Their thread angles (60° vs. 55°) are different. You can use a brass adapter that has NPT threads on one end and BSP threads on the other to connect the two systems. Each adapter adds two potential leak points.
What is the most common air compressor fitting size?
For portable and home workshop compressors in North America, 1/4″ NPT is the most common thread size for the compressor outlet, hose ends, and tools. The most common quick-connect style is M-Style (Industrial/Type D).
How do I stop my air fittings from leaking?
First, ensure the threads match (NPT/NPT or BSP/BSP). Use PTFE tape or sealant on tapered threads. For quick-connects, check that the plug and socket styles match and that the O-rings inside the socket are not cracked or missing. Replace worn couplers.
What material is best for air fittings?
Brass is the best all-around material. It resists corrosion from moisture, provides excellent seals, and is durable. For high-pressure permanent lines or corrosive environments, stainless steel is best. Avoid plastic for anything beyond very light, low-pressure duty.
My old tool doesn’t fit my new hose. What do I do?
Identify the plug on the tool (likely an older A-style or PCL). Identify the socket on the hose (likely M-style or Euro). You have three options: 1) Replace the tool’s plug with one that matches your hose. 2) Replace the hose’s socket with one that matches your tool. 3) Use a short adapter nipple between them (the least reliable option).
The Bottom Line
Air compressor fittings are the punctuation in the sentence of your pneumatic system. Get them wrong, and the whole meaning falls apart in a hiss of leaks and weak tools.
Ignore universal claims. Match the three things: thread standard (NPT or BSP), coupler style (M, V, G for your tool’s CFM), and material (brass for life). A set of Milton M-style brass couplers and a few spare O-rings will solve 90% of connection problems in a home shop.
The right fitting doesn’t cost more. It just lasts longer and lets your tools work as hard as they were designed to. Start by auditing what’s on your compressor and your most-used tool. That five-minute check will tell you everything you need to buy, and more importantly, what to avoid.
