Step-by-Step: Unlocking a Ryobi 40V Trimmer Head Correctly
This post contains affiliate links. As an Amazon Associate, we earn from qualifying purchases.
People jam their thumb on the plastic shaft lock button, crank the trimmer head the wrong way, and wonder why it won’t budge. They assume it’s just stuck and reach for the pliers. That’s how you crack a $70 gear case or strip the threads on the driveshaft.
Unlocking a Ryobi 40V trimmer head requires matching three things: a disengaged power source (remove the battery), a fully depressed shaft lock button on the gearhead, and a counter-clockwise turn on the head itself. The head uses standard right-hand threads, so turning it left loosens it. Forcing it clockwise tightens it further and can damage the internal lock mechanism.
Let’s walk through the exact sequence, identify why your head might feel welded on, and cover what to do once it’s off, whether you’re changing line, swapping heads, or doing a deep clean.
Key Takeaways
- Always remove the 40V battery first. The shaft lock mechanism is mechanical, but a bump to the trigger with the battery in can cause the shaft to spin violently.
- The thread direction is almost always standard (right-hand). Turn the head counter-clockwise to loosen. Look for a small arrow molded into the plastic head or housing pointing left; that’s your visual confirmation.
- If the head is stuck, use penetrating oil on the threads, not brute force. Let it soak for ten minutes. Applying heat from a hairdryer to the head’s collar for 60 seconds can expand the plastic just enough to break a friction seal.
- You rarely need to remove the entire head just to replace line. Most Ryobi 40V bump-feed heads allow you to unlock the spool cap by aligning arrows and pulling it off.
What “Unlocking” Actually Means on a Ryobi 40V
You’re not picking a lock. On these models, “unlocking” specifically refers to disengaging the shaft lock so you can unscrew the head. It’s the first part of the removal process.
The Ryobi 40V trimmer’s shaft lock is a spring-loaded plastic pawl inside the gearhead. Pressing the external button retracts this pawl from a notch on the driveshaft, allowing the shaft, and the head threaded onto it, to rotate freely. If the button isn’t fully depressed, the pawl drags, creating grinding resistance.
That internal pawl is why you can’t just muscle it. The first time I forced a head on an RY40210 model, I heard a sharp plastic crack from inside the housing. The pawl had snapped.
The head came off, but the lock button was useless afterward. I had to replace the entire gear case assembly. Now I press the button until I feel a definite click, then turn.
The Step-by-Step Unlocking Process
Follow this order. Skipping to step three because the first two seem obvious is how projects get expensive.
Before you start: The driveshaft can spin at over 7,000 RPM. A accidental trigger bump with the head off can whip the exposed shaft. Always remove the battery. Wear gloves, the cutting line and debris on the head are often sharp.
- Remove the Battery. Pull the 40V battery pack straight out of its slot. Set it aside. This isn’t just about safety; it eliminates any chance of the motor assisting or resisting your turn, which can confuse the feel of the threads.
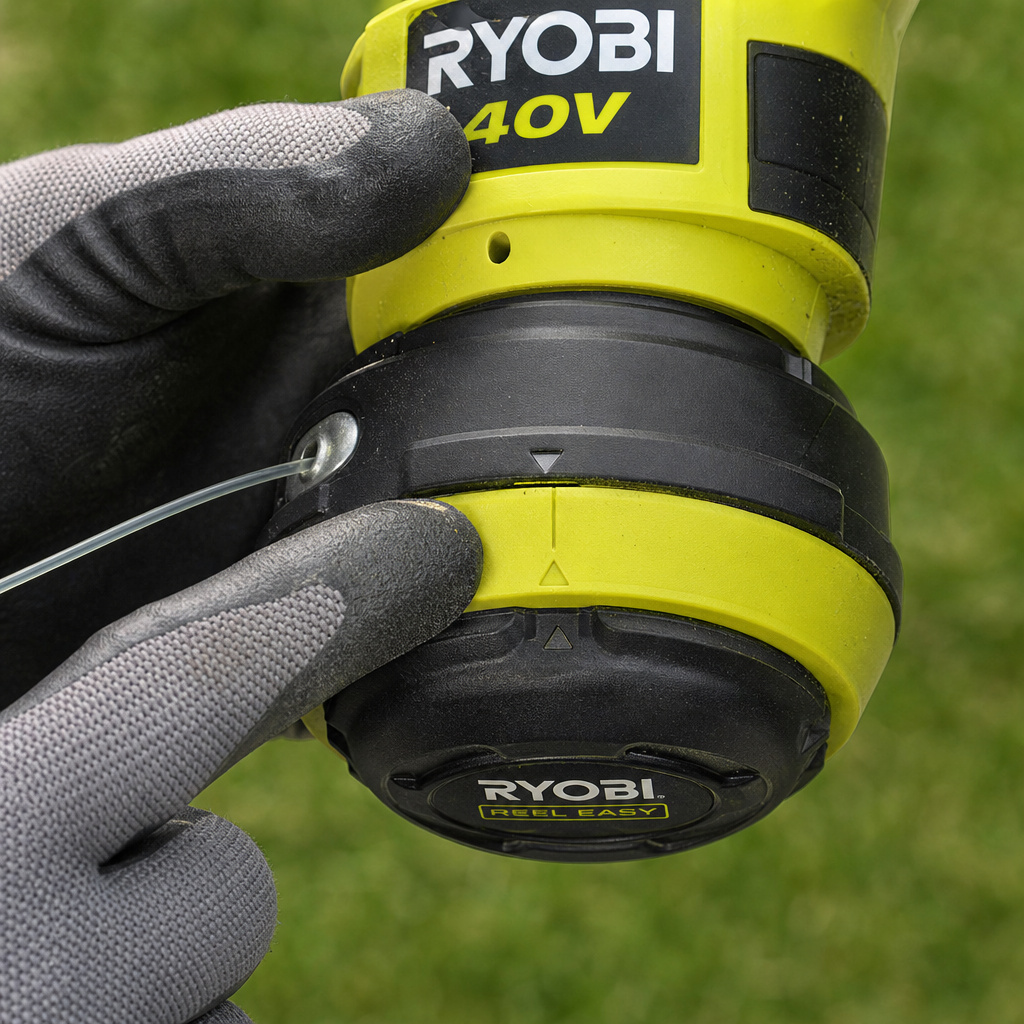
- Locate the Shaft Lock Button. Find the small, rectangular, usually black plastic button on the silver gearhead housing. It’s recessed slightly, just above where the trimmer head meets the housing. Wipe any dirt off it with your thumb.
- Press, Hold, and Turn. Press the shaft lock button firmly and hold it down. While maintaining pressure, grip the trimmer head and rotate it counter-clockwise (left). It will take a firm, steady turn, about a quarter to a half rotation, before the threads fully disengage. Don’t jerk it.
- Slide the Head Off. Once the threads are loose, you can release the button. Unscrew the head completely by hand and slide it straight off the driveshaft. If there’s grass wrapped around the shaft, cut it away with a utility knife before pulling the head past it.
If the head doesn’t turn with reasonable pressure, stop. Forcing it is the mistake. Move to the troubleshooting section below.
Why It Feels Stuck (And How to Fix It)
A head that won’t unlock has a reason. Diagnose it before applying more leverage.
| Symptom | Likely Cause | Fix & Timeline |
|---|---|---|
| Button presses but head won’t turn | Threads corroded or packed with debris | Apply penetrating oil (WD-40, Liquid Wrench) to the seam between head and shaft. Wait 10 minutes. Try again. |
| Head turns slightly then jams | Grass or string wound tightly around shaft | Cut away debris with a knife. The head may need to be worked back and forth while cleaning. |
| Button feels mushy, doesn’t click | Internal lock pawl broken or jammed | Gearhead disassembly required. This is a sign you forced it previously. |
| Head turns freely in both directions | Shaft lock not engaging (pawl issue) | Try rotating the head slowly while pressing the button to find the engagement notch. If nothing, internal repair. |
| Very stiff, especially in cold weather | Plastic-on-plastic friction from contraction | Warm the head collar with a hairdryer for 60 seconds to expand the plastic slightly. |
The cold-weather issue is real. I left my trimmer in an unheated garage over a Wisconsin winter. The next spring, the head felt glued. A hairdryer on the collar for one minute made it turn like it was summer. Plastic contracts more than metal.
For a truly seized head, the penetrating oil soak is your best friend. Spray it into the seam, let it wick down for ten full minutes, then try the lock-and-turn sequence again. If it moves even a millimeter, work it back and forth to distribute the oil. Going straight for channel-lock pliers will crush the plastic head and guarantee you need a replacement head installation.
Do You Even Need to Remove the Head?
Most of the time, no. The common reason people think they need to “unlock” the head is to replace the trimmer line. For Ryobi’s bump-feed heads, you usually only need to remove the spool cap.
Here’s how to tell what you’re dealing with:
- Bump-Feed Head (Common): The head has two halves. Look for two arrows, one on the rotating cap and one on the stationary base. Align them and pull the cap straight off to access the spool. You never touch the shaft lock button. This is the intended method for restringing a trimmer.
- Fixed-Line or Quick-Load Head: These often require full removal to reload line. That’s when you use the shaft lock button procedure.
- Upgrading to a Blade or Aftermarket Head: This requires full removal. You’ll follow the unlocking steps, then thread on the new head.
If your spool cap is stuck, don’t use the shaft lock button to try and spin the whole head. The cap is a separate piece. Tap the sides of the cap with the handle of a screwdriver to break any dirt seal, then try aligning and pulling again. Forcing it can break the plastic tabs that hold the spool inside.
After the Head is Off: Inspection and Next Steps
Don’t just slap a new head on. The thirty seconds you spend here prevent problems.
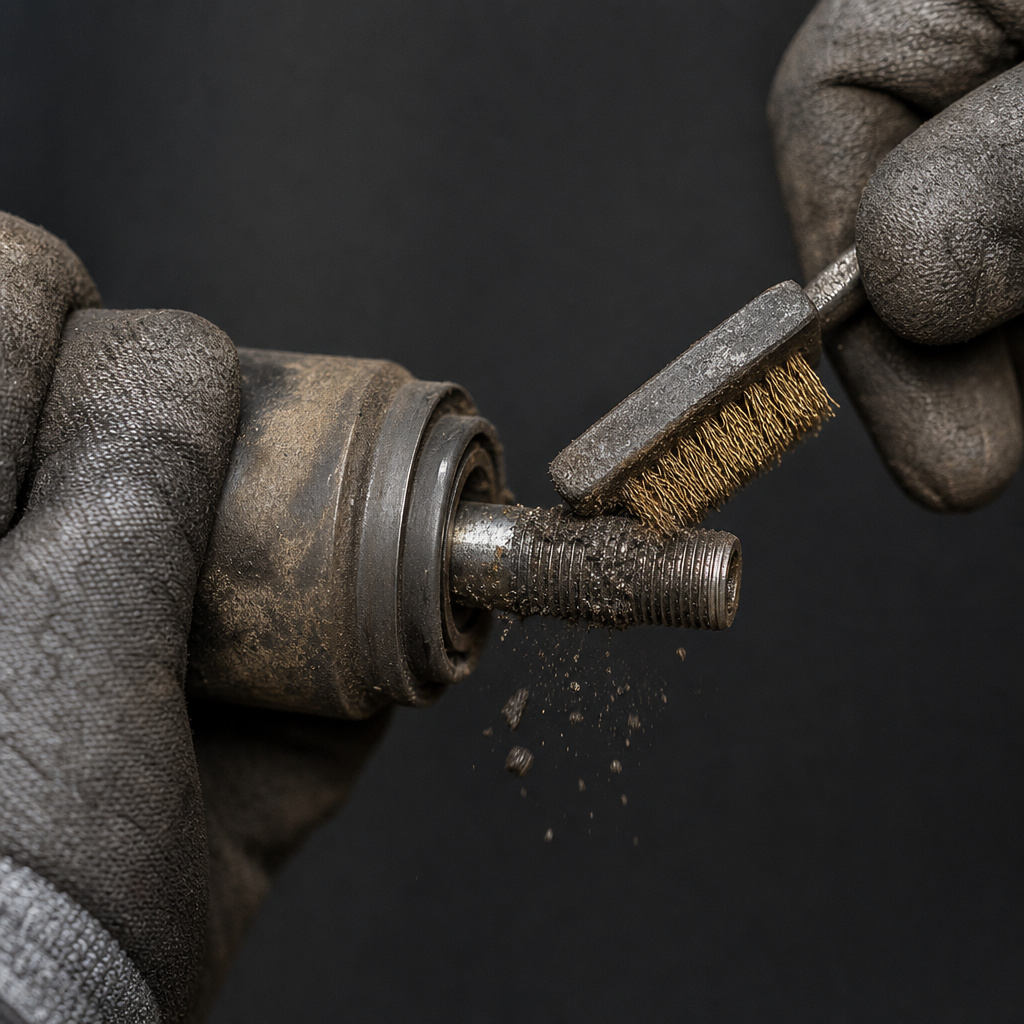
- Clean the Driveshaft Threads. Wipe the exposed metal threads with a rag. Remove any old grass, dirt, or rust. A wire brush can help. Debris left here makes threading the new head difficult and can cross-thread the connection.
- Inspect the Gear Case Seal. Look at the rubber or felt seal where the shaft exits the gearhead. If it’s cracked, dry, or missing, dust and moisture can enter and kill the gears. A damaged seal means it’s time for a deeper service.
- Check for Shaft Play. Grab the end of the driveshaft and try to wiggle it up and down. There should be almost no movement. Visible wobble indicates worn gearhead bearings, a sign the tool has seen heavy use.
- Lubricate (Optional but Recommended). Apply a tiny drop of light machine oil to the driveshaft threads before installing the new head. This ensures smooth installation and easier future removal. Don’t overdo it; excess oil attracts dirt.
If you’re installing a universal trimmer head, this is the moment to verify the adapter matches your shaft diameter and thread direction. Universal heads often include multiple adapters, find the one that threads on by hand smoothly before final tightening.
When reinstalling any head, thread it on by hand until it’s snug. Then, with the shaft lock engaged, give it one final firm tighten by hand. Do not use tools. Overtightening stresses the plastic and makes the next removal a struggle. The vibration from use will not loosen a hand-tight head; it’s a common myth.
Frequently Asked Questions
Older or base-model Ryobi trimmers may use a hole in the shaft instead. Look for a small hole near the base of the head. Insert a 3mm or 4mm Allen key (or a sturdy paperclip) into the hole to lock the shaft, then turn the head counter-clockwise.
I turned it counter-clockwise and it’s getting tighter. What now?
You have a less common model with reverse (left-hand) threads. Immediately stop and turn the head clockwise instead. Look for any directional arrows molded into the head, a clockwise arrow means turn right to loosen.
Can I use this method on an 18V Ryobi trimmer?
The process is similar, but the shaft lock button location might differ. Always remove the battery first. The core principle, lock the shaft, turn the head counter-clockwise, applies to most cordless Ryobi trimmers.
The head is off, but the spool inside won’t come out.
The spool is likely held in by a center screw or a retaining clip. On bump-feed heads, the spool should lift out once the cap is removed. If it’s stuck, there’s probably tangled line wound around the central hub. Use needle-nose pliers to carefully pull the tangled mess out.
How often should I remove the head for cleaning?
For most homeowners, a full removal once a season is plenty. The critical task is cleaning your trimmer after each use, especially the underside of the head guard, to prevent grass buildup that can eventually jam the mechanism.
The Bottom Line
Unlocking a Ryobi 40V trimmer head is a simple, mechanical process that gets complicated when you skip steps or fight the design. Power off, find the button, press it fully, and turn left. If it resists, penetrating oil and patience work better than any wrench. Remember that most line replacements don’t require this at all, just pop the spool cap. Keep the threads clean, don’t overtighten, and that head will come off easily for years.