How to Use a Miter Saw the Right Way (Safety & Accuracy)
This post contains affiliate links. As an Amazon Associate, we earn from qualifying purchases.
Using a miter saw correctly requires matching three things: a rock-solid setup, a blade matched to your material, and a patient cutting rhythm that lets the tool do the work. The blade must be square to the fence, the workpiece must be clamped and supported, and your hands must stay clear of the cutting path.
Most people rush the setup. They skip the calibration check, eyeball the workpiece, and push the blade down too fast. The result is a cut that’s off by a degree or two, a burned edge, or a nasty kickback that sends wood flying across the garage. That degree matters. On an eight-foot piece of crown molding, it means a visible gap you’ll spend an hour trying to fill.
This guide walks through the physical reality of using the saw. We’ll cover how to set it up so it doesn’t move, how to choose a blade that won’t bog down, and the exact hand positions that keep your fingers safe. You’ll learn the sequence for crosscuts, miters, and bevels, plus what to do when the cut doesn’t look right.
Key Takeaways
- Bolt the saw down. A miter saw that shifts even a quarter-inch during a cut ruins accuracy and is a tipping hazard.
- The blade kerf, the width of the cut the teeth make, steals about 1/8 inch of material. If you mark a line and cut directly on it, your piece will be 1/8 inch short. Always cut on the waste side.
- Let the blade stop completely before lifting it. Raising a spinning blade grabs the workpiece and can throw it backward toward your chest. Wait for the whine to stop.
- Support long workpieces at both ends. Letting a board tip down as you cut binds the blade, causes kickback, and guarantees a splintered edge.
- A clean blade is a safe blade. Pitch buildup on the teeth creates friction, overheats the motor, and makes the saw work harder, increasing the risk of stalling or snapping the blade.
The 3 Non-Negotiable Safety Steps
Before you start: The blade spins at over 3,000 RPM and will cut through bone before you feel it. Wear safety glasses that seal to your face, sawdust in the eyes blinds you mid-cut. Secure all loose clothing and tie back long hair; a sleeve or drawstring caught in the blade pulls your hand in faster than you can react. Keep your free hand at least six inches from the blade path, use a clamp to hold the workpiece, not your fingers.
These aren’t suggestions. They’re the rules that prevent a five-minute project from becoming a permanent injury. The most common accident happens when someone reaches to hold a small piece near the blade. The saw doesn’t care.
A miter saw generates significant force perpendicular to the cutting direction during operation. This force, combined with a workpiece that is not fully supported or secured against the fence, can cause the material to shift, bind the blade, and propel the saw head or the workpiece backward toward the operator in a kickback event.
Your first move is always securing the tool itself. A miter saw on a flimsy plastic stand will wobble. Bolt it to a heavy workbench or a dedicated miter saw stand. That solid base is the foundation for every accurate cut.
Ear protection is non-optional on longer jobs. A 12-inch sliding compound miter saw like the DeWalt DWS780 hits about 100 decibels. Thirty minutes of that leaves your ears ringing for hours.
Setting Up for Success: Workpiece, Blade, and Saw
Never assume a new saw is perfectly square. The factory setting is close, but shipping vibrations and assembly can tweak it. You check it with a combination square or a precision machinist’s square.
Place the square’s blade against the saw’s fence and lower the saw head until a tooth touches the square. There should be no light gap between the tooth and the square along its entire height. If there is, locate the calibration screws near the pivot, usually on the miter detent plate or the bevel arm, and adjust until it’s true. This is the single most important step for accurate miter saw cuts.
Blade choice dictates the quality of your cut. It’s not one-size-fits-all.
| Blade Type & Tooth Count | Best For | What Happens If You Use the Wrong One |
|---|---|---|
| 24-40 TPI Framing Blade (Diablo 60T Framing) | Dimensional lumber (2x4s), pressure-treated wood, rough cuts | A fine-tooth blade will gum up with sap and pitch, overheat, and produce a slow, burned cut. |
| 60-80 TPI Finishing Blade (Freud 80T Ultimate Miter) | Hardwood trim, molding, plywood, fine crosscuts | A framing blade will tear out the back of the plywood and leave a ragged, splintered edge on expensive oak. |
| 90-100 TPI Ultra-Fine Blade | Plastic trim, laminates, aluminum (with proper speed) | On wood, it cuts painfully slow and clogs instantly, risking motor strain and blade warpage from heat. |
The number on the saw, 10-inch or 12-inch, is the blade diameter, which dictates your miter saw cutting capacity. A 10-inch saw can crosscut a 2×6 at 90 degrees. A 12-inch sliding model can handle a 2×12. Don’t force a saw to cut beyond its rated capacity; the blade will bog down, the motor will scream, and the cut will be unsafe and inaccurate.
The Step-by-Step Cutting Sequence
This is the rhythm. Break it, and you break the cut.
- Mark and Position. Draw your line across the face and down the edge of the workpiece. Place the workpiece flat on the table and firmly against the fence. Your marked line should be to the left of the blade (for a right-side drop). This is the “waste side.” Clamp it. If the piece is shorter than six inches, use a dedicated push stick or a sacrificial backing board clamped to the fence. Small pieces are dangerous.
- Set the Angle. For a simple crosscut, the miter gauge should click at 0 degrees. For a miter, lift the lock, pivot the table to your angle (e.g., 45 degrees), and lock it down. For a bevel cut, unlock the bevel arm, tilt the saw head left (or right on a dual-bevel model), set the angle, and re-lock. On a compound miter saw, you can set both a miter and a bevel for a compound angle.
- Dry Run. Without power, lower the blade through its full path to ensure it clears your clamps and the workpiece doesn’t shift. Check your hand placement.
- Power and Cut. Put on your safety gear. Start the saw and let the motor reach full speed, you’ll hear the pitch stabilize. Smoothly lower the blade handle to engage the wood. Don’t push down; guide it. Let the teeth do the cutting.
- Return and Wait. Release the trigger but keep holding the handle down. Wait for the blade to come to a complete stop. Any vibration or spinning sound means wait longer. Only then should you raise the blade to its upright position.
I learned the waiting lesson the hard way on a batch of pine 1x4s. The cuts were repetitive, and I got impatient. On the tenth piece, I lifted the blade while it was still spinning down.
It caught a splinter on the edge of the board, jerked the workpiece out of my hand, and slammed it into the fence with a crack loud enough to make my neighbor look over. The board was ruined, and I had a bruise on my forearm from the handle. Now I count to three after the sound stops. Every time.
For a sliding miter saw, the sequence adds a step: pull the saw head toward you, start the motor, then push it smoothly through the workpiece. Don’t slide it back and forth like a handsaw; one smooth forward motion.
Making Specific Cuts: Crosscuts, Miters, and Bevels
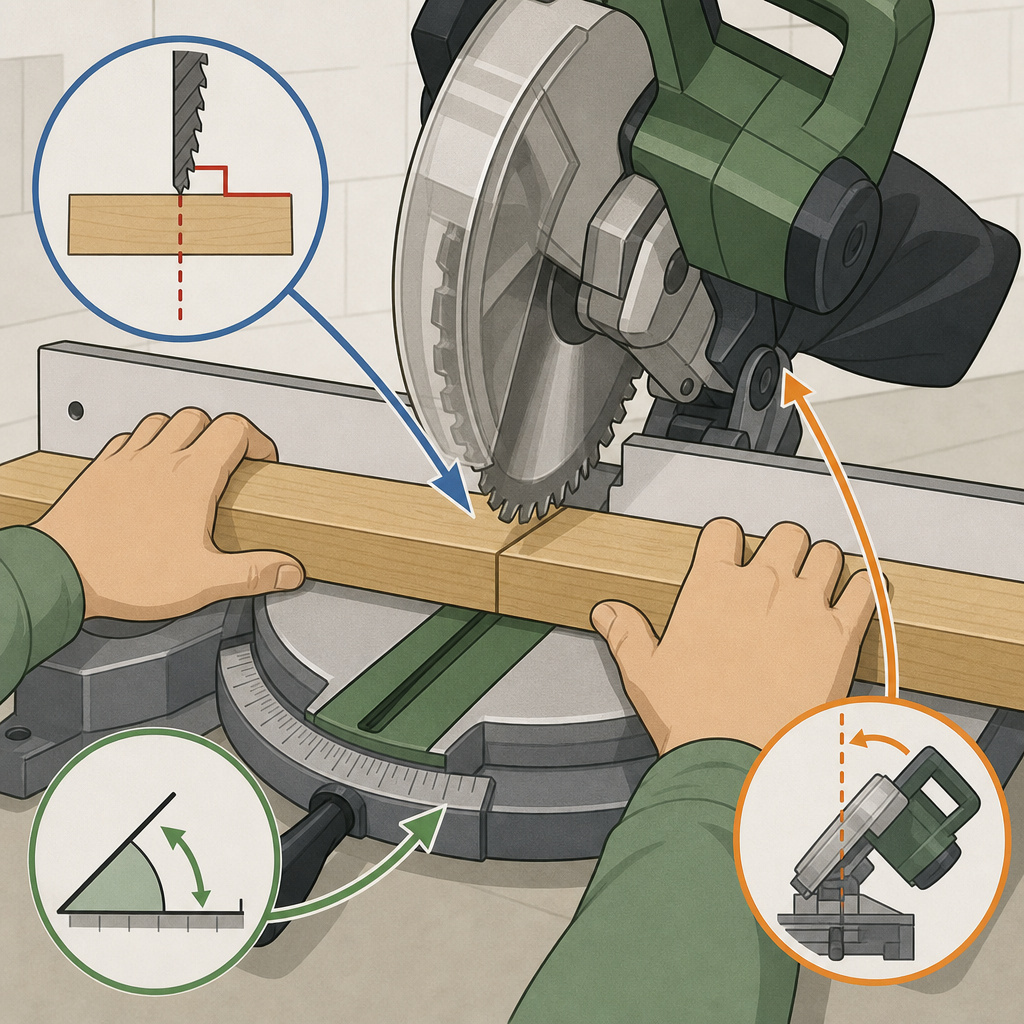
- Crosscut (90-degree cut across the grain): This is the saw’s default mode. The fence is your reference for squareness. The most common mistake is not holding the workpiece tightly against the fence along its entire length, which allows it to pivot during the cut.
- Miter Cut (angled cut across the face): Used for picture frames and cutting baseboards. You pivot the table left or right. For a 45-degree miter, the saw has a positive detent. Don’t just rely on the detent; use the scale and a square to verify the angle on your first cut with a scrap piece. Detents can wear.
- Bevel Cut (angled cut through the thickness): The saw head tilts. This is for cutting the angle on the edge of a board, like for a chamfer. A dual bevel miter saw lets you tilt left or right without flipping the workpiece, which is crucial for long crown molding.
- Compound Cut (a miter and a bevel combined): This is for crown molding laid flat on the table. You need both angle settings. There are charts for common spring angles. Write your settings on a piece of tape on the saw’s fence until you memorize them.
Why Won’t My Cuts Line Up? Troubleshooting Guide
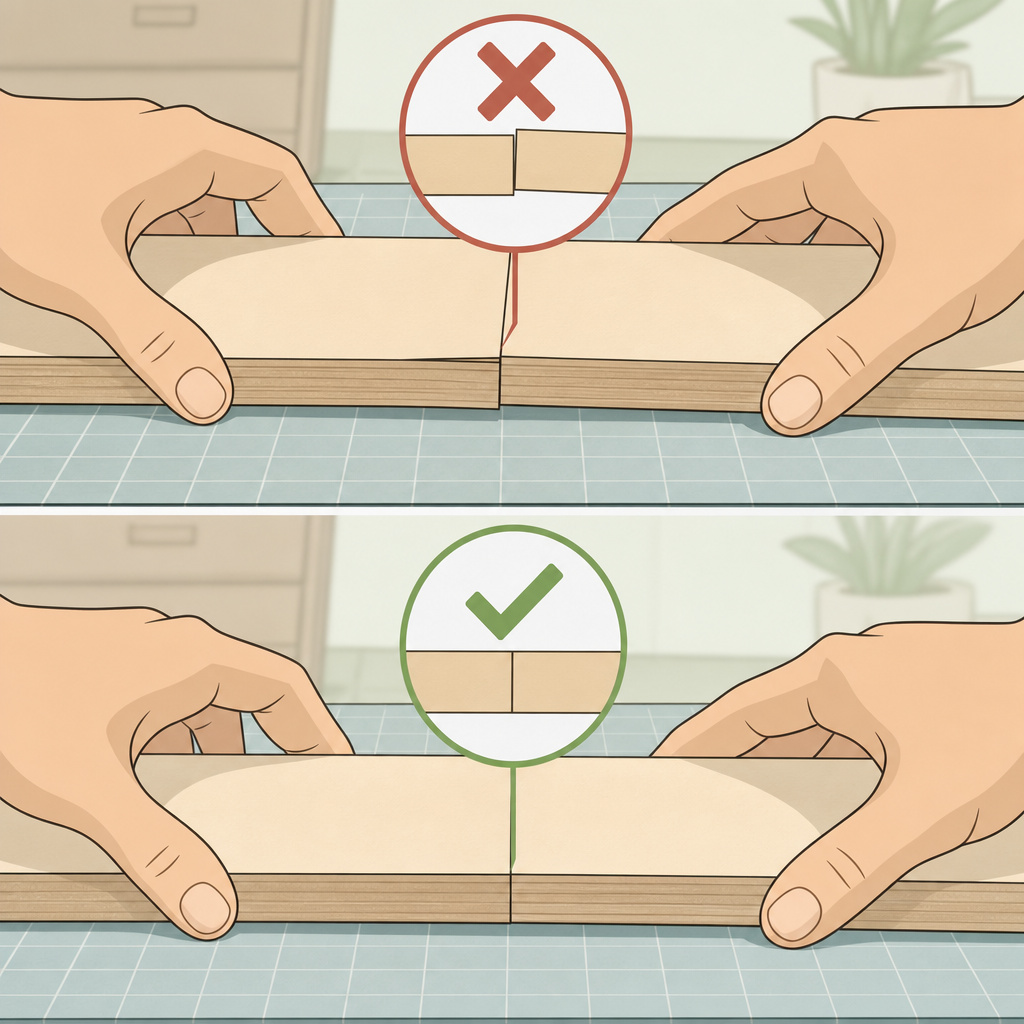
If your joints are gappy or your crosscuts aren’t square, the problem is in one of three places. This table diagnoses it.
| Symptom | Most Likely Cause | The Fix |
|---|---|---|
| Cut is not 90 degrees in the vertical plane (front to back). | Blade is not square to the table (bevel angle off 0). | Re-calibrate the bevel squareness at 0 degrees using a square on the table, not the fence. |
| Cut is not 90 degrees in the horizontal plane (left to right). | Fence is not square to the blade path OR workpiece shifted during cut. | Square the blade to the fence at 0 miter. Then, always use a clamp to secure the workpiece. |
| Mitered corners don’t meet at a sharp point; there’s a gap. | Miter angle is off by a degree or two OR blade deflection due to dull teeth or forcing the cut. | Verify miter angle with a digital angle finder. Check blade sharpness. Make slower, gentler cuts. |
| Tear-out or splintering on the back side of the workpiece. | Dull blade or cutting too fast. The teeth are ripping, not slicing. | Use a sharper, higher-tooth-count blade. Place a sacrificial scrap board behind your workpiece to support the fibers. |
| Burn marks on the cut edge. | Blade is dirty (pitch buildup) or cutting too slowly. Friction causes heat. | Clean the blade with a dedicated pitch remover. Ensure you are pushing the blade through at a steady, confident pace. |
Blade deflection is real. A thin-kerf blade on a stiff piece of hardwood can bend slightly under load, creating a cut that’s not perfectly straight. That’s why for precision trim work, many pros prefer a full-kerf blade on a powerful saw like the Makita LS1019L, it resists flexing.
Maintenance That Actually Matters
Maintenance isn’t about annual overhauls. It’s about the five minutes after you finish cutting.
Empty the dust bag or connect a shop vac. A full bag restricts airflow and lets fine dust coat the motor and switches. That dust is abrasive and attracts moisture.
Clean the blade. After cutting pressure-treated pine or cedar, a black gum forms on the teeth. Use a brass brush and a blade cleaner like Simple Green or a dedicated citrus-based degreaser. A clean blade runs cooler and cuts easier.
Lubricate the sliding rails on a sliding saw with a dry PTFE spray. Don’t use WD-40; it’s a solvent, not a lubricant, and it attracts dust. Wipe down the table and fence to prevent rust.
Store it with the head down and locked. This takes tension off the spring. If you’re parking it for the winter, give the metal surfaces a light coat of machine oil.
Frequently Asked Questions
What’s the difference between a miter saw and a chop saw?
chop saw is a heavier-duty tool designed almost exclusively for straight 90-degree cuts in metal or masonry using an abrasive blade. A miter saw is for wood and composite materials and is built with a pivoting table for angled cuts. The mechanics are similar, but the precision and adjustability of a miter saw basics are far greater for woodworking.
Can I cut metal with my miter saw?
Yes, but you must use the correct blade, a non-ferrous metal cutting blade with a negative hook angle, designed for the RPM of your saw. Never use an abrasive cutoff wheel meant for a chop saw. The speed is wrong, and it can shatter. Wear a full face shield and fire-resistant gloves, as it will throw sparks.
How do I make repetitive identical cuts quickly?
Use a stop block. Clamp a piece of wood or a commercial stop to the fence at your desired length. Then, every workpiece you push against the block will be cut to the same size. Never use the saw’s built-in flip-down stop for precision repetitive cuts; it has play in it.
Why does my saw blade seem to slow down or bog in the middle of a cut?
You’re either forcing the cut too fast, using a blade with too many teeth for the material, or the wood is pinching the blade. For thicker stock, use a lower-tooth-count blade and a steady, patient feed rate. Ensure your workpiece is supported on both sides of the cut so the kerf doesn’t close and pinch the blade.
Is a laser guide accurate?
It’s a helpful visual aid, but it’s not a precision instrument. Lasers can shift with vibration and temperature. Use it to get close, but always align the actual blade teeth to your mark for the final verification. Trust the metal, not the light.
Before You Go
Accuracy comes from a square saw, a sharp blade, and a patient hand. Bolt the tool down, check its alignment with a metal square, and clamp every piece you cut. Match the blade’s teeth to the job, rough lumber gets few teeth, fine trim gets many. Start the saw high, let it cut at its own speed, and wait for the silence before you lift.
The goal isn’t just getting through the wood. It’s leaving a clean edge that fits on the first try. That saves you time, material, and frustration.
Keep the blade clean, support your work, and respect the spin. The saw will do exactly what you ask of it. Make sure you’re asking the right way.
