
How to Use a Drill Doctor: A Step-by-Step Sharpening Guide
This post contains affiliate links. As an Amazon Associate, we earn from qualifying purchases.
To use a Drill Doctor, you need three things: the correct chuck for your bit size, the right point angle setting (118° or 135°), and a precise alignment in the chuck jaws before grinding. The motor runs at 15,000 RPM, so a misaligned bit gets ground unevenly in seconds. Proper setup prevents the “negative relief” that makes a sharpened bit cut worse than a dull one.
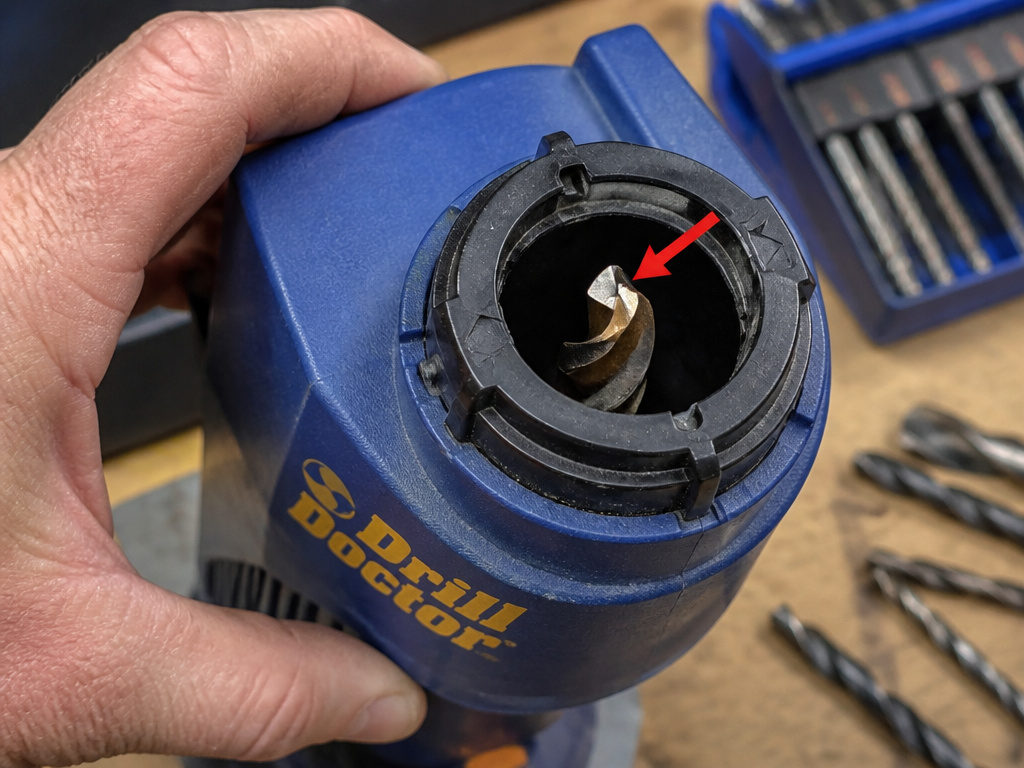
The alignment step is where most first-time users fail. They see the white lines on the alignment port and assume any position is fine. It’s not. Those lines are your only visual cue that the bit’s cutting lip and heel are positioned for the diamond wheel to grind the correct relief angle. Skip that check, and you’ll sharpen a bit that rubs instead of cuts.
What follows is the full walkthrough: how to match your bit to the chuck, set the point angle, execute the alignment, and run the sharpening cycle. We’ll also cover the specific fixes for off-center points, flat chisel edges, and the specialty bits that need extra attention. By the end, you’ll know how to pull a burned-out bit from the scrap pile and put it back to work.
Key Takeaways
- The Drill Doctor’s 15,000 RPM motor removes metal fast. Precise alignment in the chuck jaws is non-negotiable; a crooked bit ruins the point in three seconds.
- Match the point angle to your material: 118 degrees for general-purpose drilling in wood and soft metals, 135 degrees for harder steels and split-point applications.
- The white alignment guides inside the port must frame the bit’s cutting lip. If the heel sits above the lip, you’ve created “negative relief” and the bit will not cut.
- For bits between 3/32″ and 1/2″, use the standard chuck. For bits up to 3/4″, the DD750X includes the large chuck; the DD500X requires an optional add-on.
- Always use an even number of half-turns when sharpening. An odd number grinds one side more than the other, producing an off-center point that walks across your workpiece.
How a Drill Doctor Actually Works
A Drill Doctor isn’t a grinder. It’s a jig. The 15,000 RPM motor spins a diamond-coated wheel, but the sharpening geometry is controlled by the chuck and the alignment port. The chuck holds the bit at a fixed angle. As you rotate the chuck handle, the cam guide inside the sharpening port moves the bit in a precise arc against the wheel. This arc grinds the correct relief angle behind the cutting edge.
That relief angle is the secret. A hand-sharpened bit often has zero or negative relief, the heel of the bit is level with or higher than the cutting edge. It rubs. The Drill Doctor’s mechanism guarantees positive relief, so only the cutting edge contacts the workpiece. The machine’s internal cam is machined to replicate the exact clearance a new bit has from the factory.
The Drill Doctor 750X sharpens twist-style drill bits from 3/32” to 3/4”. Its motor operates at 15,000 RPM and is certified to international safety standards including IEC 61029-1. The sharpening process requires aligning the bit within visual guides to ensure proper relief angle geometry.
The diamond sharpening wheel is the consumable. It wears down over hundreds of bits. A worn wheel cuts slower and can overheat the bit, drawing the temper from high-speed steel. You’ll know it’s time for a replacement when sharpening takes noticeably longer or the bit tip turns blue. The DD500X and DD750X use a quick-change system, no tools needed.
The 3-Step Sharpening Sequence
This process applies to both the Drill Doctor DD500X and DD750X. The only difference is the maximum bit size each chuck accepts. The DD750X includes the large chuck; for the DD500X, you need the optional DA70100PF chuck for bits over 1/2″.
Step 1: Chuck Selection and Bit Preparation
First, identify your bit’s diameter and point angle. The shank will usually have the size stamped on it. If the point is completely gone, measure the diameter with calipers.
- 3/32″ to 1/2″ bits: Use the standard chuck.
- 1/2″ to 3/4″ bits: Use the large-bit chuck (included with DD750X, optional for DD500X).
Clean the bit. Remove any burrs on the shank with a file. Grit or metal chips between the chuck jaws and the bit will hold it off-center, guaranteeing a bad sharpen. Blow out the chuck jaws with compressed air before you start.
Step 2: Alignment – The Make-or-Break 30 Seconds
This is the step every manual emphasizes, and for good reason. It’s the whole game.
- Loosen the chuck knob and insert the bit. Push the bit shank all the way in until the point touches the drill stop deep inside the chuck.
- Tighten the chuck knob firmly. Don’t crush it, but ensure the bit cannot wiggle.
- Insert the chuck into the alignment port. Push it in until it stops.
- Look at the alignment guides. Inside the port, you’ll see raised fins with white lines. Your goal is to position the bit so its cutting lip is centered between these lines. The heel of the bit should be visible below the lines.
- If the heel appears above the cutting lip, you have the start of negative relief. Loosen the chuck, rotate the bit 180 degrees in the jaws, and retighten. Re-check the alignment.
Common mistake: Rushing the alignment check. If the bit isn’t centered between the white guide lines, the relief angle will be wrong. The bit will get hot, squeal, and produce ragged holes.
Step 3: Sharpening and Splitting the Point
With the bit aligned, you’re ready to grind.
- Set the point angle. Turn the point angle adjustment knob to either 118° (Standard) or 135° (Split Point).
- Insert the chuck into the sharpening port. The cam pin will engage.
- Turn on the motor. With light, steady pressure, rotate the chuck handle through a smooth half-turn (180 degrees). You’ll hear the grinding sound.
- Pull the chuck out, rotate it 180 degrees, and re-insert to grind the opposite cutting lip. Perform an even number of half-turns on each side (e.g., 3 turns per side is 6 total half-turns).
- For a 135-degree split point: After sharpening, move the chuck to the split point port. Push in and rotate to create the self-centering tip.
The sound tells you everything. A consistent, crisp grinding noise means it’s working. A intermittent screech means the bit is misaligned or the wheel is worn. Stop and re-check.
| Step | Critical Action | What Happens If You Skip It |
|---|---|---|
| 1. Chuck Selection | Match chuck to bit diameter (≤1/2″ or ≤3/4″). | The bit won’t seat fully against the drill stop, causing an off-center grind. |
| 2. Alignment | Center cutting lip between white guide lines in port. | Creates negative relief; the sharpened bit will rub, overheat, and dull instantly. |
| 3. Sharpening | Use smooth, even half-turns; maintain light pressure. | Creates flat spots between the cutting edge and heel, killing cutting efficiency. |
| 4. Point Splitting (135° only) | Fully insert chuck into split point port and rotate. | The bit will “walk” on hard materials, requiring excessive pressure to start the hole. |
Choosing the Right Point Angle: 118° vs 135°
Your drill bit’s original point angle is stamped on the shank or is known by its type. Getting this right determines how the bit performs in different materials. This isn’t a minor preference, it’s a functional specification.
The 118-degree point is the universal standard. It’s what comes on most general-purpose bits. The sharper angle makes it aggressive in wood, plastic, and soft metals like aluminum. It’s the default setting for a comprehensive drill bit guide.
The 135-degree split point is for hard materials. The flatter angle is stronger and resists chipping in steel, stainless steel, and cast iron. The split point, the little notch you grind in the third step, keeps the bit from wandering on curved or hard surfaces. It’s the go-to for metalworking and is often found on cobalt drill bits.
| Point Angle | Best For | Grind Style | Bit Types |
|---|---|---|---|
| 118° | Wood, plastic, soft metals (aluminum), general DIY. | Standard point. | High-speed steel, titanium-coated, basic masonry. |
| 135° | Hard metals (steel, stainless), cast iron, tough alloys. | Split point (self-centering). | Cobalt, carbide-tipped, performance metal bits. |
If you’re unsure, look at the bit. A 118-degree point is noticeably sharper. A 135-degree point is blunter. When in doubt, default to 118 degrees, it’s the safer guess for most home workshop tasks. For a deep dive on this choice, our article on 118 vs 135 degree drill bits breaks down the mechanics.
Troubleshooting Common Sharpening Problems
You followed the steps, but the bit looks wrong. Here are the fixes, straight from the Drill Doctor manual.
Problem: The drill point is off-center.
- Cause: You did an odd number of half-turns, grinding one side more than the other. Or, the bit was loose in the chuck.
- Fix: Re-chuck the bit, ensure it’s tight, and sharpen again using an even number of half-turns on each side (e.g., 2 and 2).
Problem: Flat spots between the cutting edge and the heel.
- Cause: You paused during a half-turn. The wheel ground one spot longer than the rest.
- Fix: Apply light, inward pressure and rotate the chuck smoothly without stopping. Complete each half-turn in one continuous motion.
Problem: The chisel edge (the center tip) is flat, not pointed.
- Cause: During alignment, the bit clamps gripped the high points of the bit’s flutes, not the narrowest section of the shank.
- Fix: Re-align. Loosen the chuck and ensure the bit clamps are gripping the bit where the flutes are deepest and the body is narrowest. This is detailed in the official Drill Doctor manual PDF.
Problem: The bit has “negative relief” (the heel is higher than the cutting edge).
- Cause: The bit was misaligned in the chuck jaws. This is common with specialty bits like slow-spiral or raised-margin types.
- Fix: Use the variable alignment adjustment. Move the alignment tube to the “+” setting and re-sharpen. This increases the relief angle.
Problem: The split point is uneven.
- Cause: Uneven pressure or time in the split point port.
- Fix: Insert the chuck into the split point port and split both sides again. Apply equal, firm pressure until the chuck stops. Repeat until the split looks symmetrical.
Safety and Maintenance Are Not Optional

The Drill Doctor is a power tool that throws sparks and metal dust. It also screams at 85 decibels. Treat it with the same respect as your cordless drill.
- Eye protection is mandatory. Everyday glasses are not safety glasses. You need ANSI Z87.1-rated goggles or a face shield.
- Wear hearing protection. Foam earplugs are sufficient. That high-pitched whine damages hearing over time.
- Use a dust mask. The manual includes a Proposition 65 warning about dust from grinding. A simple NIOSH N95 mask is fine.
- Secure the unit. Bolt or clamp your Drill Doctor to a workbench. It will try to walk away during sharpening.
For maintenance, blow out the grit tube and the internal cam track after every few bits with compressed air. Grit buildup changes the sharpening geometry. The diamond wheel is user-replaceable. When sharpening takes more than 30 seconds per cutting edge, order a new wheel.
Frequently Asked Questions
Can a Drill Doctor sharpen masonry bits?
Yes, but only the steel shank of carbide-tipped masonry bits. Use the masonry bit alignment mark on the chuck. The Drill Doctor will sharpen the steel support wings, but it will not touch the carbide tip. A sharpened masonry bit will clear debris better and drill faster in brick or block.
How do I sharpen a drill bit that’s completely broken or chipped?
Start with a coarse (100 grit) diamond wheel if you have one. You may need to grind past the damaged area to establish a new point, which shortens the bit. Use the variable alignment to set maximum relief and take your time. The motor has the power, but you need to be patient to avoid overheating.
Why does my newly sharpened bit get hot and smoke when drilling?
This is the classic sign of negative relief. The heel of the bit is rubbing, not cutting. The friction generates intense heat. Go back to the alignment step. Loosen the chuck, rotate the bit 180 degrees, re-tighten, and re-check the guide lines. The heel must sit below the cutting lip.
Can I sharpen cobalt or titanium drill bits?
Absolutely. The Drill Doctor’s diamond wheel is designed for high-speed steel, cobalt, and even solid carbide. Titanium coated bits are just high-speed steel with a surface treatment; you’ll grind the coating off the cutting edges, but the bit will still be perfectly functional.
Is the Drill Doctor worth it for a home DIYer?
If you own more than a handful of drill bits and use them regularly, yes. It pays for itself after saving 20-30 bits from the trash. The consistency is impossible to match by hand. For a professional or serious hobbyist, it’s essential shop equipment. The Drill Doctor 750X is the model to buy if you ever drill metal or use bits over 1/2 inch.
The Bottom Line
Using a Drill Doctor is a skill, not a magic trick. The machine does the grinding, but you control the setup. Your job is chuck selection, point angle setting, and visual alignment. Do those three things right, and every bit comes out sharper than store-bought. Do them wrong, and you’ll waste time and ruin bits.
Keep the manual handy. Its troubleshooting section answers 90% of questions. Wear your safety gear. And start with your oldest, ugliest bits, the ones you’ve already written off. There’s no better proof that this works than pulling a bit from the “maybe someday” jar and putting it back in your guide to drill bit types rotation, cutting like new.
