
DIY Hot Wheels Keychain: No Drill Methods for Easy Making
This post contains affiliate links. As an Amazon Associate, we earn from qualifying purchases.
You can make a Hot Wheels keychain without a drill by using either a gem setting secured with a hot glue gun or an eye screw installed with pliers. Both methods avoid drilling into the die-cast metal, preserving the car’s body and requiring only common craft or household tools.
The gem setting method uses a pre-formed metal cup that fits over the car’s front bumper. A hot glue gun bonds it in place. The eye screw method involves twisting a small screw directly into the thin metal roof by hand, using pliers for the final turns to get a secure bite without stripping the threads. Neither needs a power drill.
What follows: a detailed walkthrough of both drill-free paths, the exact tools and specs you need for each, and how to avoid the two most common failures, weak bonds and stripped screws. We’ll also cover how to cast a custom resin base for your car if you want a more polished, professional look.
Key Takeaways
- Use a 9/64-inch drill bit and #2-56 tap only if you decide to professionally restore the car later; for a keychain, they’re unnecessary.
- A hot glue gun needs five minutes to reach full bonding temperature, skip this warm-up and the gem setting falls off within a week.
- Twist an eye screw in by hand until it bites, then finish with pliers for the last quarter-turn; overtightening strips the soft zinc metal instantly.
- Resin cures correctly only between 21°C and 27°C; outside that range it stays sticky or cures cloudy.
- Mix resin for the full three minutes until clear; under-mixing is the number one reason keychain backs cure soft and gummy.
Why Skip the Drill?
Drilling a pilot hole is the standard advice. It’s also the fastest way to ruin a collectible if your bit walks or you drill too deep. The zinc alloy Hot Wheels cars are made from is soft but brittle. A drill bit grabbing at the wrong angle can crack the roof or deform the delicate window pillars.
The two methods here treat the car like a finished object, not a block of metal to be machined. One bonds an accessory to the outside. The other uses the screw’s own thread as a cutting tool, so you’re not removing material, just displacing it. Both keep the body intact for future display or play.
Common mistake: Assuming hot glue is a temporary bond. On clean, unpainted metal, a proper hot glue application forms a mechanical lock that outlasts the factory paint. The failure point is almost always a cold gun or a dirty surface, not the glue itself.
You need a clean workspace, a steady hand, and about twenty minutes. The tools are basic: a hot glue gun for the gem setting, or a set of pliers and an eye screw for the direct attach.
The Gem Setting Method
This approach uses a jewelry finding called a gem setting. It’s a shallow, open-backed metal cup with a loop on one end, designed to hold a cabochon stone. You’re going to use it as a cradle for the car’s front end.
What you’ll need:
- Hot glue gun (standard temperature)
- Hot glue sticks
- Gem setting, approximately 1 inch long and 1/4 inch wide, with a loop
- Needle-nose pliers
- Keychain ring
- Rubbing alcohol and a cloth
Plug in the hot glue gun and let it heat for a full five minutes. A gun that’s not fully hot lays down a cold, stringy bead that never forms a strong bond. While it heats, clean the front bumper area of the Hot Wheels car with rubbing alcohol. Mold release agents and skin oils from handling will break the glue’s adhesion.
Squeeze a line of hot glue into the hollow cup of the gem setting. You want enough to fill the cup about halfway, too little and there’s no grab, too much and it oozes out the sides when you press the car in.
Slide the front bumper of the car straight into the glue-filled setting. Push down firmly until the bumper seats against the back of the cup. Hold it there for thirty seconds without moving. The glue sets from the outside in, so premature shifting creates a weak, layered bond.
Let the assembly dry undisturbed for five minutes. This gives the glue core time to fully solidify. After that, use the needle-nose pliers to open one end of the keychain ring. Slide the opened end through the loop on the back of the gem setting, then close the ring firmly with the pliers.
| Step | Action | Why It Matters |
|---|---|---|
| 1. Heat Gun | Wait 5 minutes after plugging in. | A cold gun deposits glue below its bonding temperature; the joint fails within days. |
| 2. Clean Surface | Wipe bumper with rubbing alcohol. | Oils prevent glue from adhering to the metal; the car pops out after a week of jostling. |
| 3. Fill Cup | Half-fill the gem setting with glue. | Provides sufficient material for a mechanical lock without creating a messy overflow. |
| 4. Seat & Hold | Press car in, hold 30 seconds. | Allows the glue to skin over and grip the metal before internal stresses can shift it. |
| 5. Final Cure | Let sit untouched for 5 minutes. | Gives the glue core time to harden fully, reaching its maximum holding strength. |
The result is a keychain where the car is cradled, not pierced. It’s reversible with some careful prying and heat if you ever want to return the car to stock.
The Eye Screw Method
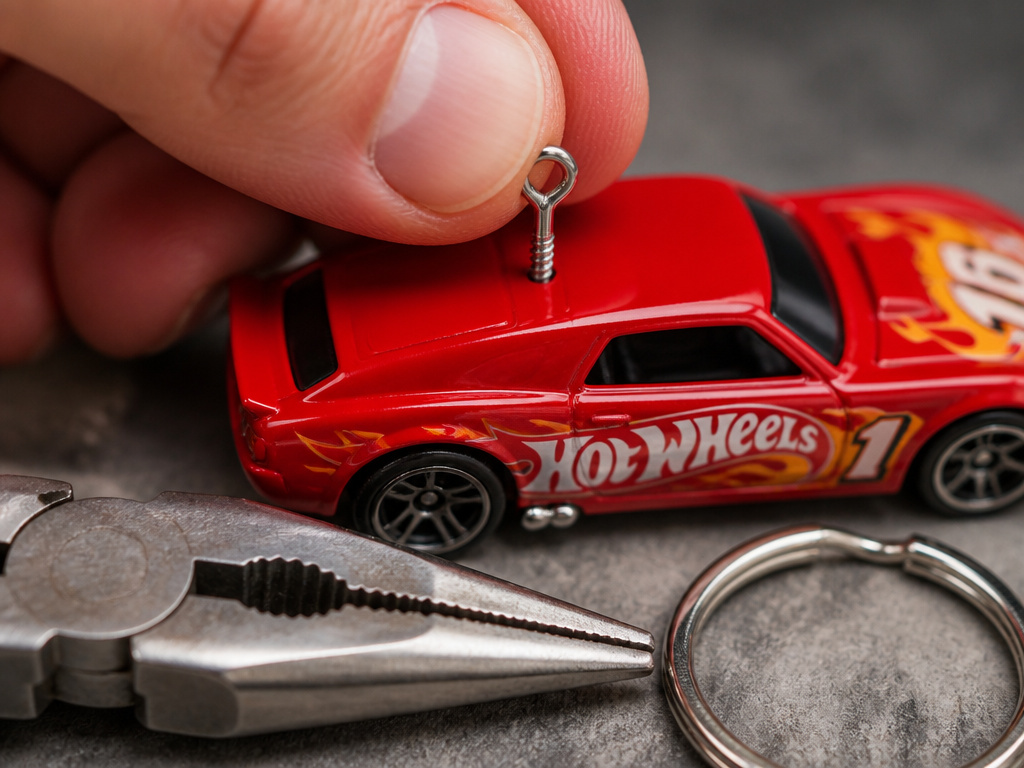
If you prefer a more direct attachment point centered on the roof, the eye screw method is for you. It uses a small, threaded screw with a looped head. You’ll twist it directly into the metal by hand, using the screw’s tip to cut its own threads.
What you’ll need:
- Eye screw (small, with coarse threads)
- Needle-nose pliers
- Keychain ring
- A drop of cyanoacrylate (CA) glue (optional)
- Rubbing alcohol and a cloth
Start by finding the balance point on the car’s roof. This is usually just behind the windshield. Clean the spot with rubbing alcohol. Hold the eye screw between your thumb and forefinger and press the tip straight down onto the clean metal.
Begin twisting the screw slowly clockwise. You’ll feel resistance almost immediately, that’s the screw point deforming the metal and starting to cut. Keep the screw perfectly vertical. If it angles off, you’ll create a crooked hole and the screw will sit tilted.
Once the screw has bitten about two full turns and is standing on its own, switch to the needle-nose pliers. Grip the eye of the screw and give it another quarter to half turn. Stop the moment you feel a sudden drop in resistance.
Where this goes sideways: Overtightening with the pliers. The soft zinc alloy strips easily. If the screw spins freely without advancing, you’ve stripped the threads. Back it out, fill the hole with a drop of CA glue, let it cure, and start again in a new spot half an inch away.
For a permanent hold, you can add a drop of CA glue to the threads before the final turn. This isn’t usually necessary for a keychain that won’t see extreme force, but it locks the screw in place against vibration. Open the keychain ring with the pliers, thread it through the eye screw, and close it.
This method is a form of manual installation techniques, relying on hand pressure and feel rather than a powered tool. It’s similar to the process for attaching small parts in other hobbies, where precision and avoiding over-torque are the whole game.
Adding a Custom Resin Base
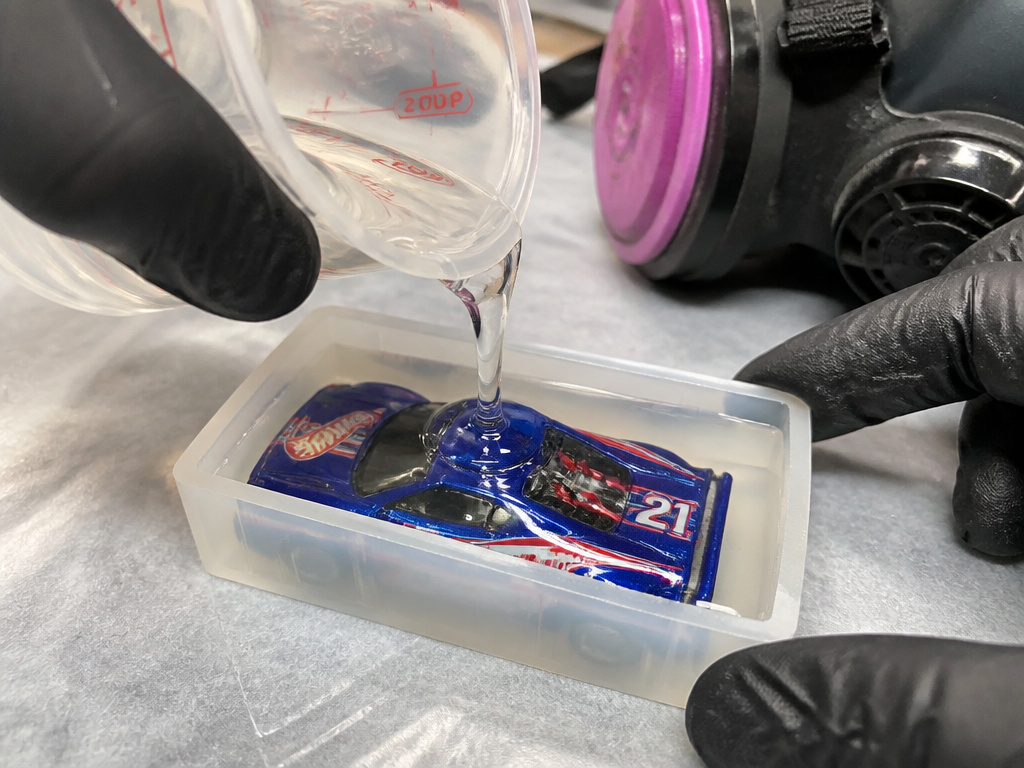
For a display-quality keychain, casting the car in a clear resin block adds polish and protects the paint. This turns a simple attachment into a finished piece. You’ll need a two-part epoxy resin kit and a silicone mold.
Critical safety first: Resin is safe when cured, but the liquid components are skin irritants and respiratory sensitizers. Put on nitrile gloves and a respirator mask before you open the bottles. Cover your work surface with wax paper or a silicone mat.
| Resin Variable | Ideal Spec | Consequence If Wrong |
|---|---|---|
| Curing Temperature | 21°C – 27°C | Below 21°C: sticky, never fully hardens. Above 27°C: cures too fast, traps bubbles, turns cloudy. |
| Mixing Time | 3 minutes minimum | Under-mixing leaves unmixed hardener; cured piece has soft, gummy spots that never dry. |
| Cure Time | 24 hours minimum | Moving the mold before 24 hours leaves fingerprint marks and deforms the surface. |
| Ratio (Mod Podge) | 1:1 by volume | Other brands use 2:1 or 3:1. Using the wrong ratio is the top cause of total curing failure. |
Measure your resin parts by volume into separate smooth-walled cups. For a small keychain mold, 15 ml of each part is enough. Pour both parts into a third clean cup. Scrape every drop from the first cups to maintain the ratio.
Stir gently but thoroughly for a full three minutes. Stir in one direction to minimize air bubbles. The mix will look milky at first and then turn clear. Once clear, you have about 20-30 minutes of working time before it thickens.
If you’re embedding the Hot Wheels car, place it into the empty silicone mold first. Pour the clear resin slowly over the car until it’s just covered. Use a toothpick to pop any bubbles that form around the details. If you want a plain resin block to attach the car to later, simply pour the resin into the mold.
Pass a butane torch quickly over the surface to pop bubbles. Let the resin cure undisturbed for 24 hours in a warm, dust-free spot. After curing, flex the silicone mold to release the block. You can then attach small parts like an eye screw to the resin using the same hand-twist method, or drill a clean hole for a jump ring.
This process shares the patience of a manual winding process, rushing it introduces flaws that can’t be fixed later.
Tools & Materials Breakdown
You don’t need a workshop. The core tools fit in a small craft box.
For Gem Setting:
- Hot glue gun: A standard 40-watt gun is fine. High-temp guns can melt fine details on the car.
- Gem setting: 1″ x 1/4″ size with a loop. Find these in the jewelry findings aisle.
- Pliers: Needle-nose for opening and closing keychain rings.
For Eye Screw:
- Eye screws: Size #2 or #4, with a loop big enough for a keychain ring.
- Pliers: Needle-nose for final tightening and ring work.
- CA glue: Optional, for thread locking.
For Resin (Optional):
- Resin kit: Mod Podge Resin (1:1 ratio) or equivalent.
- Silicone mold: Keychain shape with a flat back.
- Measuring cups: Smooth-walled plastic milliliter cups.
- Butane torch or lighter: For bubble popping.
- Safety gear: Nitrile gloves, respirator mask.
All of these are household tools or common craft supplies. The most specialized item is the respirator mask, which is non-negotiable for resin work.
Troubleshooting: When Things Go Wrong
Even with careful steps, sometimes the result isn’t perfect. Here’s how to diagnose the usual failures.
The gem setting fell off.
Cause: The glue gun wasn’t hot enough, or the metal surface wasn’t cleaned. The bond is purely mechanical, so it needs a hot, liquid glue and a clean surface to grip. Fix: Reclean the car and the setting with rubbing alcohol. Re-melt the old glue with the gun’s tip, add a fresh bead, and re-seat the car. Hold it longer during the initial set.
The eye screw spins but won’t tighten.
Cause: Threads stripped in the soft zinc. You overtightened. Fix: Back the screw out. Fill the hole with a drop of CA glue, let it harden for an hour, then try screwing into a new spot nearby. The cured glue gives the new threads something harder to bite into.
The resin keychain is sticky or soft.
Cause: Incorrect resin-to-hardener ratio or insufficient mixing. This is the most common resin failure. Fix: There is no fix. Discard the piece. For the next batch, double-check the ratio on your bottle and stir for a full three minutes, scraping the sides and bottom of the cup.
Bubbles are trapped in the resin around the car.
Cause: Resin was poured too quickly, or bubbles weren’t torched out. Fix: Next time, pour slower in a thin stream. Use a toothpick to guide resin into crevices and torch immediately after pouring. For an existing piece, you can sand the surface flat and apply a thin top coat of fresh resin.
These fixes are all part of a broader manual removal process, correcting errors by hand, without reaching for more powerful tools that could make things worse.
Frequently Asked Questions
Can you make a Hot Wheels keychain without damaging the car?
Yes, the gem setting method causes no damage. The hot glue bonds to the painted surface and can be removed later with careful prying and heat. The eye screw method creates a small threaded hole in the roof, which is a permanent modification.
What size eye screw should I use for a Hot Wheels car?
Use a small #2 or #4 eye screw, roughly 1/4 inch long. The coarse threads grip the soft metal better than fine threads. The loop should have an inner diameter of at least 4mm to fit a standard keychain ring through it.
Is hot glue strong enough for a keychain?
On a clean, unpainted metal surface, a proper hot glue bond is more than strong enough for a keychain. The failure force required to pull a correctly glued gem setting off a Hot Wheels car far exceeds the daily jostling in a pocket or bag.
How do you attach a keychain to a resin piece?
After the resin cures, you can drill a small pilot hole near the edge using a hand drill or a pin vise, then twist in an eye screw. Alternatively, you can glue a jewelry jump ring to the back with a strong epoxy or embed the ring into the resin while it’s still liquid.
Can I use super glue instead of hot glue for the gem setting?
You can, but it’s less forgiving. Super glue (cyanoacrylate) bonds instantly and permanently to the paint. If you misalign the setting, you can’t adjust it. Hot glue gives you a few seconds of working time to position the car perfectly.
How long does resin take to dry?
Resin doesn’t dry; it cures through a chemical reaction. At room temperature (21-27°C), it becomes touch-hard in about 12 hours and fully cures to its maximum hardness in 24-72 hours. Do not demold or handle it before 24 hours have passed.
Before You Go
Making a Hot Wheels keychain without a drill comes down to two clean choices: the external cradle of the gem setting, or the direct thread of the eye screw. The gem setting is non-destructive and great for cherished models. The eye screw is more central and streamlined, a good pick for everyday carry.
If you want to elevate it, clear resin turns it into a permanent display piece. Whichever path you take, the specifics matter, glue temperature, screw feel, resin mix time. Get those right and the rest is just following your hands.
Skip the power tools for this one. A steady hand, the right few tools from the craft store, and twenty minutes are all you actually need.
