Electric Drill Refitting Plate Shears Installation Guide & Tips
This post contains affiliate links. As an Amazon Associate, we earn from qualifying purchases.
To install electric drill refitting plate shears, you must match three things: your drill’s voltage to the shear’s capacity, the adapter shaft to your drill’s chuck, and the correct rotation direction. For simple bump-feed adapters, insert the triangle shaft, lock the collet, and mount the support bracket. For hydraulic weld shears, the drill must run in reverse only after the tool is locked on the rail.
The voltage mismatch is where most DIYers fail first. A 12V drill on a shear rated for 1.5mm aluminum will stall and burn the motor within ten cuts. The capacity chart in the manual isn’t a suggestion; it’s the limit before the gear teeth shear.
What follows: the two installation paths (simple adapter vs. Hydraulic system), the three specs that decide which path you’re on, and the field mistake that cracks the cutter head on the third use.
Key Takeaways
- Match your drill’s voltage to the shear’s rated capacity. A 12V drill has “slightly poor” shearing force (per the Levior manual) and will burn out on material over 1mm thick.
- Hydraulic weld shears like the Pandrol 05100-ECO require the attached drill to run in reverse (counterclockwise) only after the shear is locked on the work rail. Running it forward first deadheads the pump.
- These tools cannot cut bent, ribbed, deformed, or welded plates. Attempting to forces the cutter head, and the triangle adapter shaft snaps at the collet.
- Always disconnect the battery pack before making any adjustments or changing accessories. A shear can cycle if the switch is bumped, and the blades close on a finger in under a second.
- For universal bump-feed adapters, the installation is a three-step mechanical sequence. For dedicated cordless shears like the Bosch GSC18V-16E, the “installation” is battery insertion and blade-gap verification.
The Two Types of Drill-Powered Shears
You have two distinct categories of tool here. Installing one is a five-minute mechanical job. Installing the other is a multi-point safety checklist with a hydraulic system attached.
Bump-feed plate cutters, like the common Levior model, are simple gear-drive adapters. They turn your drill’s rotary motion into a scissoring action through a set of interlocking round cutters. The installation is physical: shaft into chuck, bracket mounted, spring attached. Their limits are blunt. The Levior manual states they cannot cut bent, ribbed, or welded plates. Force it and the gear teeth chip.
Hydraulic weld shears, like the Pandrol 05100-ECO, are a different class. Your drill powers a hydraulic pump that drives the cutting cylinder. Here, installation includes hose checks, rail positioning, and a strict rotation sequence. The Pandrol manual mandates using only the provided Milwaukee drill and specifies the drill must be in reverse after the shear is mounted. This isn’t about torque; it’s about pump direction. Get it wrong and you deadhead the hydraulic system, blowing seals.
Before you start: Wear gloves and safety glasses. Sheet metal edges are sharp enough to require stitches. Hydraulic oil leaks under pressure can inject into skin. Check hoses for nicks or wear before each use, especially around hot weld areas where oil can ignite.
The 3 Specs That Decide Your Installation Path
You don’t pick a method. Your tool’s specs pick it for you. Ignore this and you install everything correctly but still break the tool on the first cut.
| Specification | Bump-Feed Adapter (e.g., Levior) | Hydraulic Weld Shear (e.g., Pandrol 05100-ECO) | Dedicated Cordless Shear (e.g., Bosch GSC18V-16E) |
|---|---|---|---|
| Power Source | Your existing 12V-21V drill | Dedicated drill (Milwaukee 2803-22 specified) | Integrated 18V battery platform |
| Key Installation Step | Lock triangle shaft in chuck | Set drill to reverse after mounting on rail | Insert battery, check blade clearance |
| Critical Warning | Cannot cut bent/welded plate | Never transport with drill attached | Guide at 80–90° angle; do not tilt |
| Failure Timeline if Ignored | Adapter shaft snaps on 3rd forced cut | Hydraulic pump seals blow on first forward cycle | Blades bind and chip; motor overloads within cuts |
1. Drill Voltage and Shear Capacity
The numbers are not interchangeable. The Levior manual is explicit: “The shearing capacity of 12V electric drill is slightly poor. 21V electric drill has stronger shear capacity.” This means a 12V drill might handle 0.8mm steel, but it will bog down and overheat on the 1.5mm aluminum the shear is rated for. You’ll smell the motor winding before you finish the cut.
For a dedicated tool like the Bosch GSC18V-16E, the voltage is built in (18V), and the capacity is fixed at 16-gauge (1.6mm) mild steel. The Makita JS1670 provides a detailed capacity chart: 1.6mm for mild steel, but only 1.0mm for harder 600 N/mm² steel. Your material’s tensile strength is part of the spec.
2. Adapter Type or Drive System
Is it a triangle shaft or a hydraulic quick-connect? The triangle shaft (common on inexpensive adapters) needs a chuck that can grip its three flat sides securely. A worn chuck will slip, rounding the edges and making it unusable.
The Pandrol shear uses a specific chuck attachment on a provided Milwaukee drill to connect to the hydraulic pump. The manual’s warning is absolute: “Use only the Milwaukee drill provided with this tool.” Another drill may physically fit but run at the wrong RPM or lack the torque, starving the pump.
3. Rotation Direction
This is the single most common point of failure. For bump-feed adapters, rotation is typically forward (clockwise). The cutter head is designed to feed material in one direction.
For hydraulic shears, the rule is reversed and conditional. The Pandrol manual states: “Attach the drill… Ensure it is in reverse (counterclockwise rotation) only after the weld shear is installed on the rail.” Running the drill in reverse off the rail does nothing. Running it in forward on the rail deadheads the pump instantly. The sequence is non-negotiable.
The 3-Step Installation Sequence for Bump-Feed Adapters
The Levior manual diagrams a straightforward process. The trick is in the spring tension and the bracket lock.
Insert the triangle shaft of the plate cutter into the collet. Rotate the locking collet to secure it. Fix the bracket as shown in the figure, adjust the angle, and tighten the screws. Hang the spring on the bracket to ensure no shaking during operation.
Step 1: Seat the Shaft. Insert the triangle adapter fully into the drill chuck. Hand-tighten, then use the chuck key to secure it with firm pressure. A loose shaft will wobble, creating an uneven cut and stressing the gear teeth. * Consequence if skipped: The shaft spins inside the chuck, grinding the flat edges smooth. The adapter is trash after two uses.
Step 2: Mount the Bracket. The support bracket stabilizes the shear against the workpiece. Adjust its angle so the cutter head sits flat against the metal sheet before you tighten its mounting screws. * Consequence if wrong: If the bracket is too high or low, the shear tilts. The outer and inner cutters misalign, pinching the metal instead of shearing it. You get a ragged, burred edge.
Step 3: Attach the Spring. The spring between the bracket and the tool body eliminates play. With the spring attached, try to wobble the shear by hand. There should be no rattling. * Consequence if skipped: Vibration during operation loosens the bracket screws. The cut wanders, and the increased load jams the cutter head.
The One Rotation Rule That Burns Out Motors
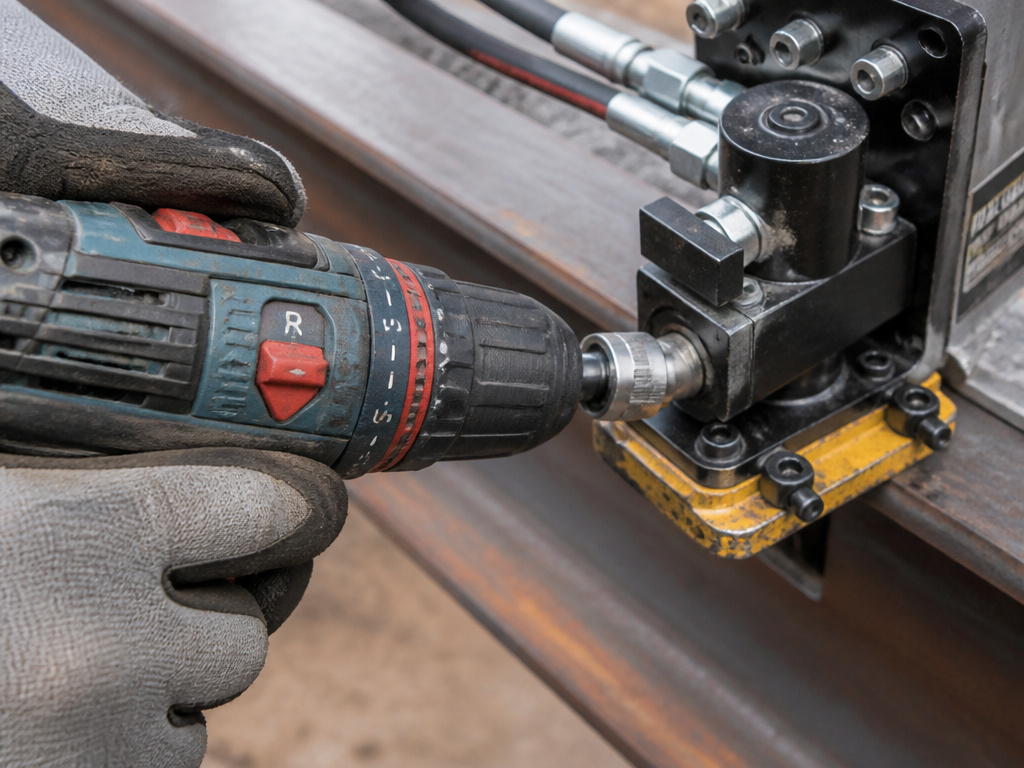 Get the rotation wrong and you don’t just get a bad cut. You break the tool’s internal mechanism. The direction is dictated by the drive system.
For mechanical bump-feed adapters, the cutter head is designed to turn in one direction to eject the cut material. The manual doesn’t always say “forward,” but the cutting action will feel wrong in reverse. The metal will bind.
For hydraulic systems, the pump has an intended flow direction. The Pandrol weld shear’s pump is designed for counterclockwise drill rotation. Running the drill clockwise forces fluid the wrong way through the valves, causing an immediate pressure spike.
Where this goes sideways: Running a hydraulic shear with the drill in forward. The pressure relief valve may not react fast enough. The spike blows past pump seals, and hydraulic oil leaks into the tool body. The shear loses power and requires a full rebuild.
The safe sequence for a hydraulic shear is a checklist: 1. Inspect hoses and fittings. 2. Position the shear on the work rail and lock the hold-downs. 3. Then attach the drill. 4. Then set the drill to reverse. 5. Then press the trigger.
What You Absolutely Cannot Cut
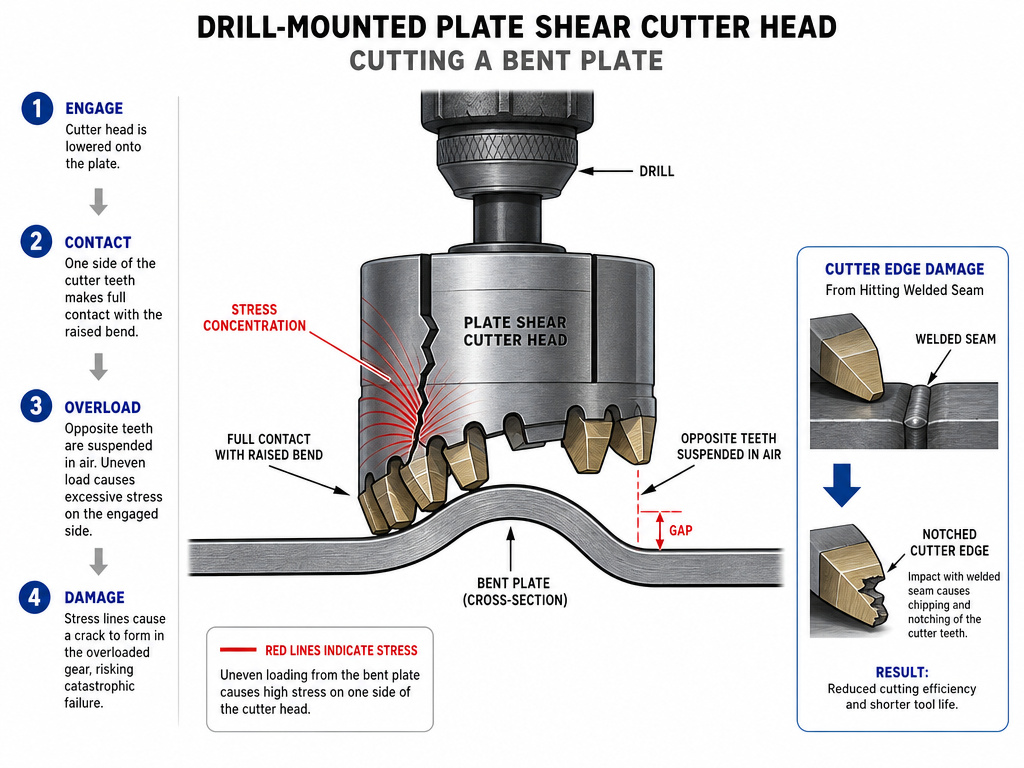 The capacity chart tells you what thickness you can cut. The prohibition list tells you what shapes will break your tool. This is not a suggestion.
The Levior manual is clear: “Bending, ribbed, deformed or welded plates and non-metallic plates cannot be cut.” Why? A bent or ribbed piece doesn’t present a flat, uniform surface to the cutter. The force becomes uneven, and one side of the cutter head takes the full load. The hardened gear teeth crack.
Welds are harder than the base metal. Forcing a shear through a weld is like hitting a rock with a pair of scissors. The cutter edges notch, and the next cut on soft metal will have a burr.
If the tool jams during a cut, the manual has one instruction: “Adjust the electric drill to reverse direction and automatically withdraw.” Do not force it forward. Do not twist the tool. Reverse the drill to back the cutter out of the bind.
Setting Up a Dedicated Cordless Shear
Tools like the Bosch GSC18V-16E or Makita JS1670 are all-in-one units. “Installation” means preparing the tool itself.
Blade Clearance is Everything. Before the first cut, check the gap between the upper and lower blades. The Pandrol manual specifies adjusting to 1/32 inch when the cylinder is extended. Too little clearance pinches the metal, causing excessive wear. Too much clearance bends the material instead of shearing it. * Tool needed: A feeler gauge set. Don’t guess.
Battery and Switch. Insert a charged battery. The Bosch shear has a slide switch with a lock-on button. Engage the lock only when you are in position and ready to make a sustained cut. Disconnect the battery before any blade change or maintenance.
Cutting Angle. The Bosch manual dictates: “Guide the power tool at an angle of 80° to 90° to the surface of the sheet metal and do not tilt it to the side.” Tilting the shear twists the blades, causing a jagged cut and rapid edge dulling.
Safety and Maintenance Non-Negotiables
This isn’t general workshop advice. These are the warnings from the manuals that prevent injury and tool failure.
- Disconnect the Power: Always remove the battery or unplug the drill before changing blades, clearing a jam, or performing any adjustment. The switch can be bumped.
- Gloves and Glasses: Wear them. ALWAYS. Sheet metal produces sharp, flying slivers. Hydraulic lines can spray hot oil.
- Secure the Workpiece: Use clamps. Holding sheet metal by hand is unstable, and a slip directs the cutting force into your hand.
- Inspect Hydraulic Lines: Before each use, check hoses for cuts, abrasions, or leaks. A pinhole leak under 2000 PSI can inject fluid into your skin.
- Store Blades Dry: Wipe down blades after use and apply a light coat of oil to prevent rust. Corroded blades tear metal instead of cutting it.
Common mistake: Using the shear to cut wire, nails, or hardened steel. The blades are hardened for sheet metal. Cutting harder material notches the edge, and every subsequent cut will be worse. You’ll need a new blade set after three abuses.
Frequently Asked Questions
Can I use any cordless drill with a plate shear adapter?
No. You must match the drill’s voltage to the shear’s capacity. A 12V drill lacks the torque for thicker materials and will overheat. More importantly, hydraulic shears like the Pandrol model require a specific drill (the Milwaukee 2803-22) to match the hydraulic pump’s flow and pressure requirements. Using a different drill can cause pump failure.
What happens if I install the shear and the drill runs but doesn’t cut?
Check three things. First, ensure the drill is in the correct rotation direction (forward for mechanical adapters, reverse for hydraulic shears after mounting). Second, verify the blade clearance is set correctly—too wide a gap just bends the metal. Third, confirm you are not exceeding the material thickness or trying to cut a prohibited shape like a bent or welded plate.
How do I know the blade is dull and needs replacing?
Sharp shear produces a clean, burr-free edge with minimal effort. A dull blade requires more force, leaves a pronounced burr on the underside of the cut, and may produce a rough, torn edge. You’ll also hear the motor strain more. For tools like the Bosch GSC18V-16E, follow the manufacturer’s maintenance schedule for blade inspection.
Why does my shear keep jamming?
Jam usually has one of three causes. The most common is attempting to cut material that is too thick or a prohibited shape (like a ribbed panel). The second is incorrect blade clearance, which pinches the material. The third is a worn or chipped cutter head on adapters, which fails to cleanly shear the metal. Always clear a jam by reversing the drill, not by forcing it.
Is a dedicated cordless shear better than a drill adapter?
For frequent use or cutting thicker gauge metal, yes. A dedicated tool like the Bosch GSC18V-16E is engineered as a system, with optimized blade geometry, proper balance, and a motor matched to the load. Drill adapters are cost-effective for occasional, thin-gauge work but are less efficient and put strain on your drill’s motor. For installing cabinet pulls or drilling into a metal door, a drill is the right tool. For shearing sheet metal, a purpose-built shear is.
The Bottom Line
Installing a plate shear on your drill isn’t complicated, but it is specific. Your drill’s voltage must meet the shear’s demand, the rotation must match the drive system, and the material must be on the “can cut” list. Skip the capacity chart and you burn out a motor. Ignore the rotation rule for a hydraulic shear and you blow a seal.
For thin-gauge DIY work, a Levior-style adapter works if you follow its three-step mount and respect its limits. For anything involving thicker metal or repetitive cuts, a dedicated cordless shear like the Bosch or Makita is the right tool for the job. Its installation is just a battery and a blade check, and its performance is in a different league.
